Nuova Mondial Mec MANTA Series User manual

MANUALE D'USO
OWNER'S MANUAL
MODE D'EMPLOI
HANDBUCH
MODO DE EMPLEO
MANTA / MANTA ALLUMINIUM / MANTA LX

MANUALE SERIE MANTA
Nuova Mondial Mec S.R.L. pag.1
1] ITALIANO......................................................................................................................................... PAG. 02
2] ENGLISH......................................................................................................................................... PAG. 15
3] FRANÇAIS....................................................................................................................................... PAG. 21
4] DEUTSCH........................................................................................................................................ PAG. 27
5] ESPAÑOL........................................................................................................................................ PAG. 33

MANUALE SERIE MANTA
Nuova Mondial Mec S.R.L. pag.2
SOMMARIO
FOTOGRAFIE..........................................................................................................................................PAG.03
01] NORME USO GENERALE. ...............................................................................................................PAG.09
02] SCOPO DEL MANUALE....................................................................................................................PAG.10
03] MODO DI IDENTIFICAZIONE MACCHINA........................................................................................PAG.10
04] DATI TECNICI SERIE MANTA..........................................................................................................PAG.10
05] INSTALLAZIONE...............................................................................................................................PAG.10
06] AVVERTENZE PER IL CORRETTO USO .........................................................................................PAG.11
07] MONTAGGIO DEGLI UTENSILI........................................................................................................PAG.11
08] TRASPORTO DELLA MACCHINA.....................................................................................................PAG.11
09] PARTI DI RICAMBIO.........................................................................................................................PAG.12
10] ACCESSORI OPTIONAL...................................................................................................................PAG.12
11] MANUTENZIONE E PULIZIA DELLA MACCHINA.............................................................................PAG.12
12] MISURAZIONE ACUSTICA...............................................................................................................PAG.12
13] ESTENSIONE MANTA LX.................................................................................................................PAG.13
14] SCHEMI ELETTRICI..........................................................................................................................PAG.05
15] DISEGNI............................................................................................................................................PAG.08
16] DICHIARAZIONE DI CONFORMITA'.................................................................................................PAG.14
17] GARANZIA........................................................................................................................................PAG.14
18] MANTA ALLUMINIUM ISTRUZIONI PER IL TRASPORTO .................................................................. PAG. 40
N.B.
Questo libretto si riferisce a tutta la serie MANTA, attenzione ai riferimenti dei disegni perché potrebbero
cambiare secondo il tipo: tipo "EUROPA" commercializzato negli altri paesi della comunità europea.
MANUALE SERIE MANTA
Nuova Mondial Mec S.R.L. pag.3
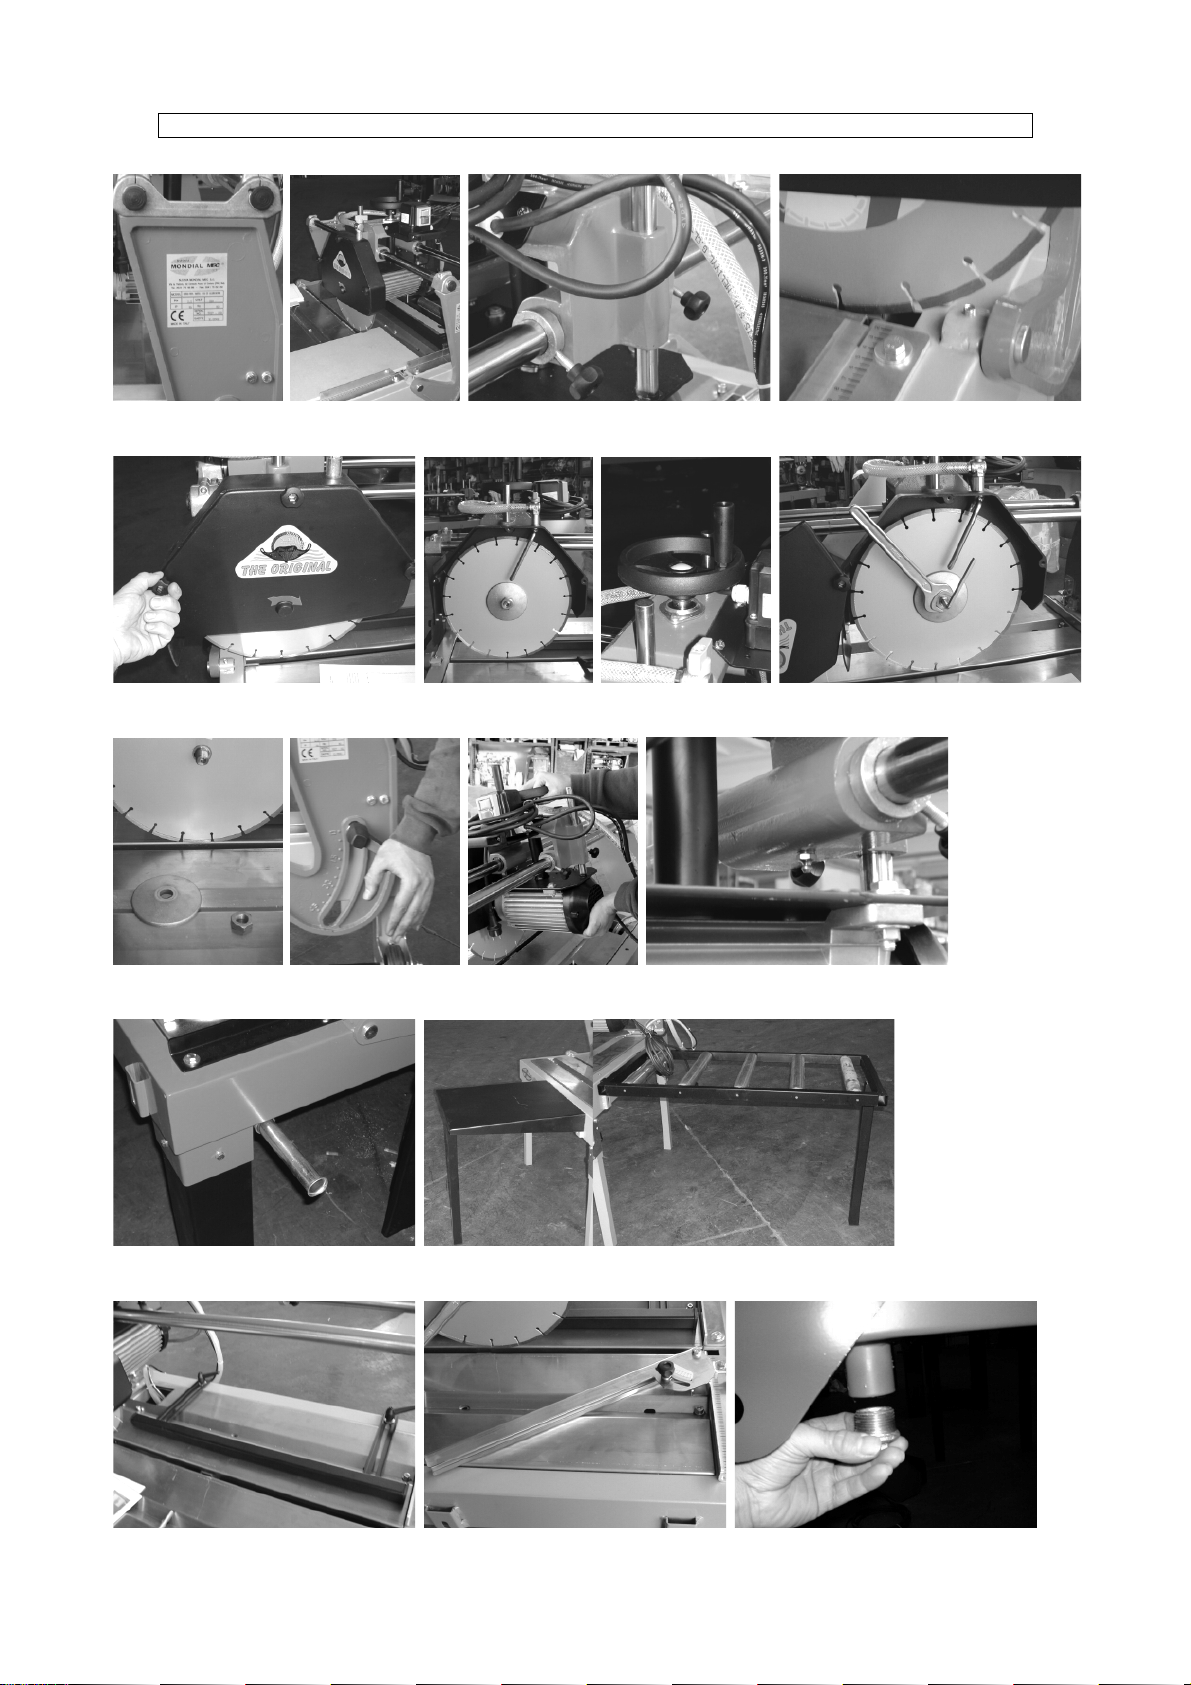
FOTOGRAFIE-PHOTO-FOTO-BILDE
1
2
3
4
5
6
7
8
9
10
11
21
13
14
14
15
16
17
MANUALE SERIE MANTA
Nuova Mondial Mec S.R.L. pag.4
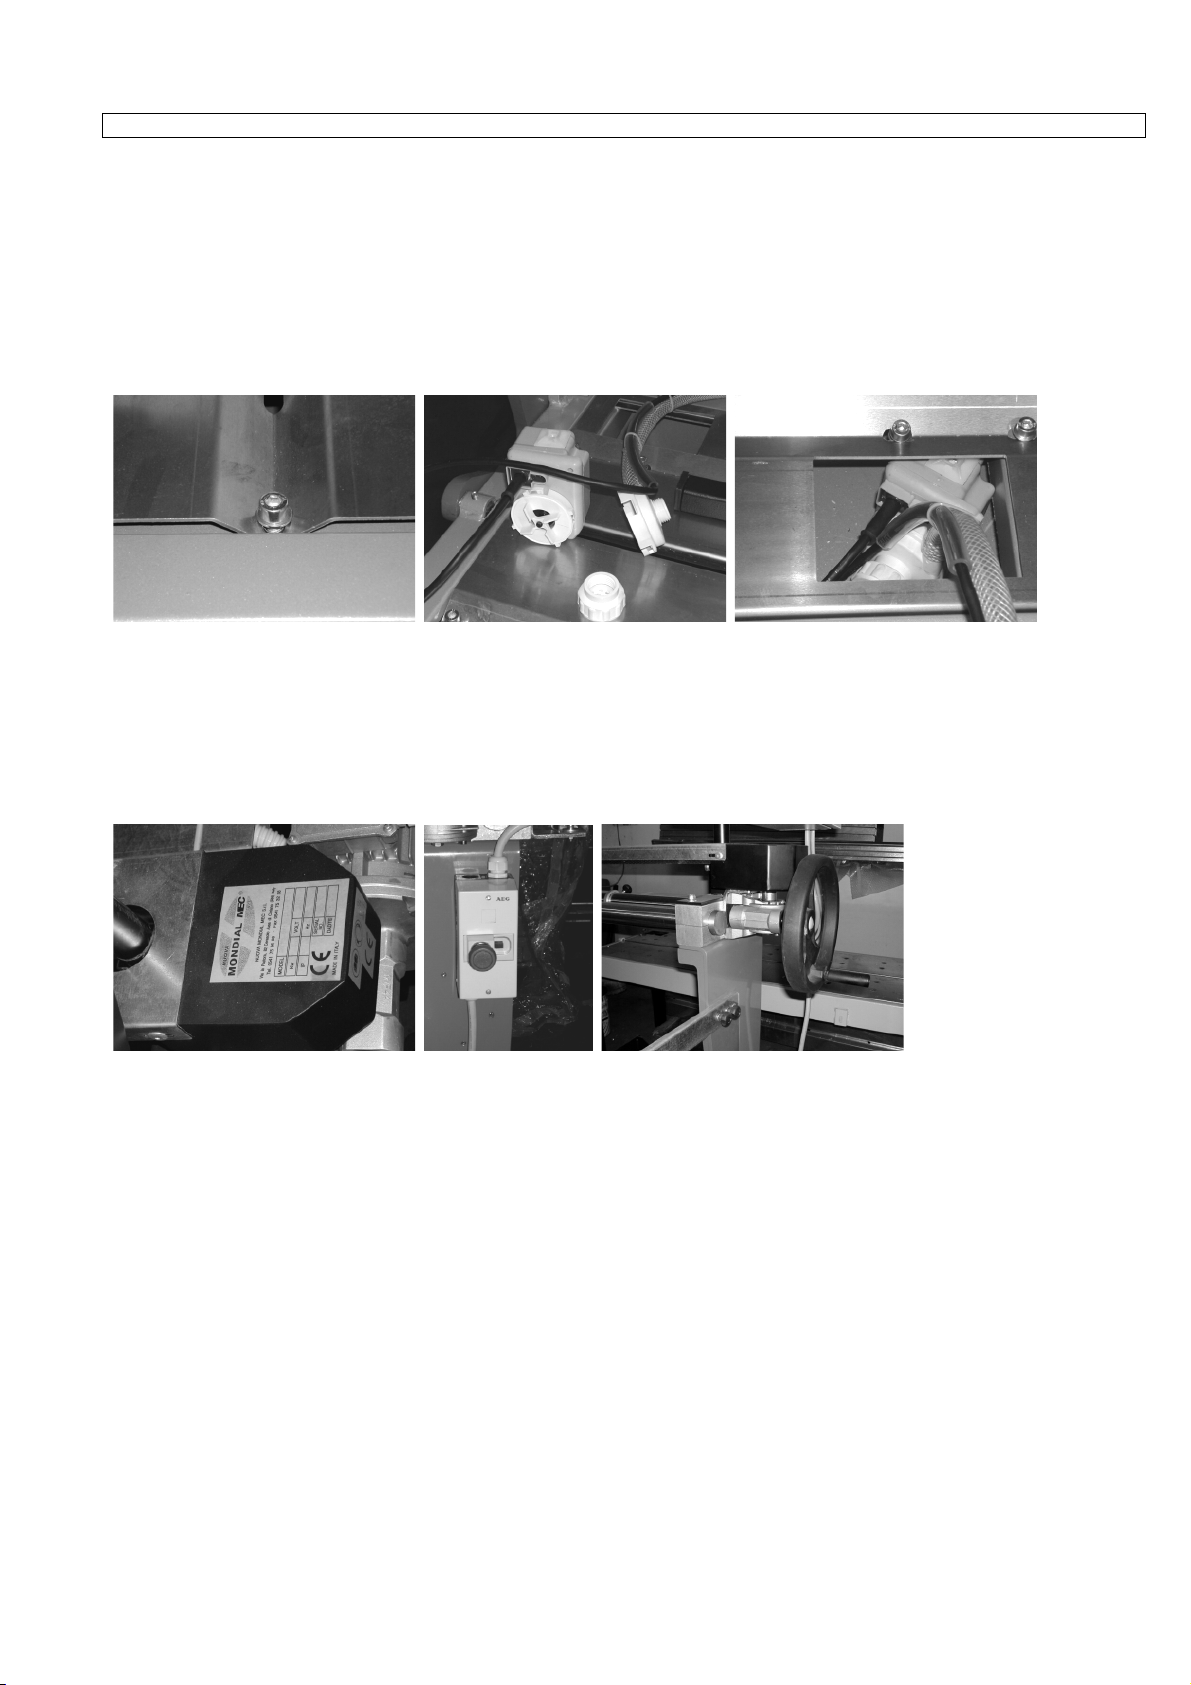
FOTOGRAFIE-PHOTO-FOTO-BILDE
18
19
20
22
23
24

MANUALE SERIE MANTA
Nuova Mondial Mec S.R.L. pag.5
SCHEMA ELETTRICO TRIPUS MONOFASE-TRIPUS SINGLE-PHASE ELECTRICAL DIAGRAM-SCHEMA
ELECTRIQUE TRIPUS MONOPHASE-SCHALTPLAN EINPHASEN-TRIPUS-ESQUEMA ELÉCTRICO TRIPUS
MONOFÁSICO
SCHEMA ELETTRICO TRIPUS TRIFASE-TRIPUS TRIPLE-PHASE ELECTRICAL DIAGRAM-SCHEMA ELECTRQUE
TRIPUS TRIPHASE-SCHALTPLAN DREIPHASEN-TRIPUS-ESQUEMA ELÉCTRICO TRIPUS TRIFÁSICO

MANUALE SERIE MANTA
Nuova Mondial Mec S.R.L. pag.6
SCHEMA ELETTRICO MANTA LX (mod. Europa)-MANTA LX ELECTRICAL DIAGRAM (Europe version)-SCHEMA
ELECTRIQUE MANTA LX (mod. Europe)-SCHALTPLAN MANTA LX (mod. Europa)-ESQUEMA ELÉCTRICO
MANTA LX (mod. Europa)
1) pump
2) motor
MANUALE SERIE MANTA
Nuova Mondial Mec S.R.L. pag.7
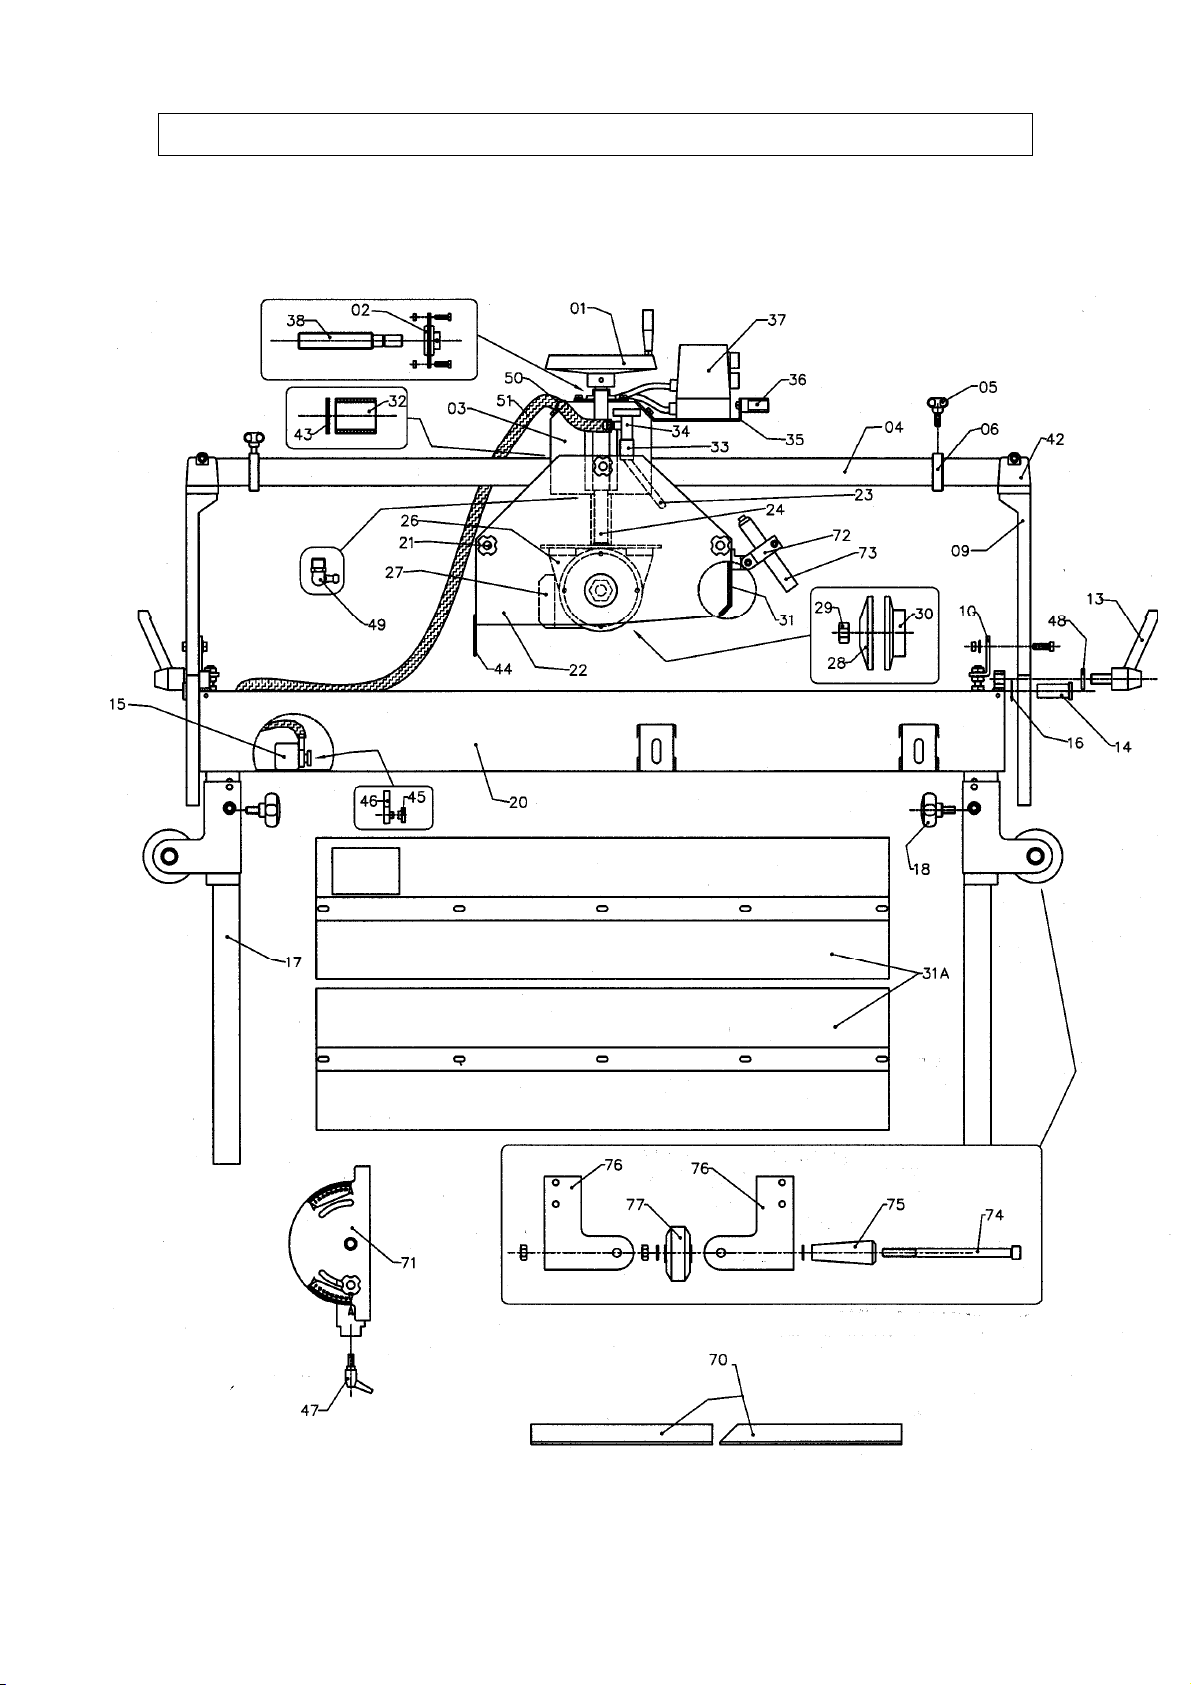
DISEGNO MANTA ALLUMINIUM-MANTA ALLUMINIUM DIAGRAM-DESSIN MANTA ALLUMINIUM-ZEICHNUNG
MANTA ALLUMINIUM-DIBUJO MANTA ALLUMINIUM

MANUALE SERIE MANTA
Nuova Mondial Mec S.R.L. pag.8
DISEGNO MANTA EUROPA-MANTA EUROPE DIAGRAM-DESSIN MANTA EUROPE-ZEICHNUNG MANTA
EUROPA-DIBUJO MANTA EUROPA

MANUALE SERIE MANTA
Nuova Mondial Mec S.R.L. pag.9
DISEGNO MANTA LX-MANTA LX DIAGRAM-DESSIN MANTA LX-ZEICHNUNG MANTA LX-DIBUJO MANTA LX
N.B.
PRIMA DI LASCIARE IL NOSTRO STABILIMENTO CIASCUNA MACCHINA VIENE SOTTOPOSTA A COLLAUDI E
CONTROLLI.
NORME DI USO GENERALE
Leggere attentamente le avvertenze ed i consigli contenuti nel presente libretto, in quanto forniscono importanti
indicazioni circa: la sicurezza di installazione, uso e manutenzione della macchina.
Il produttore non risponde per danni derivanti dall'inosservanza delle note ed avvertenze in esso riportate.
CONSERVATE CON CURA QUESTO LIBRETTO.
Dopo aver tolto l'imballaggio, assicurarsi che la macchina sia intatta in ogni sua parte; in caso contrario rivolgersi al
rivenditore di zona.
Il materiale dell'imballaggio deve essere consegnato ad un apposito centro di raccolta.
ESSO NON E' UN GIOCO PER BAMBINI !
This manual suits for next models
15
Table of contents
Languages:
Other Nuova Mondial Mec Saw manuals


