manuals.online logo
Brands
  1. Home
  2. •
  3. Brands
  4. •
  5. Nuvico
  6. •
  7. Security Camera
  8. •
  9. Nuvico Xcel NCT-8ML2-OV21AF User manual

Nuvico Xcel NCT-8ML2-OV21AF User manual

Package
Overview
Installation
1
2
3
4
Warning and Caution
■If the product does not work properly, please contact your dealer or the nearest
service center. Never attempt to disassemble the camera yourself. (We shall not be
responsible for any problems caused by unauthorized repair or maintenance.)
■Do not allow water or liquid intrusion into the camera.
■In the use of the product, you must be in strict compliance with the electrical
safety regulations of the nation and region. When the product is mounted on wall
or ceiling, the device shall be firmly fixed.
■Do not use camera beyond specified voltage range.
■Do not drop the camera or subject it to physical shock.
■Avoid touching the camera lens.
■If cleaning is necessary, please use clean cloth to wipe it gently.
■Avoid pointing the camera towards the sun or other light sources.
■Do not place the camera in extremely hot, cold (the operating temperature shall
be -22˚F~140˚F), dusty or damp locations, and do not expose it to high
electromagnetic radiation.
■To avoid heat accumulation, good ventilation is required for operating
environment.
Camera Quick start guide
Plastic plug ×4
Drill template
Allen Key
4 tapping screws
■Please read these instructions carefully before using the product and keep it
for further reference.
■All the examples and pictures used here are for reference only.
■The contents of this manual are subject to change without notice.
■Visit nuvico.com for additional downloads, manuals, and resources.
2
13
1 Ethernet Connector
2 Audio Input (MIC)
3 Audio Output (HP)
4 Alarm Input/Output
5 DC12V Power Connector*
6 Zoom-*
7 Zoom+ *
8 Micro SD Card Slot
9 Reset
10 CVBS Interface (unavailable)
* If the PoE switch is used to power the camera, DC12V power supply is not required.
* It is recommended to install the security cap for outdoor installation.
①
②Attach the drill template to the place where you want to fix the camera
and then drill 4 screw holes and 1 cable hole (if you want to route the cables
through the ceiling) according to the drill template.
Trim Ring ∅4 .6 mm
3.55 in
3.55 in
Figure 1 Figure 2
1
3
4
5
9
9
6
7
8
8
10
2
ALARM
4 3 2 1
Security cap
1--ALM-COM
2--ALM-OPEN
3--ALM-INA
4--ALM-GND
DC12V
ALARM
4 3 2 1
Sensor
IPC
ALARM-INA
ALARM-GND
Alarm Input:
3
4
Alarm
Power
IPC
ALARM-COM
ALARM-OPEN
+
+
-
-
Alarm Output:
1
2
►Connecting Alarm Input/Output
(Type A)
(Type B)
* Only some models support T/W button. If your camera doesn’t have these two buttons, please
skip 6 and 7.
NCT-8ML2-OV21AF Vandal Dome Camera
Quick Start Guide
Rotate the trim ring counter-clockwise to remove it from the camera.
Camera Installation►
►Connecting Network Cable
Rubber plug
①
②
Loosen the nut from the main element.
Run the network cable (without the RJ45 connector) through
both elements. Then crimp the cable with the RJ45 connector.
③Connect the cable to the hermetic connector. Then tighten the nut
and the main cover.
Before you start, please make sure that the wall or ceiling is strong
enough to withstand three times the weight of the camera. Please install
the camera in a dry environment. Be sure to install the cover or lower
dome back within 4 hours after removing it. Do not remove the protection
film until the installation is completed.
NCT-8ML2-OV21AF450043001389 A1
Mac Address
IP Address
Modify Network Parameter
Modify
CE :98 :23 :75 :35 :22
192 .168 . 1 . 201
255 . 255 . 255 . 0
192 .168 . 1 . 1
Subnet Mask
Gateway
For example, the IP address of your computer is 192.168.1.4. So the IP address of
the camera should be changed to 192.168.1.X. After modification, please enter the
password of the administrator and click “Modify” button to modify the settings.
The default password of the administrator is “123456”.
④ Double-click the IP address to open up the web browser or you can directly enter
the IP address in the address bar of the web browser. Then follow directions to
download the plug-in. After that, enter the user name and password in the login
interface to login.
The default username is admin; the default password is 123456.
Transparent Dome Maintenance
Transparent dome is an optical element which is made of plastics. As dirt, dust or
fingerprints on the dome will reduce the clarity of the image, please keep it clean in the
course of installing or using but do not directly touch or wipe it. If there is any dirt or
dust, please follow these cleaning tips to clean your dome camera.
* If there is dust on the dome, please use a dry soft brush to gently brush it .
* If there is water or grease on the dome, please gently wipe off the water or grease with
a soft cloth. Then use another clean cloth with a little neutral detergent to wipe it
several times until it is clean. Finally, dry it with a soft cloth.
* If there are fingerprints on the dome, please use a clean cotton cloth or lens cleaning wipe
with a little neutral detergent to wipe it several times and then dry it with a soft cloth.
Tips
Hold it and rotate
Rubber plug
Lower dome
⑤Three-axis adjustment. Before adjustment, preview the view angle of the
camera on a monitor and then adjust the camera according to the figure below to
get an optimum angle.
Rotation 0°~345°
Tilt 0°~77°
Pan 0°~345°
Zoom+
Zoom-
⑦
put the trim ring onto the lower dome and then rotate it clockwise until it is
locked. Finally, remove the protection film softly.
Install the lower dome back to the camera and fix it with screws. Then
⑥ Insert a micro SD card. Then adjust the image of the camera by pressing T or
W button. Before adjustment, view the image of the camera on a monitor.
Figure 3
Figure 5
Figure 4
Figure 6
①
②
Fix the junction box to the wall with screws.
Rotate the trim ring counter-clockwise to remove it from the camera and
then loosen the screws to open the lower dome (See Figure 1 and 3).
③Route and connect these cables (take side conduit cabling for example). Then
fasten the camera to the junction box with screws.
④
⑤
Insert a micro SD card. Then adjust the view of angle and the image (See
Figure 4 and 5 ).
Install the lower dome back to the camera and fix it with screws. Then
put the trim ring onto the lower dome and then rotate it clockwise until it is
locked. Finally, remove the protection film softly. (See Figure 6)
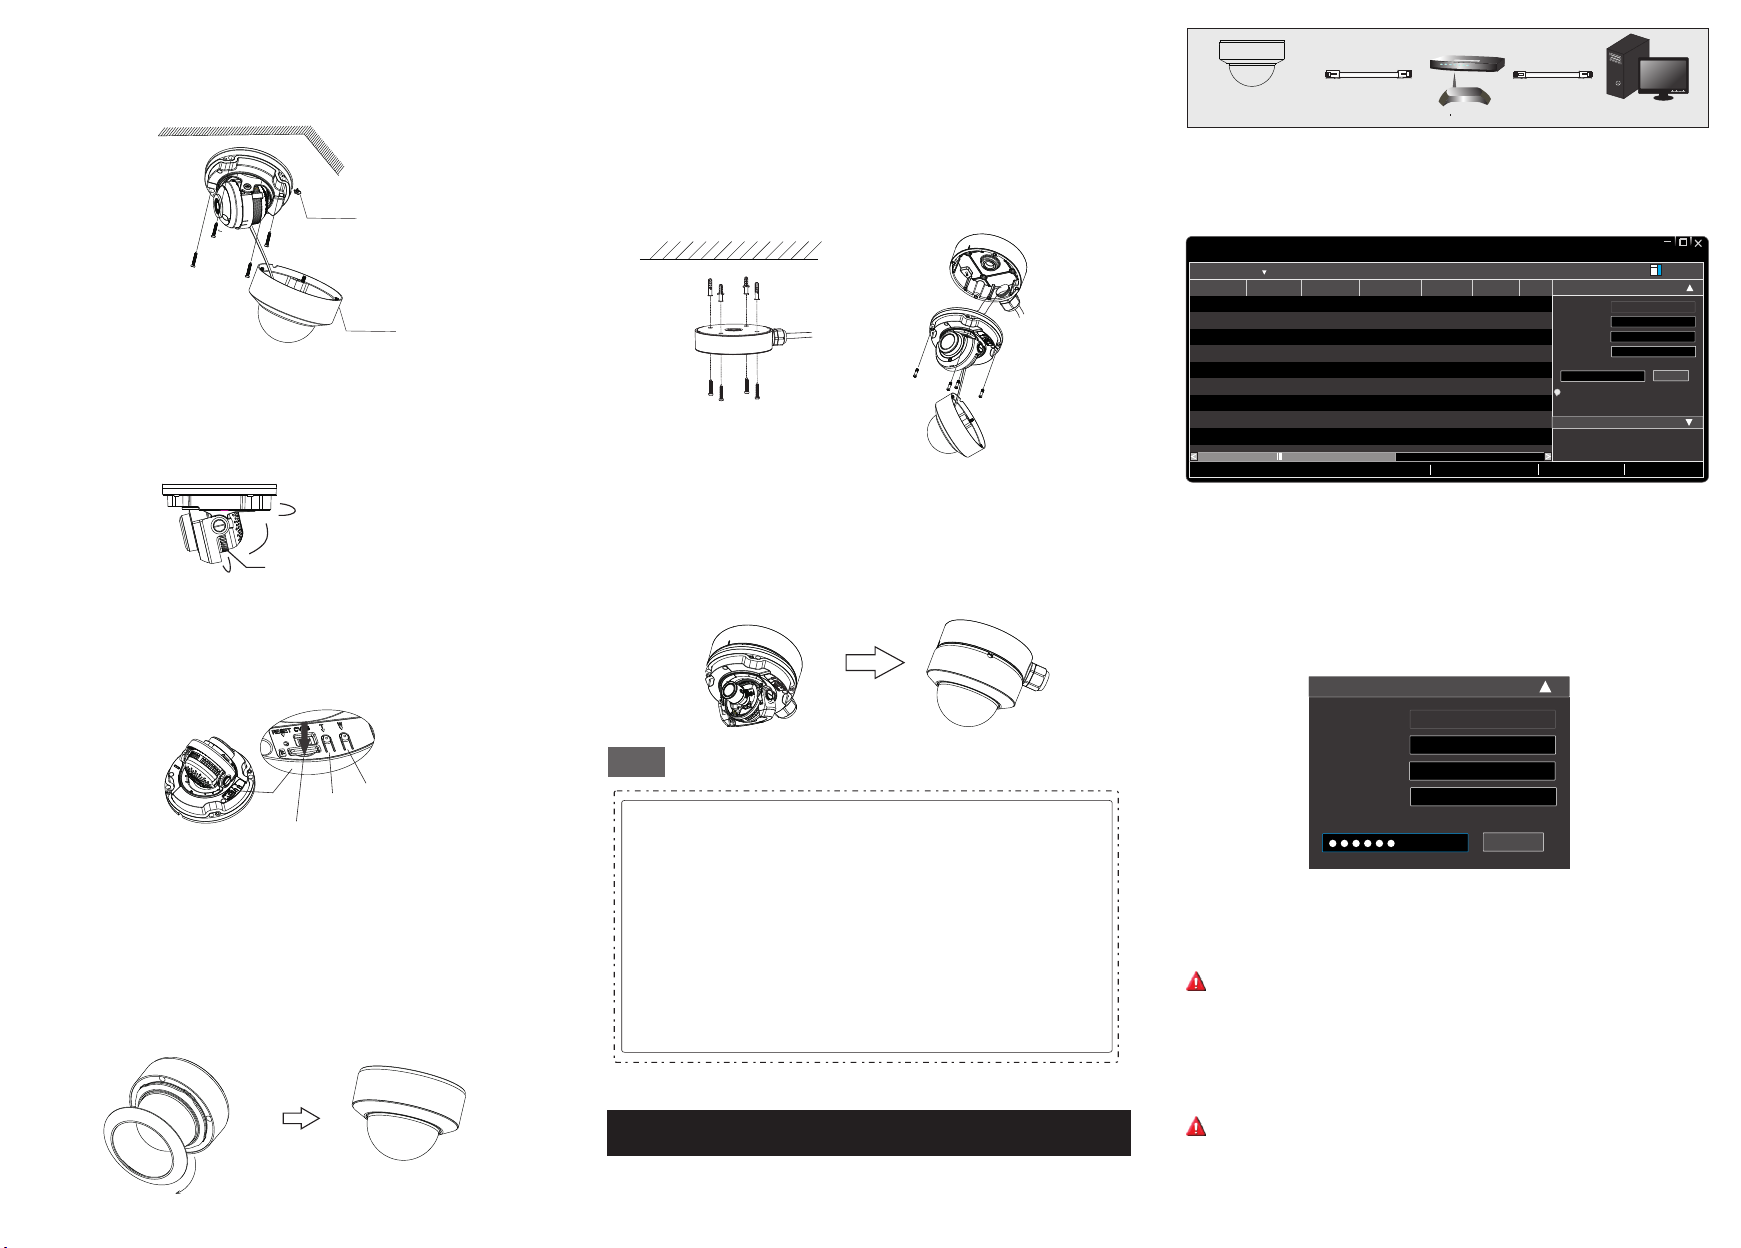
Network Connection
5
•Access the camera through Xcel IP Utility
MENU
IPC
Network Cable Network Cable
Switch
Router Computer
①Make sure that the camera and the PC are connected via LAN.
②Download and install Xcel IP Utility from nuvico.com and run it after
installation.
Device Network Search
Immediate Refresh
Nuvico Xcel
Nuvico Xcel
Nuvico Xcel
IPC
IPC
IPC
NCT-8ML2-E2
NCT-5MLC-B2
NCT-5ML-OV2
192.168.226.201
192.168.1.2
192.168.1.3
80
80
80
9008
9008
9008
255.255.
255.255.
255.255.
Modify Network Parameter
Mac Address
IP Address
Modify
CE :98 :23 :75 :35 :22
192 . 168 . 226 . 201
255 . 255 . 255 . 0
192 . 168 . 226 . 1
i
Tip: Enter the administrator password, and
then modify the network parameters.
Total Device: 3
Local IP Address:192.168.1.4Subnet Mask:255.255.2 55.0 Gateway: 192.168.1.1 DNS:210.21.196.6
Device Name Device Type IP Address Http Port Data Port Subnet
Product Model
About
Subnet Mask
Gateway
Restore IPC Default Configuration
③ Modify the IP address. The default IP address of this camera is
192.168.226.201. Click the information of the camera listed in the above table
to show the network information on the right hand. Modify the IP address and
gateway of the camera and make sure the network address is in the same local
network segment as the computer. Please modify the IP address of your device
according to the practical situation.
Insert a micro SD card
* Install it when routing the cables
through the ceiling.
Note: Only some models support T/W button. If your camera doesn’t have these two
buttons, please skip the above zoom adjustment.
④
ceiling or wall with the screws provided.
Route and connect the cables. Then secure the camera to the
③ Loosen the screws to open the lower dome. ►Install Camera with Junction Box

Other Nuvico Security Camera manuals

Nuvico Xcel NTCT-3M-IRPTZ20 User manual

Nuvico

Nuvico Xcel NTCT-3M-IRPTZ20 User manual

Nuvico Zoom Matic User manual

Nuvico

Nuvico Zoom Matic User manual

Nuvico ZoomMatic CI-Z22N-L User manual

Nuvico

Nuvico ZoomMatic CI-Z22N-L User manual

Nuvico CD-21N User manual

Nuvico

Nuvico CD-21N User manual

Nuvico EasyView Lite CD-H2N-I User manual

Nuvico

Nuvico EasyView Lite CD-H2N-I User manual

Nuvico Xcel NCT-4M-E31AF User manual

Nuvico

Nuvico Xcel NCT-4M-E31AF User manual

Nuvico CV-H2N User manual

Nuvico

Nuvico CV-H2N User manual

Nuvico Xcel NCT-5ML-B2 User manual

Nuvico

Nuvico Xcel NCT-5ML-B2 User manual

Nuvico Xcel NCT-5ML-E21AF User manual

Nuvico

Nuvico Xcel NCT-5ML-E21AF User manual

Nuvico EasyView WDR Series User manual

Nuvico

Nuvico EasyView WDR Series User manual

Nuvico Xcel NCT-4M-E2 User manual

Nuvico

Nuvico Xcel NCT-4M-E2 User manual

Nuvico Xcel NCT-6M-FE User manual

Nuvico

Nuvico Xcel NCT-6M-FE User manual

Nuvico EasyView Lite CD-H21N User manual

Nuvico

Nuvico EasyView Lite CD-H21N User manual

Nuvico SD-z35 User manual

Nuvico

Nuvico SD-z35 User manual

Nuvico CF-ST1N User manual

Nuvico

Nuvico CF-ST1N User manual

Nuvico Xcel NCT-8ML2-OV2 User manual

Nuvico

Nuvico Xcel NCT-8ML2-OV2 User manual

Nuvico XCEL TNP84-4MOV8 User manual

Nuvico

Nuvico XCEL TNP84-4MOV8 User manual

Nuvico SD-Z18N-PHW User manual

Nuvico

Nuvico SD-Z18N-PHW User manual

Nuvico CT-2M-D3 User manual

Nuvico

Nuvico CT-2M-D3 User manual

Nuvico CT-2M-P30FHIR User manual

Nuvico

Nuvico CT-2M-P30FHIR User manual

Nuvico SD-Z35N User manual

Nuvico

Nuvico SD-Z35N User manual

Nuvico NCT-4M-MV2A User manual

Nuvico

Nuvico NCT-4M-MV2A User manual

Nuvico Xcel NCT-8ML2-B21AF User manual

Nuvico

Nuvico Xcel NCT-8ML2-B21AF User manual

Nuvico CB-HDE21N-L User manual

Nuvico

Nuvico CB-HDE21N-L User manual

Popular Security Camera manuals by other brands

urmet domus 1092/257HZ quick guide

urmet domus

urmet domus 1092/257HZ quick guide

Bosch DINION inteox 7100i IR user manual

Bosch

Bosch DINION inteox 7100i IR user manual

FLIR A6700sc user manual

FLIR

FLIR A6700sc user manual

Speco ProVideo CVC-7005EXTP Specification sheet

Speco

Speco ProVideo CVC-7005EXTP Specification sheet

Canon VB-C300 Operation guide

Canon

Canon VB-C300 Operation guide

Vitek VTC-C770DN Specifications

Vitek

Vitek VTC-C770DN Specifications

Canon VB-R13VE installation guide

Canon

Canon VB-R13VE installation guide

Panasonic BL-C210 Series Setup guide

Panasonic

Panasonic BL-C210 Series Setup guide

Bosch series VG4-300 user manual

Bosch

Bosch series VG4-300 user manual

Panasonic WVNP1000 - NETWORK CAMERA operating instructions

Panasonic

Panasonic WVNP1000 - NETWORK CAMERA operating instructions

Honeywell HD2FC1X instruction manual

Honeywell

Honeywell HD2FC1X instruction manual

Commax DRC-40KPT user manual

Commax

Commax DRC-40KPT user manual

Eneo ICB-62M2712M5A user manual

Eneo

Eneo ICB-62M2712M5A user manual

wavestore WV-CT-4F quick start guide

wavestore

wavestore WV-CT-4F quick start guide

Bticino 391348 user manual

Bticino

Bticino 391348 user manual

Epcom EYH003FAP instruction manual

Epcom

Epcom EYH003FAP instruction manual

Toshiba DF03A - IK CCTV Camera instruction manual

Toshiba

Toshiba DF03A - IK CCTV Camera instruction manual

Defender PX301 instruction manual

Defender

Defender PX301 instruction manual

manuals.online logo
manuals.online logoBrands
  • About & Mission
  • Contact us
  • Privacy Policy
  • Terms and Conditions

Copyright 2025 Manuals.Online. All Rights Reserved.