NuWave Pro Plus User manual

10
Connecting Power Head to Dome
Assembling the Full NuWave Oven
NuWave®Oven Pro Plus
Assembly Guide
Lock
1. Place Power Head on rim of the Dome
2. Lock it into place by rotating the Power
Head clockwise until the locking lugs
are engaged.
Place Base Tray on a firm, stable
surface, but never on a stovetop.
Place Liner Pan inside Base Tray. When
doing so, make sure the handles are
in the dropped down position. If the
handles are not fully dropped, the Dome
may not fit over the Base properly.
Place dual level Cooking Rack in
the Liner Pan according to cooking
requirements.
Place food on Rack.
Place Dome with Power Head over food,
connecting to the Base Tray. The Dome
should fit evenly onto the Base.
Set cook time and temperature
according to recipe requirements.
BEFORE USING:
Prior to the first use of your NuWave Oven,
wash Dome, Liner Pan, Base, and Cooking
Rack in warm soapy water or run through a
dishwasher cycle.
IMPORTANT - Do not wash or immerse Power
Head in water or cycle through dishwasher. The
outer surface may be cleaned by wiping carefully
with a damp dishcloth or sponge.
Owner’s Manual

11
Step 3
Place the assembled Power Head and
Dome at a 45° angle on the holder as
shown.
Note: Do not leave Dome in Dome
Holder for an extended period of time.
Only lift Dome by the handles on
the Power Head. Once the Power
Head and the Dome are assembled,
the handles will allow you to lift both
together when removing or checking
food. When removing Liner Pan after
cooking, be extremely careful and
always use oven mitts.
For best results, follow the time,
temperature, and Cooking Rack height
instructions provided in the cooking
chart and recipe book.
No preheating required.
How to Install and Use Dome Holder
Make sure the Power Head is tightly locked onto the
Dome. The whole assembly can be easily lifted and
put aside as shown in steps 1, 2 and 3.
Step 1
Place Dome Holder under either
side of Base handle.
Step 2
Make sure both feet of the Dome Holder
are situated inside the handle, and the
Dome Holder is resting horizontally on a
flat surface.
Cooking Instructions
Owner’s Manual

12
If your NuWave Oven included a 3-inch
Extender Ring, the Ring can be used
for multi-level cooking or for oversized
food items that may not fit under the
standard Dome. Generally, foods (such
as a ham or turkey) that exceed 10
pounds would require the use of the
Extender Ring for optimal cooking.
• Place foods that require the longest
cooking time on the rack closest to the
heating element (ex. potatoes, carrots),
and place soft vegetables on the lower
racks (ex. mushrooms, tomatoes).
• When choosing the multi-level cooking
option, use food combinations that
take roughly the same amount of time
to prepare. Examples: pork or chicken
and potato wedges; fish and stewed
tomatoes; or frozen beef with baked
potatoes.
Directions
The Extender Ring should be positioned
between the original Dome and the
Base. The addition of the Extender Ring
will expand the NuWave Oven’s available
cooking space by approximately 440
cubic inches when using the 3-inch
Ring. When adding the Extender Ring
to the NuWave Oven, make sure it fits
snugly onto the Dome. When the Ring is
placed under the Dome incorrectly, the
overlapping edges will not fit together
properly. Please use caution when
using the Ring. If improperly used,
heat or steam could escape from Oven
which could cause burns or alter the
necessary cooking times of your foods.
The Extender Ring should only be used
as an accessory item with the NuWave
Oven. It is not intended to serve as a
replacement for the Dome, Base, or any
other components of the NuWave Oven.
Models Containing 3-inch Extender Ring
• If top layer foods finish cooking
earlier, remove rack(s) from above and
continue cooking bottom foods until
done.
• Use shallow or oven-safe dishes for
cooking.
• To warm bread, place it on the bottom
rack or Liner Pan and cover. To bake
bread, place bread on the top rack.
General Rules
Owner’s Manual

13
2-inch Rack
The 2-inch Rack for the NuWave Oven
Pro Plus can be used in a variety of ways.
• It can be the primary rack with or
without the Extender Ring.
• With the Extender Ring, it can be
positioned on top of or under the 3-inch
rack for more multi-level cooking space.
• Without the Extender Ring, the 2-inch
rack can also facilitate multi-level cooking
by creating a third cooking surface
between the Liner Pan and the bottom of
the 3-inch rack.
• You may use two extra 2-inch racks
above and below the 3-inch rack, which
is especially useful for dehydrating.
Care and Use
The Stainless Steel Extender Ring should
not be cleaned with any harsh abrasive,
but it is dishwasher safe.
Models Containing Extender Ring Kit
Do not touch the Dome or any surface on the cooking area
during operation. The air inside the Dome can reach 350°F
(177°C) which makes the surface very hot and may cause
burns. Do not open the Dome or remove the power head
while the NuWave Oven is operating. Turn off the power
before removal.
CAUTION
2-inch Cooking Rack
10-inch Enamel Baking Pan
3-inch Stainless Steel Extender Ring
Note: The 2-inch rack is only to be
used in the positions and purposes
shown below. Any other uses may
affect cooking time and quality.
3-inch Cooking Rack 1-inch Cooking Rack 2-inch & 1-inch
Cooking Rack
3-inch & 2-inch
Cooking Rack
2-inch & 3-inch
Cooking Rack
Owner’s Manual

14 Owner’s Manual
NuWave Pro Plus Black Control Panel Graphic
Directions for the NuWave®Oven Pro Plus
• Do not place the Pro Plus or any associated parts directly on your stove top, inside a
conventional oven or in contact with any other direct heat source. Damage may result.
• Make sure the unit is plugged into a properly grounded outlet and that the cord is not
touching any heated objects.
• Be certain that Liner Pan has been properly placed within the Base.
• Metal, glass or silicone dishes and pans, and all other oven-safe materials used in a
conventional oven may be utilized in the NuWave Pro Plus.
• Always place the Dome back onto the Base when finished cooking.
General Use Instructions
Control Panel in Power Source
“0” should appear on LCD display when program is clear.
Quick Start
To start cooking, press the Cook Time Button, enter time as desired, then press Start.
Default is programed at 350ºF. If cooking at any other temperature, Cook Temp Button
will be needed.
Start Cooking
Set appropriate temperature and time, then press Start to begin cooking. The
remaining cooking time will appear in the display panel, and the colon symbol
between the hours and minutes will blink. The oven will automatically stop cooking
when the time has expired, and a “beep” will alert you to that fact.
Pause/Clear Cooking
To pause the Oven, press the Pause/Clear Button once. The remaining cooking time
will stay listed on the display panel but the colon will not blink. To stop or to clear
cooking time, press the Pause/Clear Button twice. Cooking functions will cease
immediately, remaining time will be fully cleared, and a "0” will appear.

15
˚F/˚C Conversion
The default temperature setting is Fahrenheit (˚F) but the NuWave Oven Pro Plus can
display Celsius (˚C) as well.
1. Press and hold Cook Temp for 3 seconds to activate ˚F/˚C conversion mode. The LED
Display will display “350” and TEMP will be flashing.
2. The LED Display will display ˚F, beep once and TEMP will be illuminated for 5 seconds.
If no further action is taken, the Oven will automatically exit ˚F/˚C conversion mode.
3. While in ˚F/˚C conversion mode, press 0 to change the LED display to ˚C at which point
the Oven will give off one single long beep.
4. Press 0 once more to change back to ˚F, if desired.
5. Once the desired temperature setting is set, do not press any buttons for 5 seconds or
press Clear to exit ˚F/˚C conversion mode.
6. The new temperature setting (˚F or ˚C) will become the default setting until changed,
even if the Oven is powered off.
Cook Time Function
1. Press the Cook Time Button. The TIME indicator will flash in the right corner of the
display panel and "0" will be illuminated on the LED display.
2. Enter the time in hours and minutes by pressing the corresponding numerals then
press Start. For example, 1 hour and 30 minutes would be entered by pressing 1,3,0
and the display panel will show 1:30. For 5 minutes just push 5; for 46 minutes,
push 4, 6. If the number needs to be corrected, clear the entry by pressing the
Pause/Clear button twice. Then re-enter the correct numbers and press Start.
3. While cooking, you may change the cooking time at anytime by pressing Cook Time,
TIME will begin flashing. Enter the desired cooking time, the LED display will show
the remaining cooking time, TIME will be illuminated and the colon will be flashing.
NOTE: When cooking at temperatures between 100°F and 324°F, the maximum cooking
time is 9 hours and 59 minutes. When cooking at temperatures between 325°F and 350°F,
the maximum cooking time is 2 hours. If a cooking time longer than 2 hours is entered
when cooking in this temperature range, the NuWave Oven Pro Plus will default back
to 2 hours.
Cook Temp Function
1. The default cooking temperature is 350°F (177°C).
2. To change the cooking temperature, press Cook Temp. The LED Display will display
350°F (177°C) and TEMP will be flashing.
3. Select your desired cooking temperature. The temperature can be adjusted by 1
degree within the NuWave Oven Pro Plus’s temperature range. The minimum
temperature is 100°F (38°C) and the maximum temperature is 350°F (177°C). TEMP
will continue to flash on the LED Display.
4. While cooking, you may change the cooking temperature at any time by pressing Cook
Temp. The colon in the LED Display will disappear, TIME will be illuminated and TEMP
will be flashing. The current cooking temperature will be displayed for 3 seconds.
During that time, you may enter a new cooking temperature of your choice.
5. While cooking, only Cook Time, Cook Temp and Pause/Clear buttons can be used.
6. The cooking temperature cannot be changed after pressing Delay or Reheat.
Owner’s Manual

16 Owner’s Manual
IMPORTANT - Do not wash or immerse Power Head in
water or cycle through dishwasher. The outer surface
may be cleaned by wiping carefully with a damp
dishcloth or sponge.
Delay Function
After setting your temperature and time, you can delay the program before cooking
starts. When entering Delay function, it will always be the first function. The delay function
is only for cook time and delaying start time. When you enter in desired cook time, cook
temperature, then Delay, Delay will be illuminated and Time will blink on the LCD display.
Input delay time and press Start. Delay stops blinking and remains on until time expires.
It is possible to delay a program for up to 9 hours and 59 minutes. If the delay countdown
reaches 0, the Oven will beep to signal the end.
Reheat Function
The default setting is programmed at 350ºF for 4 minutes. This function is perfect
for reheating single portion-sized foods. To activate the reheat function, make sure
programming is clear. The LCD display will read 0. Press the Reheat Button. This will
activate the default setting. Press Start. Oven will “beep” 3 times once time has expired.
For example, if you are warming leftover pizza, simply place the slice on the 3-inch rack,
press Reheat, then Start. If you are warming a rice or noodle dish, place a single-serving
amount in an oven-safe container (glass, metal, silicone). For softer rice or noodles, add
a sprinkle of water and cover with foil.
Warm Function
After the initial cooking time is complete, you may keep foods warm. When entering
Warm function, it will always be the last function. The default setting is programmed at
155° for 2 hours. In “WARM mode, only the TIME can be adjusted.
•If you wish to adjust the time BEFORE the “WARM” function is operating, you can
do this by simply pressing “WARM”, and then enter the desired time on the numeric
keypad, then press “start”.
•
If you wish to adjust the time DURING the “WARM” function, press “WARM”, then
enter the desired time on the numeric keypad. The Pro Plus Oven will automatically
begin countdown.
You may program the oven to keep foods warm for up to 9 hours and 59 minutes. Once
the initial cooking cycle is finished, the oven will “beep” twice before switching to the
Warm function.
CLEANING AND CARE INSTRUCTIONS
Unplug the unit before cleaning. The Dome and all other parts, except the Power Head,
are dishwasher safe. Protect the metal and plastic surfaces; do not use abrasive cleaners
or scouring pads. Clean after each use. The outer surface of the Power Head can be
cleaned by wiping with a damp cloth.

17
THE MANUFACTURER WARRANTS
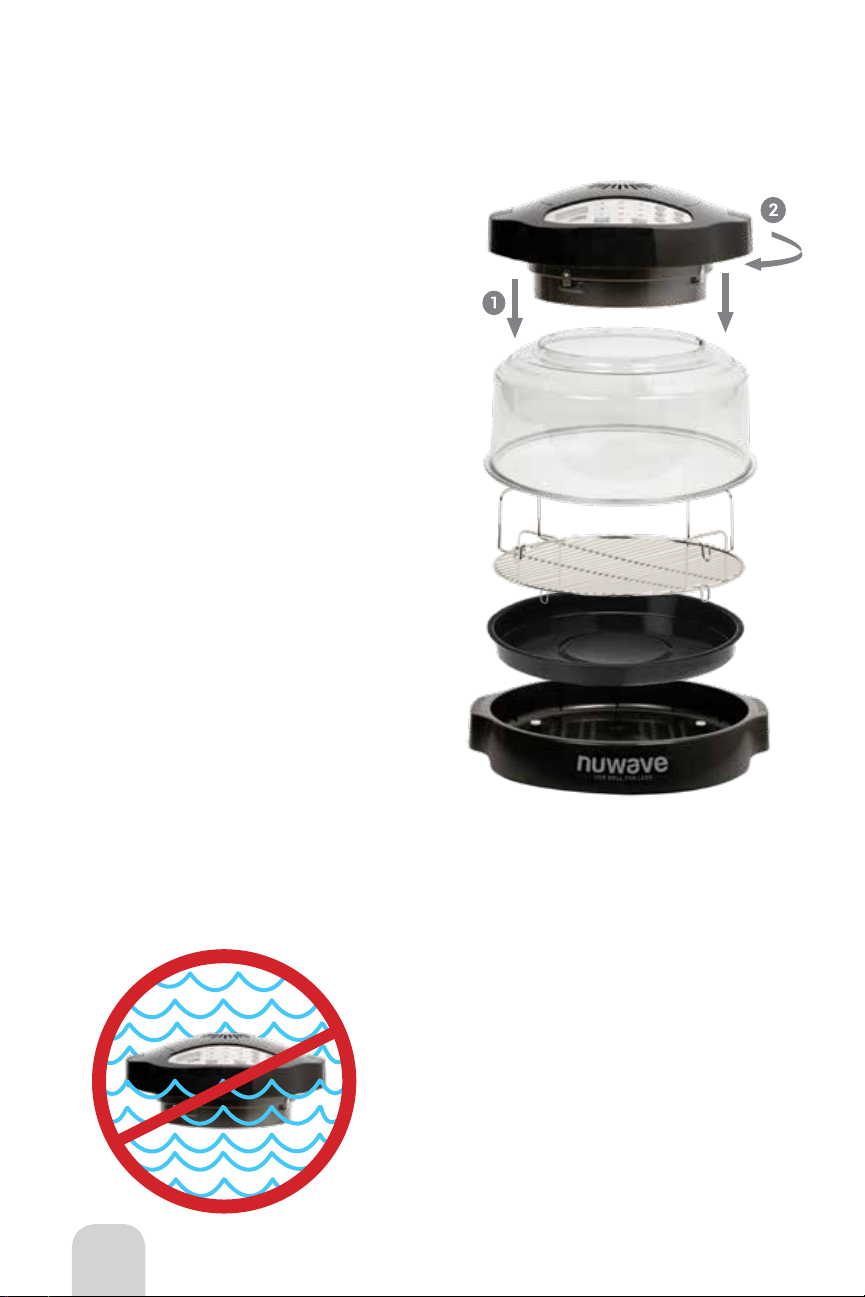
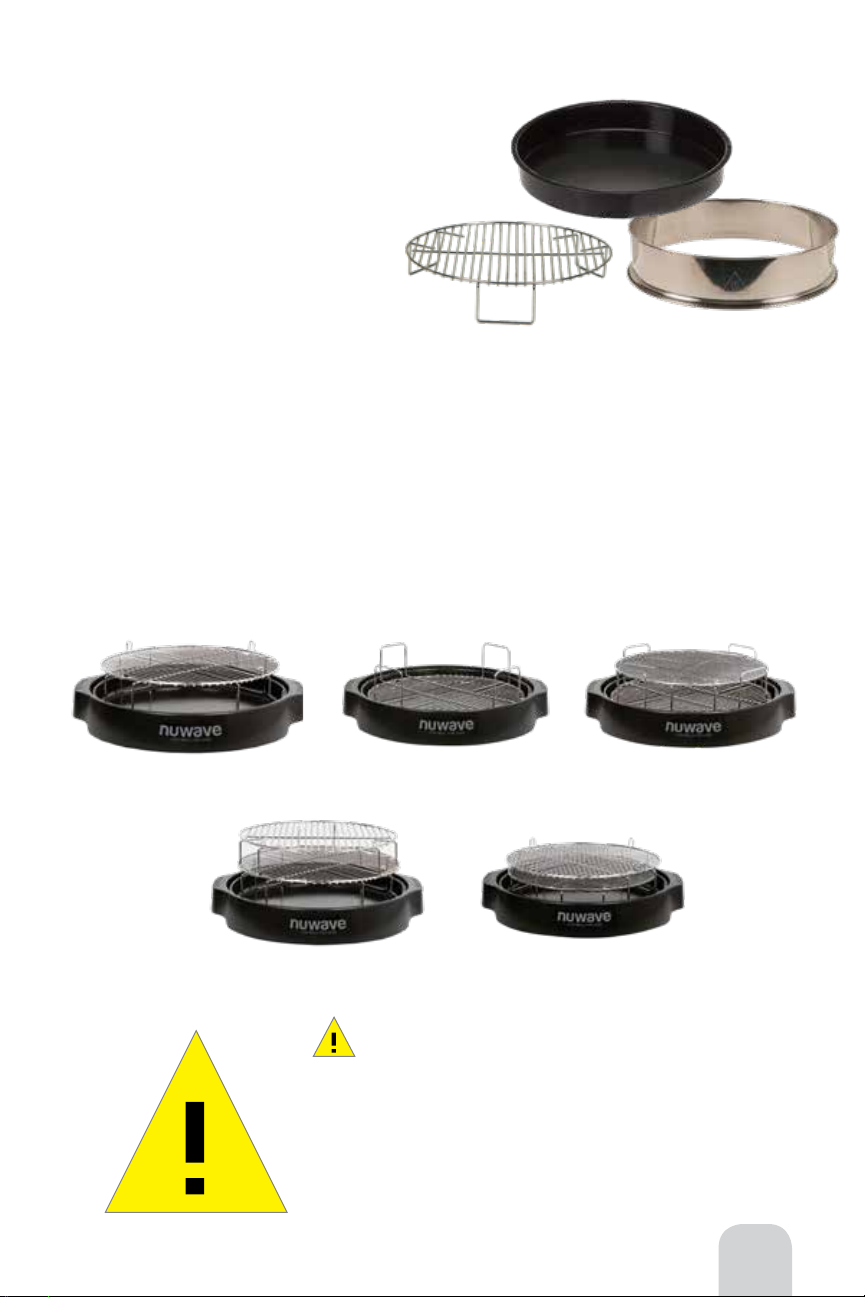
The infrared cooking system including power head, Dome, Cooking Rack, Liner Pan,
Base, and all electrical components are to be free from defects and workmanship
under normal household use, when operated in accordance with the Manufacturer’s
written instructions provided with each unit for one (1) year from date of purchase.
The Manufacturer will provide the necessary parts and labor to repair any part of the
infrared cooking system at NuWave, LLC Service Department. After the expiration of the
warranty, the cost of the labor and parts will be the sole responsibility of the owner.
THE WARRANTY DOES NOT COVER
The non-stick coating (if applicable) on any part of the cooking system. The Limited
Warranty is voided if repairs are made by an unauthorized dealer or the serial
number data plate is removed or defaced. Normal deterioration of finish due to use or
exposure is not covered by this Warranty. This Limited Warranty does not cover failure,
damages or inadequate performance due to accident, acts of God (such as lightning),
fluctuations in electric power, alterations, abuse, misuse, misapplications, corrosive
type atmospheres, improper installation, failure to operate in accordance with the
Manufacturer’s written instructions, abnormal use or commercial use.
IMPORTANT TIPS:
1. Check the power outlet to ensure proper operation. NuWave Oven uses up to 1500
watts/12.5 amps. Do not operate the unit simultaneously with other major appliances
plugged into the same outlet.
2. Check the cooking temperature if Oven is cooking too slowly.
3. The electrical plug must be properly inserted into the outlet.
4. Always turn off and unplug the oven before washing.
5. Moisture may accumulate inside Dome if food is not promptly removed once cooking
time has expired. Steam/moisture buildup can be avoided through prompt removal of
cooked foods.
6. Do not rest Dome in Dome Holder for extended period of time, as it could warp. Always
replace Dome on Base Tray promptly after removing food.
From the NuWave Chef:
For best results, we recommend that the food (meats, poultry, and fish) is removed
immediately from the oven after cooking to rest. Resting prevents overcooking, and
taking the time to let the food rest will ensure that it is moist, tender, and juicy at the
desired doneness. Remove the food from the oven; place it on a plate or serving platter;
and cover it loosely with a foil. This will allow the juices that were driven to the center
of the food during cooking to be redistributed throughout the food and reabsorbed. Be
careful not to wrap the food too tightly as that may result in sweating and will lead to loss
of moisture you want to keep in the food. Resting times will vary depending on the size
of the food. As a general rule, roasts and whole chickens should rest 15 to 30 minutes
before carving. Steaks, chops, and chicken breasts should rest at least 5 minutes. A
good rule of thumb is rest 1 minute for every 3.5 oz.
THE NUWAVE®OVEN PRO PLUS COOKING SYSTEM
To obtain warranty service, contact the service department
at this toll free number: 1-877-689-2838
NuWave, LLC
1755 N. Butterfield Rd.
Libertyville, IL 60048, U.S.A.
www.NuWaveNow.com | help@nuwavenow.com
Owner’s Manual

18 Owner’s Manual
TO OBTAIN SERVICE
The owner shall have the responsibility to: Pay for all services and parts not covered
by the warranty; Prepay the freight to and from Service Department for any part or
system returned under this warranty; Carefully package the product using adequate
padding material to prevent damage in transit. The original container is ideal for this
purpose. Include in the package the owner’s name, address, daytime telephone
number, a detailed description of the problem, and your “RGA number.” (Call
1-877-689-2838) or e-mail help@nuwavenow.com to obtain the RGA (Return Goods
Authorization number). Provide the cooking system model & serial number and proof
of date of purchase (a copy of the receipt) when making claims under this warranty.
MANUFACTURER’S OBLIGATION
The Manufacturer’s obligation under this Limited Warranty is limited to repairing or
replacing any part of the infrared cooking system expressly covered by this Limited
Warranty which upon examination is found to be defective under normal use. The
Limited Warranty is applicable only within the continental United States and only to
the original purchaser of the manufacturer’s authorized channels of distribution. THE
LIMITED WARRANTY MAY NOT BE ALTERED, VARIED OR EXTENDED EXCEPT BY
A WRITTEN INSTRUMENT EXECUTED BY THE MANUFACTURER. THE REMEDY
OF REPAIR OR REPLACEMENT AS PROVIDED UNDER THIS LIMITED WARRANTY
IS EXCLUSIVE. IN NO EVENT SHALL THE MANUFACTURER BE LIABLE FOR ANY
CONSEQUENTIAL OR INCIDENTAL DAMAGES TO ANY PERSON, WHETHER OR
NOT OCCASIONED BY NEGLIGENCE OF THE MANUFACTURER, INCLUDING
WITHOUT LIMITATION, DAMAGES FOR LOSS OF USE, COSTS OF SUBSTITUTION,
PROPERTY DAMAGE, OR OTHER MONEY LOSS.
Some states do not allow the exclusion or limitation of incidental or consequential
damages, so the above limitation exclusions may not apply. This Limited Warranty
gives specific legal rights, and there may also be other rights which vary from
state to state. EXCEPT AS OTHERWISE EXPRESSLY PROVIDED ABOVE, THE
MANUFACTURER MAKES NO WARRANTIES EXPRESSED OR IMPLIED ARISING
BY LAW OR OTHERWISE, INCLUDING WITHOUT LIMITATION, THE IMPLIED
WARRANTIES OF MERCHANTABILITY AND FITNESS FOR A PARTICULAR PURPOSE
TO ANY OTHER PERSON. READ YOUR OWNER’S MANUAL. IF YOU STILL HAVE
ANY QUESTIONS ABOUT OPERATION OR WARRANTY OF THE PRODUCT, PLEASE
CONTACT NuWave, LLC
1-877-689-2838 Monday
email: help@nuwavenow.com

19
*RoHS stands for “the Restriction Of the use of certain Hazardous
Substances in electrical and electronic equipment”.
If you want to find out more about the RoHS Directive, please visit
www.rohsguide.com/rohs-faq.htm
RoHS Restricted Materials
Maximum Concentration
0.1% by weight
0.1% by weight
0.01% by weight
0.1% by weight
0.1% by weight
0.1% by weight
Lead (Pb)
Mercury (Hg)
Cadmium (Cd)
Hexavalent Chromium (Cr-VI)
Polybrominated Biphenyls (PBB)
Polybrominated Diphenyl Ethers (PBDE)
Material & Toxicological Profile
At NuWave, LLC, we have taken a great amount of
care in ensuring that our products are safe and secure
for every household. All NuWave Ovens are built
and manufactured in strict compliance with RoHS*
standards. Although US manufacturers are not bound
by law to follow RoHS standards, NuWave, LLC has
made a conscious decision to voluntarily follow this
directive to preserve the safety of its consumers and
the quality of our environment.
Owner’s Manual

20
We love baking pizza in the NuWave Oven so much we’ve created these
tools so you can bake the best tasting pizza ever! Achieve hot, fresh,
better-than-just-delivered pizza at home...
AS EASY AS 1 - 2 - 3 when you use your NuWave Oven and the Supreme
Pizza Kit! Whether you prefer your pizza thin, regular or deep dish...your
NuWave Oven, along with the Supreme Pizza Kit, will do the trick!
*Your order may contain only some
of the above items. To purchase this
product, call NuWave, LLC Customer
Service at 1-877-689-2838 or order
online at www.NuWaveNow.com
The NuWave Supreme Pizza Kit*
The spring-loaded, easy grip handle
allows you to securely clamp the
10-inch stainless steel rings shut,
safely letting you flip your pizzas,
calzones, quesadillas and much more!
Bake your pizza crust first without
overcooking your cheese or favorite
toppings. The slick surface will not stick
to cheese, and also collects unwanted
grease (complies with FDA regulations).
Two great utensils rolled into one! The
NuWave Pizza Server, with multiple
stainless steel cutting surfaces and
easy grip handle, will have you slicing
and serving your pizza with ease.
The unique bamboo cutting board will
spare damage to your countertops
and help protect the environment.
This board is multi-functional with a
flat side for cutting pizzas and breads
and a grooved side for cutting fruits,
vegetables and other foods with juices.
The NuWave Stainless Steel Pizza Flipper
The NuWave Silicone Pizza Liner
The NuWave Stainless Steel Pizza Server
The NuWave 100% Bamboo Cutting Board
Frozen, Fresh, Thick or Thin...
Supreme Pizza Kit

21
1. Place the Pizza Liner over the top of
your pizza.
2. Place pizza upside down on the 3-inch
rack. Cook at 350ºF, until crust of pizza is
a light brown in color.
How to Use the NuWave Pizza Flipper &
Pizza Liner with your NuWave®Oven
Note:
Make sure the reversible rack is positioned as the 3-inch rack in the NuWave Oven.
5. While gripping the handle, rotate the pizza
and Pizza Liner completely around and set
pizza back on the rack crust side down. The
pizza should now be right side up.
6. Remove the Pizza Liner and cook at 350ºF
for 3-5 minutes or until cheese is melted to
your preference.
3. When using Pizza Flipper, start with the
Pizza Flipper open and slide under the
Pizza Liner and over the top of the crust.
4. Using the handle, close the Pizza
Flipper until pizza is securely held.
Care & Use
The Pizza Flipper, Pizza Liner, Pizza Server and Bamboo Cutting board should be
washed with mild soap and water. It should not be cleaned with harsh abrasives. Allow
utensils to dry completely before using or storing.
Caution
The edges of the spatula and pizza cutter are sharp. Always cut away from your body.
Serrated edges are sharp, and should not be used for support.
Supreme Pizza Kit
Other manuals for Pro Plus
4
Table of contents
Other NuWave Oven manuals

NuWave
NuWave 20902 User manual

NuWave
NuWave BRAVO XL PRO User manual

NuWave
NuWave PRO-SMART 38051 User manual

NuWave
NuWave PRO SMART 20902 User manual

NuWave
NuWave Bravo XL User manual

NuWave
NuWave Bravo XL User manual

NuWave
NuWave 20902 User manual

NuWave
NuWave BRAVO XL PRO User manual

NuWave
NuWave 20008 User manual

NuWave
NuWave Bravo 20831 User manual