manuals.online logo
Brands
  1. Home
  2. •
  3. Brands
  4. •
  5. NVX
  6. •
  7. Subwoofer
  8. •
  9. NVX BE-TSLAS-VCW104 User manual

NVX BE-TSLAS-VCW104 User manual

Other NVX Subwoofer manuals

NVX XQW102 User manual

NVX

NVX XQW102 User manual

NVX XQW102 User manual

NVX

NVX XQW102 User manual

NVX VCW102 User manual

NVX

NVX VCW102 User manual

NVX VSW82V2 User manual

NVX

NVX VSW82V2 User manual

NVX VS Series User manual

NVX

NVX VS Series User manual

NVX VCW102 User manual

NVX

NVX VCW102 User manual

NVX NSW102V2 User manual

NVX

NVX NSW102V2 User manual

NVX S Series User manual

NVX

NVX S Series User manual

Popular Subwoofer manuals by other brands

Extron electronics SF 8CT SUB user guide

Extron electronics

Extron electronics SF 8CT SUB user guide

SVS PB-4000 quick start guide

SVS

SVS PB-4000 quick start guide

Pioneer S-DVR9SW Service manual

Pioneer

Pioneer S-DVR9SW Service manual

Yamaha YST-SW515 Service manual

Yamaha

Yamaha YST-SW515 Service manual

Velodyne SPL-800 ULTRA - REV B datasheet

Velodyne

Velodyne SPL-800 ULTRA - REV B datasheet

Teufel US 2110/1 SW operating instructions

Teufel

Teufel US 2110/1 SW operating instructions

Wet Sounds SS-65 user manual

Wet Sounds

Wet Sounds SS-65 user manual

Pyle PLQB10 Specifications

Pyle

Pyle PLQB10 Specifications

Sony XS-L1536 Product guide

Sony

Sony XS-L1536 Product guide

Sony XS-AW8 operating instructions

Sony

Sony XS-AW8 operating instructions

B&C Speakers 15 HPL 76W Specifications

B&C Speakers

B&C Speakers 15 HPL 76W Specifications

Velodyne DD-18+ Specifications

Velodyne

Velodyne DD-18+ Specifications

Sonance Cinema Series SUB 10-150 Specifications

Sonance

Sonance Cinema Series SUB 10-150 Specifications

Hifonics HW-12 Owners & installation manual

Hifonics

Hifonics HW-12 Owners & installation manual

Yamaha 64263 owner's manual

Yamaha

Yamaha 64263 owner's manual

Magnat Audio ADR 130 BP user manual

Magnat Audio

Magnat Audio ADR 130 BP user manual

Technics SB-AS500 Operaing instructions

Technics

Technics SB-AS500 Operaing instructions

Lyngdorf BW-2 owner's manual

Lyngdorf

Lyngdorf BW-2 owner's manual

manuals.online logo
manuals.online logoBrands
  • About & Mission
  • Contact us
  • Privacy Policy
  • Terms and Conditions

Copyright 2025 Manuals.Online. All Rights Reserved.

PMS Version
Blue: PMS 300
Black: PMS Black
Gray: PMS Black 50%
INSTALLATION GUIDE
BE-TSLAS-VCW104 B.O.O.S.T.
Series Bass Enclosure for Telsa Model S
We recommend the installation of
the NVX BE-TSLAS-VCW104 to be
performed by a professional that will
have the skills and tools to ensure
the job is done correctly. Please
follow the steps above to get the best
performance out of the BE-TSLAS-
VCW104. Installing and mounting
NVX BE-TSLAS-VCW104 improperly
can present a serious safety hazard
in the event of a collision. If you have
any questions regarding installation
of this product or an amplifier in this
vehicle please feel free to contact
NVX directly for further guidance and
installation techniques.
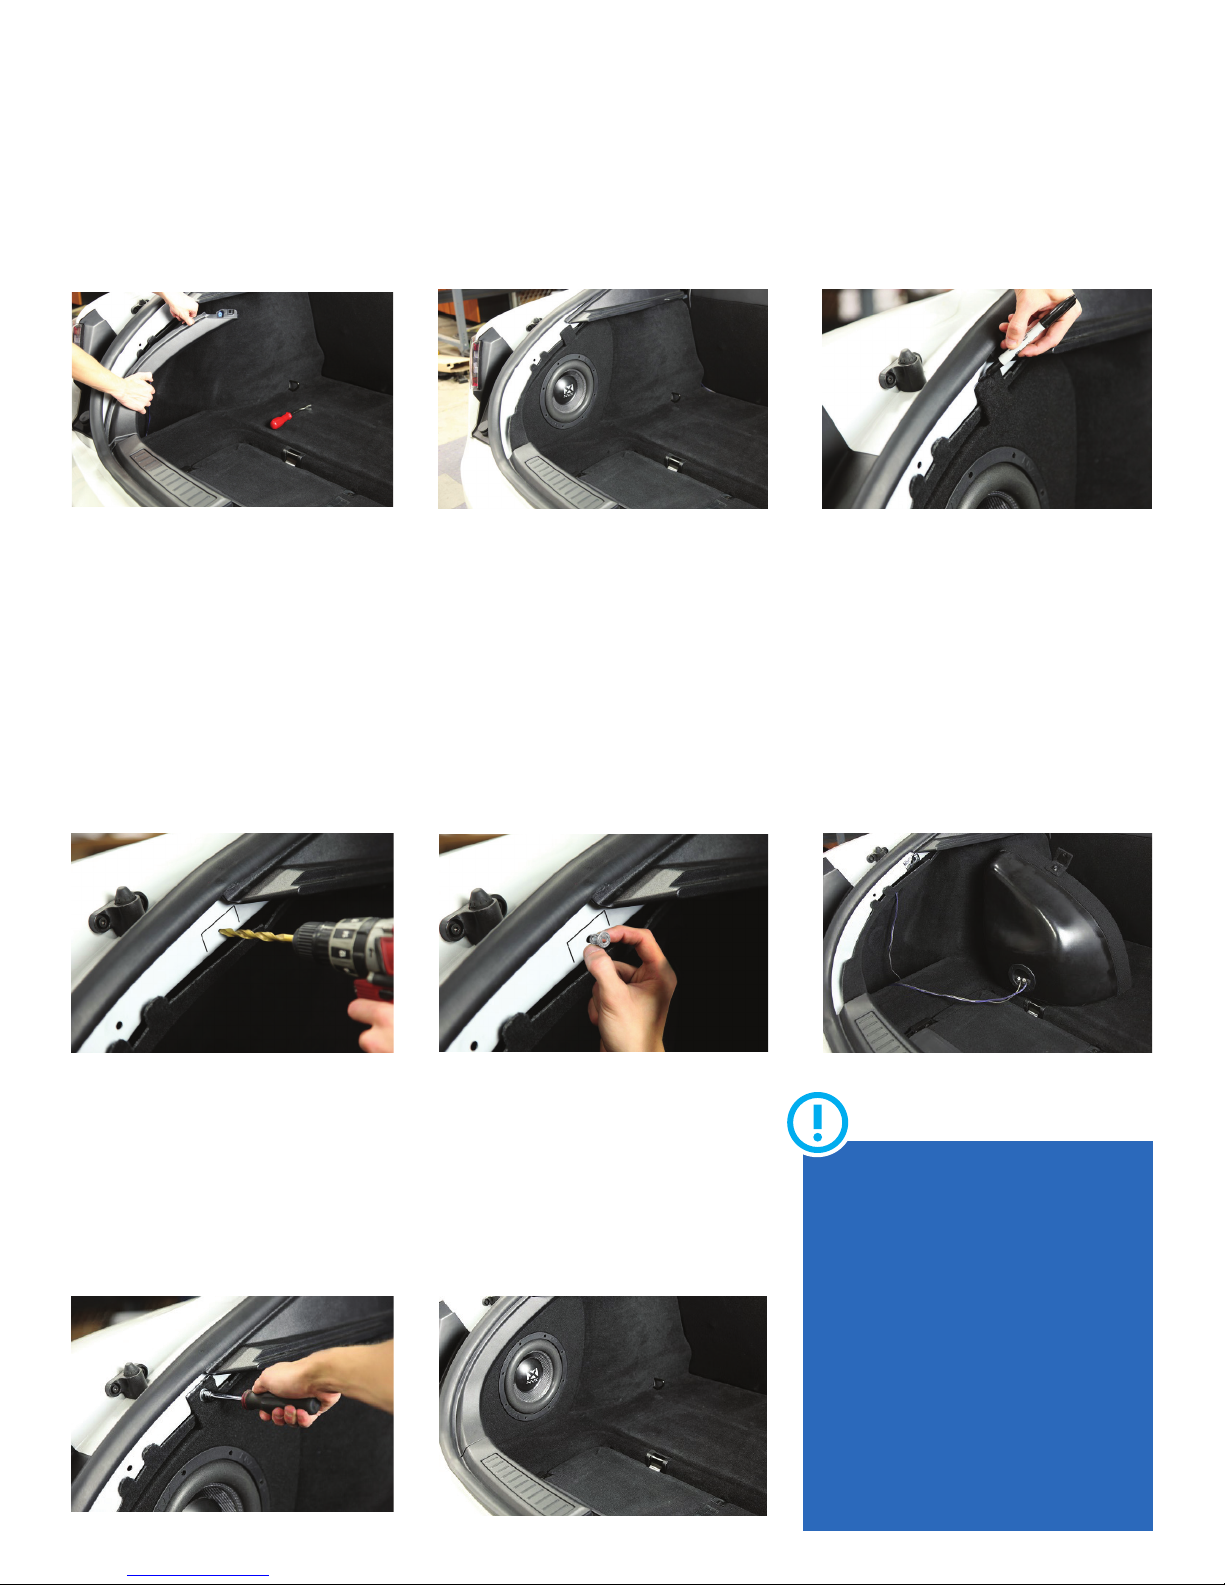
Step 1
Remove upper trim panel using a soft
plastic panel removal tool to prepare
for the installation of the BE-TSLAS-
VCW104.
Step 2
Place the BE-TSLAS-VCW104 enclosure
into the spot as shown. Make sure you
place the bottom of the box in first
ensuring the tab on the bottom is behind
the lip in the cubby.
Step 3
Using a marker outline the shape of the
bracket on the enclosure to the vehicles
metal panel. Also at this time mark the
hole in the center of the bracket which
will be drilled in step 4.
Step 4
Using a center punch mark the center
of the hole you made in step 3. Start by
using a smaller drill bit to create a pilot
hole. Next use a 7/16” drill bit to make
the final hole diameter.
Step 5
Insert supplied Jack Nut into hole that
was created in step 4. Once inserted use
supplied dampening material to cover
the Jack Nut. Using a razor blade cut the
dampening material that is covering the
center hole of the Jack Nut.
Step 6
Connect speaker wires to the terminal
posts making sure the Positive and
Negative speaker wires are connected
to the correct terminal. Once connected
reinstall the BE-TSLAS-VCW104 into its
final mounting location.
Step 7
Using the supplied washer and ¼-20
10mm bolt start threading it into the
now installed Jack Nut. Make sure to
tighten the bolt till the Jack Nut has fully
collapsed. Do not over tighten due the
possibility of stripping the Jack Nut.
Step 8
Once the enclosure has been mounted
reinstall the trim panel following step 1
in reverse. Now it’s time to enjoy you’re
new BE-TSLAS-VCW104!
PMS Version
Blue: PMS 300
Black: PMS Black
Gray: PMS Black 50%