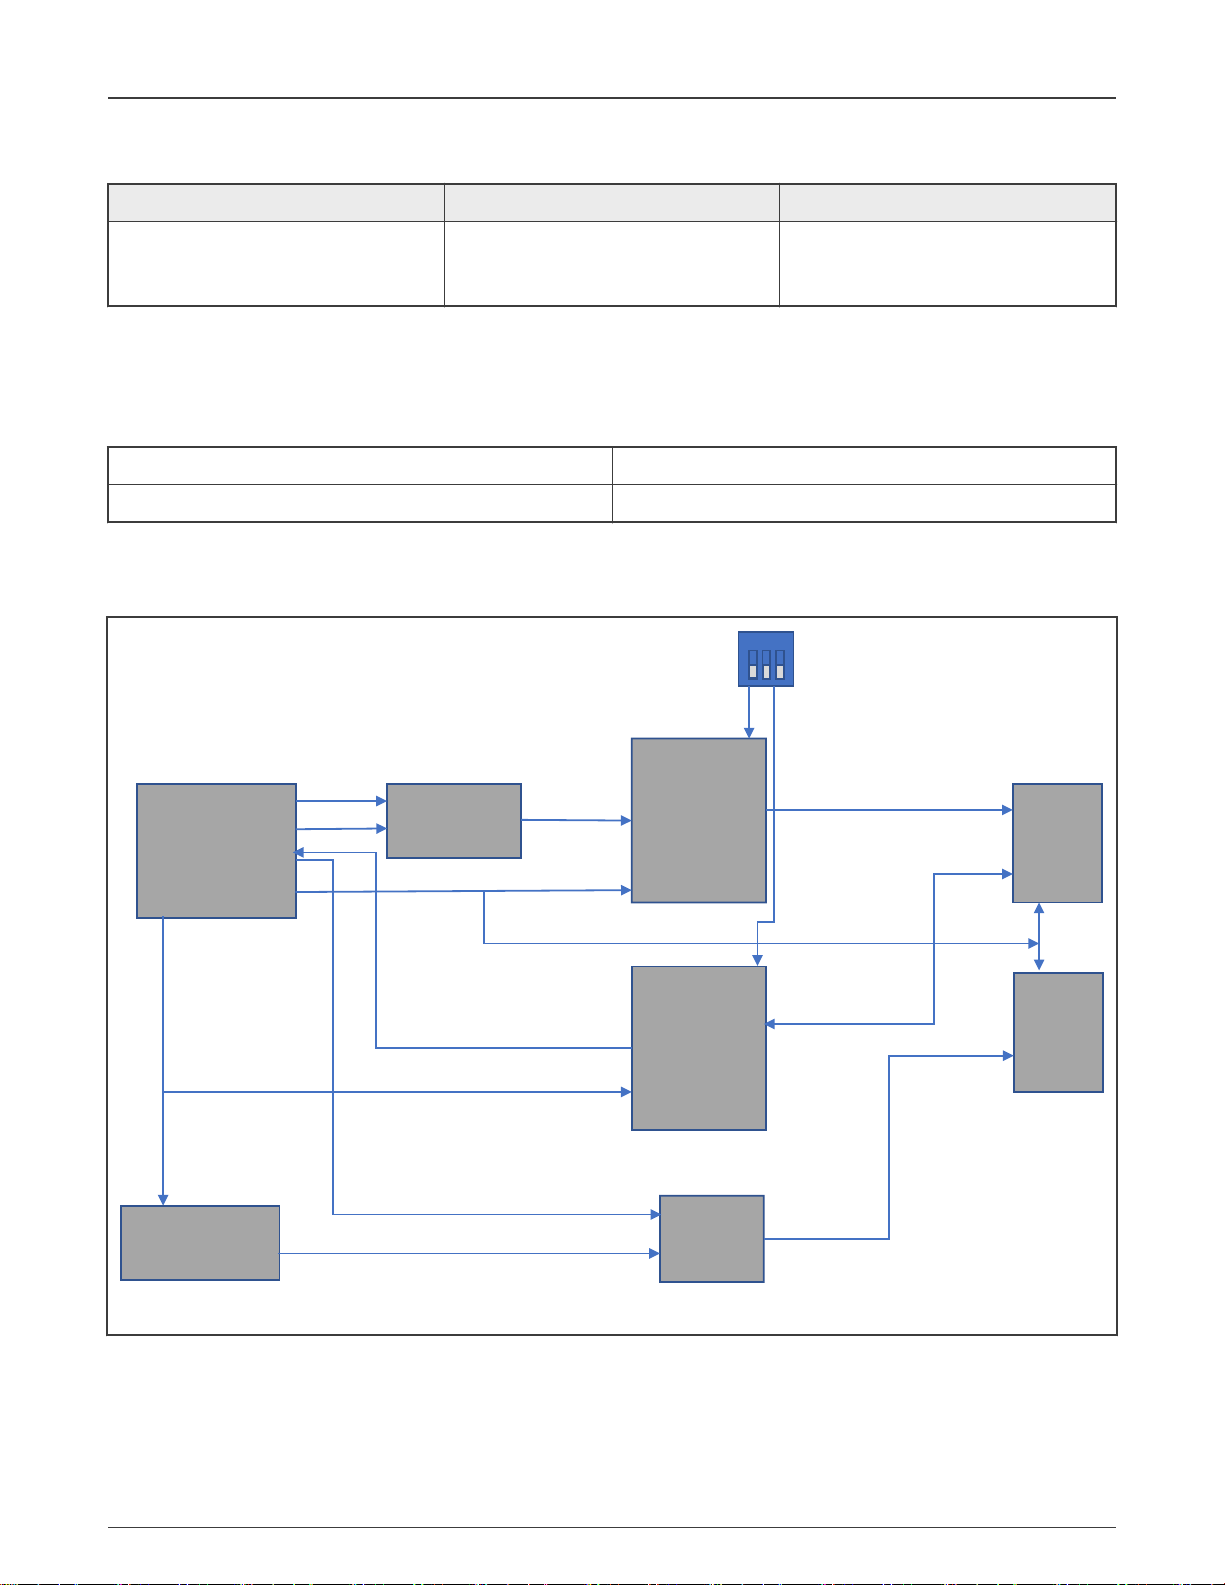
Table 7. Jumpers (continued)
Part
identifier
Jumper type Description Settings
• control the data from
ADG711 (U12) switch
and clock from ADG711
(U16) switch for MIC 3
• control the data from
ADG711 (U18) switch
and clock from ADG711
(U21) switch for MIC 9
• Shorted: Data control and clock control signals for MIC 3
and MIC 9 are low, and MIC 3 and MIC 9 are enabled
J7 1x2 header Used to control the data from
ADG711 (U12) switch and
clock from ADG711 (U13)
switch for MIC 2
• Open: Data control and clock control signals for MIC 2
are high, and MIC 2 is not enabled (default setting)
• Shorted: Data control and clock control signals for MIC 2
are low, and MIC 2 is enabled
J8 1x2 header Used to control the data from
ADG711 (U12) switch and
clock from ADG711 (U13)
switch for MIC 1
• Open: Data control and clock control signal for MIC 1 are
high, and MIC 1 is not enabled
• Shorted: Data control and clock control signal for MIC 1
are low, and MIC 1 is enabled (default setting)
J9 1x2 header Used to control the data from
ADG711 (U12) switch and
clock from ADG711 (U13)
switch for MIC 0
• Open: Data control and clock control signals for MIC 0
are high, and MIC 0 is not enabled
• Shorted: Data control and clock control signals for MIC 0
are low, and MIC 0 is enabled (default setting)
J10 1x2 header Used to control the data from
ADG711 (U15) switch and
clock from ADG711 (U19)
switch for MIC 6
• Open: Data control and clock control signals for MIC 6
are high, and MIC 6 is not enabled (default setting)
• Shorted: Data control and clock control signals for MIC 6
are low, and MIC 6 is enabled
J11 1x2 header Used to control the data from
ADG711 (U15) switch and
clock from ADG711 (U16)
switch for MIC 4
• Open: Data control and clock control signals for MIC 4
are high, and MIC 4 is not enabled (default setting)
• Shorted: Data control and clock control signals for MIC 4
are low, and MIC 4 is enabled
J12 1x2 header Used to:
• control the data from
ADG711 (U15) switch
and clock from ADG711
(U16) switch for MIC 3
• control the data from
ADG711 (U15) switch
and clock from ADG711
(U13) switch for MIC 2
• Open: Data control and clock control signals for MIC 2,
MIC 3, MIC 4, MIC 5, MIC 6, and MIC 10 are high, and
MIC 2, MIC 3, MIC 4, MIC 5, MIC 6, and MIC 10 are
not enabled
• Shorted: Data control and clock control signals for MIC
2, MIC 3, MIC 4, MIC 5, MIC 6, and MIC 10 are high,
and MIC 2, MIC 3, MIC 4, MIC 5, MIC 6, and MIC 10 are
enabled (default setting)
Table continues on the next page...
NXP Semiconductors
Overview
Eight-channel DMIC Board User Manual, Rev. 2, 15 March 2022
User Guide 9 / 25