Nymet WaterMe User manual

User Manual
Wireless Irrigation Controller
www.control-me.net
www.waterme.com.au

2
Thank you for purchasing a WaterMe Wireless Irrigation Controller.
Nymet Australia have designed and manufactured a Wireless Irrigation Controller that is straightforward to install and simple
to use. The WaterMe Wireless Irrigation Controller is capable of up to 10 programmable watering zones that can be controlled
remotely through any device that has internet connectivity. e.g. Smart Phone, Computer or Smart TV at www.control-me.net
Before you use WaterMe please read this installation guide thoroughly to ensure the product is congured and installed
correctly.
Download WaterMe App
To download the WaterMe App please search for‘WaterMe‘ on your mobile device. WaterMe is compatible with both Apple
and Android mobile platforms.
Support
User support is available via [email protected] as well as ongoing product information and updates at
www.waterme.com.au
The contents of this manual will be periodically updated or revised due to product updates. New versions of the WaterMe
Installation/User Guide will be available via visiting www.waterme.com.au/support
Introduction to WaterMe

3
!Note
• NOTE indicates something of importance that should be acknowledged during the installation process
Caution
• CAUTION indicates a hazard in which, if not avoided, could result in damage to your WaterMe Wireless Irrigation
Controller and it not functioning properly, and/or physical human damage
!
iInformation
• INFORMATION indicates additional information, important contents or tips that will assist you in the installation and
set up process.
Please take note of the following symbols as they will ensure successful installation and operation of your WaterMe Wireless
Irrigation Controller.
Once the WaterMe Wireless Irrigation Controller has been connected to a power source, the main indication light will display a
colour representing a connection type.
Type Description
Green Solid Device has established an internet connection and is communicating with the WaterMe
server
Green and Red Flashing Device is in pairing mode. Press conguration button for two beeps.
2 Green and 2 Red Flashing Device is in access point mode. Press the conguration button for three beeps.
Red Flashing Device is looking for the Wi-Fi network
Green Flashing Device is looking for a connection to the WaterMe server
Red Solid Device initialisation
Symbols Explanation
LED Denitions
!Note
• Please note that the WaterMe main status indicator light may ash green intermittently. This is normal.

4
Unpack and Check Components
No. Item Description
1 WaterMe Wireless Irrigation Controller Rear Housing Assembly + Power Adapter (Connected)
2WaterMe Front Housing Front Housing
3 Quick Start Guide Contains the most relevant information in getting WaterMe operational
4Power Adapter (1.5 Metres) 100 - 240V
50/6042, 2A Max
Output = 24V
Power adapter comes connected to the WaterMe controller.
52x Stainless Steel Screws Size: M5
64x Cover Mounting Screws Size: M5
7 2x Wall Plug Size: 7mm x 25mm
81” Flow Sensor 2-100LPM
60˚C Max Temp
Caution
• Only use the equipment supplied by Nymet Australia i.e. Power Pack. Use of non approved components may
result in damage to WaterMe and void the warranty
!
12 3
6 8
4
x2 x4
57
x2

5
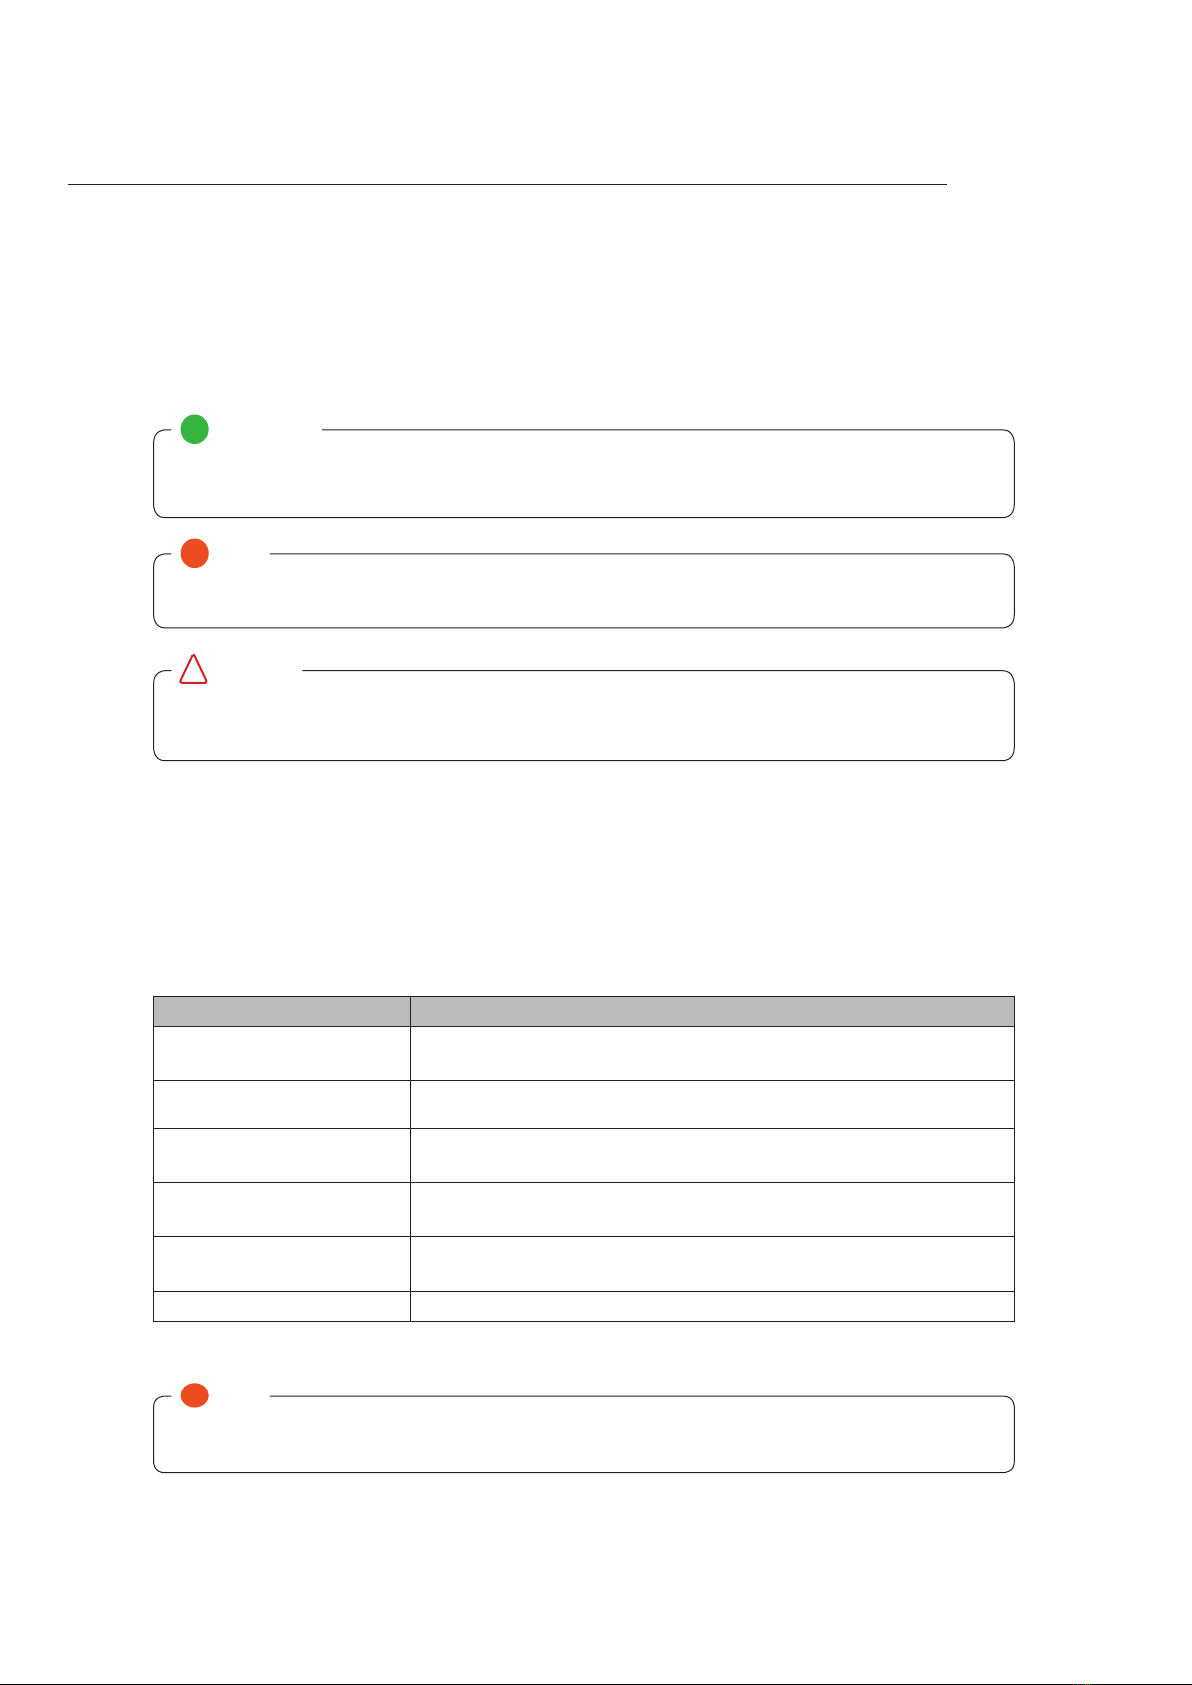
Item Description Desirable Essential
Internal Network Wi-Fi modem connected to your network ü
Internet Browser Chrome, Safari, Internet Explorer, Firefox ü
Smart Phone with Internet Access Please be aware data charges may apply ü
Solenoid Valves Used to control the opening and shutting of sprinklers ü
Flow Sensor (additional sensors are
optional)
1” ow sensor supplied with your controller. The
WaterMe Wireless Irrigation Controller is capable of
supporting up to 3 ow sensor Inputs.
ü
Rain Sensor Detect the presence of rain to alter watering
conditions.
- -
Moisture Sensor Moisture sensor detects moisture in the air to determine
whether watering is necessary
- -
Screw Driver (3mm Blade Flat Head) Connecting valve wires to the controller ü
Screw Driver (Phillips Head) Mounting the controller to a wall ü
Before proceeding please ensure that you have the following items available to successfully install and connect your WaterMe
Wireless Irrigation Controller.
Pre-Installation Setup
Minimum Checklist Required for Operation
The following checklist are the minimum items required for WaterMe to operate. Further information regarding checklist items
are described in detail throughout this technical user guide.
Item Desired Essential
WaterMe connected to the network by Wi-Fi ü
Flow sensor installed ü
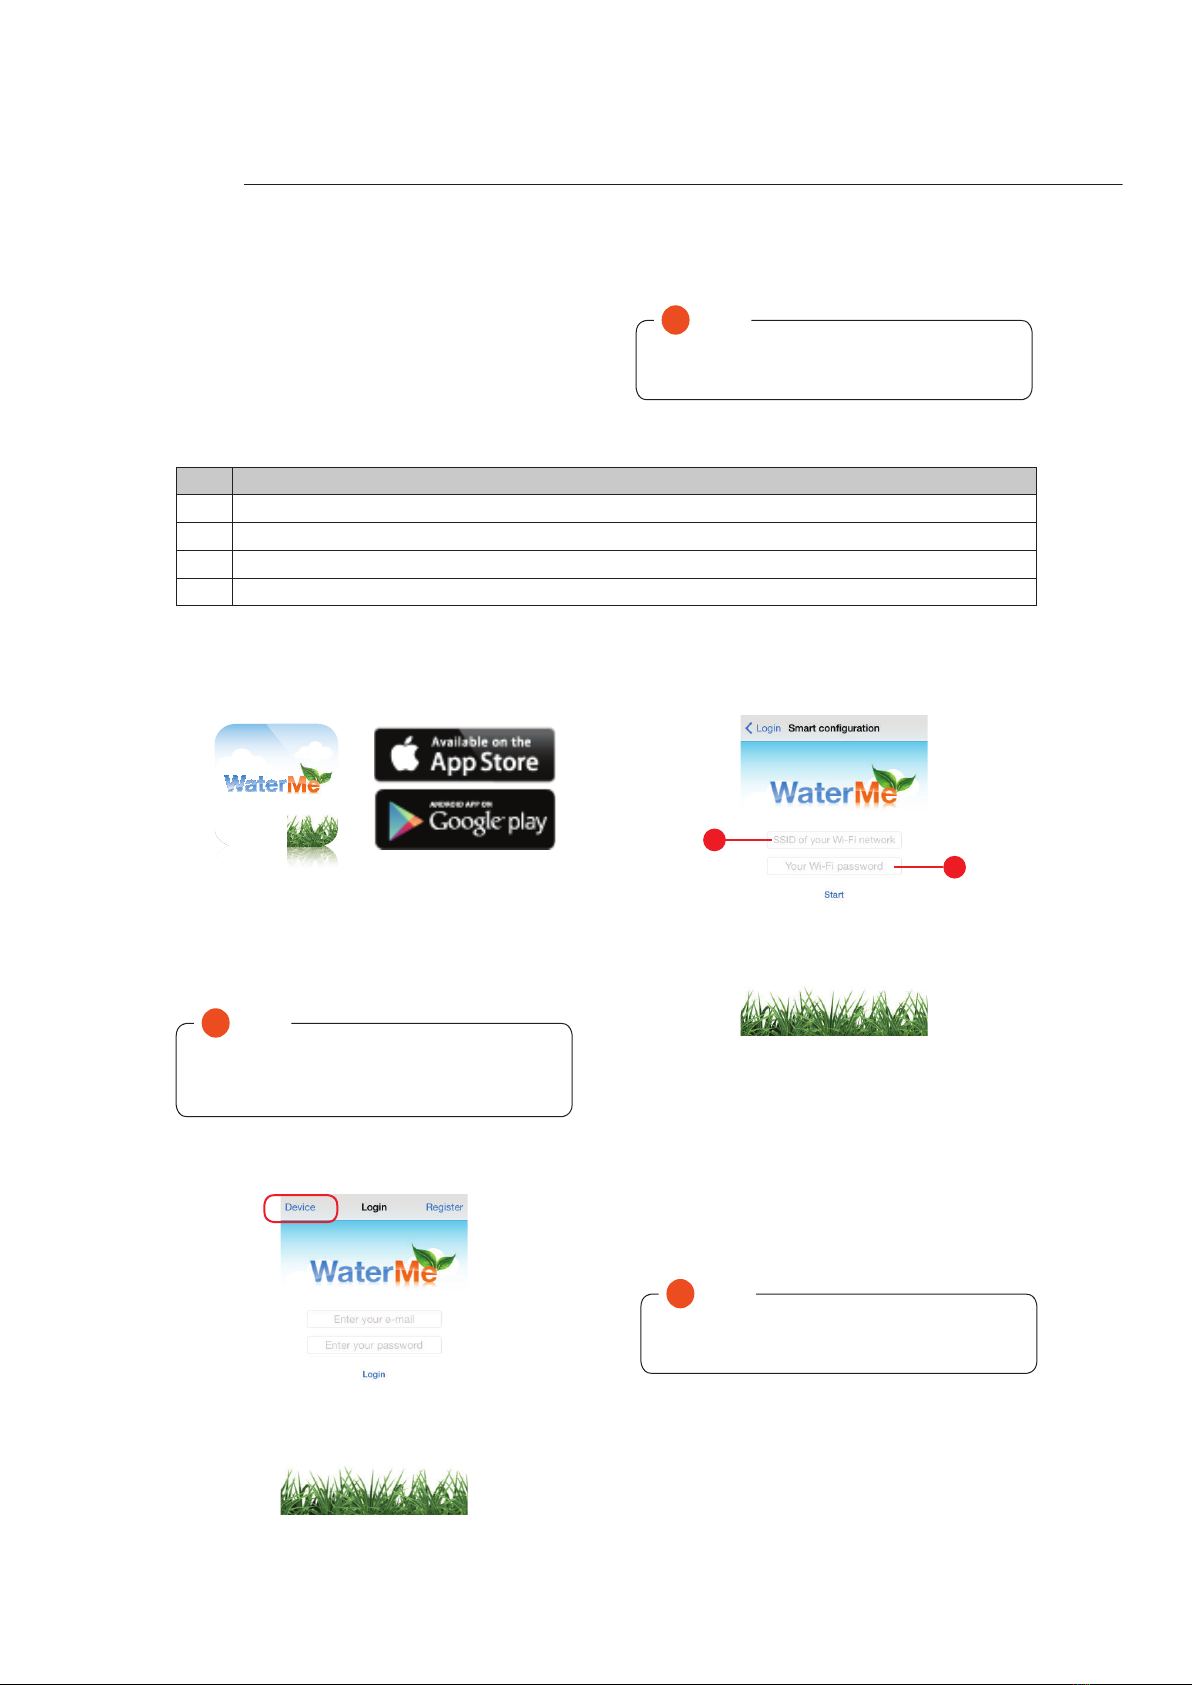
WaterMe App downloaded from Apple App Store or Google Play ü
WaterMe activated and registered on the WaterMe Server ü
Must see green connection icon on the summary screen (mobile app only) ü
Flow calibrated for all zones (if ow sensor is installed) ü
Selecting time zone setup for device ü
Rainfall parameters established ü
AC or DC latching connection established ü
Default action set up for alarms ü
Setup master valve delay time ü
Setup zone delay time ü
All solenoids and sensors have been connected ü
Zones setup for operation ü

6
Contents
Section 1.0 How does WaterMe Operate 7
1.1 WaterMe Wireless Irrigation Controller 8
Section 2.0 Connection to the Internet 9
2.1 Connecting via Wi-Fi through your Mobile Phone 10
2.2 Register WaterMe Via your Mobile Phone 12
2.3 Connecting via Wi-Fi through your Personal Computer 13
2.4 Register WaterMe via your Personal Computer 15
Section 3.0 Determine the Installation Location 17
3.1 Installation Types 18
3.2 Making an Incision in the Grommet 19
3.3 Mounting the WaterMe Wireless Irrigation Controller 20
Section 4.0 Connecting the Valve and Sensor Wires 21
4.1 Connecting Wires to the Terminals 24
Section 5.0 Mounting the Front Housing 25
Section 6.0 Flow Sensor - Installation and Connection 26
6.1 Additional Sensors - Installation and Connection 28
Section 7.0 Website Navigation and Operation 29
7.1 Weather Schedule 36
7.2 WaterMe Flow Calibration 39
7.3 Deleting your WaterMe Account 40
Section 8.0 Mobile App Navigation and Operation 41
8.1 WaterMe Flow Calibration 46
8.2 WaterMe App Conguration 47
8.3 Push Notications 51
8.4 Weather Schedule 52
Section 9.0 Troubleshooting 55
Section 10.0 Exclusions of Liability 56

7
Server
The WaterMe Wireless Irrigation Controller is connected to the WaterMe Server by wireless connection to your wireless internet
modem/router. The diagram below provides an example of how the WaterMe Wireless Irrigation Controller connects to the
WaterMe Server and can be controlled through your computer or mobile phone. In most cases the controller is connected to the
network via a Wi-Fi connection.
No. Item Description
1. WaterMe Wireless
Irrigation Controller
The WaterMe Wireless Irrigation Controller is connected to the network via Wi-Fi.
2. Computer WaterMe can be controlled and monitored by any computer at any location providing
there is a connection to the internet.
3. Smart Phone (e.g. iPhone
or Android Platform)
WaterMe can be controlled and monitored by a smart phone (Apple and Android
supported) at any location in the world providing there is an internet connection.
4. Modem A modem provides WaterMe with a connection to the internet. This is required for
WaterMe to communicate with the WaterMe Server allowing remote management of
your irrigation system.
5. Internet An internet connection provides the mode of communication between the WaterMe
controller and your smart phone or computer.
6. WaterMe Server The WaterMe Server holds all of your irrigation information, schedules and settings. The
Server allows you to control WaterMe remotely from any location from your smart phone
or computer providing there is an internet connection.
1
2
3
4
5
6
How does WaterMe Operate
SECTION 1.0

8
Me
The WaterMe Wireless Irrigation Controller can be controlled and monitored from any location by logging into www.control-me.
net on a computer or through the WaterMe App which is available from the Apple App Store and Google Play (the WaterMe App is
compatible with both Apple and Android devices).
External Top View
No. Item Description
1. Main Status Light Indicates that WaterMe has power to the device
2. Zone Indication Lights Indicates which zone is operational
3 Power Connection Outlet Outlet for the power supply
4. Cover Screw Holes Used to secure the top cover to the base
5. Standard Wire Conduit Standard installation with wire extrusion at the bottom of the device
Internal Top View
No. Item Description
1. Main Status Light Indicates that WaterMe has power to the unit
2. Zone Indication Lights Indicates which zone is currently active
3 Terminal Inputs Solenoid wire connection points
4. Sensor Inputs Inputs for ow sensor and optional rain and moisture sensor
5. Wireless Antenna Allows wireless connection to an internet Wi-Fi modem
6. Power Connection Point Connection point for the power supply
7. Smart Wire Conduit Rear conduit allows solenoid wires to extrude from the rear of the unit
8. Wall Mount Screw Holes Used for installation of the WaterMe unit
9. Standard Wire Conduit Standard installation with wire extrusion at the bottom of the unit
10. Smart Conguration Button Used to congure a Wi-Fi connection using your SSID & password
External Top View Internal Top View
1
2
345
1
2
34
5
6
7
8
9
SECTION 1.1
WaterMe Wireless Irrigation Controller
11
10

Pairing mode is used in conjunction with the smartphone
app. Input of the SSID and password will prompt a pairing
between your network and the WaterMe unit. Once a
connection is established, the unit will be controlled via
the smartphone app as long as a stable internet signal is
maintained between WaterMe and your network.
Access point mode can be used if conguration is to
be achieved uisng a Wi-Fi enabled PC, or if there are
incompatibility issues with your router and pairing mode is
unsuccessful. This method of conguration displays all Wi-Fi
routers in range, allowing your network to be selected and
connected to.
Option 1: Pairing Option 2: Access Point Mode
9
The WaterMe Wireless Irrigation Controller requires a connection to the internet to allow remote access from your smart phone,
computer or any device with an active internet connection. This connection can be established via a Wireless connection through
an ADSL/Wi-Fi modem. You must ensure that the WaterMe Wireless Irrigation Controller is connected within range of your Wi-Fi
modem. The range of Wi-Fi signal will vary depending on the model of your wireless modem and interference from nearby
objects. As a general rule you will be able to achieve line of sight distances of around 50 metres. The WaterMe unit requires input
of your network SSID and password. There are two ways to achieve this: pairing and access point mode.
!Note
• Please ensure that your modem is Wi-Fi capable (802.11b/g).
• WaterMe operates with a 2.4 GHz or dual band router. If connection is unsuccessful, please check that your
router matches these specications.
SECTION 2.0
Connection to the Internet

10
4. Enter the required information on the smart
conguration page.
Description:
1. Enter the SSID of your Wi-Fi network: This is the
name of your home network that would have been
allocated during initial setup of your Wi-Fi modem.
2. Your Wi-Fi password: This password is unique to
your home Wi-Fi network and would have been
allocated during initial setup of your Wi-Fi modem.
SECTION 2.1
Connecting via Wi-Fi through your Mobile Phone
To congure WaterMe from your mobile phone please ensure you have the following available:
No. Item
1 WaterMe Wireless Irrigation Controller
2Connection to a power supply
3 2.4 GHz or dual band capable router
4 Internet capable mobile phone (Apple or Android operating platform)
1. Download the WaterMe app to your mobile phone
by searching for‘WaterMe’ in the App Store (Apple) or
Google Play (Android).
2. Open the WaterMe App from your mobile phone.
• From the WaterMe app you are able to pair your
WaterMe device to your home Wi-Fi network.
3. Press the ‘Device’ button.
!Note
• Please do not press‘Start’ at this point.
2
1
!Note
• Please note that your mobile device must be
connected to your Wi-Fi network, not 3G/4G
Pairing Method !Note
• It is advisable that you wire your WaterMe unit
AFTER all software conguration is complete

11
6. To put WaterMe into pairing mode press and hold
the smart conguration button until 2 beeps sound
(approximately 3 seconds ). The WaterMe main status
light will begin to ash in green and red intervals. This
indicates that WaterMe is now in pairing mode.
• Once WaterMe is in pairing mode, go back to the
WaterMe app on your mobile device.
7. Press‘Start’ on the smart conguration screen
containing information relating to your home Wi-Fi
network. The pairing function will share your network
information with the WaterMe controller.
• After approximately 30 seconds, the WaterMe unit will
restart.
8. If successful, the main status light on your WaterMe unit
will remain solid green. If the indicator light does not
remain solid green, then refer to the access point mode
conguration.
!Note
• Initially the main status light will ash red until
it establishes a connection. When a connection
has been established the main status light will
remain solid green.
5. Once the information has been entered ensure
that your WaterMe Wireless Irrigation Controller is
connected to a power source and you have the top
cover removed. Once connected, the main status light
will ash red indicating a network connection needs
to be established. After approximately 30 seconds, the
unit will beep once, indicating that WaterMe has been
initialised and is ready to be used.
1
2
Description
1. Smart conguration button
2. Main status indicator light

12
2. Enter your information in the required elds on the
registration page.
1. Enter your rst name
2. Enter your last name
3. Enter your email address
4. Enter a chosen password
5. Repeat password for conrmation
6. Enter the license number of your device (this
number is found on the WaterMe internal housing)
7. Register submission button
1. Access the WaterMe app from your mobile phone. From
the main menu screen press‘Register’.
Register WaterMe via your Mobile Phone
To complete the activation process you must register your WaterMe device on the WaterMe server to function. The
registration process is simple and can be completed via your mobile device. Once WaterMe is registered you are able to login
to the app using your email address and chosen password.
SECTION 2.2
4
6
2
1
3
5
1
7

13
Connecting via Wi-Fi through your Personal Computer
Access Point Mode Method
To congure WaterMe from your personal computer please ensure you have the following available:
No. Item
1 WaterMe Wireless Irrigation Controller
2 Connection to a power supply
3 2.4 GHz or dual band capable router
4 WiFi enabled PC (Windows or Macintosh operating system)
1. Before attempting to congure your WaterMe device
using the access point mode, ensure that you rst turn
o your device. This will ensure that WaterMe scans for
all available networks.
• Once the WaterMe unit is switched o, wait until the
indicator light extinguishes and all power has stopped
owing through the device.
• Switch the unit back on and wait for one beep to sound
(approximately 30 seconds). This will indicate that the
device has initialised and is ready to be used.
!Note
• If you did not hear three beeps sound, or the
main status indicator light does not ash,
please switch o the device and start the
process again to enable reinitialisation
3. When you enter access point mode, a new Wi-Fi
network will become available. The network is called
Waterme.
• Searching for availble networks can be done by select-
ing the internet status bar near the time and date of the
bottom toolbar of a PC, or in the settings function of a
mobile phone.
4. Connect to the Waterme network using the password
12345678.
SECTION 2.3
1
2
2. Press and hold the conguration button until three
beeps sounds (approximately 5 seconds). Once the but-
ton is released, the main status indicator ligt will ash
two red and two green repeatedly. The device is now in
access point mode.
Description
1. Smart conguration button
2. Main status indicator light

14
5. Open a new web browser and type 192.168.1.1 into
the address bar. This will display a table of Wi-Fi routers
in range. Select the SSID associated with your Wi-Fi
network and enter the password in the PassKey section
in the box below.
6. The submit button will restart the WaterMe controller
prompting it to attempt to join the selected network.
7. Once the controller has connected to the server, the
main status indicator light will show solid green and the
device is now ready to be registered.
!Note
• You can manually enter the SSID if you wish
• The WaterMe controller will only scan for
networks once

15
Register WaterMe via your Personal Computer
To complete the activation process you must register your WaterMe device on the WaterMe server to function. The registration
process is simple and can be completed via your personal computer. Once WaterMe is registered you are able to login to the
website using your email address and chosen password.
SECTION 2.4
1. To register your device, access the web interface via
http://www.waterme.com.au and select ‘Sign into your
WaterMe Account’ at the top right hand corner of the
page.
2. The www.control-me.net landing page gives you the
option of registering your WaterMe Wireless Irrigation
Controller. Enter all the required information into the
‘New to WaterMe? Register Now’ section. This will gain
you access to the rest of the website.

16
Name Description
SSID/Network Name Your wireless network name, this could also be referred to as an SSID
Password (Network Key) You unique identication key to your wireless network. The password could also be
identied as a security key, encryption key and network key
Encryption Type Ensure that you know your correct encryption type of your home network (e.g. WPA,
WPA, WPA2, Open)
If you don’t know the above information you will not be able to connect your WaterMe Wireless Irrigation Controller to your
Wi-Fi network.
How to nd this information
Review the documentation provided with your Wireless modem
If you don’t know the above security information, please consult the modem manufacturer, your system administrator, or
internet provider.
!Note
• Please do not contact Nymet Australia without your wireless security information. We cannot assist you in locating
your network settings
Wi-Fi Terminology

17
1. Install WaterMe in an accessible area able to be
connected to a power source, sensors and solenoids.
The WaterMe Wireless Irrigation Controller is designed for outdoor installation but it is recommended to be installed in a semi
protected location e.g. under eves to avoid direct sunlight contact or exposure to harsh weather such as hail and rain. Please
follow the steps below to ensure correct installation of your device as this will ensure maximum life and performance for your
controller.
Caution
• Do not install the WaterMe Wireless Irrigation Controller in direct sunlight or exposed to weather conditions such
as rain, hail or strong wind
!
!Note
• Mains power must be available within 1.5 metres (5 feet) from the WaterMe Wireless Irrigation Controller
iInformation
• The WaterMe Wireless Irrigation Controller has an IP Rating of IP44
x
x
Determine the Installation Location
SECTION 3.0
Installation Recommendations
It is recommended that WaterMe is installed under an eve
protecting it from harsh weather conditions. This will ensure
a greater service life.
• It is suggested that WaterMe is installed vertically
with the bottom wire conduit facing the ground. This
will help avoid any potential liquid ingression into the
device.
• Secure WaterMe to the wall with adequate space
surrounding the device.
ü

18
It is recommended that the WaterMe is installed with the bottom wire conduit facing the ground. WaterMe is uniquely designed
to oer two installation types that provides access for both front and rear wire extrusion.
Option 1: Standard Installation
The WaterMe Wireless Irrigation Controller has a wire conduit
at the bottom of the device for valve wire extrusion. The
controller has provisions for PVC pipe installation to provide
protection from the wire conduit (optimal 32mm PVC pipe -
not included).
Wire Output
(PVC Pipe Installation - optional)
Wall
Installation Types
Option 2: Smart Installation
Wall
Wire Extrusion
Rear Conduit
The WaterMe Wireless Irrigation Controller is intelligently
designed to be capable of wire output at the rear of the
controller. This type of installation allows for the option of
hidden wires and power output at the rear of the controller.
An extrusion point will need to be made in the supporting
wall for the valve wires to pass through. This extrusion
point needs to be made prior to installation of WaterMe
iInformation
• Smart installation requires a wire entry to be
made in the wall of the mounting location
SECTION 3.1

19
1. To create an opening in the silicon grommet ensure that WaterMe is on a secure surface.
2. Make an incision with a sharp object and carefully push against the plastic to allow for an opening for the wires to exit.
Apply pressure carefully and release pressure once an opening has been made.
Standard Installation grommet incision Smart Installation grommet incision
The sensor and valve wires are required to exit the controller via the bottom or rear grommet. The silicon grommet needs
to be cut to allow the sensor and valve wires to exit the controller. The WaterMe Wireless Irrigation Controller has two wire
grommets, one at the base of the controller for standard installation and one at the rear for smart installation.
The following process outlines the recommended method to make an incision and create an opening in the grommet.
For this process you will need the following:
Item Type
1 WaterMe Wireless Irrigation Controller
2 Sharp utility knife
Caution
• To minimise water ingression ensure that the opening is not oversize but large enough to allow wires to pass
through. If the unit is installed where there is a possibility of water ingress, it is advisable to seal the grommet
area with a suitable silicone sealant.
!
Making an Incision in the Grommet
SECTION 3.2

20
1. Place the WaterMe Wireless Irrigation Controller into position on the wall and insert screws through the installation wall
mount holes.
2. Turn the screwdriver to the right to tighten the screws.
For this process you will need the following:
No. Item
1 WaterMe Wireless Irrigation Controller
22x Wall mounting stainless steel screws
3Screw driver (not provided)
Caution
• For Standard and Smart Installation ensure that the controller is placed in the correct upright position with the
main wire outlet at the bottom as previously mentioned in Section 4: Determine the Installation Location
!
!Note
• O-rings are supplied in the screw mounting holes. Please ensure that these O-rings have not fallen out.
1
3
Mounting the WaterMe Wireless Irrigation
Controller
1
2
SECTION 3.3
Description
1. Installation wall mount holes
2. O-rings
3. Use a screwdriver to tighten the screws in place
Table of contents
Popular Controllers manuals by other brands

TINY
TINY TNC-M14-CNC Operation manual

Evco
Evco c-pro 3 micro AHU Hardware manual

Bosch
Bosch rexroth CHC instruction manual

Watts Industries
Watts Industries MS12832 Installation and user guide

Altinex
Altinex Wireless Touchscreen Controller CP451-008 user guide

Simons Voss Technologies
Simons Voss Technologies SmartRelais 2 quick guide