nystrom AcousticMAX SVX Instruction manual

1
©2020
Nystrom, Inc.
Rev 8/2020
Installation, Operation
+ Maintenance Manual
AcousticMAXTM Smoke Vent
Model(s): SVX/SVY
GENERAL DESCRIPTION
Acoustical smoke vents are designed to open automatically to provide
emergency smoke and heat ventilation. Prompt venting in case of fire
is essential for the safe evacuation of occupants and for effective fire-
fighting conditions within a building. The smoke vent is not intended
for use as general-purpose building ventilation devices. International
Building Code (IBC) requires smoke venting in a variety of applications
including; Section 410 for stages and platforms, Section 910 for factory
and storage occupancies.
Acoustical smoke vents are primarily used in theaters and performing arts centers because they block the
intrusion of exterior environmental noise. Acoustical smoke vents provide both sound control and thermal
performance The BSVX and BSVY is sound rated STC48/OITC 36 and the SVY is rated STC50/OITC 39.
The STC50 provides ultimate sound control and a total R-14 thermal resistance for superior thermal
performance. The STC50 sound rated series meets International Building Code IBC 1207 sound transmission
class requirements and is used in high end theater applications as well as in building applications where
condensation is a concern.
Sound transmission is tested by an independent lab accredited by the U.S. Department of Commerce and
the National Institute of Standards and Technology for conducting official acoustical test procedures for
sound transmission class (STC) and Outdoor-Indoor Transmission Class (OITC) according to the following
tests;
•ASTM E90 Laboratory Measurement of Airborne Sound Transmission of Building Partitions
•ASTM E1332 Standard Classification for Determination of Outdoor-Indoor Transmission Class

2
©2020
Nystrom, Inc.
Rev 8
/2020
Installation, Operation & Maintenance
AcousticMAX Smoke Vents
Model(s): SVX/SVY
Introduction + Safety
Please read the complete instructions carefully before beginning any work. To ensure proper
installation and performance of the roof hatch the following actions must be completed by the
installing contractor. Failure to do so will affect product warranty.
Transportation + Storage
oInspect all shipments and materials for missing or damaged components and hardware.
oMaterial must be stored in a clean, dry location.
INSTALLATION
The following is a general instruction for installing, operating and maintaining smoke vent products. These
are recommended general guidelines only. Locally accepted roofing and sealing practices and procedures
should be followed as appropriate for the different roofing systems. This product may be installed on a
flat or sloping roof. When installed on a slope up to 7:12 pitch (30˚), the hinge side must run parallel with
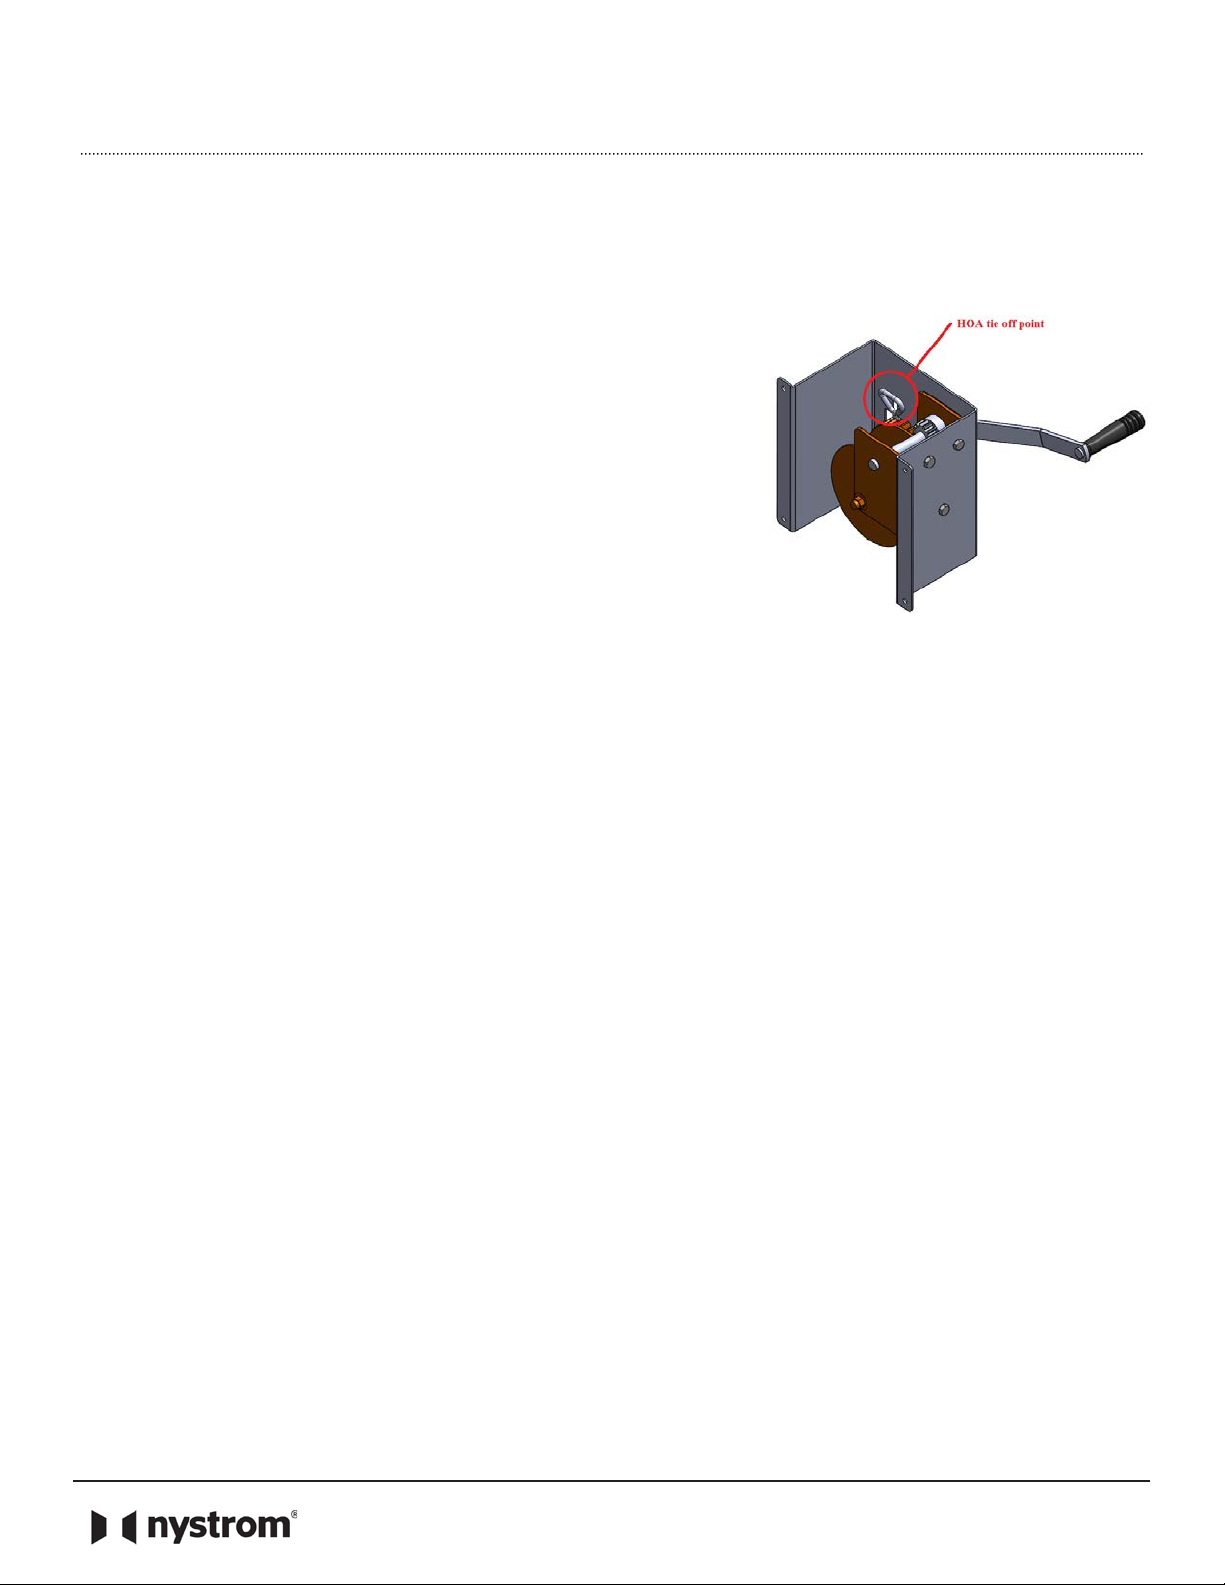
the slope. CAUTION: smoke vent doors are under spring pressure.
1. Ensure that the roof mounting surface is level to avoid twisting of the smoke vent base. It is essential
that the vents are installed level and square for the door to make a proper seal. Place the smoke vent
over the existing opening in the roof that has been prepared with appropriate roofing membrane, if
applicable.
a. The roof rough opening dimensions are equal to the vent dimensions as measure from the
inside curb to inside curb. For example, a 48” x 96” smoke vent will have a roof rough opening
of 48” by 96”.
2. The smoke vent curb flange comes with two (2) types of mounting holes to accommodate the
following fastening methods
a. Mark the pre-drilled 5/8” diameter holes from the mounting flange through to the roof deck or
a concrete curb. Drill roof deck or concrete curb for installation of anchors or other fasteners
(provided by others). Bolt or otherwise fasten roof hatch curb flange to roof deck using 3/8” or
½” bolts with washers.
GENERAL SAFETY PRECAUTIONS
Improper selection, installation, or use can cause personal injury or property damage. It
is solely the responsibility of the user, through its own analysis to select products suitable for their specific application
requirements, ensure they are properly maintained, and limit their use to its intended purpose. Follow proper local,
state and federal regulations for proper installation and operation requirements.

3
©2020
Nystrom, Inc.
Rev 8
/2020
Installation, Operation & Maintenance
AcousticMAX Smoke Vents
Model(s): SVX/SVY
b. Mark the pre-drilled 3/16” diameter holes from the mounting flange through to the roof deck,
typically into a built-up wood fame curb. Fasten roof hatch curb flange to faming using roofing
nails and/or screws, recommended size #10 by 1-1/4” long.
3. Install roofing material up to and around the roof curb, up under the counterflashing, using
appropriate roofing material and locally accepted processes. Ensure all joints are fully sealed to provide
a weather tight seal.
4. Finally, check operation by opening the smoke vent doors by pulling the exterior manual pull handle.
Closing the doors may require two people to ensure proper latch engagement.
OPERATION
•Vents are designed and built for years of dependable service. Smoke vents do not require field
painting. If field painted, all component parts must be masked, especially moving parts and all labels.
Field painted component parts will void the warranty.
•Latch: Positive hold rotary latches are designed to hold the covers closed.
•Gas Spring/Damper: Provides force to automatically open covers.
•Hold Open Arm: Automatic hold open arm engages to keep doors locked open when released.
Pull the redPolypropylene grip handle forward to disengage, while safely closing the door(s).
•Link: Fusible melt out links are replaceable (SV-KIT-LINK-165, SV-KIT-LINK-280, etc.)
Smoke vents are designed to open manually via pull handles located on the exterior and interior of the
smoke vent. The internal pull cable can be extended and rigged down to the floor level to assist with
emergency vent opening.
1. Smoke vents are designed to open thermally when a UL listed fusible link melts at temperatures of
165˚F, 212˚F, 280˚F, 350˚F, 360˚F, 370˚F, 386˚F or 450˚F. Fusible links are easily accessed from the roof
for replacement, as detailed.

4
©2020
Nystrom, Inc.
Rev 8
/2020
Installation, Operation & Maintenance
AcousticMAX Smoke Vents
Model(s): SVX/SVY
2. OPTION: Electrical Belimo Actuator
Smoke vents can include an option to open electrically with a
low voltage (24VDC/AC) or High Voltage (110VAC/220VAC) at
2.5Watt signal. The electrical option is ideal to coordinate vent
opening with a fire alarm, smoke detector, sprinkler system or
other.
Smoke vent covers are closed manually from the exterior roof top
level. Make sure to disengage the hold open arm prior to closing
the doors.
Acceptance Testing
An acceptance performance test and inspection of all vents shall be conducted immediately following
installation to establish that all operating mechanism functions properly. Vents should be operated in
accordance with the authority having jurisdiction (AHJ).
Test for proper operation using one or more of the following methods.
1. Manual pull handles: Pull the manual pull handle from the exterior of the smoke vent. Pull the
internal manual pull handle, if it has been routed down to the floor level.
Belimo

5
©2020
Nystrom, Inc.
Rev 8
/2020
Installation, Operation & Maintenance
AcousticMAX Smoke Vents
Model(s): SVX/SVY
2. Fusible link: Melt the fusible link from the inside at the smoke vent level using a hand-held propane
tank torch. Make sure to have replaceable fusible links on hand in order to reset the latch and close
the doors. An alternative method is to remove the fusible link to simulate melting to verify that the
smoke vent would indeed open.
3. Optional electrical Belimo actuator: Send an electrical signal from the fire alarm, push button control,
or other to validate electrical fire system performance.
MAINTENANCE
•Vents should be manually operated once a year to inspect, maintain and replace components as
necessary.
•Inspect fusible links for evidence of corrosion, stress/strain or build up. Clean or replace as required.
•Non-moving parts can be cleaned with a mild soap or dishwashing detergent and water solution.
•Gaskets can be cleaned with a clean, damp, lint-free cloth. Do not apply mineral oils, vinyl dressings, or
other lubricants to the gasket as they can cause the gasket to break down over time.
Fusible link ambient temperature rating
The fusible link should be specified with a temperature rating greater than the maximum ambient
exposure temperature that will be seen at the installation. For example, an “ordinary” fusible link rated at
165 degrees F has a maximum ambient exposure temperature rating of 100 degrees F. If this fusible link is
routinely exposed to ambient temperatures over 100 degrees F, it is liable to separate. Select a fusible link
rated at 212 degrees F (or greater) for this type of application. See table below to find a fusible link
temperature range compatible with an expected or measured ambient temperature. This is in accordance
with UL guidelines.

6
©2020
Nystrom, Inc.
Rev 8
/2020
Installation, Operation & Maintenance
AcousticMAX Smoke Vents
Model(s): SVX/SVY
OVERVIEW- MANUAL WINCH OPTION
Smoke vents with manual winch remote operation provide are designed with the additional convenience of
opening and closing the smoke vents from a remote location, such as the catwalk or floor level.
Manual Winch Operation
Open Smoke Vent with Manual Winch
1. Pull manual release cable to release the rotary latch in the smoke vent
2. Unwind manual winch to fully open smoke vent doors
Close Smoke Vent with Manual Winch
1. Move lever to the downward position to disengage the locking hold open arm
2. Wind the manual winch till the vent rotary latches engage to secure covers closed
3. Return the lever to the upward position
Smoke Vent covers also open when activated by the following methods: Reset at roof level is required.
•Thermal: Release by heat with fusible link.
•Manual at Roof: Pull external manual release cable.
•Optional Electrical: Released by 2.5W Belimo actuator when energized to 24V or 110V.
Reset at Roof Level
1. Feed out a minimum of 14’ of cable at lower winch to create slack.
2. At upper winch remove spent fusible link from the system by removing the retaining lock nuts.
Reseat the spring attached to the lever arm to the winch housing. Pull the lever arm up, bring the
two screws close enough to set the new fusible link in place and secure with the retaining lock
nuts. (only if thermally released).
3. Flip the ratchet at upper winch up to the engaged position.
4. Wind upper winch until the cable in taught.
5. The thermal release is now reset and the vent can be winched closed by lower winch.

7
©2020
Nystrom, Inc.
Rev 8
/2020
Installation, Operation & Maintenance
AcousticMAX Smoke Vents
Model(s): SVX/SVY
Installation Instructions for Manual Winch
1. Once the smoke vent has been roofed in and is fully installed the Manual Winch option can be set up
to operate the doors to open and close.
2. Determine the desired location for the floor level winch (shipped loose) and mount it to a suitable
structure.
3. Rig the 1/8” manual winch cable, 1/16” HOA cable, and 1/16” manual release cable down to the floor
level winch. (All three cables should be coiled on the interior side of the unit)
4. Attach and wind the 1/8” cable taught onto the floor level winch.
Figure A – Cable Termination for Floor Winch

8
©2020
Nystrom, Inc.
Rev 8
/2020
Installation, Operation & Maintenance
AcousticMAX Smoke Vents
Model(s): SVX/SVY
5. Open the smoke vent by pulling the interior manual release (now rigged to a location near the floor
winch) and unwind the manual winch to the fully open position.
6. Place the lever on the floor winch in the downward position
and tie the 1/16” HOA cable to the HOA tie off point of the
lever. Ensure the cable is taught. (IMPORTANT : this cable is
require to disengage the hold open arms, if it is not installed
prior to closing the smoke vent with the manual winch the
unit will be damaged during the operation, UL 793 requires
the inclusion of the hold open arms as the doors are required
to lock into the open position)
Figure B – HOA Tie-off Point
7. To ensure the HOA cable was correctly fastened, with the lever in the downward position, wind the
winch slowly to begin closing the doors. If the doors close the HOA cable has been properly secured. If
the doors only close slightly and the force required to wind the winch increase greatly the HOA cable
has not been secured tight enough and the operator should cease winding as continued operation
could result in damage to the unit. If the HOA cable has not been secured tight enough, detach and
reattach it tighter than it was previously.
8. Once the HOA cable has been confirmed to be securely fashioned the smoke vent can be winched
close and the installation of the Manual Winch option is complete.
OVERVIEW
Smoke vents with linear actuators are designed to conveniently open and close smoke vents remotely with a
push button controller. The system is comprised of linear actuators (one per cover), a control box mounted
to the inside of the smoke vent curb, a 2 position (open, close) push button station and door position
sensors.
These smoke vents are also designed to open automatically without power in the event of a fire emergency.
Smoke vents open thermally when heat parts a fusible link and they also open manually with both internal
and external manual pull handles.

9
©2020
Nystrom, Inc.
Rev 8
/2020
Installation, Operation & Maintenance
AcousticMAX Smoke Vents
Model(s): SVX/SVY
Linear Actuator Smoke Vent Modes of Operation
Open Smoke Vents
1. Manual*: Pull manual release cable (exterior or interior) to release the actuator latch and open
vents
2. Thermal*: Fusible link melts to release the actuator latch and open vents. A new link is required.
*If smoke vent is opened manually or thermally, the linear actuator must be reset and securely re-latched to
curb. This is accomplished by electrically opening to fully extend the linear actuator so that the rotary latch
engages.
3. Electrical Open with Controller:
a. Push OPEN button on controller, continuously hold until door limit stops motion
b. Rotate the toggle switch to other door (A or B)
c. Push OPEN button on controller, continuously hold until door limit stops motion
4. Electrical Open with signal (by others)
a. Wire a 24VDC signal from a fire alarm, smoke detector, etc. into the control box at the smoke
vent level.
Close Smoke Vent
1. Electrical Close:
a. Push CLOSE button on controller, continuously hold until door limit stops motion
b. Rotate the toggle switch to other door (A or B)
c. Push CLOSE button on controller, continuously hold until door limit stops motion

10
©2020
Nystrom, Inc.
Rev 8
/2020
Installation, Operation & Maintenance
AcousticMAX Smoke Vents
Model(s): SVX/SVY
User Operation
Execution
Reset?
Open using push button station
User sets toggle switch to position A and depresses the
open button until door A fully opens, user then switches
the toggle to position B and depresses the open button
until door B fully opens.
no
Close using push button station
User sets toggle switch to position A and depresses the
close button until door A fully closes, user then switches
the toggle to position B and depresses the close button
until door B fully closes.
no
Open using interior manual pull
*
User pulls the interior manual pull
yes
Open using exterior manual pull
*
User pulls the exterior manual pull
yes
Thermally *
Fusible link melts at listed temperature (160-520F)
yes
Open with 24V Signal (fire
alarm)
Optional signal sent from fire alarm, smoke detector, etc.
by others
no
Reset
Push and hold the Open button on the control button
station until the actuators back into the rotary latches.
n/a
Push Button Station
Linear Actuator

11
©2020
Nystrom, Inc.
Rev 8
/2020
Installation, Operation & Maintenance
AcousticMAX Smoke Vents
Model(s): SVX/SVY
* EMERGENCY OPERATION, releasing the actuator from the rotary latched pivot point
Input
Operation
User has toggle to actuator A.
Presses and holds the open
button.
Controller checks to ensure the open position limit switch for door
A is not closed, if not the controller will drive the actuator to extend
until the user releases the open button or the open position limit
switch for door A closes
User has toggle to actuator B.
Presses and holds the open
button.
Controller checks to ensure the open position limit switch for door
B is not closed, if not the controller will drive the actuator to extend
until the user releases the open button or the open position limit
switch for door B closes
User has toggle to actuator A.
Presses and holds the close
button.
Controller checks to ensure the close position limit switch for door
A is not closed, if not the controller will drive the actuator to
collapse until the user releases the close button or the close
position limit switch for door A closes
User has toggle to actuator B.
Presses and holds the close
button.
Controller checks to ensure the close position limit switch for door B
is not closed, if not the controller will drive the actuator to collapse
until the user releases the close button or the close position limit
switch for door B closes
Fire alarm tie-in sends a
constant signal to the 24V relay
in control box when the fire
alarm is tripped
The controller will drive actuator A until the open position limit
switch for door A closes or until the timer finishes, it will then drive
actuator B until the open position limit switch for door B closes
QUESTIONS?
For more information on installation, repair or replacement, please visit www.Nystrom.com or
call (800)-547-2635.
This manual suits for next models
1
Table of contents
Other nystrom Fan manuals
Popular Fan manuals by other brands

AEG
AEG VL 5530 S instruction manual

Hinkley
Hinkley Grander 900672F instruction manual

Envirovent
Envirovent fliterless infinity fan 230v installation guide

Xpelair
Xpelair GX6 EC3 RF Installation and maintenance instructions

Progress Lighting
Progress Lighting AirPro Claret P250007 installation manual

Hunter
Hunter 54017 owner's guide