O-Two eAdvantage 01EQ3000 User manual

USER MANUAL
Made in Canada by O-Two™ Medical Technologies Inc.
Part Number: 15PL1033 Rev. 7, July 2022
eAdvantage®
Electronic Nitrous Oxide/Oxygen
Analgesic Gas Mixing and Delivering System
01EQ3000
M
ar
k
et
ing
D
i
g
it
al
ly
si
g
n
e
d
b
y
M
a
r
k
e
ti
ng
D
N
:
c
n
=
M
a
r
k
e
ti
n
g,
o
=
O
-
T
w
o
M
e
d
ic
al
T
e
c
h
n
ol
o
g
ie
s
I
n
c,
o
u,
e
m
ai
l
=
r
e
s
u
s
ci
t
a
ti
o
n
@
o
t
w
o.
c
o
m
,
c
=
CA
D
a
t
e:
2
0
2
2.
0
7.
1
8
1
2:
4
3:
1
1
-
0
4'
0
0'

2eAdvantage User Manual (15PL1033 Rev. 7, July 2022)
TABLE OF CONTENTS
1. Safety 4
2. General Information 5
2.1. Intended Use 5
2.2. Environment of Use 5
2.3. Contraindications 5
3. Overview 6
3.1. Product Description 6
3.2. Principles of Operation 6
3.3. Controls, connections and indicators 7
3.4. Control Functions 8
3.5. LED Indicators 8
3.6. Symbols and Notations 9
4. Preparation for Use 10
4.1. Component List 10
4.2. Set up 10
4.2.1. ON/OFF 10
4.2.2. Installing / replacing the battery 10
4.2.3. Connecting the gas supply hoses 11
4.2.4. Connecting the patient circuit and Sensor line 13
4.2.5. Turning the Mixer ON 13
4.3. Testing Prior to introduction into Service 14
4.3.1. Input Leak test 14
4.3.2. Output Leak test 14
4.3.3. Demand Function 14
4.3.4. Low Input Pressure Alarms 15
4.3.5. Low Input Pressure Shut OFF 15
4.3.6. Oxygen Flush key 15
4.3.7. Oxygen Concentration 15
4.4. Pre-use Checklist 16

3
eAdvantage User Manual (15PL1033 Rev. 7, July 2022)
5. Operating Instructions 16
5.1. Start-up and selecting settings 16
5.2. Demand Mode 18
5.3. Lock Feature 19
5.4. Settings mode 20
5.4.1. Date & time 21
5.4.2. Passcode 22
5.4.3. Software update 25
5.4.4. Stored events 27
5.4.5. Stored events transfer 28
5.5. Use of the device 29
5.6. Turning OFF the device 30
6. Post Use 30
6.1. Disconnecting the Device After Use 30
6.2. Storage 30
7. Alarms, Warnings and Notifications 31
7.1. Functional Alarms 31
7.2. Flow Valve Leak Alarm 33
7.3. Battery Indicators 33
8. Cleaning, Preventive Maintenance and Servicing 35
8.1. Cleaning 35
8.2. Charging the Battery 36
8.3. Preventive maintenance and Servicing 37
9. Technical Data 39
9.1. Specifications 39
9.2. Circuit Diagram 40
9.3. Battery and Power Supply 40
9.4. Electromagnetic Compatibility 41
10. Troubleshooting 43
11. Replacement parts and accessories 44
12. Warranty 46

4eAdvantage User Manual (15PL1033 Rev. 7, July 2022)
1. SAFETY
WARNINGS
• Federal Law restricts this device to sale by or on the order of a
physician.
• The eAdvantage® shall only be used by qualified healthcare
professionals trained in its use for the purposes specified under
“Intended Use”.
• The eAdvantage® system is designed for patient self-administration.
• Never attach the face mask to the patient using a head harness.
• The eAdvantage® shall not be used in oxygen rich nor flammable
gases or anaesthetic agents environments. Keep away from open
flames, sparks and grease/oil.
• It is recommended to use cylinders that are at least 1/4 full. Always
turn ON the cylinder valve slowly and fully.
• The nitrous oxide cylinder should be operated in an upright position.
If the nitrous oxide cylinder is in a valve-down position while the post
valve is open, liquid may be expelled through the vent passages. This
liquid, Nitrous Oxide, can cause burns by freezing on exposed skin.
• Never allow oil or grease to come into contact with any part of the
cylinders, regulators or eAdvantage® system.
• Always use the checklist to ensure that all components are
reassembled correctly and that all disposable items are replaced.
• Before use on a patient, the settings of the delivered gas should be
checked to ensure they are in accordance with the intended use.
• It is recommended to use an oxygen monitor complying with ISO
80601-2-55 whenever the gas mixer is in use by connecting it to the
gas outlet on the device between the device and the circuit.
• This device must be used with the O-Two™ Breathing Circuit,
01CV8037. It is recommended to connect the expiratory tubing of
the circuit to an Anaesthetic Gas Scavenging System complying with
ISO 80601-2-13
• If the alarm sounds continuously, immediately discontinue use and
shut OFF the gas supply.
• After use, always turn OFF the cylinders to ensure that gas cylinders
with sucient volume are attached before returning the unit to its
normal storage position.
• After use always turn OFF the device.
• Do not disassemble any part of the unit except where described
in this manual as any unauthorized disassembly will invalidate the
warranty.

5
eAdvantage User Manual (15PL1033 Rev. 7, July 2022)
2.1 Intended Use
The O-Two eAdvantage® N2O/O2electronic analgesic gas mixing and
delivery systems are intended to administer an operator adjustable
mixture of nitrous oxide analgesic/anxiolytic gas and oxygen, on demand,
to a conscious, spontaneously breathing patient.
2.2 Environment of Use
The device is suitable for use in hospitals, medical, dental and doctor’s
oces, where short-term or intermittent inhalation analgesia is required for
a wide range of procedures.
2.3 Contraindications
The contraindications for this device include, but may not be limited to:
• Hypersensitivity to the medication
• Head injuries with impaired consciousness
• Maxillofacial injuries
• Artificial, traumatic or spontaneous pneumothorax
• Air embolism
• Middle ear occlusion, ear infection
• Decompression sickness
• Abdominal distension / intestinal obstruction
Note: Nitrous oxide/oxygen (
N2O/O2
) mixtures must never be used in any
condition where air is trapped in the body and expansion (up to 3x original
size) would be dangerous. For example, it will exacerbate a pneumothorax
and increase pressure in any intracranial air. Air in any other cavities such as
the sinuses, middle ear and abdomen may also expand.
2. GENERAL INFORMATION
• DO NOT use the Oxygen Flush function to provide positive pressure
ventilations to a non-breathing patient.
• After use, always turn OFF the cylinders and ensure that gas cylinders
with sucient volume are attached before returning the unit to its
normal storage position.
• Medical gases must be dry and free from dust and oil. A malfunction
in the medical gas pipeline will cause this device to stop working.
• This device and its associated breathing system are compatible for
use with N2O and O2.
• The patient shall be constantly monitored by trained healthcare
professionals while using the eAdvantage.

6eAdvantage User Manual (15PL1033 Rev. 7, July 2022)
3. OVERVIEW
3.1 Product Description
The eAdvantage® is an electronically controlled (mains supply or battery),
gas pressure operated, self-administered mixing system for the delivery
of a variable concentration of a gaseous mixture of nitrous oxide and
oxygen (N2O/O2), on demand flow to spontaneously breathing, conscious
patients via a unique patient circuit with monitoring line.
Note: This device shall be used by the patient under the guidance of
qualified personnel trained in its use.
Intended Patient Population:
Conscious, spontaneously breathing patients who are able to
comprehend the activity, understand verbal commands and self-
administer the set analgesic gas mixture.
3.2 Principles of Operation
The eAdvantage® System utilizes variable flow control and measurement
to deliver accurate concentrations of N2O/O2from pressurized and
regulated gas supplies (either cylinder or pipeline) at flow rates
equivalent to that demanded by the patient. Two input connectors are
provided on the device for the connection of pressure regulated gas
sources of nitrous oxide and oxygen. The device has only one control
for turning ON or OFF as well as adjusting the setting selections. When
it is turned ON, and the device auto-calibration is completed, the
display changes to the operation screen with Demand Flow mode set
at 50%-50% mixture as the default setting. The gas mixture output can
be selected on the screen from a range of percentages from 0%/100%
(N2O/O2) to 70%/30% (N2O/O2) in 5% increments.
The gas specific built-in alarm systems will generate both visual and
audible alarms should either the nitrous oxide or oxygen input pressure
fall below 45 PSI, and the device will be automatically shut OFF should
the oxygen input pressure fall below 21 PSI.
An oxygen flush function allows the healthcare professional to provide
a constant flow of 100% oxygen to the patient.
7
eAdvantage User Manual (15PL1033 Rev. 7, July 2022)
Note: The eAdvantage® mixer is considered a critical device, and its
components considered critical components. Only those individuals
trained in the operation of nitrous oxide/oxygen analgesic gas delivery
systems (and this device) should use this equipment. Thoroughly review
the instruction manual before use.
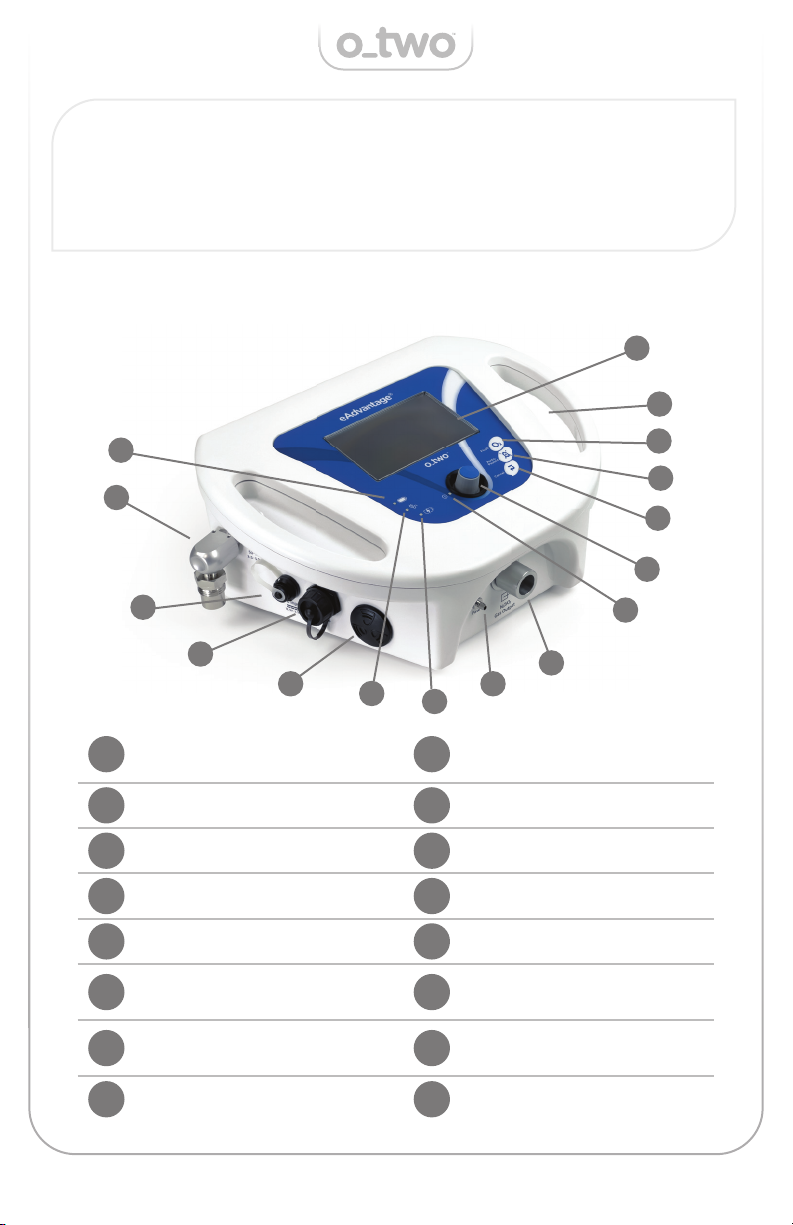
3.3 Controls, Connections and Indicators
AGreen LED for battery
operation indicator IOutput Connection
BN2O Input Connection JLED Confirmation Indicator
CPower Input Connection KControl Knob
DUSB Connection LCancel Key
EAlarm Buzzer MAudio Paused Key
FGreen LED indicator for
AC power NOxygen Flush Key
GOrange LED indicator for
battery charging OOxygen Input Connection
HAirway pressure
monitoring port PLCD Screen
A
B
C
D
EFG
H
I
J
K
L
N
O
P
M
8eAdvantage User Manual (15PL1033 Rev. 7, July 2022)
3.4 Control Functions
Control Knob (K):
The Control Knob is used to turn ON the mixer (by depressing it for 1 second)
or turn the mixer OFF (by depressing it for 4 seconds).
It is also used to navigate between the options and settings on the screen,
by rotating it in either direction when needed and for confirming the setting
selection (by depressing the knob).
Cancel Key (L):
Pressing the Cancel Key will cancel the current selection stage to go back to
the previous stage until the main screen with no selection is reached.
Audio Paused key (M):
The eAdvantage® is equipped with an Audio Paused key to silence the
Audible Alarm for 2 minutes. The Audio paused function will be activated
any time the Audio Paused key is depressed even without an active alarm.
Oxygen Flush key (N):
The eAdvantage® is equipped with the ability to manually deliver a constant
flow of 40 L/min of 100% oxygen as long as this key is pressed.
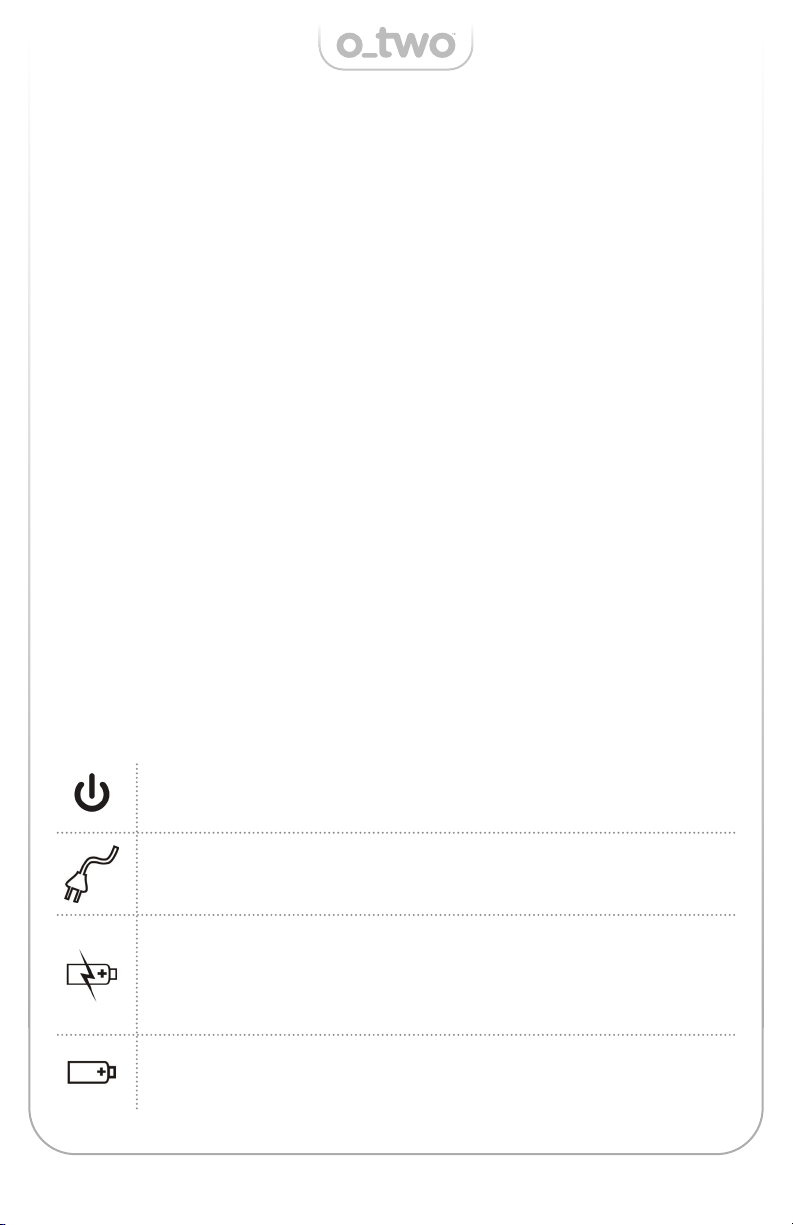
3.5 LED Indicators
Green LED – Continuously illuminated when unit is ON and
flashes when unit is OFF.
Green LED – Continuously illuminated when unit is connected
to an external power source during both ON and OFF phases.
Orange LED – Continuously illuminated when unit is charging
and OFF when battery is fully charged during both ON and
OFF phases. During OFF state this light will start flashing
when battery capacity drops to around 60%.
Green LED – Continuously illuminated when the unit is
operated using the internal battery.

9
eAdvantage User Manual (15PL1033 Rev. 7, July 2022)
Consult the instructions for use.
Warning! Risk of injury and possible negative patient outcome.
Warns of material damage with potential patient consequences.
Oers useful tips to assist in the proper use of the equipment.
Keep away from open flames.
No smoking around mixer.
Ingress protection rating: “Dripping Water”. Do not immerse.
Type BF applied part complying with the specified requirements
of IEC60601-1 to provide a higher degree of protection against
electric shock.
Separate selection for waste of electrical and electronic
components
Read the User Manual before use.
Demanded flow delivery during Patient eort.
Return for Service
Audio paused
Caution: Federal law restricts this device to sale by or on the
order of a physician
WARNING
NOTE:
IPX2
3.6 Symbols and Notations

10 eAdvantage User Manual (15PL1033 Rev. 7, July 2022)
4. PREPARATION FOR USE
4.1 Component List
Ensure that all the following components have been received:
1. eAdvantage® mixer
2. Single use patient circuit with mouthpiece
3. Oxygen supply hose
4. Nitrous oxide supply hose
5. External power supply with power supply cord
6. Battery pack
7. Operating manual
If any components are missing from the shipping carton, call the
supplier immediately.
4.2 Set Up
4.2.1. Connecting the electrical power supply
The eAdvantage® mixer is supplied with a regulated power supply with
the customer specified power cord for the country of use. The power
supply plugs into the socket on the left hand side of the unit. This
socket is protected with a dust cap when not in use. (Fig. 1)
Note: Power supply cords are available for most countries. Please
specify the country of use at time of purchase.
Should external power be lost, the device will automatically switch
to internal battery power (providing the battery is charged) and the
green battery LED on the left of the front panel will illuminate.
WARNING
Do not place this device in a position that limits access to the mains
power inputs.
WARNING
The replacement of lithium batteries by personnel not specifically trained
in the use of this device may be hazardous.
4.2.2. Installing / replacing the battery
The battery is inserted into the battery compartment on the right side
of the device by unscrewing the yellow/black knob anti-clockwise and
allowing the compartment door to open.

11
eAdvantage User Manual (15PL1033 Rev. 7, July 2022)
WARNING
“Finger tight” only – DO NOT USE A WRENCH (Fig. 1).
4.2.3. Connecting the gas supply hoses
The eAdvantage® mixer is designed to operate on medical nitrous oxide and oxygen
from either pressure regulated medical gas cylinders or “piped-in” systems. The
entrance fittings on the device are non-interchangeable fittings specifically for nitrous
oxide and oxygen.
The device is designed to operate between 50 – 70 PSI (3.5 - 4.8 Bar) input
pressures for both N2O and O2gas supplies.
The nitrous oxide supply hose provided shall be attached to the N2O input
connection on the left side (when facing the device). The oxygen supply hose
provided shall be attached to the O2INPUT connection on the right side of the
device. Tighten the supply hoses.
Yellow/black knob
Connector
Insert the battery with the connector
on the right hand side.
WARNING
• A fully charged battery must always be installed for safety reasons,
even when operating from an external power supply, so that continuous
operation is not interrupted in the absence of external power. Never
run the device with the battery removed or unplugged.
• The use of batteries, other than those specified, may cause the mixer
to fail and/or endanger the patient and operator.
• Connect the mixer to an external electrical source right away if the
“Battery Empty” alarm is triggered.

12 eAdvantage User Manual (15PL1033 Rev. 7, July 2022)
1
4
2
3
Attach the N2O
input hose here.
Insert power
Supply plug here
Attach the
O2input hose here.
Attach a new patient
circuit and monitoring line
to the device here
Fig. 1 Connecting the Supply hoses, Patient Circuit and Power Supply
WARNING
Using a wrench or applying excessive force in tightening the supply hose
may damage the seal or the thread of the connection.
Note: Power supply cords are available for most countries. Please
specify the country of use at time of purchase.
Should external power be lost, the device will automatically switch
to internal battery power (providing the battery is charged) and the
green battery LED on the left of the front panel will illuminate.

13
eAdvantage User Manual (15PL1033 Rev. 7, July 2022)
WARNING
The use of patient circuits, other than those approved by the
manufacturer, may interfere with the correct operation of this device.
Therefore, the use of non-approved circuits with this device will void the
product warranty.
Note: Ensure both the monitoring line and patient circuit are securely
connected.
4.2.4. Connecting the patient circuit and Sensor line
Connect a new patient circuit (01CV8037) to the 22mm outlet connection
port, remove the monitoring line plug and connect to the monitoring line
connection port (Fig. 2).
4.2.5. Turning the Mixer ON
To turn the mixer ON, depress the ON/OFF Control Knob
for 1 second.
Fig. 2
Remove the plug and connect to the
monitoring line connection port.

14 eAdvantage User Manual (15PL1033 Rev. 7, July 2022)
4.3.3. Demand Function
Apply a vacuum to the patient connector equivalent to a flow rate of 30 L/
min for a minimum of 1 second. The mixer will provide a flow rate equivalent
to that demanded. Remove the vacuum from the patient connector; the
flow from patient connector should stop.
Note: Connections should be “finger tight” only.
4.3 Functional Checks Prior to Introduction into
Service
Along with the contents of the shipping cartons you will require the
following items to enable you to undertake the functional check prior
to introduction of the device into service:
1. Nitrous oxide and oxygen pressure sources with 50-70 PSI output
capable of providing a minimum of 100 L/min at no less than 45
PSI (3.1 Bar).
2. Vacuum generator with a minimum 30 L/min flow rate.
4.3.1. Input Leak test
Having connected the supply hoses to the device (refer to section 4.2.3 for
connection of hoses), ensure that the O-Two™ eAdvantage® mixer is OFF
and turn ON the N2O and O2Gas sources. Using a mild soap solution, spray
the input connections (B and O) to check for leaks. If any leak is present,
tighten the connection and re-test. Once no leakage is confirmed, turn the
device ON.
4.3.2. Output Leak test
The eAdvantage® is equipped with leak detection feature which will notify
the User if a leak is detected inside the device. It is recommended to
perform this test before introduction into service:
Connect one gas at a time to the corresponding input connection, spray the
other input connectors, no bubbles should be observed coming from either
the other connection or the output connector (I).
Testing of the Individual Features of eAdvantage® System
The following features can be individually tested or measured using a
calibrated pressure gauge and flowmeter during the pre-use Functional
Checks:

15
eAdvantage User Manual (15PL1033 Rev. 7, July 2022)
With the adjustable outlet pressure regulator set with an outlet pressure of
50 PSI, gradually reduce the outlet pressure of the regulator to around 45 PSI
while slowly releasing the gas from the device until the audible and visual Low
Input Pressure Alarm is activated.
4.3.5. Low Input Pressure Shut OFF
Continue to decrease the oxygen regulator outlet pressure to around 20 PSI,
the device should automatically shut OFF.
4.3.6. Oxygen Flush key
When pressed with the ON/OFF switch set to ON, oxygen should flow from
the patient circuit.
4.3.7. Oxygen Concentration
If required, the oxygen concentration of the delivered gas can be determined
by:
A. Connecting an oxygen monitor to the output connection of the
eAdvantage® using a T-Connector.
B. Utilizing a 1 Liter calibrated syringe connected to the output of the
eAdvantage®, draw 5 full breaths (1 Liter each) from the unit.
C. Check the corresponding reading of the oxygen percentage, ensure the
reading falls within +/- 5 % V-V of the preset value.
4.3.4. Low Input Pressure Alarms
Note: The vacuum source can be as simple as a 500 ml calibrated syringe.
Note: To fully test this function it is necessary to have a supply regulator
with an adjustable output pressure and a release valve (Not supplied).
Checking of the alarm may be undertaken by simply slowly closing the
cylinder valve.
16 eAdvantage User Manual (15PL1033 Rev. 7, July 2022)
Note: It is important that the device is turned OFF after each patient
use and turned ON prior to use to allow this self-diagnostic protocol
to take place
4.4 Pre-use Checklist
When the device is turned ON it will undertake an internal self-
diagnostic test protocol to ensure that the device is fully functional
(see section 5.1).
Ensure that the patient circuit and monitoring line are securely
connected to the device.
5. OPERATING INSTRUCTIONS
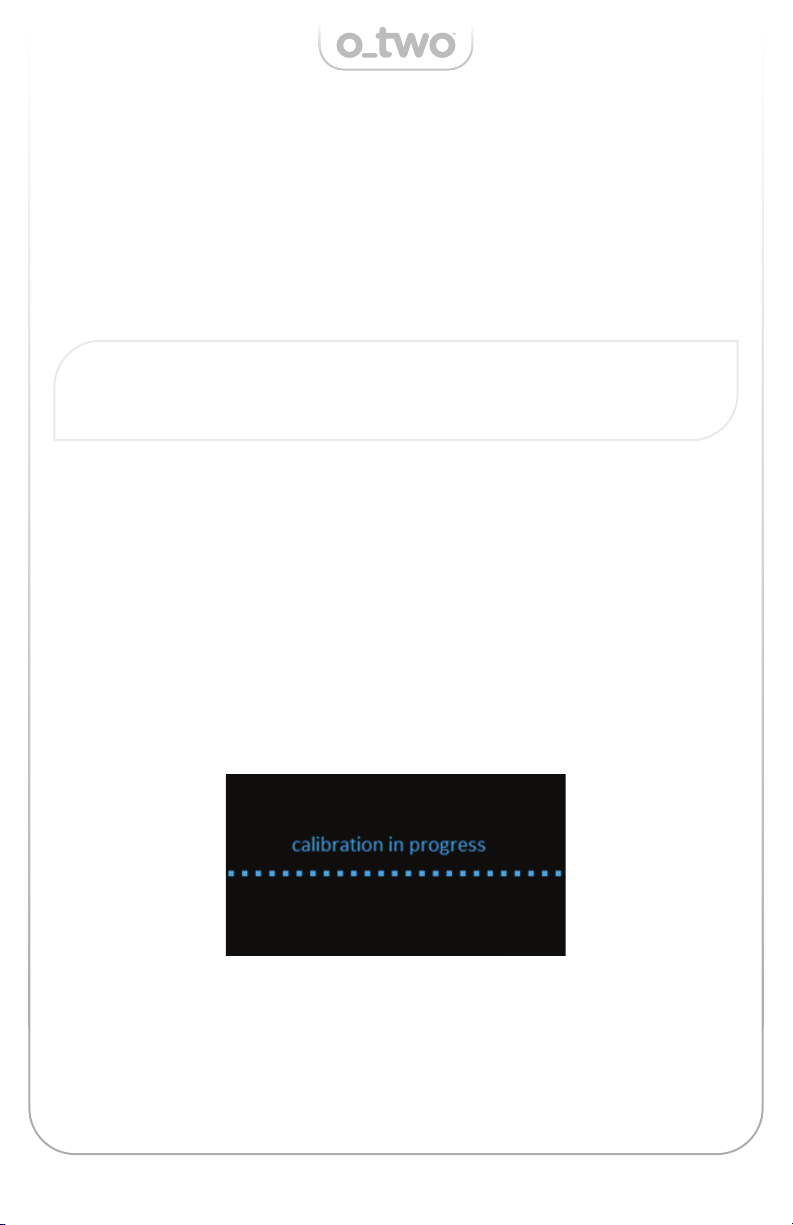
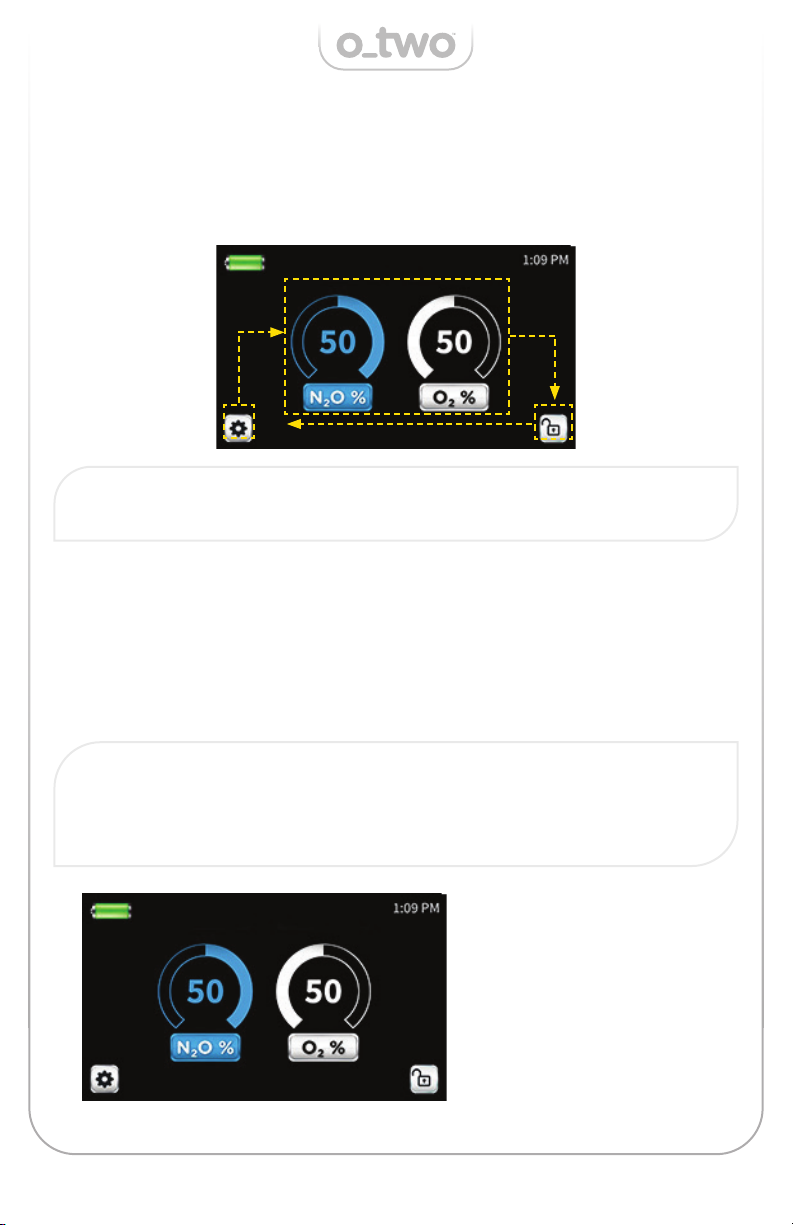
5.1 Start-up and Calibration
To start the eAdvantage®, press the Control Knob (K) for 1 second, the
associated green LED (J) will commence flashes at a high frequency.
After 1 second, the eAdvantage® will turn ON and begin the calibration
process.
A calibration progress bar will be displayed commencing from the left
to the right of the screen. The calibration process takes 5 seconds.
Once calibration is completed, the display changes to the operation
screen. Demand flow mode is the default mode during start up. The
screen will display the concentration of each gas (with 50%-50%
mixture as the default setting), the time, battery status and lock status
as shown below:
17
eAdvantage User Manual (15PL1033 Rev. 7, July 2022)
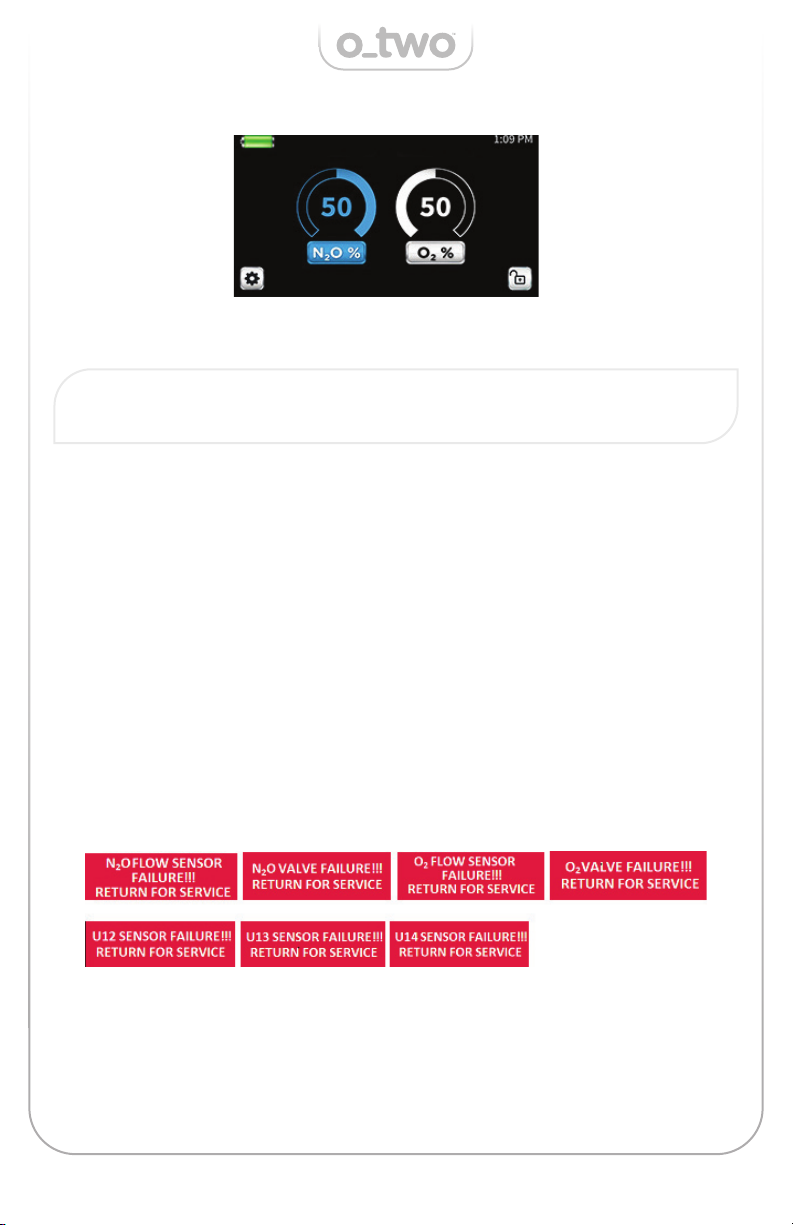
Once this screen is displayed the mixer is ready for operation.
The eAdvantage® will not switch ON if any of the problems listed below
are detected:
1. O2Valve Failure.
2. N2O Valve Failure.
3. O2Flow Sensor Failure.
4. N2O Flow Sensor Failure.
5. U12 (Paw) Sensor Failure.
6. U13 (O2input pressure) Sensor Failure.
7. U14 (N2O input pressure) Sensor Failure.
Instead, a new screen will display the cause of the malfunction and
request the mixer to be checked or returned for service. At the same
time a continuous Audible Alarm will sound.
The above failures will be saved in the events log under specific failure
as listed in “Stored History” section
If multiple failures were detected the mixer will switch between the
messages related to the failures.
Note: Start Up Calibration Error (Startup calibration results and during
use technical failure):
18 eAdvantage User Manual (15PL1033 Rev. 7, July 2022)
To select (or make changes to) the device settings, rotate the Control
Knob (K) and a frame will move around the selected figures following
the direction of the Control Knob rotation. Below is an illustration of
clockwise knob rotation:
To change the gas concentration, rotate the Control Knob (K) until
selection frame surrounds the gas mixture display on the screen as
shown below:
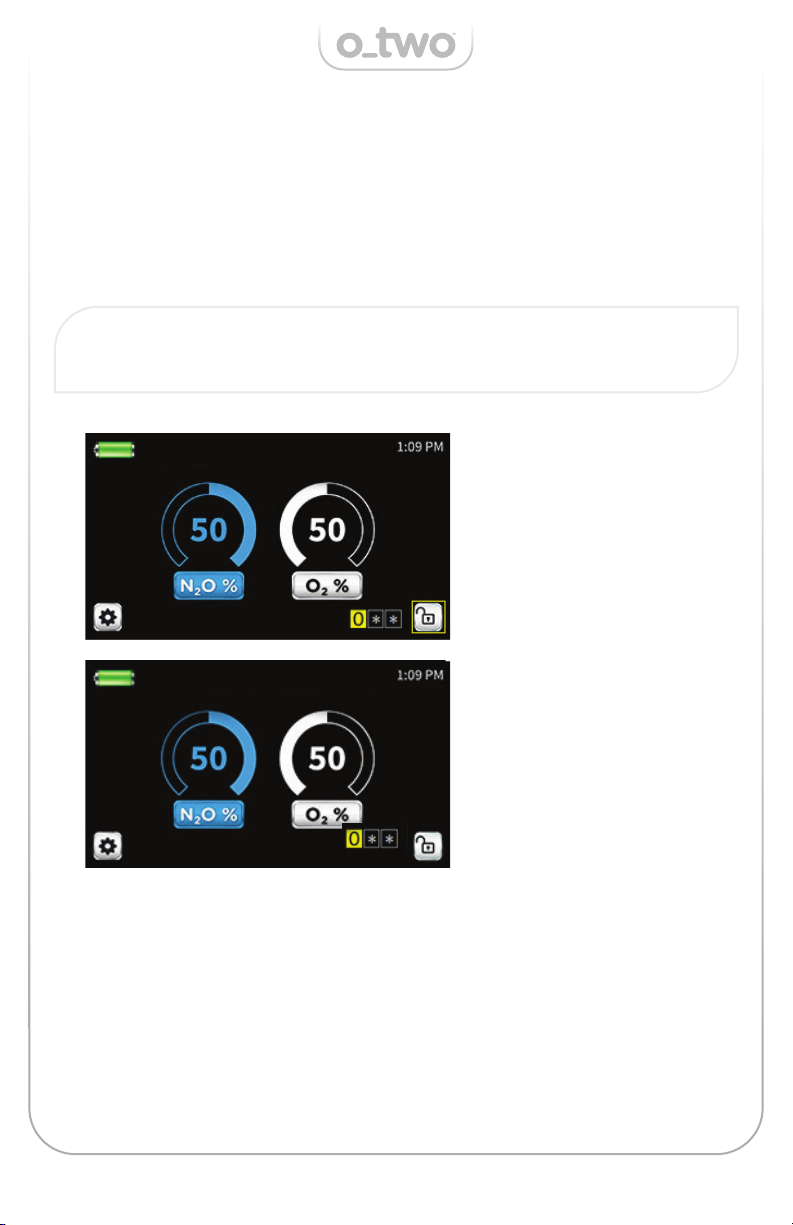
Press the Control Knob (K) to activate the selection. At this point the
percentages of both O2and N2O will commence flashes indicating that
a change is being initiated.
Note: If the screen is locked the selection of the mode, gas mixture
and setting will be inactive until the screen is un-locked.
Note: The setting change will be automatically cancelled if no change
is made within 10 seconds.
The Cancel Key (L) can be also used to exit this mode prior to making
any changes.
5.2 Demand Mode
Rotate the Control Knob
(K) to change the
concentration as listed
below:
0/100, 5/95, 10/90, 15/85,
20/80, 25/75, 30/70,
35/65, 40/60, 45/55,
60/40, 65/35, 70/30.
19
eAdvantage User Manual (15PL1033 Rev. 7, July 2022)
Press Control Knob (K) to confirm selection. Once confirmed, the 2
numbers stop flashing and the screen will display the new gas mixture
selection.
Rotating the Control Knob (K) in either direction will result in changing
the symbol from lock to unlock or vice versa.
To activate the lock
feature, rotate the Control
Knob until the selection
frame surrounds the lock
symbol as shown below:
Press the selection
knob (K) to activate the
selection. At this point
the symbol changes
from solid to flashes
accompanied by a color
change from light grey to
yellow.
5.3 Lock Feature
The eAdvantage® is equipped with a “lock” feature (protected by
passcode) to prevent patients from making changes to the setting
selected by their caregivers.
Note: When the lock is activated the mixer will not permit changes to
the selected concentration and will inactivate the Setting mode and
Oxygen Flush function.
Press Control Knob (K) to confirm selection.
Once confirmed, a 3-digit passcode will appear. The default passcode
number shipped with each unit is 000. Users may change the passcode
in the setting mode (see section 5.6).
To unlock the screen, repeat the same steps required to lock the screen.

20 eAdvantage User Manual (15PL1033 Rev. 7, July 2022)
5.4 Settings Mode
Within the Settings Mode, Users can set the date & time, change the
passcode, display and transfer “Stored event information” or perform
software upgrades.
Note: The screen must be unlocked to access this mode.
A. To access the setting mode, rotate the Control Knob (K) until the
selection frame surrounds the settings symbol as shown below:
B. Press the Control Knob (K) to confirm the selection.
C. Once confirmed the screen will change to the setting page with a
solid reversed color “Date & time” window as shown below.
Note: The selection frame will disappear if no action is taken within 10
seconds.
D. Rotate the Control Knob (K) in either direction and the solid color
frame will move between the 5 setting selections until the desired
selection is reached. Press Control Knob (K) to confirm selection.
Table of contents
Other O-Two Medical Equipment manuals


Popular Medical Equipment manuals by other brands

otometrics
otometrics MADSEN AccuScreen Handling guide

CME Medical
CME Medical BodyGuard 323 Quick user guide

Ring Rescue
Ring Rescue CompressionDevice Technical reference manual

Mortara
Mortara ELI-200 Service manual

Vermeiren
Vermeiren D100 instruction manual

Berchtold
Berchtold Operon D850 Service & parts manual


W&H
W&H PROXEO HP-44M Instructions for use

Lowenstein Medical
Lowenstein Medical CARA Full Face Instructions for use

GANSHORN
GANSHORN PowerCube-Ergo Service manual

Dräger
Dräger MU10900 Instructions for use

Mediroyal
Mediroyal MR328 DYFEX FHP instructions

Medical Depot
Medical Depot drive 12062 installation instructions