Oakcastle IR100 Manual

IR100 | Internet Radio
Instruction Guide
EN

Box Contents ������������������������������������������������������������������������������1
Controls & Funcons ����������������������������������������������������������������� 3
Support �������������������������������������������������������������������������������������4
Navigaon Sengs�������������������������������������������������������������������� 5
Instrucon Guide�����������������������������������������������������������������������6
Basic Operaon��������������������������������������������������������������������������6
Manual WiFi Set-up ������������������������������������������������������������������� 7
WiFi Connecon Complete!�������������������������������������������������������8
Internet Radio ����������������������������������������������������������������������������9
Media Centre ���������������������������������������������������������������������������� 11
Spofy Connect������������������������������������������������������������������������ 13
Informaon Centre ������������������������������������������������������������������ 14
Connecons ����������������������������������������������������������������������������� 15
Bluetooth ��������������������������������������������������������������������������������� 16
Conguraon Sengs���������������������������������������������������������������17
Sengs: Date & Time �������������������������������������������������������������� 18
Sengs: Alarm Clock ��������������������������������������������������������������� 19
Sengs: Alarm Features ��������������������������������������������������������� 20
Sengs: Addional Features ��������������������������������������������������� 22
Remote Control App ����������������������������������������������������������������24
Addional Seng Opons ������������������������������������������������������� 25
Specicaon���������������������������������������������������������������������������� 27
Warranty ��������������������������������������������������������������������������������� 27
Safety Informaon������������������������������������������������������������������� 28
Register your product for a FREE 3-year
warranty at www.oakcastle.co.uk
Contents
3year
warranty
EN

1
EN
What’s in the Box?
Box Contents
Oakcastle IR100 Internet Radio
Power Adapter
Instructions Guide

2
EN
Front View/Control Buttons
1. Display screen
2. On/Standby
3. Menu
4. Alarm
5. Back button
6. Navigate/Volume +/-
7. Forward button
8. Sleep
9. Favourite
10. Dimmer button
Controls & Funcons
66
6

3
EN
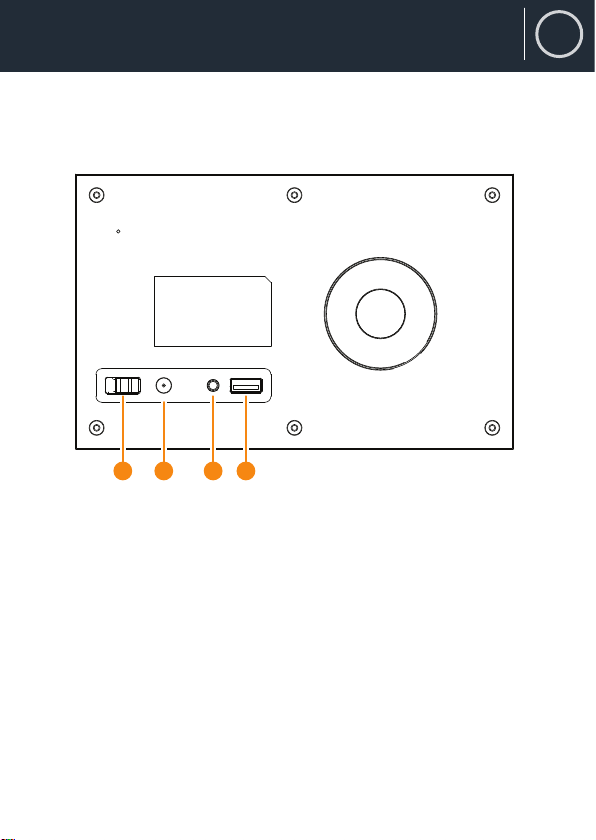
Back View/Control Buttons
Controls & Funcons
DC IN LINE OUT USB
5V 1A
OFF ON
11 12 13 14
11. On/O
12. DC in
13. Line Out
14. USB slot

4
EN
Thank you for your purchase of the Oakcastle IR100 internet radio.
Please follow the guidance of the manual to set up your new purchase
and begin enjoying its features.
If you require further assistance with your new radio, please contact our
support team on the Oakcastle website: info@oakcastle.co.uk
Support
Support

5
EN
Navigation Settings
Instrucons Guide
Standby button: This should be used to turn your radio on and o. The
Standby screen will display the date, time and any settings set such as
alarms.
To turn your radio on, press the Standby button to be taken to the
home screen or the last station used.
Select Dial/Volume: Rotate the dial clockwise or anticlockwise to scroll
through choices and press down the dial to conrm selections.
Change the volume when you are on the radio station playing display
screen. The volume will not be altered when you are navigating around
the radio as it will begin to function as the Select dial.
Menu button: Select the Menu button to browse through your audio
options such as Local Radio, Internet Radio, Media Centre, Spotify
Connect, Information Centre, Bluetooth, Conguration Settings. Also
use the Menu button to cancel out of settings being made.
Dimmer: Select Dimmer to choose between the two default dimmer
options. Once you have selected between Power Saving and‘On’ level,
choose the brightness settings by rotating the dial.
< and > buttons: Buttons used to alter settings. Use the ‘previous’
button to go back a step.

6
EN
Please note that the instructions within this manual will refer to the
radio button number e.g (Ref.*number*) in accordance with the
diagrams on pages 2-3.
Starting up your internet radio
Plug the adaptor connector into the back of the system labelled ‘DC in’
(Ref.) and turn the power on from the mains. Switch the button at
the back of the radio to ‘ON’ (Ref.) to display the Oakcastle welcome
screen.
After the welcome screen, you will be able to select your chosen
language by scrolling with the Select dial (Ref.). Select your language
by pressing down the Select dial.
If this is the rst time using your radio, the radio will display ‘Check
Network whn Power On?’. By selecting ‘Yes’, the radio will automatically
connect to your chosen network on start-up. You will then get the
option to set up your WiFi to stream Internet Radio with the message
“Would you like to congure network now?”. If you select YES, your radio
will begin to scan for nearby networks to connect to.
If you select NO then you can set this up later in conguration settings.
Basic Operation
Instrucon Guide

7
EN
Manual WiFi Set-up
Instrucon Guide
If you select YES, you will be able to select your chosen WiFi network
and enter the WiFi password in the next display screen. Type letters/
numbers by scrolling with the select dial (Ref.) until the correct digit is
displayed and click‘>’ to go to the next digit. Once nished, press down
the select dial to conrm.
Enable ‘Check Network when
Power On’?
NOYES
00:00
Would you like to
congure network now?
00:00
Yes (WPS) NOYES
00:00
Enter Password
1/1
00:00
Move OKInput
Scanning for
Wireless Network...
00:00
Wireless Network (WPS PBC)
When the screen displays “Would you like to congure network
now?”, if you select “YES (WPS)” your radio will begin to search for WiFi
connections.
Whilst this has been selected you will have 120 seconds to click the WPS
button on your WiFi modem. This will connect your WiFi to your radio
without the need to manually type in the passcode.
Enable ‘Check Network when
Power On’?
NOYES
00:00
Would you like to congure
Network now?
Yes (WPS) NOYES
00:00
Please press the WPS button on
the router within 120 Secs.
00:00

8
EN
WiFi Connection Complete!
Instrucon Guide
Once your WiFi is connected by manually entering your WiFi password
or via WPS, you will be taken to the main menu screen and the WiFi
signal will appear in white at the top left. Your internet radio is now set
up!

9
EN
Go to the main menu screen by selecting ‘Menu’ (Ref.) followed by
selecting ‘Internet Radio’. Select ‘Internet Radio’ on the display screen by
turning and pressing the Select dial (Ref.)
When in the ‘Internet Radio’screen there will be multiple options:
My Favourite: Your favourite stations will be saved here for easy
listening.
Radio Station/Music: Select this option to browse internet radio
stations in the categories of: Global Top 20, Genre, Country/Location,
Highlight. Find stations under relevant categories and select your
chosen internet station by selecting with the Select dial.
If your station is not available via this server or found in Internet Radio >
Service, please refer to page 12‘My MediaU’.
Sleep Radio: Choose from multiple relaxation sounds.
History: Browse through recently listened to stations.
Instrucon Guide
Internet Radio

10
EN
Service: Search for an internet radio station or add a new station. To
search a new station, select ‘Search Radio Station’ to go to the search
tool. Turn the Select dial to highlight the chosen character and click
‘>’ (Ref.) to move to the next character. To go back to the previous
character, press ‘<’ (Ref.) to highlight it. Press the Select dial (Ref.) to
search for the internet station.
Pre-setting your favourite internet stations
When you have found your desired station, hold down ‘Fav’ (Ref.) for
a few seconds to go to the ‘Add to my Favourites’ screen. Turn the select
dial to choose the preset number and select your option (Ref.).
To view your preset favourite stations, press the ‘Fav’ button to scroll
through your choices.
Quick use tip: Once presets have been set for Internet Radio, you can
scroll through the main display screen to one of these options e.g
Internet Radio and without selecting it, click‘Fav’to view your preset
favourite stations for quick listening.
Internet Radio
Instrucon Guide

11
EN
Instrucon Guide
Select ‘Media Centre’ on the main display screen by turning the dial and
pressing the Select dial (Ref.)
USB:
Plug in a USB stick (Ref.) with les. Highlight the desired folder/song
with the Select dial (Ref.) and select for your chosen song to play.
USB port also able to charge your device.
UPnP:
Universal Plug and Play allows you to connect to other devices to
play your music such as personal computers (Windows media player),
mobile (GooglePlay) and other devices.
Once you have selected UPnP, select the radio from your device to
connect and from your phone you may need to select the radio. Both
your device and the IR100 radio will need to be connected to the
same WiFi network.
Select the device with the Select dial you want to play music or media
from on the radio display screen in UPnP settings.
If you have set up folders on your device that is being shared you can
use the Select dial to scroll through your choices and conrm your
selection by pressing the Select dial.
Media Centre

12
EN
My Playlist:
You can create a playlist of favourite music or media from UPnP. When
you are playing the media, press and hold the Select dial from unit or
remote control to save it into My Playlist.
Access‘My Playlist’ from the Media Centre.
Clear My Playlist:
If you have created a playlist via UPnP connection, you can select this
option to clear the playlist. Select the option ‘Clear my Playlist’ with the
Select dial.
The radio will then display“Conrm delete?”. Select YES to delete your
playlist with the Select dial.
My Media U: Adding Stations
Stations can be manually added on to the radio via MediaU if they are
not available in internet radio mode.
In conguration settings there is the option to connect a MediaU
account via the website http://www.mediayou.net/
Ensure that WiFi is connected to the radio, and then obtain the wireless
MAC address of the radio via Information Centre > System Information
> Wireless Information. Enter this address on the MediaU website to
allow the radio to sync your account.
When this is successfully congured you are then able to save and view
your own MediaU station playlists.
Media Centre
Instrucon Guide

13
EN
Instrucon Guide
Press the‘Menu’button (Ref.) and scroll to the Spotify Connect
function.
Listen out loud with Spotify Connect
1. Connect your IR100 to your Wi-Fi network
2. Open up the Spotify app on your phone, tablet or laptop using the
same wi network
3. Play a song and select Devices Available.
4. Select your IR100 and start listening.
Use your phone, tablet or computer as a remote control for Spotify. Go
to spotify.com/connect to learn how.
The Spotify Software is subject to third party licenses found here:
www.spotify.com/connect/third-party-licenses.
Spotify Connect

14
EN
Go to the main menu screen by selecting ‘Menu’ (Ref.) followed by
selecting ‘Information Centre’.
Weather Information: To select the weather information for a desired
place, rst select the continent by using the Select dial (Ref.) to scroll
and select. Following this, then select the country, followed by the
town/city.
Once you choose a chosen town/city, the following information will be
displayed: current temperature, weather symbol image, approximate
temperature range for the next 5 days.
Financial Information: Select from a range of stock market index’s
from around the world. Scroll and select using the Select dial.
System Information: View system version, Spotify version and wireless
connection information. If wireless information is selected, information
such as WiFi signal strength can be found.
Information Centre
Instrucon Guide

15
EN
Instrucon Guide
Line Out
At the back of the radio, the ‘Line Out’ (Ref.13) port allows for an
external amplier/stereo.
Simply connect an AUX cord from the‘Line Out’ port to the amplier/
stereo.
Begin playing audio from the Internet Radio, Media Centre, Spotify
Connect AUX or Bluetooth setting.
Connections

16
EN
Select ‘Bluetooth’on the main display screen by turning the dial and
pressing the Select dial (Ref.) or with the remote navigation buttons.
Go to your device settings to connect your device to the radio via
Bluetooth.
The internet radio’s device will display as ‘Oakcastle IR100’. Select this
radio to connect and your radio should make a short sound, meaning
that it is connected.
Select your chosen audio on your device and play.
Control the playing audio from your device, rather than with the radio’s
navigation buttons.
Bluetooth
Instrucon Guide

17
EN
Instrucon Guide
Select ‘Conguration’ on the main display screen to browse through
a range of display, performance and audio settings.
Network: Select this for WiFi and network options
Wireless Network Conguration
On the Network settings, you can set up a Wi-Fi connection by selecting
Wireless Network Conguration. The radio will then start searching for
available WiFi connections.
Find your WiFi connection and select it with the Select dial (Ref.). To
type letters/numbers, scroll with the Select dial until the correct digit is
displayed and click‘>’ (Ref.) to go to the next digit. Press ‘<’ if you wish
to go back to previous digit (Ref.) Once you are nished, press down
the select dial to conrm.
Once your WiFi is connected, the main menu screen will show and the
WiFi signal will appear in white at the top left corner. Please note: Wi-Fi
password is case sensitive.
Wireless Network (WPS PBC)
Select this option to search for your WiFi connection. Whilst this has
been selected you will have 120 seconds to click the WPS button on
your WiFi modem. This will connect your WiFi to your radio without the
need to manually type in the password.
Conguration Settings

18
EN
Manually setting date and time
There is the option to manually set the time and date instead of using
auto-detect to set this up.
Go to ‘Conguration’ settings and select ‘Date&Time’ by scrolling and
selecting with the Select dial (Ref.).
Select ‘Set Date and Time’ with the Select dial and choose ‘Manual
Setup’.
Change the day by highlighting the character and using the Select dial
to scroll through to the desired unit. Once you have selected the correct
unit, click ‘>’ (Ref.) to go to the month. Continue this process with the
year, the hour and the minutes.
Once the manual set up is complete, press down the Select dial (Ref.)
to Enter.
To change the format of the date and the time, including setting a 12
hour or 24 hour clock, you can alter these settings under the ‘Set Time
Format’ and ‘Set Date Format’ options within this Conguration Setting
option.
Settings: Date & Time
Instrucon Guide
Manual Setup
Auto Detect (UTC + 0:00)
00:00
1/2
Set Date and Time
Set Time Format
Set Date Format
00:00
1/3
Set Date and Time
12/01/2018 14 : 13
DD/MM/YYYY HH : MM
00:00
Move OKInput
Table of contents