OBaby Zoma 3 Wheeler User manual

IMPORTANT PLEASE READ THESE INSTRUCTIONS CAREFULLY
BEFORE USING THIS PRODUCT
KEEP FOR FUTURE REFERENCE
Zoma 3 Wheeler
Instruction Manual
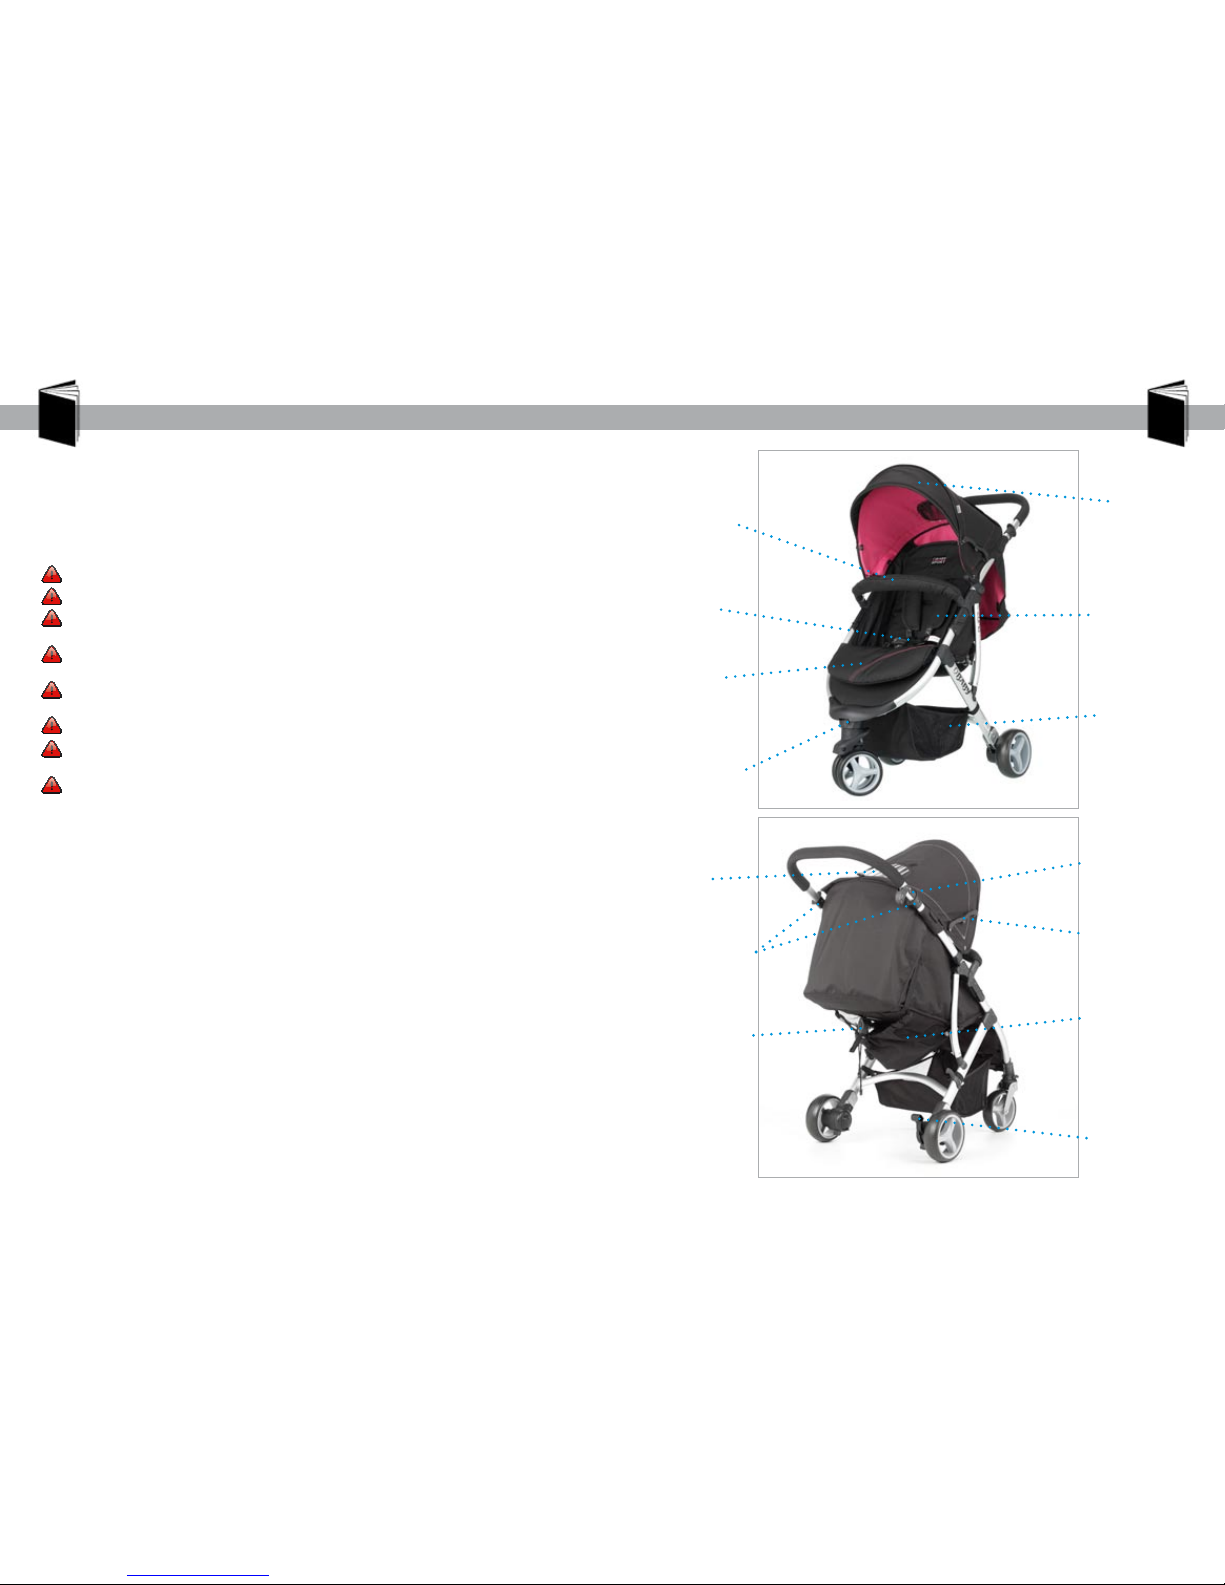
Safety Warnings Getting to know your Stroller
Harness
Bumper bar
Visor
Parent
window
Parent pocket
Secondary release
lock
Primary release
lock
Brake lever
Front swivel
wheel lever
Calf rest
Shopping
basket
Backrest release
toggle
Hood adjustment
catch
Harness pads
Thank you for choosing Obaby. To ensure that your stroller is used in accordance with
these instructions, please read them fully.
This stroller conforms to EN 1888 : 2003 and is guaranteed for 6 months from the date
of purchase against manufacturing defects. If you have any problems please contact
Obaby - info@obaby.co.uk or 0845 078 0290
Your child’s safety may be affected if you do not follow these instructions.
WARNING: A child’s safety is your responsibility
WARNING: Ensure that all locking devices are engaged before use
WARNING: Children should be harnessed in at all times. Always use the
crotch strap in combination with the waist belt
WARNING: DO NOT hang shopping bags from the handle as this may affect
the stroller’s stability. Use the basket provided - maximum weight 3kg
WARNING: This product is not suitable for running or skating. Never run or
skate with your stroller, especially across roads
WARNING: It may be dangerous to leave your child unattended
WARNING: Do not use this product as a bed, your child may become
tangled in straps and suffocate
WARNING: The child should be clear of moving parts while making
adjustments or opening or folding the stroller. Risk of serious injury
(entrapment, laceration or amputation) exists
• This stroller requires regular maintenance by the user
• Overloading, incorrect folding and the use of non approved accessories may
cause damage or break the stroller
• It may be unsafe to use replacement parts or accessories e.g. child seats,
bag hooks, rain covers, etc, other than those approved by the manufacturer
or distributor
• Always balance the weight of the stroller evenly
• We advise that your stroller is not stored or left out side at any time
• This stroller is intended to carry one child from birth and up to a maximum
weight of 15kg
ROUTINE CARE & MAINTENANCE
- For cleaning, use only a mild detergent and warm water
- DO NOT USE BLEACH
- DO NOT USE any abrasive substances
- From time to time, check your stroller for loose screws, worn parts, torn
material or stitching. Replace or adjust the parts as needed.
Due to constant updating and improvements, some components may occasionally differ slightly from
the images shown in these instructions. We reserve the rights to change the specications of any
products without prior notice. If you need any assistance please call the help line 08450 782 290 or
email info@obaby.co.uk
2
3
www.obaby.co.uk
www.obaby.co.uk
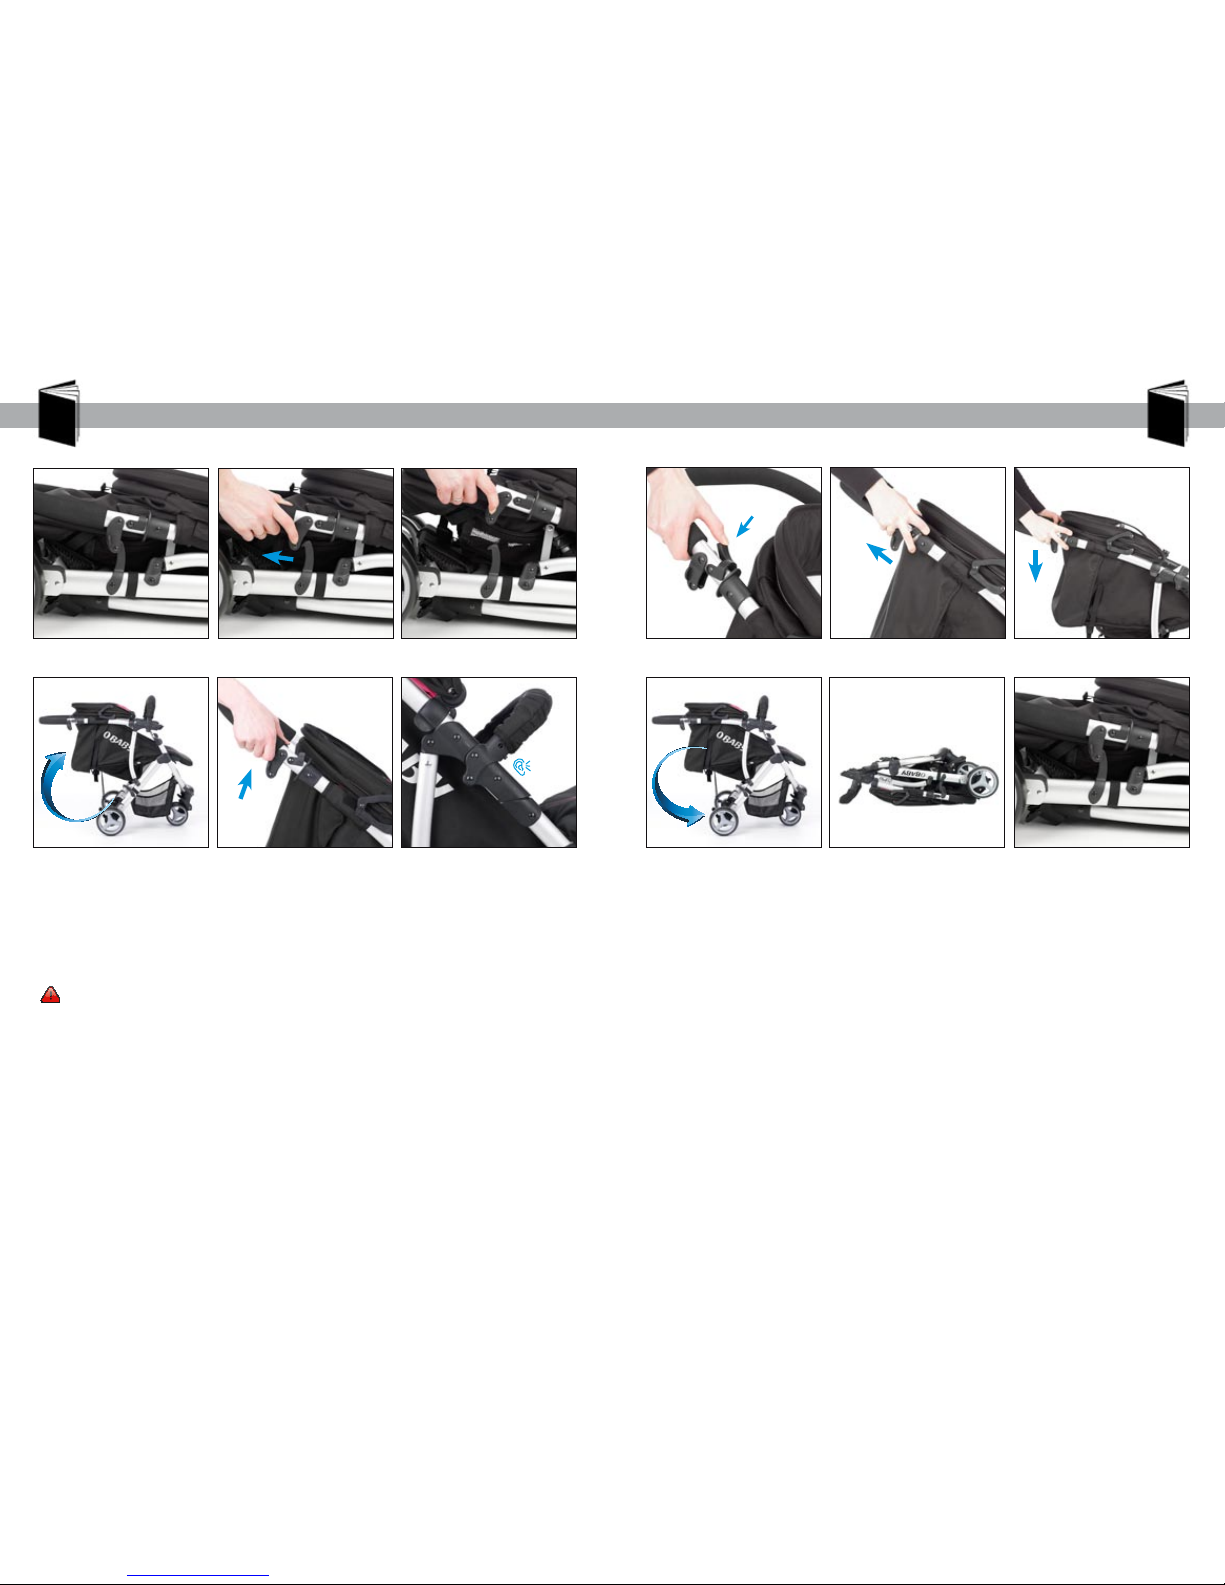
Opening your Stroller
To open your stroller release the storage clip on the right hand side of the stroller
(g.1, 2 & 3).
Lift the handle away from the wheels (g.4).
Ensure the stroller clicks into place when upright (g.5 & 6).
WARNING: Ensure that all locking devices are engaged before use.
The child should be clear of moving parts while making adjustments or opening or
folding the stroller. Risk of serious injury (entrapment, laceration or amputation)
exists.
Folding your Stroller
Before attempting to fold your stroller
- The front wheel should be in swivel mode
- The basket and seat unit should be empty
- The hood should be folded
- The seat should be reclined at
To fold the stroller, release the primary lock on the right hand side of the handle using
your thumb (g.7).
Next, using your ngers lift the secondary lock on both sides of the handle (g.8). While
holding the secondary lock up, push the handle down towards the back wheels
(g.9 & 10), until completely folded (g.11). Check that the storage clip on the right
hand side of the stroller has engaged (g.12), if the storage clip doesn’t engage, swivel
the front wheel a little.
g. 1
g. 4 g. 10g. 5 g. 11
g. 7
g. 2
g. 6 g. 12
g. 8
g. 3 g. 9
Press
“Click”
4
5
www.obaby.co.uk
www.obaby.co.uk
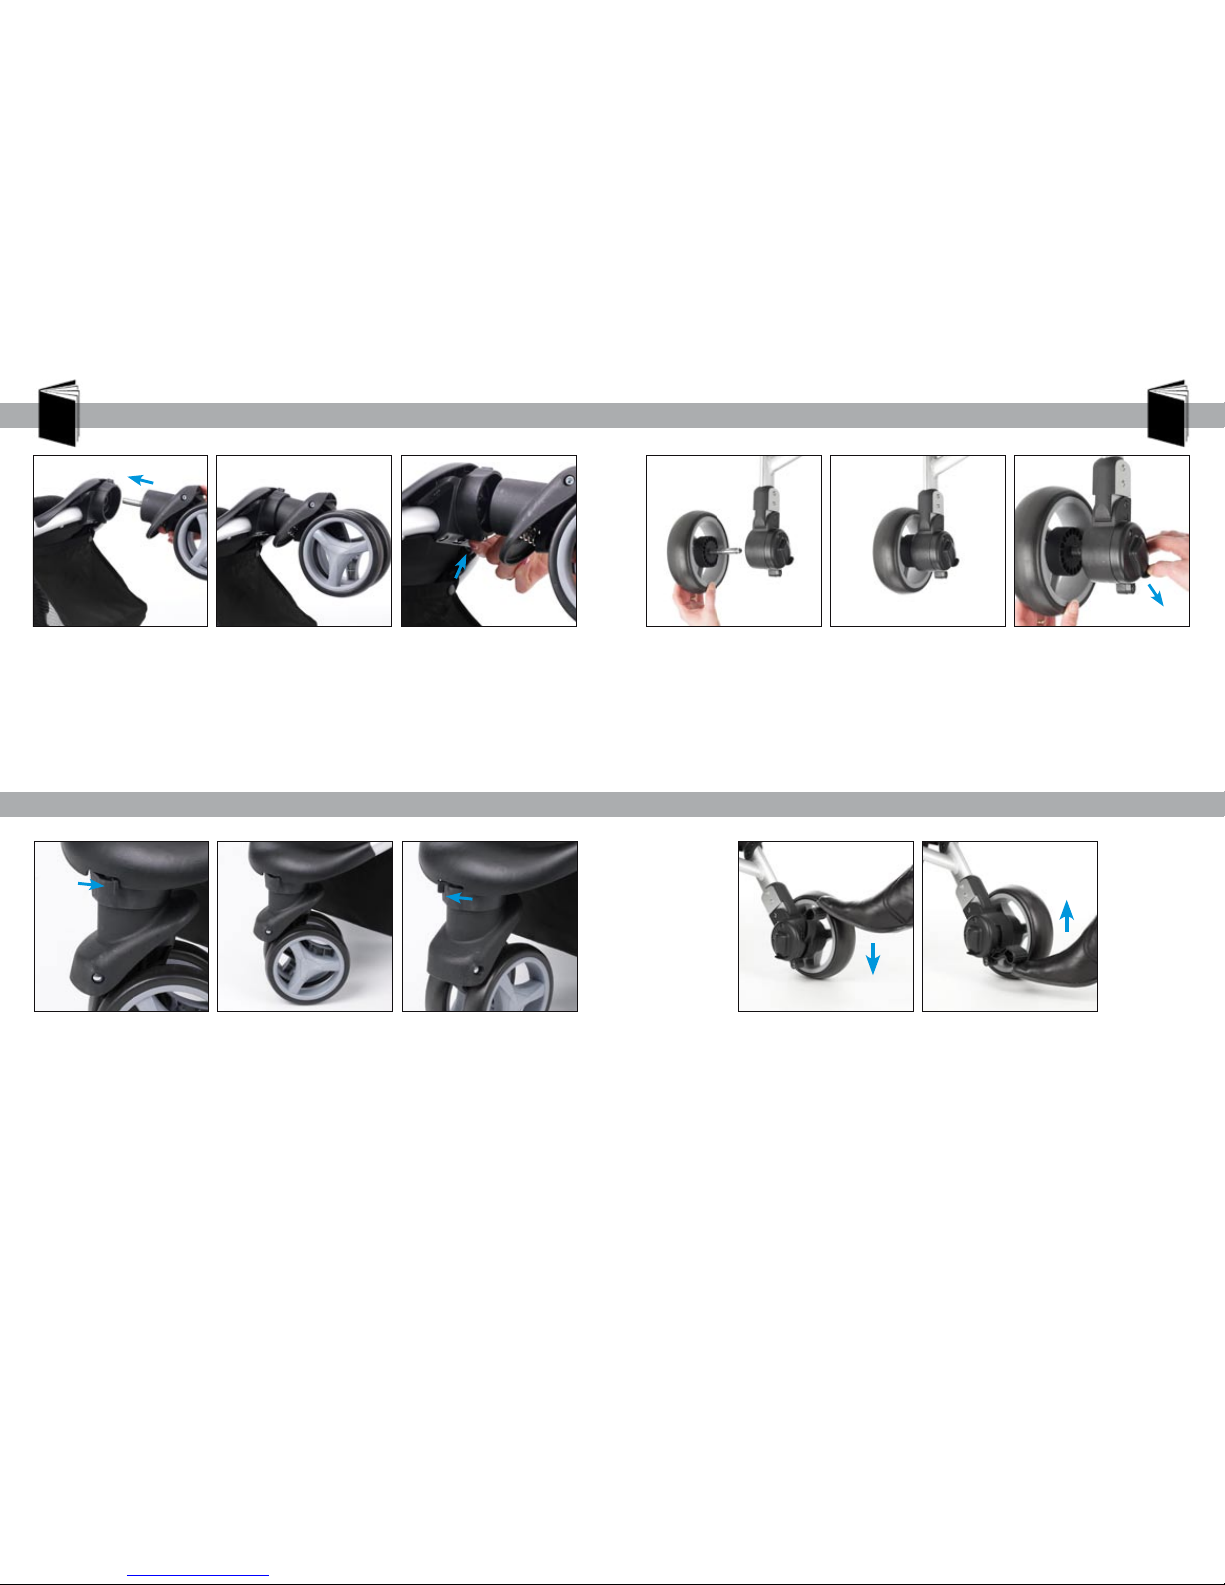
Fitting and Removing the Front Wheel
To t the front wheel, slide the locating pin on the wheel into the hole on the front wheel
mount (g.13).
Ensure the wheel has clicked into place before using the stroller (g.14).
To remove the front wheel, depress the button at the back of the mould and slide the
wheel out. (g.15).
g. 13 g. 19g. 14 g. 20g. 15 g. 21
Using the Front Swivel Wheel
To put the wheel in swivel mode, slide the lever to the strollers’ left (g.16 & 17).
To lock the swivel wheel, slide the lever to the strollers’ right (g.18).
g. 16 g. 17 g. 18
Fitting and Removing the Back Wheels
Applying the Brakes
To t the back wheels, slide the locating pin on the wheel into the hole on the rear wheel
mount (g.19). Ensure the wheels have clicked into place before using the stroller
(g.20).
To remove the back wheels push down on the ‘L’ shaped lever on the inside of the wheel
mount, then slide the wheel out (g.21).
To lock the brakes fully, using your foot, push down on the brake lever (g.22).
To release the brakes, using your foot, lift each brake lever (g.23).
g. 22 g. 23
Lock
Lock
Release
Release
Press
Press
6
7
www.obaby.co.uk
www.obaby.co.uk
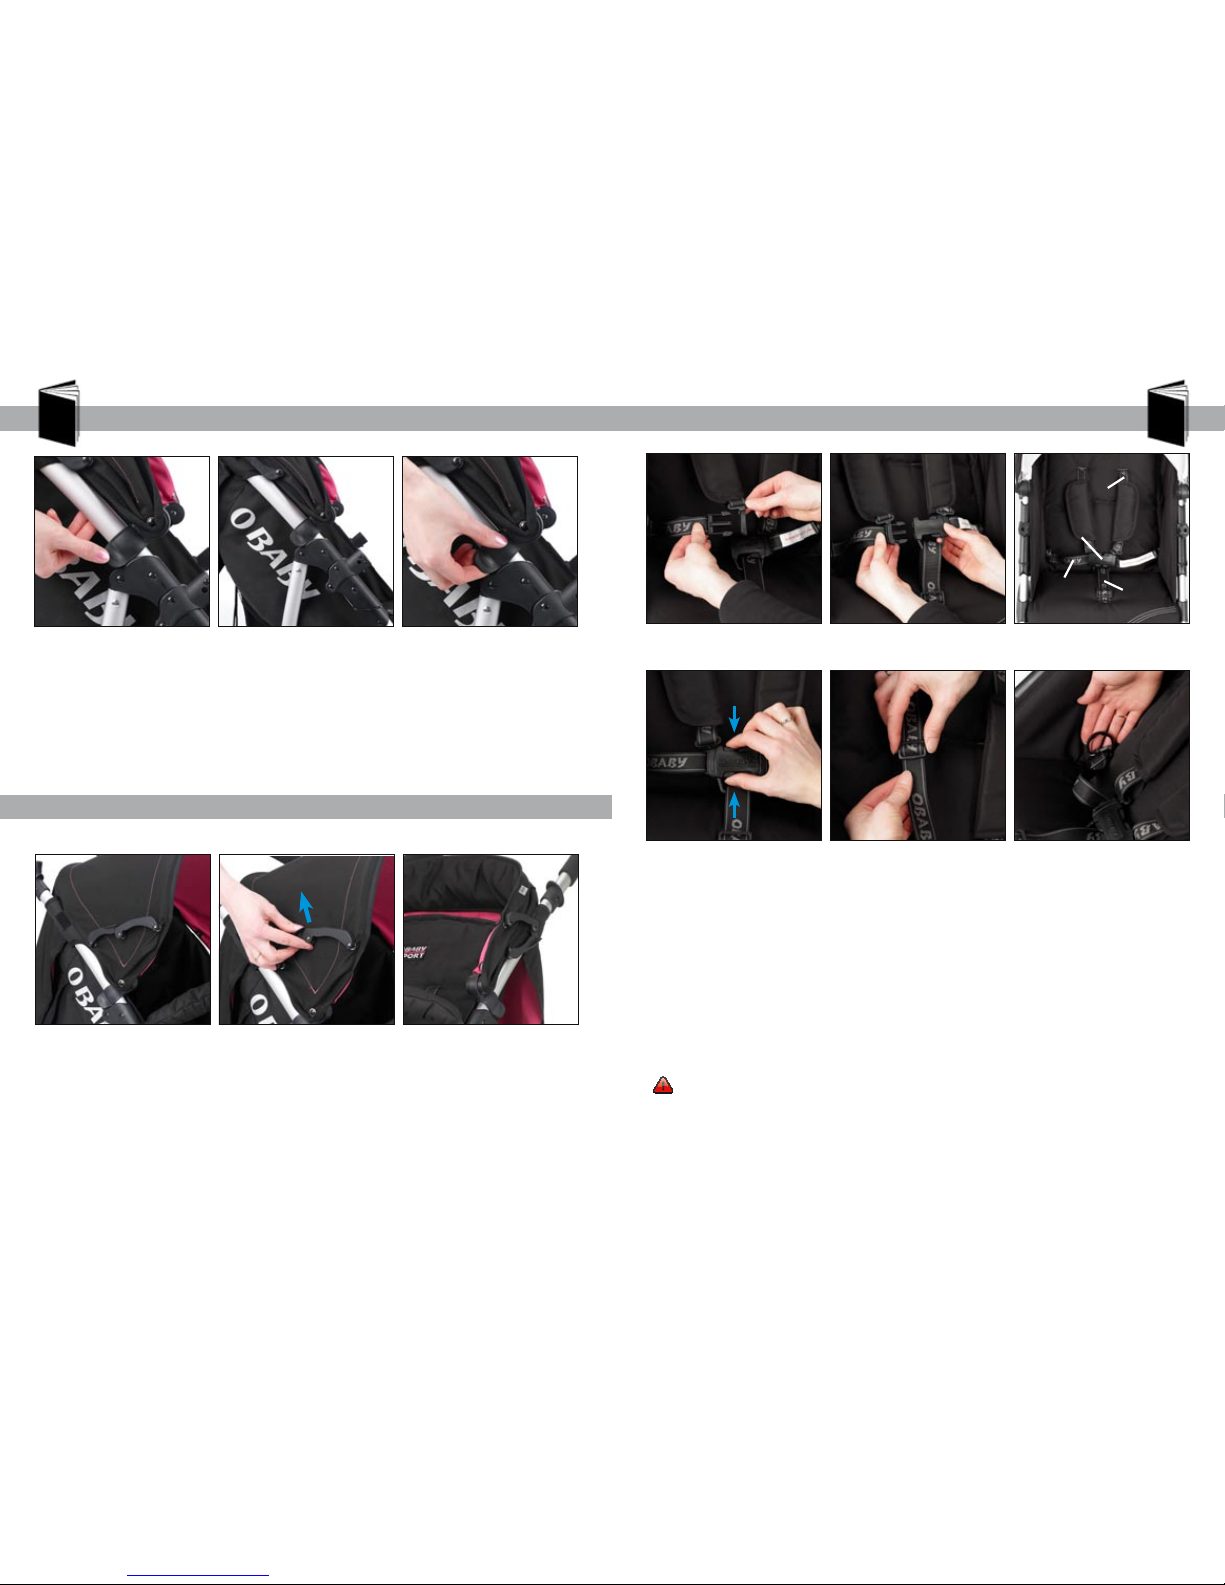
Fitting and Removing the Hood
Adjusting the Hood
To t the hood, place the hood on the chassis inline with the seat unit. Clip the hood
catches onto each side of the chassis (g.24 & 25).
To remove the hood, lift the hood catches on both sides (g.26).
g. 24
g. 27
g. 25
g. 28
g. 26
g. 29
To fold the hood, pull the hood adjusters up on both sides of the hood, as shown above.
To fasten the harness, insert both fasteners on the waist strap through the loop on the
chest strap (g.30) and secure into the clasp on the crotch strap (g.31 & 32).
To release the harness, squeeze each of the clips in the centre of the harness and pull
away from the clasp, one at a time (g.33).
Adjust the harness length using the buckles on each strap (g.34).
‘D’ Ring
The ‘D’ rings highlighted are provided for tting a separate harness complying with BS
6684 (g.35).
WARNING: Ensure the harness is correctly tted before use. The harness should
always be adjusted to t correctly. Children should be harnessed in at all times.
Always use the crotch strap in combination with the waist strap.
g. 30
g. 33
g. 31
g. 34
g. 32
g. 35
Using the Harness
Press
Press Lift
Waist
Strap
Crotch
Strap
Chest
Strap
Clasp
8
9
www.obaby.co.uk
www.obaby.co.uk

Adjusting the Backrest Fitting and Removing the Bumper Bar
To recline the backrest, press the button on the toggle and pull away from the seat to the
desired height (g.36). Lower the seat to rest on the toggle (g.37).
To put upright, grip the sides of the toggle with one hand, and the strap with the other
hand and slide the toggle up the strap to the desired height (g.38).
To t the bumper bar, slide the locating pin into the hole in the mounts either side of the
seat unit and click into place (g.42 & 43).
To remove the bumper bar, press the button underneath the mounts on both sides and
slide the bumper bar out (g.44).
g. 36 g. 42
g. 39
g. 37 g. 43
g. 40
g. 38 g. 44
g. 41
Adjusting the Calf Rest
To adjust the calf rest, press the levers underneath either side of the calf rest, slightly
lift, then adjust to the desired position (g.39, 40 & 41).
Press
Press
Press
“Click”
10
11
www.obaby.co.uk
www.obaby.co.uk

info@obaby.co.uk
0845 078 0290
Table of contents


