obsta OFP-CAB-8E-RW-240-HIA Operating instructions

1
OBSTAFLASH HI LED
LIGHTING SYSTEM
INSTALLATION AND OPERATION GUIDE
OBSTA- 2 rue Troyon 92316 Sèvres Cedex FRANCE
Phone : +33 1 41 23 50 10 Fax : +33 1 41 23 50 11
www.obsta.com
January 2021

2
DESCRIPTION
OFP-CAB-8E-RW-240-HIA
OFP-120-RW-2L-HIA-L4
OFC-CTR
ICAO PHOTOCELL 500/50 LUX
COLOR
White
White
POWER
SUPPLY
120-230 V – 50/60Hz
120-230 V – 50/60Hz
48 Vdc
P/N
113782RW-8E
113781L4
113625L
113135
This list is not exhaustive and some options can be added for synchronization and remote alarm
control (GPS for wireless synchronization, optical cable for synchronization and/or GPRS interface
for remote monitoring) and combination of medium and high intensity system.

3
BE CAREFUL
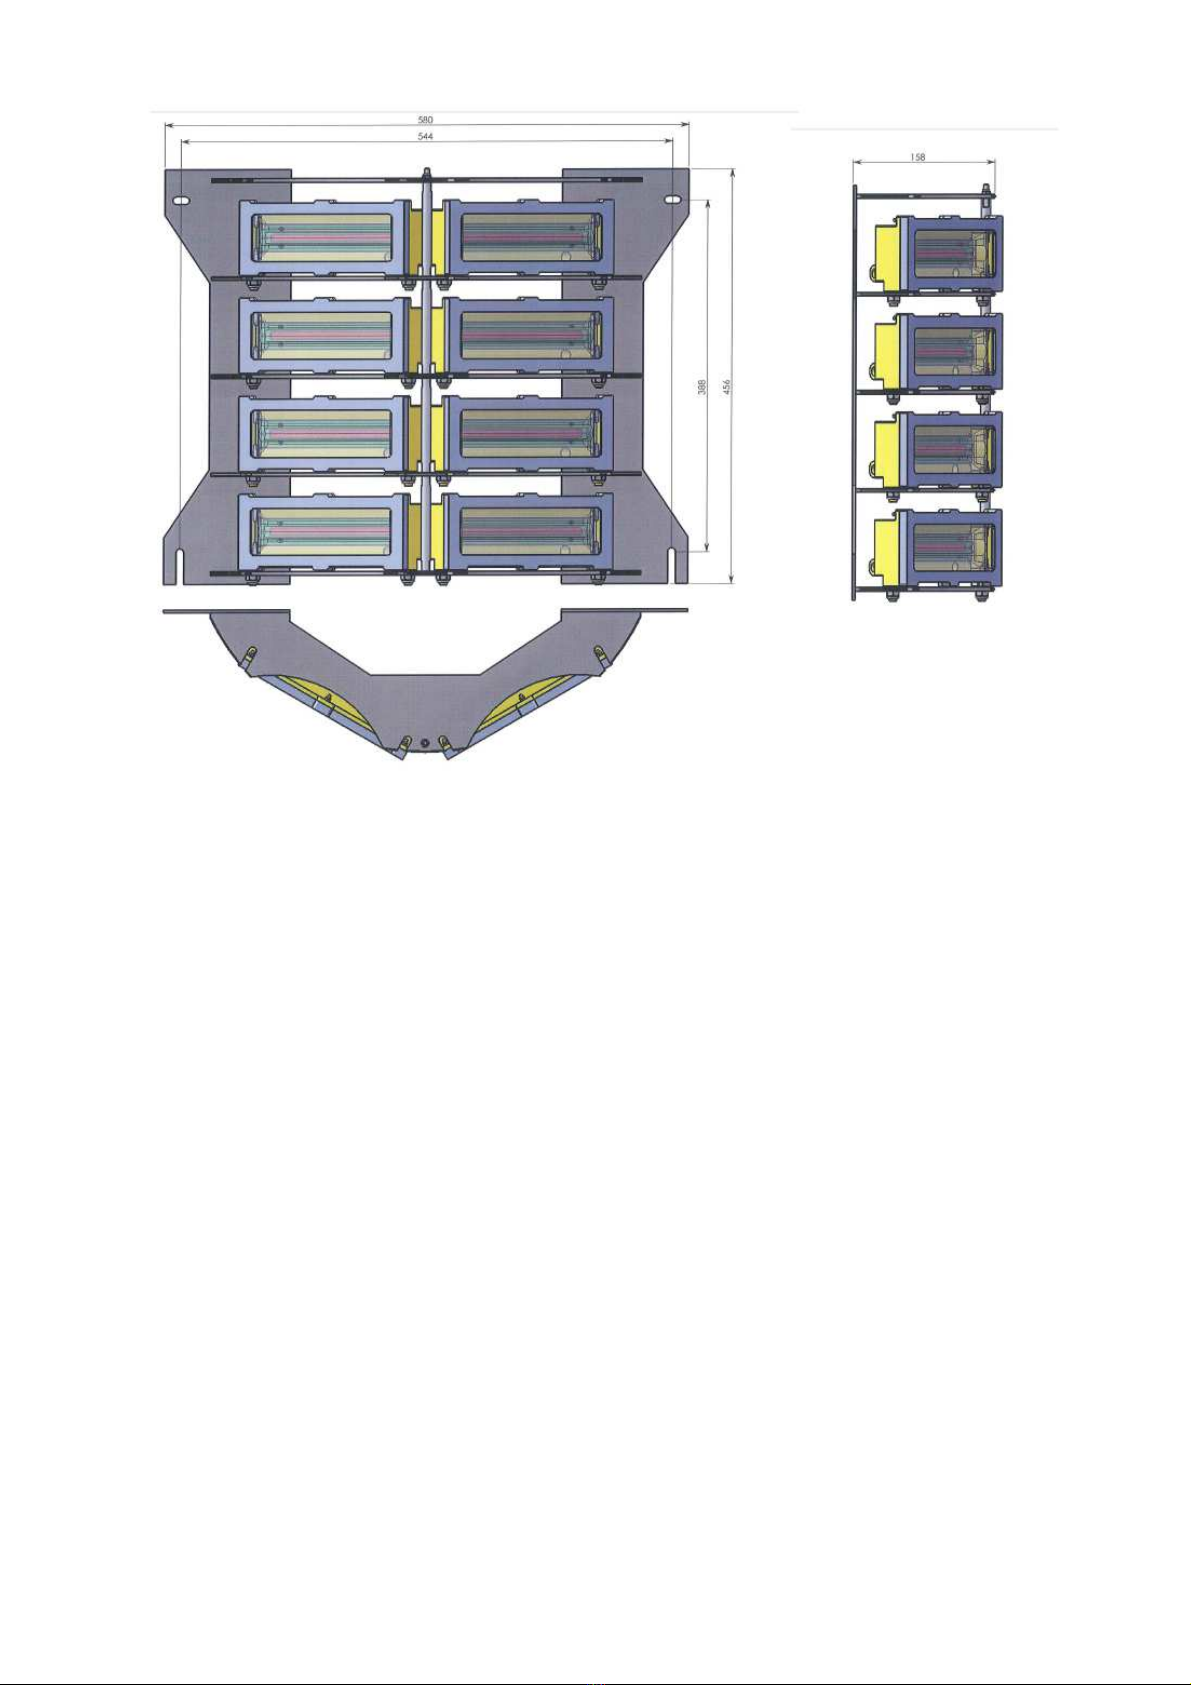
Led projectors in this lighting system Produce brilliant flashes of light which can result in temporary
or permanent eye damage. DO NOT LOOK DIRECTLY AT THE PROJECTOR WHILE IT IS
IN OPERATION.
WARRANTY
OBSTA warrants the equipment described in the instruction manual and sold to purchaser to be free from
defects in material and workmanship at the time of shipment. OBSTA's liability under this warranty being
limited to repairing or replacing, at OBSTA's option, items which are returned to it prepaid within twenty four
(24) months from shipment to the original Purchaser, or twelve months from commissioning, and found, to
OBSTA's satisfaction, to have been defective. In no event shall OBSTA be liable for consequential damages.
NO PRODUCT IS WARRANTED AS BEING FIT FOR A PARTICULAR PURPOSE AND THERE IS NO
WARRANTY OF MERCHANTABILITY. This warranty applies only if: (I) the items are used solely under
the operating conditions and in the manner recommended in OBSTA's instruction manual, specifications, or
other literature; (II) the items have not been misused or abused in any manner or repairs attempted thereon;
(III) written notice of the failure within the warranty period is forwarded to OBSTA and the directions
received for properly identifying items returned under warranty are followed; and (IV) such return notice
authorizes OBSTA to examine and disassemble returned products to the extent OBSTA deems necessary to
ascertain the cause of failure. The warranties stated herein are exclusive. THERE ARE NO OTHER
WARRANTIES, EITHER EXPRESSED OR IMPLIED, BEYOND THOSE SET FORTH HEREIN, and
OBSTA does not assume, nor does OBSTA authorize anyone else to assume for it, any other obligation or
liability in connection with the sale or use of said products. OBSTA's liability on any claim of any kind,
including negligence, for loss or damages arising out of or connected with the manufacture, sale, delivery,
repair or use of any equipment or services provided by OBSTA shall in no case exceed the price allocable to
the item or service or part thereof which gives rise to the claim.
The integrity and reliability of OBSTA aviation obstruction lighting systems is dependent on the use of
OBSTA parts and components. To ensure the optimum performance and reliability of your OBSTA system, it
is strongly advised that only components and modules manufactured by OBSTA be used.
NOTICE
The integrity and reliability of OBSTA aviation obstruction lighting systems are dependent on
the use of OBSTA parts and components. To ensure the optimum performance and reliability of
your OBSTA system, it is strongly advised that only components and modules manufactured by
OBSTA be used.
WARNING!
Modifications to the Power Supply are required for certain applications. Documentation
to describe these changes may be found at the end of the manual.

4
1.0 - GENERAL INFORMATION
1.1 Scope
This manual provides information about the installation, operation, and maintenance of the
OBSTAFLASH HI Led High Intensity Obstruction Lighting Systems manufactured by OBSTA. The
lighting systems described in this manual are ICAO High intensity type A, for use as high intensity
aviation obstruction warning systems.
1.2 General Description
The OBSTAFLASH HI Lighting System is led high intensity systems manufactured to comply with
ICAO annex 14 chapter 6. Each system consists of 1 beacon covering 120° in azimuth, an associated
power supply with integrated controls, an ambient light sensor (photocells) and the interconnecting
cable. System components are shown in Figures 1-1 to 1-8 pages 5 to 12.
The OBSTAFLASH HI beacon consists of 8 led projectors made in hard glass and aluminum, and a
stainless bracket. Each projector includes 2 white led circuits working in active redundancy: in case one
circuit is out of work, the second one keeps on working in the same azimuth, a remote alarm is activated
and related luminous indicator goes red.
The stainless power supply contains:
-
-9 modular power cards
-2 command cards to monitor the 8+1 power cards. The command card do have :
o8 luminous indicator for the 8 power cards used during day/twilight
o1 luminous indicator for the power card for the red circuit used during the night
o1 luminous indicator for synchronization signal,
o1 luminous indicator for synchronization failure in case no signal is received
o1 luminous indicator for general alarm
-all related power circuit (surge protection, switch, DC power, test buttons)
-a main switch and an AC power indicator.
So total is 12 active luminous indicators
The S1 test button allows 3 positions:
-
“Up”: remote position, the light is in normal operation
-
“Middle”: the light are forced in “day” or “twilight” or “night” mode according to S2
-
“Down” remote position, the light is in normal operation
The S2 test button in figure 1-1 page 5 allows 3 positions:
-
“Day” position, the light is forced in day mode
-
“Twilight” position, the light is forced in twilight mode
-
“Night” position, the light is forced in night mode.

5
Test Night II
Test Twlight 0
Test Day I
Alimentation à découpage 1
120-230Vac 48VDC
/ Power Supply 1
COMMAND BOARD DAY
120-230Vac 48VDC
COMMAND BOARD NIGHT / TWILIGHT
II
control
S2
I
0
Power
Carte de commande
/ Command board
Carte de commande
P/N :1 1 3 7 4 4H IL
/ Command board
P/N :1 1 3 744 H IR
ON : Master
OFF : S lave
P/N:113741B
LED blanc he
Ca rte d e p ui s s a n ce
LED blanche
wh it e L ED
/ Power card
Ca rte d e p u is s a nc e
P/N:1 1 3 7 4 1 B
wh i t e L E D
/ Power card
Alimentation à découpage 2
120-230Vac 48VDC
/ Power Supply 2
120-230Vac 48VDC
haut /up
bas/ down
S1
Ca rte d e p uis s an c e
LED blanche
Ca rte d e p uis s an c e
P/N:113741B
/ Power card
wh i t e L E D
Ca rte d e p u is s a nc e
LED blanc he
wh i t e L E D
/ Power card
LED blanc he
P/N:1 1 3 7 4 1 B P/N:1 1 3 7 4 1 B
/ Power card
wh i t e L E D
Ca rte d e p ui s sa nc e
LED blancheLED blanche
wh i t e L E D
/ Power card
Ca rte d e p ui s s a n ce
P/N:1 1 3 7 4 1B
wh i t e L E D
/ Power card
P/N:113741B
LED blanche
wh i t e L E D
/ Powe r card
Ca rte d e p ui s sa nc e
P/N:1 1 3 7 4 1 B
Up Remote
Middle Test mode
Down Remote
PARAFOUDRE CITEL
/CITE L S U RGE P R OTE C TION
Li ne
Neutr ale
123 45
Night
Twi l i ght
123
+ 48v
+ 48v
+ 48v
6
No use
Moni t or
4
+ 48v
7
Synchro
LED rouge
re d LED
/ Power card
Ca rte d e p ui s sa nc e
P/N:1 1 3 7 4 1 B
CCA
A
REL AY
PWR+
GND
CTRL
B
PWR+
GN D
CCB
18
PCB2
17
PCB1
16
15
654
321
6
5
4
321
12
12
3
3
PCA5PCA2PCA1 PCA3 PCA4 PCA6
1211
109
8
765
43
2
1
TB1
Sectionneur
/Switch
O
N
OMC N C
O
N
OMC N C
O
N
OMC N C
O
N
OMC N C
O
N
OMC N C
O
N
OMC N C
RE LAY 6 Twilight Manu
RELAY 5 Night Manu
RE LAY 4 AUTO/MANU
D
RELAY 3 AUTO/MANU
T/N
RELAY 2 twilight Auto
RELAY 1 Night Auto
12
14
11
12
14
11 12
14
11 12
14
11 12
14
11 12
14
11
A1
A2
A1
A2
A1
A2
A1
A2
A1
A2
A1
A2
TB2
Fault Transmitter Card
28
PCB7
27
OFP-CAB-8E-RW-240-HIA
P/N:113782RW-8E
NO C O M NC O UT Ni gh t D a y + 4 8 G ND
CTRL
RELAY
Figure 1-1. Power supply component locations P/N:113782RW-8E

6
Figure 1-2 Outline and mouting dimensions Power supply P/N:113782RW-8E

7
Figure 1-3 Outline and mouting dimensions HI flashhead P/N:113781L4

8
Ph2 Ph3 N Ph1 Ph2 Ph3 NPh1
134 678 1345678
123456 3456 123456
25 2
12
TB1 TB2 TB3 TB4
TB7TB6TB5
OUTPUT
CONTROLLER
LEVEL UP
/
113797AOL
113780-RW-3
N°1 or 4
OUTPUT TRI 380V
LEVEL UP
/
113797AOL
INPUT
CO NT RO L LER
Intermediary junction box
P/N: 1238DI
113780-RW-3
N°2 or 5
113780-RW-3
N°3 or 6
INPUT TRI 380V
Figure 1-4. Junction box component locations P/N :1238DI

9
29
200
25
358
25
300
400
350
4 x Ø9 mouting holes
Ø 11 to 21 cable connectors
1 WATER-RESI STANT LOCK
4 Trous de fixation Ø9
Passage de cable Ø 11 à 21
Al l di mensi ons ar e i n mm
1 SERRURE ETANCHE
Matéri el : Inox 316L ep. mi n. 2mm
Material : Stainless steel thi ckness min. 2mm
250
29
BOTTOM VI EW
FRONT VIEW
Figure 1-5 Outline and mouting dimensions junction box P/N:1238DI

10
Figure 1-6 Outline and mouting dimensions Photocell Day/Twilight/Night P/N:113135

11
CCA
A
RELAY
PWR +
GND
CTRL
654321
123
Po w er
control
Sectionneur
/Switch
Com
Nc
No
A2 A1
12
14O
N
11
OMC NC
A2 A1
12
14O
N
11 OMC NC
A2 A1
12
14O
N
11 OMC NC
A2 A1
12
14O
N
11 OMC NC
A2 A1
12
14O
N
11 OMC NC
A2 A1
12
14O
N
11 OMC NC
RELAY 6 Cr ep Manu
RELAY 5 Nuit Manu
RELAY 4 AUTO/MANU
J/C
RELAY 3 AUTO/MANU
C/N
RELAY 2 Cr épu Auto
RELAY 1 Nuit Auto
OFH-CTR
P/N : 113625L
Fault Tr ansm itter C ar d
Test Night II
Test Twlight 0
Test Day I
Alimentation à découpage
120-230Vac 48VDC
/ Power Supply
CO M MAND BO ARD
120-230Vac 48VDC
II
S2
I
0
Carte de commande
P/N :113744
/ Command board
Up Remote
Midle Test mode
Down Remote
Master/Slave
Do not touch
Do not touch
Do not touch
Do not touch
Do not touch
Do not touch
Do not touch
PAR AFO U D R E C ITEL
/C ITEL SU RG E PR O TEC TIO N
TB2
TB1
123
Li ne
Neutr ale
123 45
Night in
Twi l i ght i n
6
+ 48V P hotoc
- 48V Photoc
7
- 48V
89
Night out
10
Twilight out
Moni tor
11
Synchro
NOCOMNC OUT Night Day +48 GND
Figure 1-7. Controller component locations P/N:113625L

12
Figure 1-8 Outline and mouting dimensions Controller P/N:113625L

13
1.3 SPECIFICATIONS
1.3.1 LIGHT OUTPUT
Intensity
Day………………………....................................200 000 ±25% effective candelas, single flash
Twilight....................................................................20 000 ±25% effective candelas, single flash
Night...........................................................................2 000 ±25% effective candelas, single flash
BeamPattern................................................................................120º horizontally; 3º min. vertically
FlashRate:................................................................................................................................. 40 fpm
Master/slaveconfiguration:....................................................... up to 32 lights can be synchronized
Withcontroller:................................................................................ up to 32 lights can be connected
1.3.2 ELECTRICAL INPUT
PowerSupply.............................................................................................110V to 220VAC 50/60Hz
Maxwattage…………………………………….…………………………………………….1kW
1.3.3 MECHANICAL PROPERTIES
Obstaflash
Weight...................................................................................................................................15 kg
Dimensions..........................................................
w = 158 mm x h = 456 mm x l = 580 mm
SurfaceArea......................................................................................................................870cm²
WindLoad...................................................................................................
35 kg at 240 Km/h
PowerSupplyObstaflash
Weight...................................................................................................................................25 kg
Dimensions.................................................................w = 350 mm x h = 590 mm x l = 250 mm
Controller
Weight...................................................................................................................................12 kg
Dimensions.................................................................w = 300 mm x h = 400 mm x l = 200 mm
1.3.4 OPERATING ENVIRONMENT
OperatingTemperature................................................................................................. -40ºC to +55ºC
Humidity........................................................................................................... 95% relative humidity
1.3.5 SYSTEM OPERATING STATUS INDICATORS
-1 red indicator for power supply
-On the command card: 12 luminous indicators see figure 1-1
-Fault indication: Relay closure, contact rating of 3A at 220VAC

14
SECTION 2 : PRINCIPLES OF OPERATION
2.1 Power supply P/N 113742
The main power input is converted in 48VDC through the AC power supply that feeds the 2 command
cards and power cards.
2.2 Power cards P/N 113741B
The system includes 9 power cards that regulate the current sent to the 16 white led circuits and 1 red
led circuit as per figure 2-2:
-
8 power cards for white led circuits: each card regulates the current of 2 white led circuits of the
same projector during daytime and twilight;
-
1 power card that regulates the current of the 1 red led circuit during night time; the red led
circuit is in serial with 2 projectors.
Those power cards are connected to the command card through connector. The status of the
command cards and their respective led circuits are indicated by the luminous indicators D6 to D12
on the command card (figure 2-1 below). Those indicators are normally off and red blinking in case
of default.
2.3 Command cards P/N 113744L and 113744R
The 2 command cards are powered in 48V
-
First command card P/N113744L is used for day only and monitor the power cards of the 6
lower projectors. This command card is switch off during twilight and night mode
-
Second command card P/N113744R is used in day, twilight and night mode and monitor the
power cards of the 2 upper projectors
Day command card 113744L send an alarm in case more than 3 white circuits are out of order
Twilight/night command card 113744R send an alarm in case 2 circuits are out of order.
Both those command cards allow to detect the alarm of the complete system with 9 luminous
indicators described in figure 2-1,
The second command card P/N113744R allows to define through the dip-switches below
- the color during twilight/night,
- master or slave mode of the system (dipswitch n°1). Without controller or GPS, one command card
113744R must be set up in master mode and all command cards from other flashheads be in slave
mode. In case of GPS or external controller is used, all command cards must be set up in slave mode.
Note: The configuration of the 2 command cards is done in the
factory and shall not be modified by the end-user
.
Dip switches on the command card 113744R
•
Color during night time: dipswitch n°6 « on » -> red color (default setting), « off » -> white
color
•
when set-up in master mode (dipswitch n°1 on « on »), the command card P/N113744R
creates a top sync pulse indicated by D14 sent to second command card 113744L and other flash-
heads from terminal 1

15
•
when set-up in slave mode (dipswitch n°1 on « off»), the command card waits for a top sync
pulse on terminal 3, D14 also blink at the same frequency
•
If no pulse is received from terminal 3, D14 is off and light flashes on its own at 15 fl per
minute as per D13
Warning: In case changing master/slave dipswitch n°1 position, do not forget to change the
position on the terminal connection 1 to/from 3 of the pulse wire accordingly on the command
card

16
Figure 2-1. Luminous indicators on the command card

17
Figure 2-2. Wiring of led circuits on the command card

18
SECTION 3.0 – INSTALLATION (wiring diagram 3-1 to 3-5 page 19 to 24)
3.1 Unpacking
Carefully unpack each item and remove any internal packing material from the power supply and the obstaflash.
Examine each item for obvious physical damage. Report any claims to the carrier immediately. Pertinent data
such as installation drawings, schematics, interconnection drawings, and operation manuals are included in the
power supply carton.
3.2 Mounting and Preparation
3.2.1 OBSTAFLASH HI beacon
Normally almost 3 obstaflash beacons are mounted at 120° around the obstacle at each level on the structure on a
vertical plan.
The interconnection between the flashhead to their respective power cabinet is done with the 8 cables of
projectors according to Figure 3-1.

19
CCA
A
RELA Y
PWR+
GND
CTRL
B
PWR+
GND
CCB
18
PCB2
17
PCB1
16
15
Cable gland
6
5
4
321
6
5
4
321
12
12
3
3
PCA5PCA2PCA1 PCA3 PCA4 PCA6
1211109
8
765
43
2
1
TB1 TB2
Cable gland Cable gland Cable gland Cable gland
Cable gland Cable gland Cable gland
OFH-CAB-8 P-8 E-24 0-HI A
P/N:113782RW-8E
PCB2
27 28
Sectionneur
/Switch
O
N
OMC NC
O
N
OMC N C
O
N
OMC N C
O
N
OMC N C
O
N
OMC NC
O
N
OMC NC
REL AY 6 Cre p M anu
REL AY 5 Nu i t M a nu
REL AY 4 AUT O/ M ANU
J /C
REL AY 3 AUT O/ M ANU
C/N
REL AY 2 Cré pu Au to
REL AY 1 Nu i t Au to
12
14
1112
14
11 12
14
11 12
14
11 12
14
11 12
14
11
A1
A2
A1
A2
A1
A2
A1
A2
A1
A2
A1
A2
Te st N i ght I I
Test Twl ight 0
Test Day I
Alimentation à découpage 1
120-230Vac 48VDC
/ P ower Suppl y 1
COMMAND BOARD DAY
120-230V ac 48V DC
COMMAND BOARD NIGHT / TWILIGHT
Carte de commande
/ C o mma n d bo ar d
Carte de commande
P /N :113744H IL
/ C o mma n d b oa r d
P /N :113744H IR
ON : M a s t er
OF F : Sl a v e
P/N:113741
LE D bl anc he
Carte de puissance
LE D bl anc he
whi te LED
/ Power card
Carte de puissance
P/N:113741
whi te LED
/ Power card
Alimentation à découpage 2
120-230Vac 48VDC
/ Power Supply 2
120-230V ac 48V DC
haut /up
bas/ down
Carte de puissance
LE D bl anc he
Carte de puissance
P/N:113741
/ Power card
white LED
Carte de puissance
LE D bl anc he
white LE D
/ Power card
LE D bl anc he
P/N:113741 P/N:113741
/ Power card
whi te LED
Carte de puissance
LE D bl ancheLE D bl anc he
whi te LED
/ Power card
Carte de puissance
P/N:113741
whi te LED
/ Power card
P/N:113741
LE D bl anc he
white LE D
/ Power card
Carte de puissance
P/N:113741
Proje c t eur N °7
Proje c t eur N °5
Proje c t eur N °3
Proje c t eur N °1 Projec te ur N °2
Projec te ur N °4
Projec te ur N °6
Projec te ur N °8
Flas hhead HI
II I
control
0
S2
Po w e r
Up Remote
Middle Test m ode
Down Remote
S1
/ P ower card
P/N:113741
Carte de puissance
LE D r ouge
red LE D
PARAFOUDRE CIT EL
/CITEL SURGE PROTECTION
Line
Neutrale
123 45
Night
Twilight
123
+ 48v
+ 48v
+ 48v
6
No use
Monitor
4
+ 48v
7
Synchro
CTRL
RELAY
Figure 3-1 Wiring between power supply and its flashhead

20
3.2.2 OBSTAFLASH Power Supply
The power supply is connected to its respective obstaflash via the 4 meters cable provided with each led
projector. If you required longer length of cable, consult your OBSTA representative.
3.2.3 Ambient Light Sensor P/N113135
The ambient light sensor should be mounted upright, away from artificial light (eg., floodlights), and in a
location that will enable its sensor window to have an unobstructed view of the polar sky (eg., pointed north in
the northern hemisphere). The ambient light sensor should be connected on the master light (if there is no
controller) or on the controller (if there is a controller).
The ambient light sensor is powered through 48VDC and contains 2 photocells each returning a 0V or 48Vdc
output to indicate day/twilight or twilight/night to the system
First “Photocell twilight” returns a 0V during day and 48Vdc during twilight/night
Second “Photocell night” returns a 0V during day/twilight and 48Vdc at night
3.2.4 Wireless synchronization by GPS P/N113746 (option)
If included with the system, the GPS is a DIN rail module fixed inside the power supply of each light. It comes
with an external antenna to be mounted in an unobstructed location of the sky.
The GPS module does have 2 luminous indicators that give the information received from the satellite (usually 5
to 10 minutes after initialization):
-1 green indicator blinking at 40 flashes per minute
-1 red indicator switched off during day/twilight time and switched on during night time that optionally can
be used instead ambient light censor
This manual suits for next models
7
Table of contents
Other obsta Lighting Equipment manuals
Popular Lighting Equipment manuals by other brands

Imtra
Imtra OFFSHORE Series installation instructions

Cooper Lighting
Cooper Lighting MS245R instruction manual

Larson Electronics
Larson Electronics EPL-PM-150LED Instruction guide

Xavax
Xavax 00112926 operating instructions

Boca Flasher
Boca Flasher NICHE-HV installation manual

Gemmy
Gemmy AIRBLOW INFLATABLE 221215 quick start guide