Ocean star RP-TT70 User manual

TURNTABLE AUDIO SYSTEM
MODEL: RP-TT70
USER MANUAL
PLEASE READ THIS USER MANUAL COMPLETELY BEFORE OPERATING THIS
UNIT AND RETAIN THIS BOOKLET FOR FUTURE REFERENCE.

E-1
WARNING
TO PREVENT FIRE OF SHOCK HAZARD, DO NOT USE THIS PLUG WITH AN
EXTENSION CORD, RECEPTACLE OR OTHER OUTLET UNLESS THE BLADES CAN
BE
FULLY INSERTED TO PREVENT BLADE EXPOSURE. TO PREVENT FIRE OR
SHOCK
HAZARD, DO NOT EXPOSE THISAPPLIANCE TO RAIN OR MOISTURE.
The rating plate is located at the back panel of the apparatus.
IMPORTANT SAFETY INSTRUCTIONS
1. Read these instructions.
2. Keep these instructions.
3. Heed all warnings.
4. Follow all instructions.
5. Do not use this apparatus near water.
6. Clean only with dry cloth.
7. Do not block any ventilation openings. Install in accordance with the manufacturer’s instructions.
8. Do not install near any heat sources such as radiators, heat registers, stoves, or other apparatus
(includingamplifiers) that product heat.
9. AC adaptor is used as disconnect device and it should remain readily operable during intended
use. In order to disconnect the apparatus from the mains completely, the AC adaptor should be
disconnected from the mains socket outlet completely.
10. Only use attachments/accessories specified by the manufacturer.
11. Use only with a cart, stand, tripod, bracket, or table recommended bythe
manufacturer, or sold with the product. When a cart is used, usecaution when
moving the cart/apparatus combination to avoid injury from tip-over.
12. Unplug theAC adaptor of this apparatus during lightning storms or when unused
for a long period of time.
13. Refer all servicing to qualified service personnel. Servicing is required when the apparatus has been
damaged in any way, such as AC adaptor cord or enclosure is damaged, liquid has been spilled or
objects have fallen into the apparatus, the apparatus has been exposed to rain or moisture, does not
operate normally, or has been dropped.
14. This appliance shall not be exposed to dripping or splashing water and that no object filled with
liquids such as vases shall be placed on the apparatus.
15. Do not overload wall outlet. Use only power source as indicated.
16. Use replacement part as specified by the manufacturer.
17. Upon completion of any service or repairs to this product, ask the service technician to perform
safety checks.

E-2
18. Power Sources - This product should be operated only from the type of power source indicated on
the marking label. If you are not sure of the type of power supplyto your home, consult your product
dealer or local power company.
19. Object and Liquid Entry - Never push objects of any kind into this product through openings as they
may touch dangerous voltage points or short-out parts that could result in a fire or electric shock.
Never spill liquid of any kind on the product.
20. Damage Requiring Service - Unplug the AC adaptor of this product from the wall outlet and refer
servicing to qualified service personnel under the following conditions:
a) When theAC adaptor is damaged,
b) If liquid has been spilled, or objects have fallen into the product,
c) If the product has been exposed to rain or water,
d) If the product does not operate normally by following the operating instructions. Adjust only
those controls that are covered by the operating instructions as an improper adjustment of
other controls may result in damage and will often require extensive work by a qualified
technicianto restore the product to its normal operation.
e) If the product has been dropped or damaged in any way, and
f) When the product exhibits a distinct change in performance - this indicates a need for
service.
21. Excessive sound pressure from earphones and headphones can cause hearing loss.
22. Minimum distances of 4 inches around the apparatus for sufficient ventilation.
23. The ventilation should not be impeded by covering the ventilation openings with items, such as
newspapers, table-cloths, curtains, etc.
24. No open flame sources, such as lit candles, should be placed on the product.
25. The apparatus should be used in moderate climates.
SAVE THESE INSTRUCTIONS

E-3
COMPLIANCE WITH FCC REGULATIONS
FCC ID: LMZ-RP-TT70
This device complies with Part 15 of the FCC Rules. Operation is subject to the following two conditions:
(1) This device may not cause harmful interference, and
(2) This device must accept any interference received, including interference that may cause
undesired operation.
This equipment has been testedand found to comply with the limits for a Class B digital device, pursuant
to Part 15 of the FCC Rules. These limits are designed to provide reasonable protection against harmful
interference in a residential installation. This equipment generates uses and can radiate radio frequency
energy and, if not installed and used in accordance with the instructions, may cause harmful interference
to radio communications. However, there is no guarantee that interference will not occur in a particular
installation. If this equipment does cause harmful interference to radio or television reception, which can
be determined by turning the equipment off and on, the user is encouraged to try to correct the
interference by one or more of the following measures:
- Reorient or relocate the receiving antenna.
- Increase the separation between the equipment and receiver.
- Connect the equipment into an outlet on a circuit different from that to which the receiver is
connected.
- Consult the dealer or an experienced radio/TV technician for help.
This equipment complies with radiation exposure limits set forth for an uncontrolled environment. This
equipment should be installed and operated with minmum distance 20cm between the radiator & your
body
CAUTION: Changes or modifications not expressly approved by the party responsible for
compliance could void the user’s authority to operate the equipment.
IC Statement
This device contains licence-exempt transmitter(s)/receiver(s) that
comply with Innovation, Science and Economic Development Canada’s
licence-exempt RSS(s). Operation is subject to the following two conditions:
(1) This device may not cause interference; and
(2) This device must accept any interference, including interference that
may cause undesired operation of the device.
The term “IC: “ before the certification/registration number only signifies
that the Industry Canada technical specifications were met. This product
meets the applicable Industry Canada technical specifications.
Cet appareil contient des émetteurs / récepteurs exemptés de licence
conformes aux RSS (RSS) d'Innovation, Sciences et Développement
économique Canada. L'exploitation est autorisée aux deux conditions
suivantes : (1) l'appareil ne doit pas produire de brouillage,
et (2) l'utilisateur de l'appareil doit accepter tout brouillage
radioélectrique subi, même si le brouillage est susceptibled & apos; en
compromettre le fonctionnement.

E-4
PROTECT YOUR FURNITURE!!
The turntable and speaker boxes of this system are equipped with non-skid rubber ‘feet’ to prevent the
them from moving when you operate the controls and while playing. These ‘feet’ are made from
non-migrating rubber material specially formulated to avoid leaving any marks or stains on your furniture.
However certain types of oil based furniture polishes, wood preservatives, orcleaning sprays may cause
the rubber ‘feet’ to soften, and leave marks or a rubber residue on the furniture.
To prevent any damage to your furniture we strongly recommend that you purchase small self-adhesive
felt pads, available at hardware stores and home improvement centers everywhere, and apply these
pads to the bottom of the rubber ‘feet’ before you place the turntable and speaker boxes on fine wooden
furniture.
CUSTOMER
Selecting fine audio equipment such as the unit you've just purchased is only the start of your musical
enjoyment. Now it's time to consider how you can maximize the fun and excitement your equipment
offers. This manufacturer and the Electronic Industries Association's Consumer Electronics Group want
you to get the most out of your equipment by playing it at a safe level. One that lets the sound come
through loud and clear without annoying blaring or distortion and, most importantly, without affecting
your sensitive hearing.
Sound can be deceiving. Over time your hearing "comfort level" adapts to higher volumes of sound. So
what sounds "normal" can actually be loud and harmful to your hearing. Guard against this by setting
your equipment at a safe level BEFORE your hearing adapts.
To establish a safe level:
Start your volume control at a low setting.
Slowly increase the sound until you can hear it comfortably and clearly, and without distortion.
Once you have established a comfortable sound level:
Set the dial and leave it there.
Taking a minute to do this now will help to prevent hearing damage or loss in the future. After all, we
want you listening for a lifetime.
We Want You Listening for a Lifetime
Used wisely, your new sound equipment will provide a lifetime of fun and
enjoyment. Since hearing damage from loud noise is often undetectable
until it is too late, this manufacturer and the Electronic Industries
Association's Consumer Electronics Group recommend you avoid
prolonged exposure to excessive noise.
Customer's Record:
The serial number of this system can be found on the back cabinet of the turntable unit. You should
note the serial number in the space provided as a permanent record of your purchase to aid in
identification in the event of theft of loss.

E-5
LOCATION OF CONTROLS
MAIN UNIT
TOP PANEL
1. TURNTABLE PLATTER
2. TURNTABLE SHAFT
3. 45 RPM ADAPTOR
4. TONE ARM LIFT LEVER
5. AUTO STOP ON/OFF SELECTOR
6. 33/45/78 RPM SELECTOR
7. TONE ARM
8. TONE ARM LATCH
9. STYLUS CARTRIDGE
10. POWER/FUNCTION INDICATOR
11. STEREO HEADPHONE JACK
12. POWER/VOLUME CONTROL
13. FUNCTION SELECTOR
(PHONO / AUX IN / IN)
BACK PANEL
14. AUX IN JACK
15. SPEAKER OUTPUT JACKS (R/L)
16. PITCH CONTROL
17. DC IN JACK
SPEAKER UNITS
18. BASS REFLEX PORT
19. SPEAKER CONNECTOR (RCA PLUG)

E-6
SETTING UP THE SYSTEM
TheRP-TT70system is powered by an externalAC adaptor with an output of DC 12V 2A .
POWER CONNECTION
1. Connect the cord of the power adaptor to the DC IN JACK (#17) located on the back panel of the
main unit.
2. Plug the AC adaptor into a household 120V~ 60Hz AC wall socket.
CONNECTING THE SPEAKERS
The wires attached to the speakers have RCA type SPEAKER CONNECTORS (#19) on the ends for
easy connection. Plug the speaker you place on the right side of the turntable into the red color coded
SPEAKER OUTPUTJACK (R) on the back of the main unit. Plug the speaker you place on the left side
of the turntable into the white color coded SPEAKER OUTPUT JACK (L) on the back of the main unit.
TURNING THE MAIN UNIT OFFAND ON
When the POWER/VOLUME CONTROL (#12) is fully rotated counter-clockwise, you will hear a click
sound and the POWER/FUNCTION INDICATOR (10) will turn off confirming the power is OFF. From
the OFF position, rotate the POWER/VOLUME CONTROL (#12) clockwise and you will hear a click
sound again and the POWER/FUNCTION INDICATOR (10) will turn on confirming the power is ON.
When the power is ON, you can rotate the control normally to adjust the volume of the music playing.
PHONO OPERATION
CARE OF THE TONE ARM AND STYLUS
Remove the white plastic stylus guard from the
cartridge.
Be sure that the TONE ARM (#7) is unlocked
and free to move away from the Tone Arm Rest
prior to operating.
Lock the TONE ARM (#7) in place with the
TONE ARM LATCH (#8) when not in use.
PLAYING A RECORD
1. Rotate the FUNCTION SELECTOR (#13) to PHONO mode.
2. Rotate the POWER/VOLUME CONTROL (#12) clockwise to turn the
unit ON. A click sound will be heard and the POWER/FUNCTION
INDICATOR (#10) will light "red".
3. Raise the Turntable Dust Cover.
4. Place a record on the TURNTABLE PLATTER (#1), use the 45 RPM
ADAPTOR (#3) if required.
5. Set the 33/45/78 RPM SELECTOR (#6) to the proper position
depending on the record to be played.
6. Raise the TONE ARM (#7) from the Tone Arm Rest by using
the TONE ARM LIFT LEVER (#4) and slowly move it over the
record. The TURNTABLE PLATTER (#1) will start to rotate.

E-7
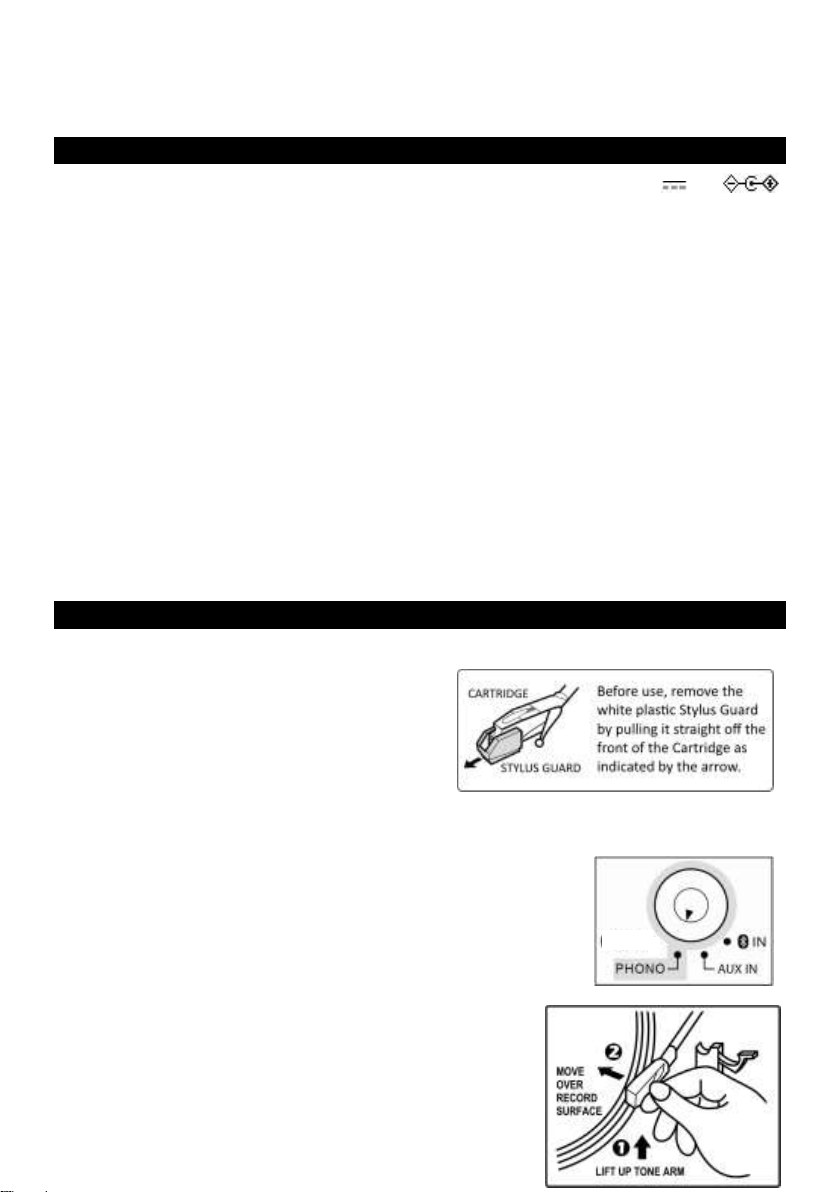
7. Place the TONE ARM (#7) over the part of the record you want to play, and lower the TONE ARM
(#7) using TONE ARM LIFT LEVER (#4). The TONE ARM will automatically lower onto the record
and begin playing.
8. Slowly adjust the output volume to the desired level.
9. At the end of the record, the platter will automatically stop spinning if the AUTO STOP ON/OFF
SELECTOR (#5) remains in the "ON" position. Lift the TONE ARM (#7) away from the record
surface and return it to the Tone Arm Rest.
10. To stop playing manually, lift the TONE ARM (#7) from the record surface using the TONE ARM
LIFT LEVER (#4) while playing and return it to the ToneArm Rest directly.
Notes:
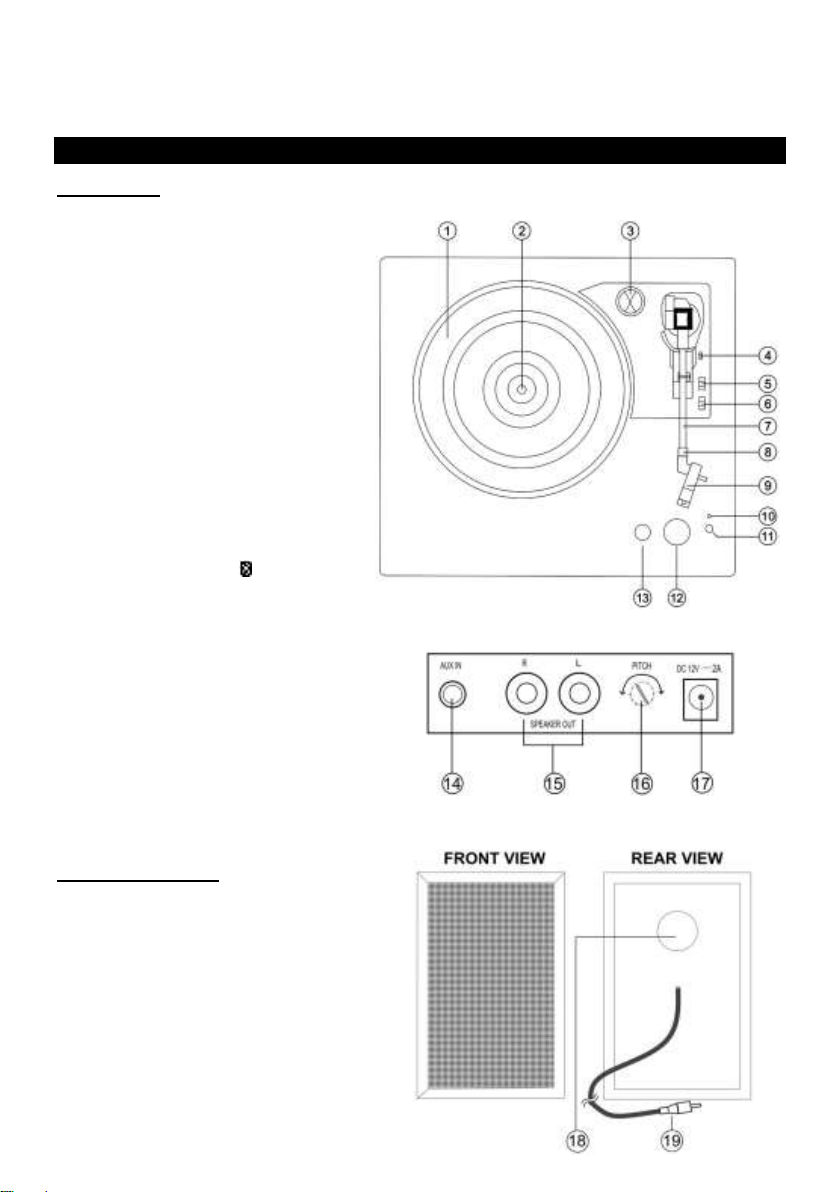
The PITCH CONTROL (#16) allows you to fine tune the playing speed of the record once the
correct speed (33/45/78 RPM) is chosen. Rotate the PITCH CONTROL to slightly increase or
decrease the speed of the turntable if necessary.
Certain types of records may have an auto-stop area outside the preset limit, so the turntable
may stop before the last track finishes. If this occurs, set the AUTO STOP ON/OFF SELECTOR
(#5) to the "OFF" position. This allows the record to play to the end, but please note that it will not
stop automatically. You must manually lift the TONE ARM (#7) and place it back on the Tone Arm
Rest and then set the AUTO STOP ON/OFF SELECTOR (#5) to the “ON” position to stop the
turntable from spinning.
To stream your record music to external Bluetooth speakers (not included), see the BLUETOOTH
OUT OPERATION section.
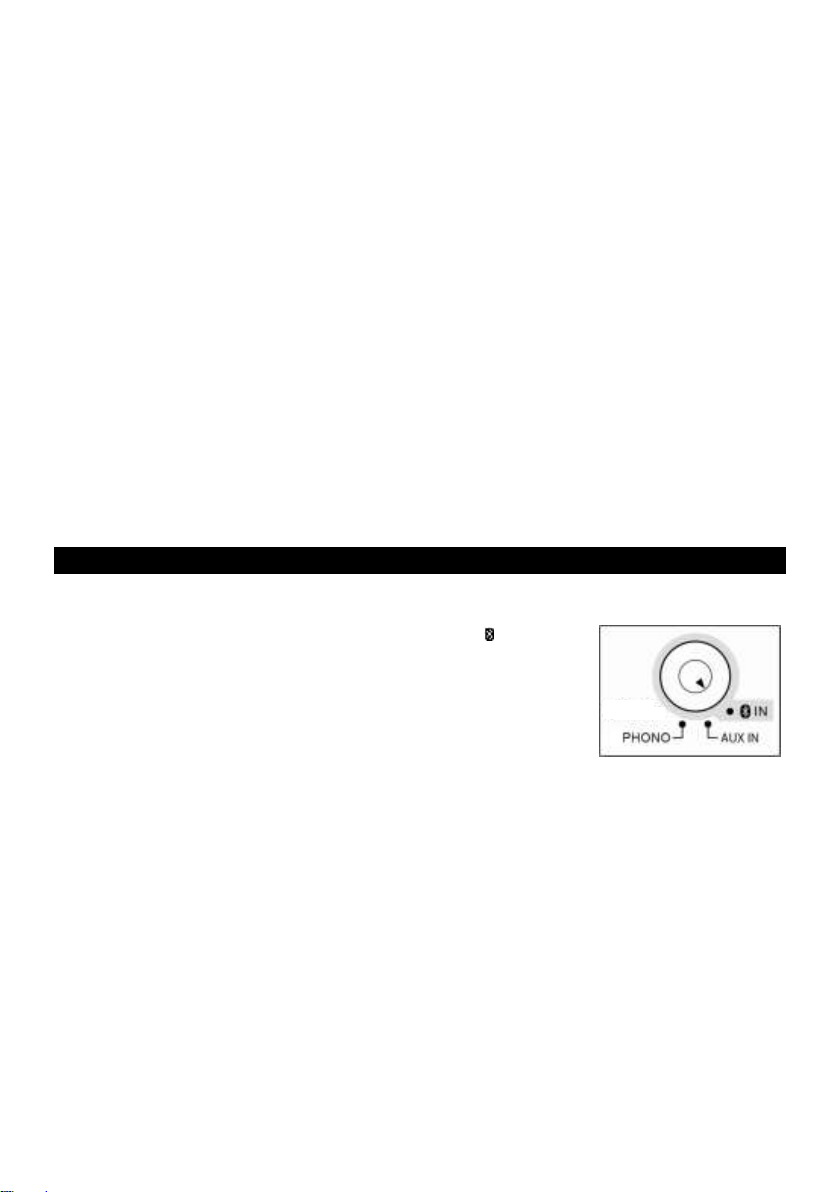
BLUETOOTH IN OPERATION
An external device with Bluetooth Connectivity, like a cell phone, can be wirelessly connected to the
RP-TT70 system using the Bluetooth IN function.
1. Rotate the FUNCTION SELECTOR (#13) to select the IN mode.
2. Rotate the POWER/VOLUME CONTROL (#12) clockwise to turn the
unit ON. A click sound will be heard and the POWER/FUNCTION
INDICATOR (#10) will light "blue" and begin to flash.
3. Turn on the Bluetooth feature of your Bluetooth device and enable
the search or scan function to find the “RP-TT70” under the available
device list.
4. Select "RP-TT70" from the device list when it appears on your device's screen. If required, enter
the pass code “0000” to pair (link) the "RP-TT70" with your device.
5. Once connected, the POWER/FUNCTION INDICATOR (#10) will stop flashing and remain lit
"blue".
6. You are now connected to your external Bluetooth device.
7. Rotate the POWER/VOLUME CONTROL (#12) and/or the volume control on your Bluetooth
device to adjust the sound level.
Notes:
1. Refer to the manual of your cell phone, tablet PC, computer or other Bluetooth enabled devices
for correct Bluetooth operation since it may vary from model to model.
2. If your Bluetooth enabled device does not support A2DP profile, it will not play the music through
the speaker, even if correctly paired (linked).
3. Remember to turn OFF the RP-TT70 system when you have finished listening.

E-8
AUX IN OPERATION
The RP-TT70 system provides an AUX IN JACK (#14) for connecting external audio devices like MP3
players, CD players, smart phones and iPods (except iPod shuffle 3rd
generation) to listen to your external source through the speakers of this
system.
1. You need an audio cable (not included) with one 3.5 mm stereo
plug on each end of the cable.
2. Plug one end of the cable into the AUX IN JACK (#14) located on
the rear panel of the unit and the other end of the cable into the
Line-out Jack or Headphone Jack of your external audio device.
3. Turn on the external audio device.
4. Rotate the FUNCTION SELECTOR (#13) to select the AUX IN mode.
5. Rotate the POWER/VOLUME CONTROL (#12) clockwise to turn the unit ON. A click sound will
be heard and the POWER/FUNCTION INDICATOR (#10) will light "purple".
6. Use the POWER/VOLUME CONTROL (#12) on the unit to adjust the output volume.
7. Operate all other functions on the external device as usual.
Notes:
If you connect the Line-out Jack on your external device then you only need to adjust the volume
control of this system. If you connect the Headphone Jack of your external device then you may
need to adjust both the volume control of your external device and the volume control of this
system to find the most desirable volume setting.
Rotate the POWER/VOLUME CONTROL (#12) counter-clockwise until you hear a “click” sound to
turn OFF the system when you have finished listening. Don't forget to switch OFF the power of
your external device as well.
USING HEADPHONES
Plug your headphones (not included) into the STEREO HEADPHONE JACK (#11) on the front panel of
the Turntable Unit for private listening. After plugging in the headphones, the speakers will
automatically be disconnected.
WARNING : ALWAYS LOWER THE VOLUME LEVEL BEFORE PUTTING ON YOUR
HEADPHONES, OTHERWISE YOUR HEARING COULD BE DAMAGED.
CARE AND MAINTENANCE
RECORD CARE AND MAINTENANCE
To ensure the best sound and the least amount of wear on your records, it’s essential that they are kept
clean. Make sure your records, especially older ones are sufficiently cleaned prior to playing them.
Thoroughly clean dust off the stylus and record regularly.
Use a soft brush to clean the stylus. Brush from the base to the tip as shown below.

E-9
For records with only light amounts of dust, we recommend brushing them off with a carbon
fiber brush or velvet pad before playing them. Use a good quality record cleaner and brush
set to keep your records clean. Carbon fiber brushes, velvet pads and record cleaning kits
are available online or in local record stores.
Using a mild dish soap and warm water for washing your records will also help remove
excess dirt and dust that builds up over the years. Use a microfiber cloth when washing and
wiping off any excess water from the record once they have been cleaned.
Note: Remember, the best cleaning in the world just removes all the dust and dirt. Some records will
have scratches and groove wear. No amount of cleaning will fix this. So after cleaning, some records
may sound “perfect” and others may not.
SPECIFICATIONS
AC/DC Adaptor Input: AC 100-240V ~, 50/60Hz, 0.8A
Output: DC 12V 2A
Bluetooth Version v4.2+EDR
Rated Audio Output Power 2 x 10Wrms
Speaker Ratings 4 ohms, 10W
* Design and specifications are subject to change without notice.

E-10
TROUBLESHOOTING GUIDE
SYMPTOM
POSSIBLE CAUSE
POSSIBLE SOLUTION
Power does not come on
AC adaptor is not securely
connected to householdAC outlet.
Reconnect theAC adaptor.
No sound
Power/Volume Control is fully
turned down or main unit is Off.
Rotate the Power/Volume
Control to the right for a "click"
sound to turn On the main unit
and increase the volume
output level.
Sound is distorted
Volume level is set too high.
Decrease the volume.
Sound source is distorted.
Try a different audio source
such as a good unscratched
record or MP3 music through
the AUX IN and BT sources.
Table of contents
Other Ocean star Turntable manuals