OCULUS BIOM 5 User manual

OCULUS BIOM
®
5
CONDITIONING INSTRUCTIONS
BIOM® 5 and Accessories

i / iii Conditioning Instruction BIOM® 5 (G/55185/0818/en)
Notes on this Instruction Manual
This instruction manual explains how to condition the BIOM® 5. It is valid for all re-
usable components and accessories of the BIOM® 5 that must be sterile for use.
To ensure safe operation, it is essential that you use the device correctly. For this rea-
son, you should thoroughly familiarize yourself with the contents of this instruction
manual before operating the device. In particular, pay attention to the safety instruc-
tions.
This instruction manual describes how to condition the following BIOM® 5 models:
BIOM 5c and 5cl (long version)
BIOM 5m and 5ml (long version)
Due to ongoing development, the diagrams shown in the instruction manual may de-
pict minor changes to the devices delivered.
If you have any questions or would like additional information about your device,
please do not hesitate to contact us by phone, mail or fax. Our service team will gladly
assist.
OCULUS Optikgeräte GmbH
OCULUS is certified according to DIN EN ISO 13485, setting high standards of quality
where development, manufacture, quality assurance and service regarding the entire
range of products are concerned.

Table of Contents
Conditioning Instruction BIOM® 5 (G/55185/0818/en) ii / iii
Table of Contents
1 Applicability..................................................................................................................................1
2 Safety Instructions......................................................................................................................1
2.1 About this Manual .........................................................................................................1
2.1.1 Used Graphic Symbols.................................................................................2
2.2 Safety Instructions for Use..........................................................................................2
3 Conditioning Procedure.............................................................................................................4
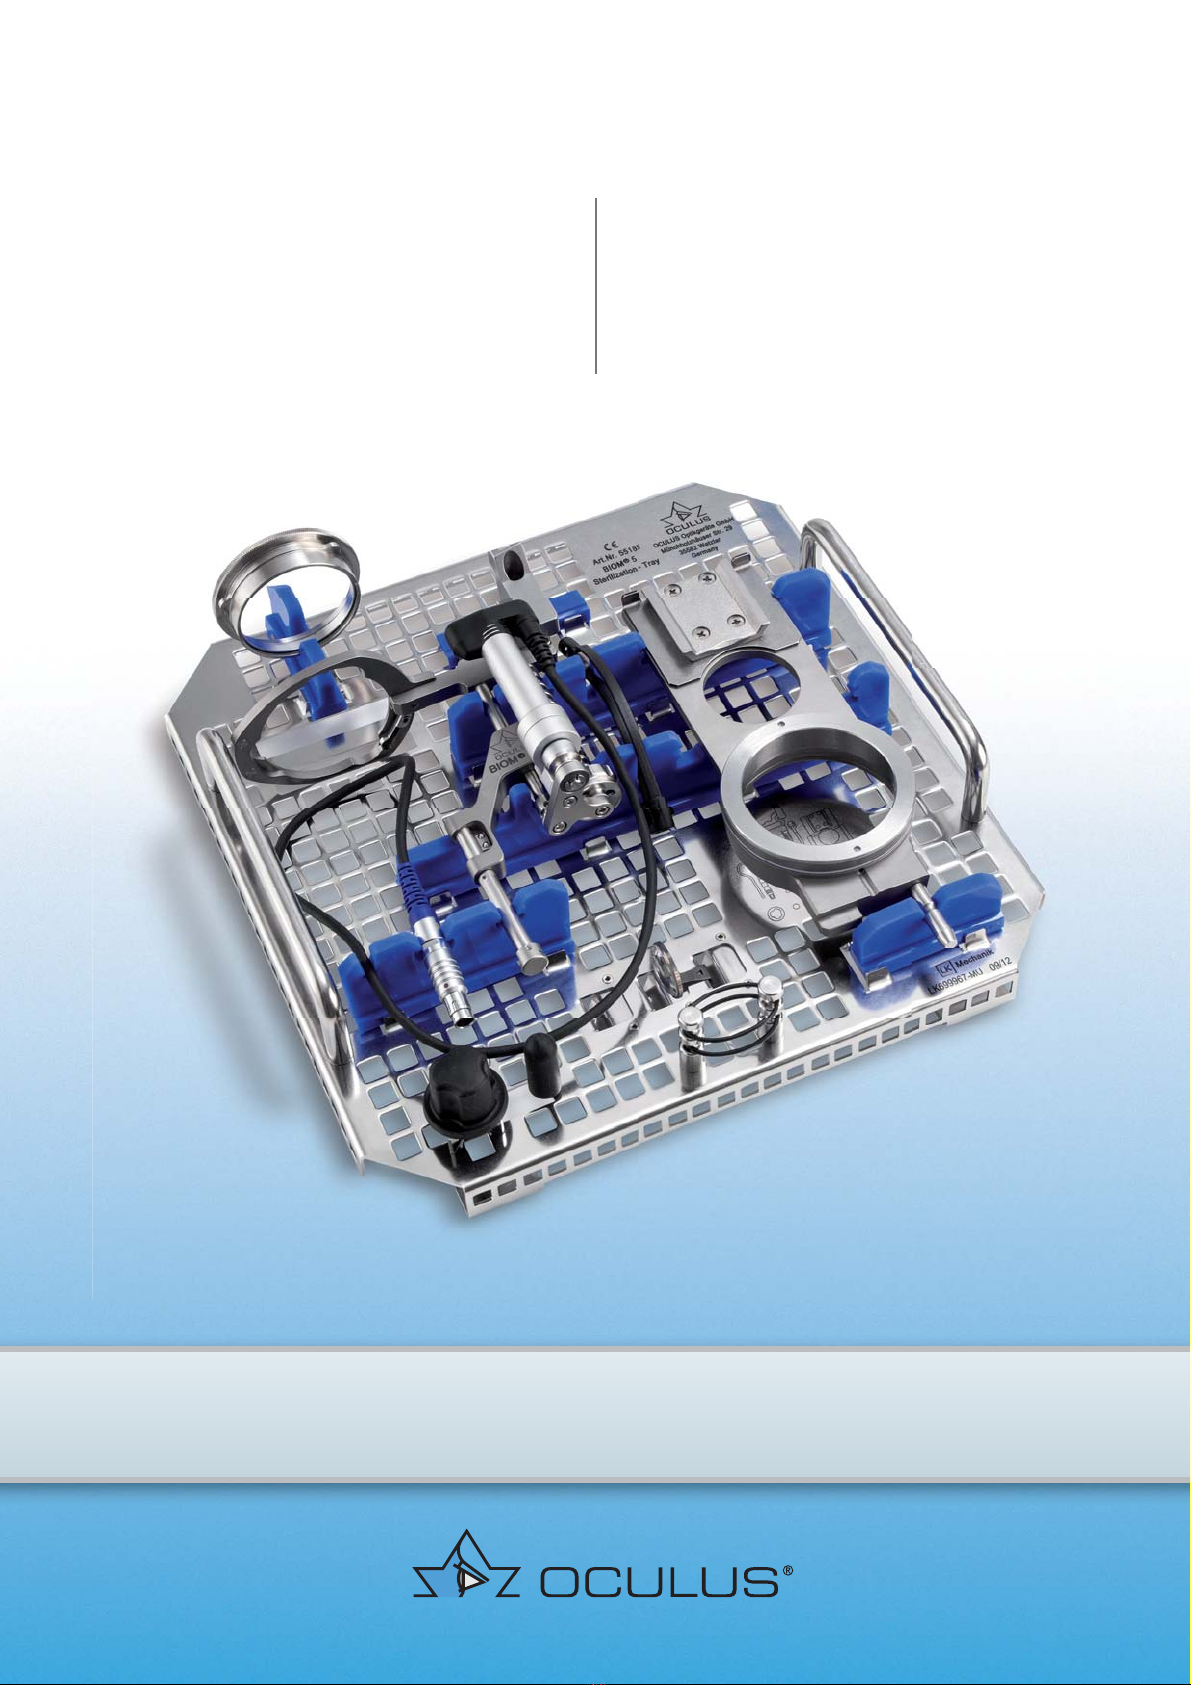
4 Components of the BIOM® 5 to be Conditioned ...............................................................5
5 Cleaning and Disinfection ........................................................................................................6
5.1 Preparation: Dismantle the BIOM® 5 .......................................................................6
5.2 Pre-Cleaning ....................................................................................................................8
5.3 Cleaning/Disinfection by Machine ............................................................................9
5.3.1 Information About Cleaning/Disinfection by Machine......................9
5.3.2 Cleaning and Disinfecting by Machine................................................ 10
5.4 Manual Cleaning/Disinfection ................................................................................. 13
5.5 Cleaning in an Ultrasonic Bath (Optional)........................................................... 14
6 Steam Sterilisation .................................................................................................................. 15
6.1 Prior to Steam Sterilisation ...................................................................................... 15
6.1.1 Function Check Prior to Steam Sterilisation...................................... 15
6.1.2 Lubrication................................................................................................... 18
6.1.3 Packaging..................................................................................................... 19
6.2 Steam Sterilisation...................................................................................................... 19
7 Storage........................................................................................................................................ 20
8 Disposal....................................................................................................................................... 20
9 Guarantee and Service............................................................................................................ 20
9.1 Manufacturer and Service Address ........................................................................ 21
10 Overview: Permitted Sterilisation Method – List of Articles ....................................... 22
11 Consumables and Sterilisable Accessories........................................................................ 25
12 Appendix..................................................................................................................................... 25

Table of Contents
iii / iii Conditioning Instruction BIOM® 5 (G/55185/0818/en)

1 Applicability
Conditioning Instruction BIOM® 5 (G/55185/0818/en) 1 / 26
1 Applicability
These conditioning instructions explain how to condition the BIOM® 5.
They apply for all models and accessories of the BIOM® 5. A list of exactly
which these are is given in sect. 10, page 22.
Example: Symbols on the BIOM® 5 sterilisation insert
2SafetyInstructions
2.1 About this Manual
Carefully read through the conditioning instructions.
Keep the conditioning instructions in a safe place. You must have
access to these during the conditioning process.
Observe the legal requirements for accident prevention.
Heed the supplementary conditioning information supplied with
certain products.
The current version of this manual can be downloaded at www.oculus.de,
or you can request a copy from OCULUS Optikgeräte GmbH, Wetzlar.
1 Company logo + manufacturer 3 Article number
2 Name of device 4 CE marking
Fig. 1–1: Symbols on the BIOM® 5 sterilisation insert
1
4
3
2

2 Safety Instructions
2 / 26 Conditioning Instruction BIOM® 5 (G/55185/0818/en)
2.1.1 Used Graphic Symbols
Attention
Denotes a potentially hazardous situation which can easily result in minor
physical injury or property damage.
Note
Denotes situations which could result in incorrect findings, denotes user
instructions and useful or other important information.
☞
Denotes important information about the product and its use, which
require special attention.
2.2 Safety Instructions for Use
Attention
Risk of injury or material damage if the conditioning procedure is done
incorrectly
Observe the following safety instructions.
Risk of personal injury or property damage due to equipment
modifications that could jeopardize safety
The BIOM® 5 sterilisation insert must not be modified without the
manufacturer’s permission.
Information about the Conditioning Personnel
Ensure that the conditioning is done by duly trained personnel only,
who due to their qualifications or knowledge and practical
experience, can guarantee proper handling.

2 Safety Instructions
Conditioning Instruction BIOM® 5 (G/55185/0818/en) 3 / 26
Conditioning Information
Attention
Risk of injury if the BIOM® 5 is not sterile
If the patient or his bodily fluids come into contact with the BIOM® 5, it
can become contaminated, e.g. when putting it away.
Make sure that the BIOM® 5 is cleaned, disinfected and sterilised.
Condition the BIOM® 5 before the first and every subsequent use.
Comply with the legal provisions in force in your country, and with
the hygiene and waste disposal regulations of the hospital or clinic.
Condition the BIOM® 5 only after you have fully understood this
instruction manual.
The BIOM® 5 and all sterilisable components of the BIOM® 5 must
be cleaned, disinfected and sterilised prior to initial use and prior to
every subsequent use. To do so, take the BIOM® 5 out of the
packaging.
Make sure that only validated device and product-specific
procedures are used for cleaning/disinfection and sterilisation and
that the validated parameters are observed for each cycle.
Use a machine (disinfector) for cleaning/disinfection purposes. This
is much more effective.
Notes on returning
Attention
Personal injury caused by contaminated BIOM® and components
Before returning the product to OCULUS: Prepare the BIOM® and
sterilisable components according to this treatment instructions.
Send only visibly prepared OCULUS products back to OCULUS

3 Conditioning Procedure
4 / 26 Conditioning Instruction BIOM® 5 (G/55185/0818/en)
3 Conditioning Procedure
Cleaning/Disinfection
Preparation
Cleaning/disinfection by machine
or
Manual cleaning/disinfection
Sterilising
Preparation for sterilisation
Steam sterilisation

4 Components of the BIOM® 5 to be Conditioned
Conditioning Instruction BIOM® 5 (G/55185/0818/en) 5 / 26
4 Components of the BIOM®5 to be Conditioned
A list of other conditionable components and other conditioning
accessories is given in sect. 11, page 25.
BIOM®5c/cl
1 BIOM® 5cl 5 Cable duct
2 Adaptor plate 6 Reduction lens
3Drivebelt
4 Ophthalmoscopy magnifying loupe
Fig. 4–1: Components of the BIOM® 5cl
BIOM®5m/ml
1 Adaptor plate 4 Safety rod
2 Housing with swivel mechanism 5 Front loupe
3 Reduction lens
Fig. 4–2: Components of the BIOM® 5ml
6
1
2
4
5
3
1
3
2
5
4

5 Cleaning and Disinfection
6 / 26 Conditioning Instruction BIOM® 5 (G/55185/0818/en)
5 Cleaning and Disinfection
☞
Recommendation:
Clean or disinfect the BIOM® 5 by machine, as this is much more
effective.
Start pre-conditioning immediately after receiving the equipment in
the conditioning station.
5.1 Preparation: Dismantle the BIOM®5
You must dismount the BIOM® 5 before you condition it.
Pull the BIOM® 5 off the adaptor plate. To do so,
swing out the BIOM® 5
Take out the reduction lens and put it down onto
the soft pad.
Pull off the front loupe and put it down onto the
soft pad.
Fig. 5–1: Dismounting the components
1
2
3

5 Cleaning and Disinfection
Conditioning Instruction BIOM® 5 (G/55185/0818/en) 7 / 26
For BIOM® 5c and BIOM® 5cl only:
Detach the cable duct from the plug.
Take off the drive belt. Before sterilising, check that the drive module is
secure. If it is loose, tighten the Allen screw, 2 mm, (1)
at the drive module, or call in your hospital technician
Fig. 5–2: Remove additional components of the BIOM® 5c or BIOM® 5cl
1
2
1
3

5 Cleaning and Disinfection
8 / 26 Conditioning Instruction BIOM® 5 (G/55185/0818/en)
5.2 Pre-Cleaning
Cleaning tools
Cold water
Water pistol
Procedure
Place the BIOM® 5 in cold water for five minutes. The BIOM® 5 must
be fully covered.
Flush the gaps, joints and cavities (the marked locations) for
15 seconds with the water pistol.
You can now clean the components either by machine (sect. 5.3, page 9)
or manually (sect. 5.4, page 13).
Fig. 5–3: Pre-cleaning

5 Cleaning and Disinfection
Conditioning Instruction BIOM® 5 (G/55185/0818/en) 9 / 26
5.3 Cleaning/Disinfection by Machine
5.3.1 Information About Cleaning/Disinfection by Machine
Cleaning/Disinfection Unit (CDU)
Make sure that the CDU meets the following criteria.
It must
have been tested for efficiency (e.g. DGHM I or FDA approval, or CE
marking, in conformity with DIN EN ISO 15883-1 )
Use a tested disinfection programme (at least 5 minutes at 90°C) for
thermal disinfection, as with chemical disinfection, there is a risk of
disinfectant residues being left on the products.
The A0value=3000 must be reached.
Use water of a quality that meets the requirements of DIN EN 285
(including demineralised water with an electrical conductivity of
approx. 15S/cm).
Use air that meets the compressed air requirements in a hospital, for
drying purposes.
Make sure that the detergent and the disinfectant do not react with
each other.
Also see “Appendix” on page 25
Regularly inspect and service the CDU in accordance with in-house
specifications.
Detergents and Disinfectants
Make sure that the detergents and disinfectants meet the following
criteria.
The detergent (e.g. neodisher MediClean concentration 0.5 %, Dr.
Weigert, Hamburg) must:
Be suitable for cleaning the products.
Be compatible with the disinfectant that is used.
Be listed with the DGHM (German Society for Hygiene and
Microbiology)

5 Cleaning and Disinfection
10 / 26 Conditioning Instruction BIOM® 5 (G/55185/0818/en)
Note
Risk of malfunctions and surface damage if alkaline detergents are used.
If you use alkaline detergents:
Properly neutralise after use in accordance with the manufacturer’s
specifications.
Check whether the chemicals that are used are compatible with the
products. Alkaline detergents can attack the surfaces of the products
and lead to malfunctions.
If thermal disinfection (at least 5 minutes at 90°C) is not performed, the
disinfectant must:
Be of a proven efficiency (e.g. have DGHM or FDA approval, or CE
marking).
Be compatible with the detergent that is used.
Always adhere to the detergent and disinfectant concentrations
specified by the manufacturer.
Cleaning method
The following cleaning method was used for validation of the steam-
autoclavability of the BIOMoptics:
See sect. 12, page 25
☞
Use the cleaning method that meets the requirements of your national
standards.
5.3.2 Cleaning and Disinfecting by Machine
Check whether the components have been pre-cleaned, sect. 5.2,
page 8.
Place the components of the BIOM® 5 into the disinfector basket or
into a sterilisation tray.
Secure the loupes in the tray with the holders provided for that
purpose. Loose loupes could get scratched.
To ensure that the effectiveness of the cleaning/disinfection is not
impaired, make sure that the components do not touch each other.
Place the disinfector basket or the sterilisation tray with the
components in the CDU.
For stackable disinfection baskets or sterilisation trays, heed the
manufacturer’s instructions.

5 Cleaning and Disinfection
Conditioning Instruction BIOM® 5 (G/55185/0818/en) 11 / 26
To prevent water stains on the optics, keep the loupes and reduction
lenses as vertical as possible during the cleaning process.
Start the cleaning programme, see sect. 12, page 25, e.g.:
3 Minute pre-wash cycle with cold water
Empty
Clean for 5 minutes at 55°C with cleaning detergent
Empty
3 Minute rinse cycle with cold, demineralised water
Empty
2 Minute rinse cycle with demineralised water
Empty
At the end of the programme: Remove the disinfector basket or the
sterilisation tray from the disinfector.
Check whether the BIOM® 5 needs to be dried with compressed air.
☞
Conduct a function test before you sterilise the BIOM® 5 with steam,
sect. 6.1.1, page 15.
For more information about these jobs, refer to sect. 12, page 25.

5 Cleaning and Disinfection
12 / 26 Conditioning Instruction BIOM® 5 (G/55185/0818/en)
OCULUS Sterilisation Insert
You can use the specially designed sterilisation insert, OCULUS Art.
No. 55185 for the BIOM® 5 and its accessories.
One adaptor plate, the BIOM® 5, one reduction lens, at least one front
loupe, 2 rubber drive belts, sterile cap for the knurled screw, SDI® control
knob belong together. These components can be put into the special
insert and placed into a suitable sterilisation container for sterilisation in
the steam autoclave.
Fig. 5–4: Components of the BIOM® 5 on the sterilisation insert
Dimensions of the OCULUS sterilisation insert
Width 240 mm
Depth 245 mm
Height 53 mm
Total height, loaded 80 mm

5 Cleaning and Disinfection
Conditioning Instruction BIOM® 5 (G/55185/0818/en) 13 / 26
5.4 Manual Cleaning/Disinfection
The method described below has been validated for manual cleaning/
disinfection:
☞
If you clean and disinfect your equipment manually, you must verify your
procedure independently and validate it specific to the product and the
method.
Cleaning tools
Cleaning solution with 0.8% detergent (Cidezyme/Enzol from
Johnson & Johnson)
Water
Procedure
☞
Perform a manual disinfection in accordance with the requirements
of the VAH or the applicable standards.
Check that the components have no visible signs of soiling, sect. 5.2,
page 8.
Place the components in the cleaning solution for 5 minutes at 40°C.
The BIOM® 5 must be fully covered.
Rinse the components for 5 seconds under running water (static
pressure 4.2 bar).

5 Cleaning and Disinfection
14 / 26 Conditioning Instruction BIOM® 5 (G/55185/0818/en)
5.5 Cleaning in an Ultrasonic Bath (Optional)
Note
If the fluid in the ultrasonic bath is too dirty, the cleaning effectiveness
will be impaired and there is a risk of corrosion. The criterion is a visibly
dirty fluid.
Change the cleaning solution based on the operating conditions. This
must be changed regularly, at least once a day.
When cleaning with ultrasound, adhere to the soaking times (at least
3 minutes) and concentrations specified by the manufacturer of the
cleaning additive.
Use the quantity of fluid specified by the manufacturer of the
ultrasonic bath.
Heed the following instructions:
Insert the BIOM® 5 in its unfolded state, with the swivel head
of the BIOM® 5 at an angle.
The loupe holder of the BIOM® 5 must be fully pulled out to the
stop
The products must always be completely submerged in the
cleaning solution
Place the products on trays only
To ensure the effectiveness of the ultrasonic bath and to
prevent damage to the optics, attach the loupes to specially
designed holders.
Fig. 5–5: Cleaning in an ultrasonic bath

6 Steam Sterilisation
Conditioning Instruction BIOM® 5 (G/55185/0818/en) 15 / 26
6 Steam Sterilisation
6.1 Prior to Steam Sterilisation
Attention
Improper cleaning/disinfection is a health risk.
After cleaning/disinfecting the components, check whether they are
macroscopically clean, i.e. free from visible soiling, corrosion or
damage.
If impurities are found: Clean/disinfect the components again.
If corrosion or damage is found: Do not use corroded or damaged
components again for a surgical procedure.
6.1.1 Function Check Prior to Steam Sterilisation
You must check the moving parts of the BIOM® 5 prior to packaging and
steam-sterilising them to ensure their function.
Check all moving parts of the BIOM® 5.

6 Steam Sterilisation
16 / 26 Conditioning Instruction BIOM® 5 (G/55185/0818/en)
Pay particular attention to the following:
Smooth movement of the articulated joint
Function of the safety rod of the front loupe
Function of the focussing knob
Flip the BIOM® 5 towards the adaptor plate. Make
sure that the housing body can be shifted without
resistance.
Slide the safety rod of the loupe holder up and
down several times to check that it runs smoothly.
After the test, the rod must be pulled fully down to
the stop.
Check that the knob turns easily and shorten the
total length until the adjuster is at the uppermost
position.
Check whether all fastening screws are present
(e.g. screws at the feather key of the safety rod).
The control mark (1) must be below the guide.
Fig. 6–1: Test the safety functions
1
2
Control
mark
3
1
This manual suits for next models
4
Table of contents
Other OCULUS Laboratory Equipment manuals