OKAI SH10 User manual

Quick Start Guide & Terms of Warranty
SH10
8VHU0DQXDO

2. Packing List 04
1. Introduction 02
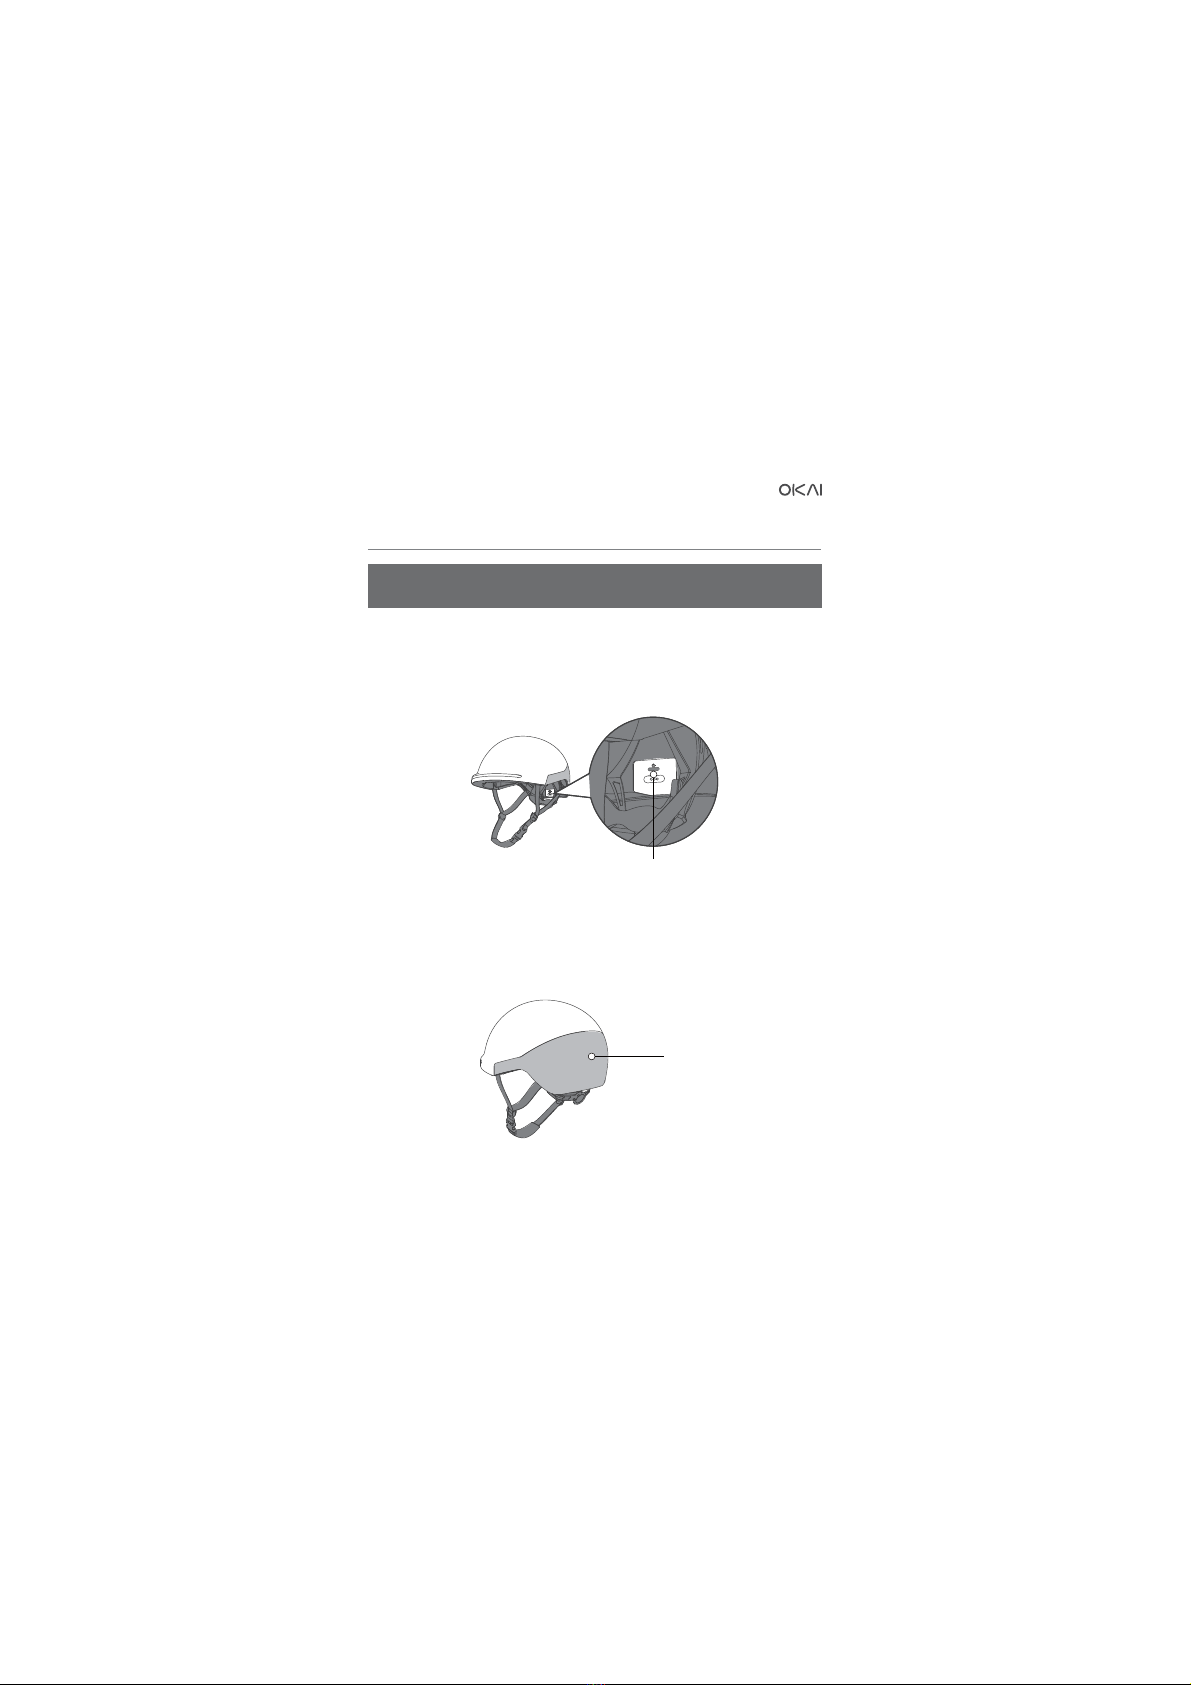
1-1. Product Diagram 03
3. Wearing the Helmet 05
3-1. Putting the Helmet On 05
3-2. Examples of Improper Wear 05
4. Instructions 06
5. Technical Specifications 11
6. Notes 12
7. Bluetooth Notes 13
8. OKAI Warranty Details 14
8-1. Terms of Warranty 14
8-2. Warranty Description 14
9. Wearing the Helmet: Warnings and Instructions 15
10. Electronic Function Troubleshooting 15
10-1. Problems 15
01
Table of Contents

02
Thank you for purchasing the OKAI smart helmet.
* The picture is for referrence only. Please refer to the actua l product for more details.
This guide will provide tips on how to better use the product. This guide may be
updated as we continue to refine our products. You can obtain the latest version of
this guide and learn more about OKAI from our official website (www.okai.co).
1. Introduction

03
1-1. Product Diagram
Dimensions (cm): 27.8 × 22 × 16.5 (L × W × H)
10.94 x 8.66 x 6.5 (in)
Front Mounted
Light
Strap Tension Adjuster
Taillight
EPS Body
Jaw Pad
Magnetic
Charging Port
Power Key

04
2. Packing List
① Smart Helmet : × 1
② Remote controller : × 1
③ Quick Start Guide : × 1
④ Dust-proof storage bag :× 1
⑤ Magnetic USB Charging Cable : × 1
X1
X1
X1 X1
RIDE IN STYLE
X1

05
3. Wearing the Helmet
3-2. Examples of Improper Wear
3-1. Putting the Helmet On
The helmet is
not level.
The helmet is not
fastened.
The helmet is tilted
forward.
1. Adjust the length of the strap. 2. Leave a finger-sized gap
between the strap and chin.
3. Straighten the helmet. 4. Check if the buckle is proper.

06
This section provides information on how to use the product correctly.
Following these instructions is critical to ensure user safety.
4. Instructions
1. Power On
Press the Power Key to power on the Smart Helmet. The back panel of the helmet will
display “OKAI” to indicate that the power on was successful.
Press and hold the Power Key for 3 seconds to power off the Smart Helmet. When
powering off, the back panel of the helmet will display a countdown as visual
confirmation.
2. Power Off
Back panel
Power Key

07
ƒ,I\RXRZQHGDQRWKHUYHKLFOHRI2.$,EUDQGWKHQ\RXFDQSDLUEHWZHHQWKHKHOPHW
and the vehicle.
ƒ3OHDVHVFDQWKH45FRGHRQWKHSDFNDJHRUHQWHUWKH$33VWRUHWRVHDUFKIRU2.$,
and download the OKAI APP to connect.
3. Connect APP instructions
1.Register and
log in
2.Click search
device
3.Connect the
device
4.Get started
Pair the vehicle

08
Once the Smart Helmet is connected to the OKAI app, you can configure and adjust
the display of its front and rear mounted lights.
Once the smart helmet is connected to the app, you can configure and adjust the
display of its brake light.
4. Light Display Switch
5. Brake Lights
Brake Light
Configuration
Front Light
Configuration
Rear Light
Configuration
Cycling Light
Configuration

09
The helmet will automatically shut down if it remains stationary for over 3 minutes.
7. Automatic Shutdown
9. Remote controller
ƒ8VHWKHPDJQHWLF86%FKDUJLQJFDEOHWRFRQQHFWWKHPDJQHWLFFKDUJLQJSRUWZLWKD
power source. The rear light of the helmet will display red to indicate charging or
green to indicate a full charge.
8. Smart helmet charging
Magnetic USB
Charging Cable
The smart helmet supports motion control functions, such as making and cancelling a
turn. Please learn more in APP.
6. Motion control
Button
Fixed ring
Charging Port

10
ƒ5HPRWHFRQWUROOHUFKDUJLQJ
First separate the remote control from the strap, use the magnetic USB charging
port to connect the remote charging contact, the L button will illuminate a red
light to indicate that charging is being made, and the R button will illuminate a
green light to indicate that charging is complete.
ƒ)L[HGULQJ
Bend the strap upwards, snap it into the slot and fix it to the handlebar.
Charging pad
Slot

11
5. Technical Specifications
* These specifications are subject to change without notice.
* The above data was measured by OKAI Laboratory at a room temperature of 25°C
and specific lighting modes. During use, there may be differences due to changes in
the actual environment.
Item
Helmet
Battery
Bluetooth
SH10Contents
27.8 × 22 × 16.5 cm
10.94 x 8.66 x 6.5 in
External Dimensions (L × W × H)
US:58 ~ 61 cm
EU:58 ~ 62 cm
22.83 ~ 24.41 in
Size Range
Up to 3 hrsCharge Time
2.4000-2.4835GHzFrequency Band (s)
20mWMax Frequency Band Power
IPX4Waterproof Rating
3W/3.85VElectrical Parameters
4~8h
Battery Life
3.85V/2400mAhBattery Specifications
3.3V — 4.2VOperating Voltage
0.8AAmperage
0℃ ~ 40℃
Charge Temperature
-15℃ ~ 45℃
Storage Temperature
Magnetic Charging
Port
Charging Port
0℃ ~ 40℃
Operating Temperature
Modified Explosion-
Proof ABS
Exterior Materials

12
6. Notes
ƒ7KHKHOPHWFRQWDLQVHOHFWURQLFIXQFWLRQV:KLOHWKHKHOPHWLVSURWHFWHGDJDLQVW
short-term splashes and rain, it should not be exposed to long periods of rain.
ƒ7KHKHOPHWFRQWDLQVD9P$KEDWWHU\WKHFDSDFLW\RIZKLFKZLOOFKDQJH
with ambient temperature. When used in low temperatures or environments lower
than 0°C, the battery life of the product may be reduced.
ƒ'RQRWFOHDQWKHJROGHQFRQWDFWVRIWKHFKDUJLQJSRUWZLWKPHWDOOLFRURWKHUKDUG
tools such as blades and tweezers. If you must clean the contacts, wipe with a cotton
swab of water or alcohol. Ensure the charging port remains clean and dry during the
charging process.
ƒ,IWKHHOHFWURQLFIXQFWLRQVGRQRWZRUNRUEHKDYHDEQRUPDOO\FKDUJHWKHKHOPHW
for 3 hours before trying again.
ƒ7KHLQWHUQDOEDWWHU\RIWKHKHOPHWPXVWQRWEHGLVDVVHPEOHGVTXHH]HGKHDWHG
or burned under any circumstances. Do not use sharp objects such as screwdrivers
to pierce or pry open the battery. Failure to follow these guidelines may result in
ignition of the battery and injury.
ƒ7RSUHYHQWGDPDJHGRQRWVWRUHWKHKHOPHWZLWKVKDUSREMHFWV
ƒ7KHKHOPHWFDQRQO\SURWHFWLILWILWVZHOODQGWKDWWKHEX\HUVKRXOGWU\GLIIHUHQW
sizes and choose the size which feels secure and comfortable on the head.
ƒ7KHKHOPHWVKRXOGEHDGMXVWHGWRILWWKHXVHUHJWKHVWUDSVSRVLWLRQHGVRWKDW
they do not cover the ears, the buckle positioned away from the jawbone and the
straps and buckle adjusted to be both comfortable and firm.
ƒ7KHKHOPHWVKRXOGEHSODFHGVRDVWRSURWHFWWKHIRUHKHDGDQGQRWEHSXVKHGWRR
far over the back of the head.
ƒ7KHKHOPHWFDQQRWDOZD\VSURWHFWDJDLQVWLQMXU\
ƒ,IWKHKHOPHWLVVXEMHFWHGWRVHYHUHLPSDFWLWVKRXOGQRWEHXVHGDJDLQDQG
discarded and destroyed as its protective ability will be severely reduced.
ƒ'RQRWPRGLI\RUUHPRYHDQ\RIWKHRULJLQDOFRPSRQHQWVRIWKHKHOPHWRWKHU
than recommended by OKAI and the helmet should not be adapted for the purpose
of fitting accessories in a way not recommended by OKAI.
ƒ1RKHOPHWFDQSURWHFWDJDLQVWDOOSRVVLEOHLPSDFWV)RUPD[LPXPSURWHFWLRQWKH
helmet must be fitted and attached properly to the wearer's head in accordance with
the manufacturer's fitting instructions.
ƒ1RORQJHUDGHTXDWHWRSURWHFWWKHKHDGDJDLQVWIXUWKHULPSDFWVDQGWKDWWKLV
damage may not be visible to the user.
ƒ7KHKHOPHWWKDWKDVVXVWDLQHGDQLPSDFWVKRXOGEHUHWXUQHGWRWKHPDQXIDFWXUHU
for component inspection or be destroyed and replace.
ƒ7KHKHOPHWFDQEHGDPDJHGE\FRQWDFWZLWKFRPPRQVXEVWDQFHVIRUH[DPSOH
certain solvents, cleaners, hair tonics etc.) and that this damage may or may not be
visible to the user.

13
To maintain battery life, we recommend that you fully charge the helmet
before each period of long-term (three months ) storage.
7. Bluetooth Notes
Any Changes or modifications not expressly approved by the party responsible for
compliance could void the user's authority to operate the equipment.
NOTE: This equipment has been tested and found to comply with the limits for a
Class B digital device, pursuant to part 15 of the FCC Rules. These limits are designed
to provide reasonable protection against harmful interference in a residential
installation. This equipment generates, uses and can radiate radio frequency energy
and, if not installed and used in accordance with the instructions, may cause harmful
interference to radio communications. However, there is no guarantee that
interference will not occur in a particular installation. If this equipment does cause
harmful interference to radio or television reception, which can be determined by
turning the equipment off and on, the user is encouraged to try to correct the
interference by one or more of the following measures:
1. Reorient or relocate the receiving antenna.
2. Increase the separation between the equipment and receiver.
3. Connect the equipment into an outlet on a circuit different from that to which the
receiver is connected.
4. Consult the dealer or an experienced technician for help.
5. Hereby, Zhejiang Okai Vehicle Co., Ltd. declares that the radio equipment type
Smart Helmet SH10 is in compliance with Directive 2014/53/EU. The full text of the EU
declaration of conformity is available at the following internet address:
https://www.okai.co/
RF exposure warning: 7KHGHYLFHKDVEHHQHYDOXDWHGWRPHHWJHQHUDO5)
H[SRVXUHUHTXLUPHQW7KHGHYLFHFDQEHXVHGLQSRUWDEOHH[SRVXUHFRQGLWLRQ
ZLWKRXWUHVWULFWLRQ
7KLVGHYLFHFRPSOLHVZLWKSDUWRIWKH)&&5XOHV2SHUDWLRQLVVXEMHFWWRWKH
IROORZLQJWZRFRQGLWLRQV7KLVGHYLFHPD\QRWFDXVHKDUPIXOLQWHUIHUHQFHDQG
WKLVGHYLFHPXVWDFFHSWDQ\LQWHUIHUHQFHUHFHLYHGLQFOXGLQJLQWHUIHUHQFHWKDW
PD\FDXVHXQGHVLUHGRSHUDWLRQ

14
8. OKAI Warranty Details
ƒ,IWKHUHDUHDQ\LQFRQVLVWHQFLHVZLWKRURPLVVLRQVIURPQDWLRQDOUHJXODWLRQVEHORZ
the national regulations will prevail.
ƒ7KLVSURGXFWLQFOXGHVDIUHHSURGXFWGHIHFWZDUUDQW\SHULRGRIRQH\HDUIURPWKH
date of purchase. A replacement will be issued within 15 days after a quality check.
ƒ2.$,GRHVQRWDVVXPHZDUUDQW\OLDELOLW\IRURWKHUDWWDFKHGLWHPVRIWKHSURGXFW
(e.g., the quick start guide and packaging).
8-2. Warranty Description
The scope of the warranty service is limited to normal use only. The warranty
is not valid for any damages caused by factors other than quality defects in
one of the following scenarios. In these circumstances, OKAI provides repairs
at a fee.
ƒ7KHZDUUDQW\SHULRGKDVH[SLUHG
ƒ7KHXVHUKDVQRSURRIRIZDUUDQW\RUYDOLGLQYRLFHH[FHSWLQFDVHVZKHUHWKHXVHU
can otherwise prove the product is within a valid warranty period.
ƒ7KHFRQWHQWVRIWKHSURRIRIZDUUDQW\GRQRWFRUUHVSRQGZLWKWKHSK\VLFDOQDWXUH
of the product or have been altered.
ƒ7KHSURGXFWZDVGDPDJHGE\WKHXVHUVIDLOXUHWRVWRUHPDLQWDLQRUXVHWKH
product according to instructions.
ƒ7KHSURGXFWZDVGDPDJHGE\GLVDVVHPEO\IURPDVHUYLFHVWRUHQRWDXWKRUL]HGE\
OKAI.
ƒ7KHSURGXFWZDVGDPDJHGE\DIRUFHPDMHXUHHYHQW
ƒ7KHSURGXFWKDVH[SHULHQFHGQDWXUDOZHDUDQGWHDULQDUHDVVXFKDVWKHH[WHULRU
keys, paint, and accessories.
ƒ7KHSURGXFWKDVRWKHUIDLOXUHVGHIHFWVRUEOHPLVKHVQRWDWWULEXWDEOHWR2.$,
8-1. Terms of Warranty

15
9. Wearing the Helmet: Warnings and Instructions
10. Electronic Function Troubleshooting
ƒ8VHUVVKRXOGVHOHFWDKHOPHWWKDWILWVWKHLUKHDGVL]H
ƒ7KHVWUDSPXVWEHIDVWHQHGGXULQJXVH
ƒ6WRSXVLQJWKHKHOPHWRUH[DPLQHLWIRUVLJQLILFDQWGDPDJHLQWKHHYHQWRIDPDMRU
impact.
ƒ'RQRWDSSO\LPSDFWWRWKHKHOPHWRUVFUXELWZLWKFRUURVLYHVROYHQWV
ƒ7KHOLIHF\FOHRIWKHKHOPHWLV\HDUV
ƒ'RQRWDOWHUWKHVWUXFWXUHRIWKHKHOPHW
ƒ3URSHUXVHRIDVSRUWVKHOPHWFDQHIIHFWLYHO\UHGXFHLQMXULHVEXWFDQQRWSUHYHQW
them completely.
ƒ3URWHFWWKHSURGXFWIURPFROOLVLRQPRLVWXUHDQGRUJDQLFFKHPLFDOVGXULQJ
transportation and storage.
If any of the problems listed below occur during use, charge the helmet in accordance
with the charge time of the quick start guide. The helmet can be reset during the
charging process. If problems persist, contact an after-sales service center.
After-Sales Hotline (PRC): 4008821787
After-Sales Email (International): [email protected]
10-1. Problems
1. The helmet does not charge or power on normally.
2. Functions such as the lights or loudspeaker do not work or behave abnormally
when the helmet has been powered on.
3. The helmet shuts down automatically soon after being powered on.
Table of contents
Popular Motorcycle Accessories manuals by other brands

kellermann
kellermann Bullet 1000 Extreme installation manual

Tucano Urbano
Tucano Urbano TERMOSCUD-R204X instruction manual

Sealey
Sealey PWH617 manual

Dynojet
Dynojet Power commander GSXR750 installation guide

Dennis Kirk
Dennis Kirk Firstgear 512817 manual

Suzuki
Suzuki 990D0-17K26-CRB installation instructions