Okayo GPA-750 User manual

Portable PA System
Operating Instructions
GPA-750 Basic PA System
GPA-750W PA System with UHF Wireless Mic
GPA-750WU/WE/WT PA System with UHF Wireless Mic & CD Player
EJ-701TS Wireless Handheld Microphone
EJ-7LT/EJ-7XT Bodypack Transmitter
This operating guide also includes instructions for the following portable PA accessories:
DR-701 : Additional UHF wireless microphone receiver
TX-701 : Wireless Audio Link transmitter
EM-750 : Karaoke echo module
HDC-809 : Bodypack charging pod
LM-90S : Lapel microphone to suit bodypack transmitter
HM-50S : Headset microphone to suit bodypack transmitter
Manufactured by E-J Electronics Co., Ltd.

Portable PA System
This compact portable PA system features a sturdy, lightweight injection molded cabinet. The system includes a high
power 50W (RMS) amplifier and can be supplied with an MP3 compatible anti-skip CD player and up to two wireless
microphone receivers. The in-built amplifier has balanced or unbalanced wired microphone inputs, plus line in and
line out RCA connections. The radio microphone receivers are 96 channels (16 channels for frequency band at
863-865MHz), allowing easy selection of non-interfering frequencies. Each receiver includes individual frequency
adjustment and volume control. The system is supplied with in-built batteries and charging facility to provide 3-4 hours
continuous use..The two way speaker system comprising an 8 inch woofer and high frequency horn ensures excellent
sound quality for both music and speech reproduction.
Weighing only 12kgs it is truly portable allowing a wide range of use in schools, places of worship, clubs, auctions etc.
Sets up in just seconds for instantaneous use.
TX-701 Optional wireless audio link transmitter: For larger venues or audiences, the addition of this module allows
several units to be used in the same area without the need for speaker or signal wiring. In this application you have a
master and as many slave units as required for the venue. The wireless audio link module is fitted to the master unit
which then transmits any audio signal (including wireless mic, CD player or wired mic) to the slave units, which are
fitted with a UHF wireless microphone receiver adjusted to receive the signal from the wireless audio link.
DR-701 Optional UHF wireless microphone receiver: Installation of this module adds a second wireless micro-
phone to the Portable PA.
EM-750 Optional karaoke echo module: For karaoke applications this module includes adjustable repeat and delay,
plus two local wired 6.35mm/XLR combo mic inputs.
Features
Operation
Compact design sets up in just seconds
Rugged lightweight cabinet
MP3 compatible CD player
Inbuilt carry handle
High performance 50W RMS amplifier
Built in backup battery
Optional radio microphone receivers
Suitable for desk or speaker stand mounting
Optional wireless audio link for cable free transmission to additional systems
Optional karaoke echo module
Provision for 8 ohm extension speaker
RCA line input / output
6.35mm / XLR combination wired microphone input
96 -264VAC mains or battery operation
Power & Charging Functions
The portable PA system is powered by 96 - 264V AC mains via IEC socket (see figure 2 for location) or via the internal
battery pack. When operating for the first time the internal battery will require charging for up to 8 hours. Charging
will occur whenever the unit is plugged into the 96 - 264VAC mains supply. The charge status indicator (shown in figure
2) will illuminate red when charging. Once battery is 80-90% charged, the indicator will flash red and green. Once
charging is complete, the indicator will illuminate green.
When in use without mains power, the LED built into the power switch provides indication of battery status:
100% to 30% capacity: no illumination
30% to 10% capacity: red illumination
<10% capacity: flashing red illumination
2

Portable PA System
Figure 1: Front
Figure 2: Rear
1. Handle
2. Horn Tweeter
3. Woofer
4. Speaker Grill
5. Port
6. Heatsink
1. UHF receiver modules (blanking panels
fitted in the base models)
2. CD / MP3 player
3. Power switch & charge indicator (this
panel is replaced when adding a wireless
link or digital echo module)
4. Level, treble & bass controls
5. Speaker out (8 )
6. Mic input (6.35mm / 3 pin XLR)
7. RCA line in / out
8. 240V AC input
(shown configured with 2 x UHF wireless
microphones & CD player)
3

Figure 3: UHF Wireless Mic
Module (DR-701)
1. LCD screen
2. A / B diversity indicator
3. RX audio indicator
4. AF audio level indicator
5. Frequency set button
6. Up / Down frequency adjustment buttons
7. Power switch & mic level control
Portable PA System
Figure 4: CD / MP3 Player Module
Figure 5: Audio Link Transmitter Module
1. Track program button
2. CD slot
3. Shuffle / repeat button
4. Play / pause button
5. Stop / eject button
6. Power switch
1. LCD screen
2. TX audio indicator
3. AF audio level indicator
4. Frequency set button
7. LCD screen
8. Folder selection button
9. << Search / previous track
10. >> Search / next track
11. CD level control
5. Up / Down frequency adjustment buttons
6. Power switch & mic level control
7. Battery charging indicator
8. System power switch
4

Portable PA System
DR-701 Wireless Microphone Module - Figure 3.
The portable PA system can be equipped with one or two UHF microphone modules. Each module features 96 selec-
table channels for interference free operation with multiple microphones or PA systems.
(See page 7 for installation guidelines for this module)
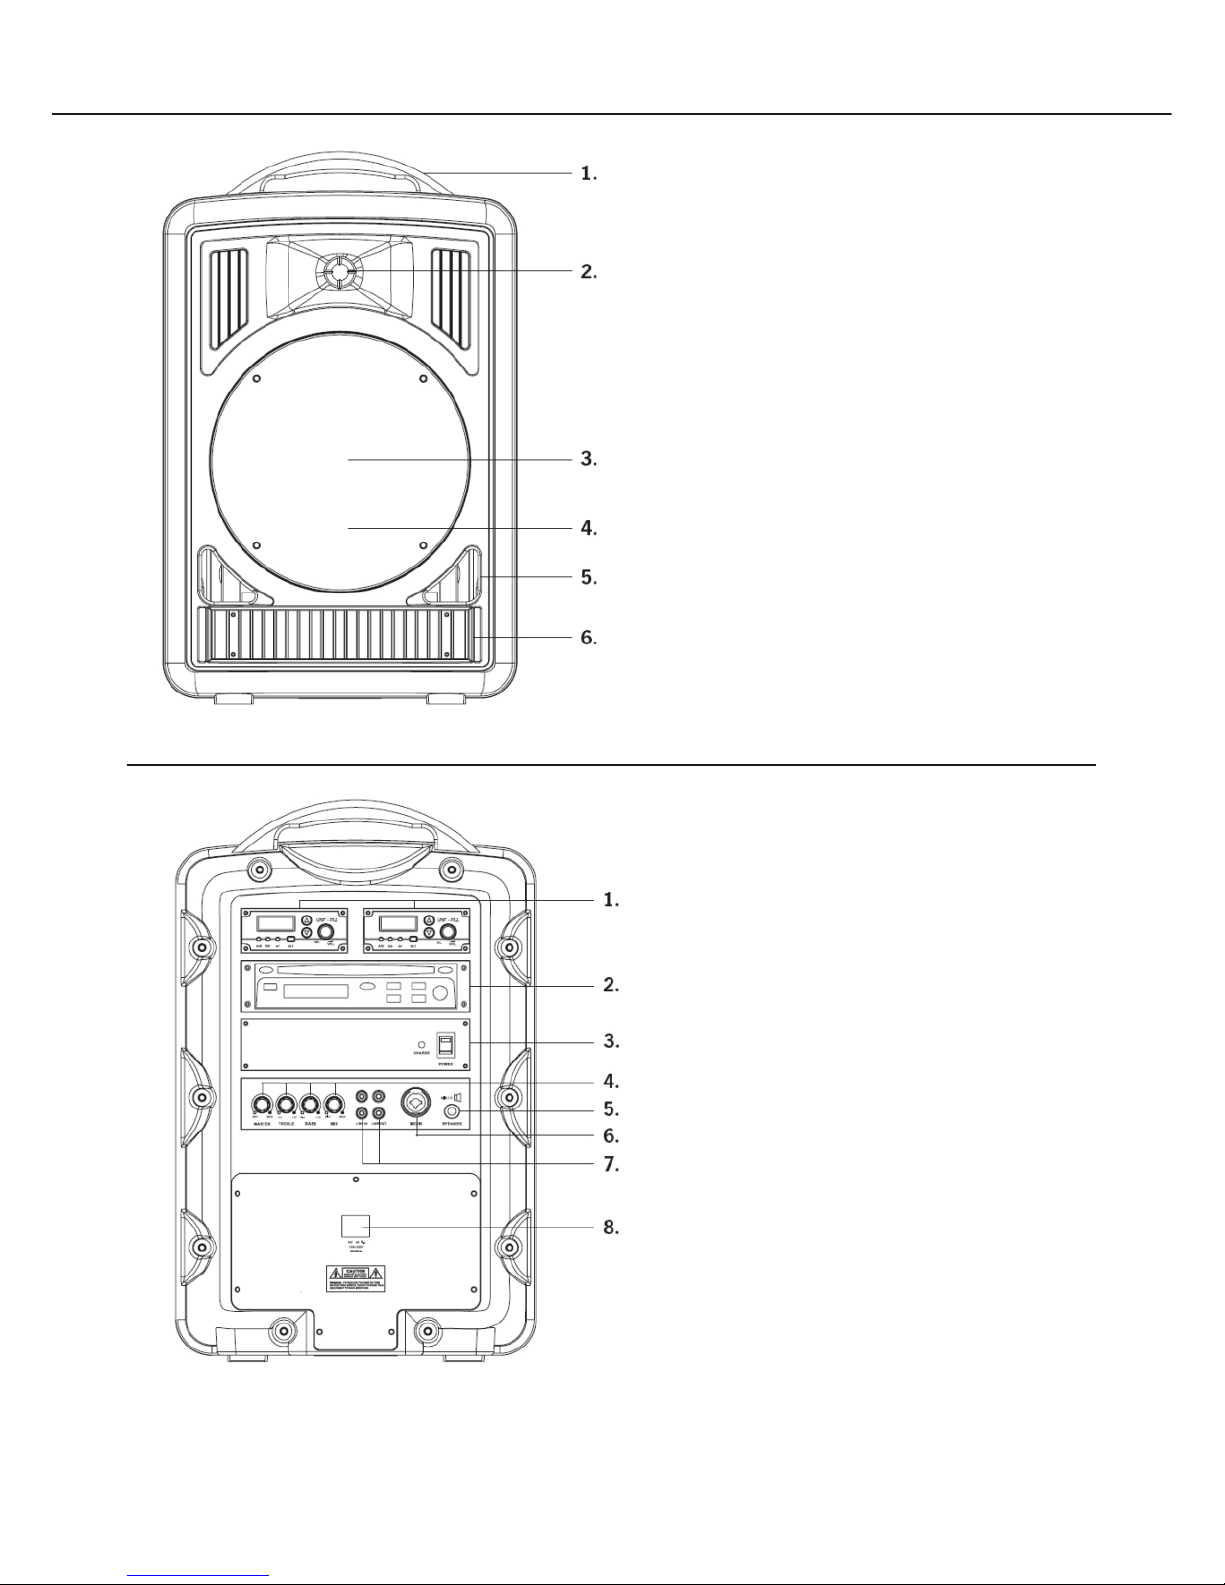
1. Turn the power switch / volume knob clockwise to turn the receiver unit on.
2. The LCD screen will display "On" then revert to the factory default channel (or the channel last selected).
3. To select a channel, press the "SET" button. Using the UP / DOWN frequency adjustment buttons, you can set the
receiver to match the channel used by the transmitter.
4. Adjust the volume level to the desired position.
5. The module is now ready to receive signal from either a handheld of bodypack transmitter. When receiving signal,
the A / B diversity indicator will illuminate red or green to show the diversity status. The RX indicator will illuminate
when signal from the transmitter is being received. The AF indicator displays audio level when users are speaking
into the microphone.
CD / MP3 Player - Figure 4.
This anti-shock CD / MP3 player allows playback of both standard CD's and data CD's containing MP3 files.
1. To operate push the power button. Insert a CD into the CD slot and press play / pause button.
2. Adjust volume to desired level.
3. To skip forward a whole track, press the next track button (>>l). To skip backwards a whole track, press the previous
track button (l<<). To search through tracks, press and hold either of these buttons until you reach the desired point in
the sound track.
4. Repeat allows repeating of single songs or all songs. Shuffle plays tracks in a random order.
5. To program specific tracks for palyback, press the track program button. Select the song you wish to program on the
disc using the next track (>>l) and previous track buttons (<<l). Press repeat to enter the track into the program.
Repeat as necessary. To playback programmed tracks, press the play/ pause button. Note: program will be reset
whenever the track program button is pressed.
6. For use with MP3 discs, you can select folders of music on the CD. Press the folder button and use the next track
(>>l) and previous track button(l<<) to select your desired folder. Note: this function searches the disc in the alphanu-
meric order.
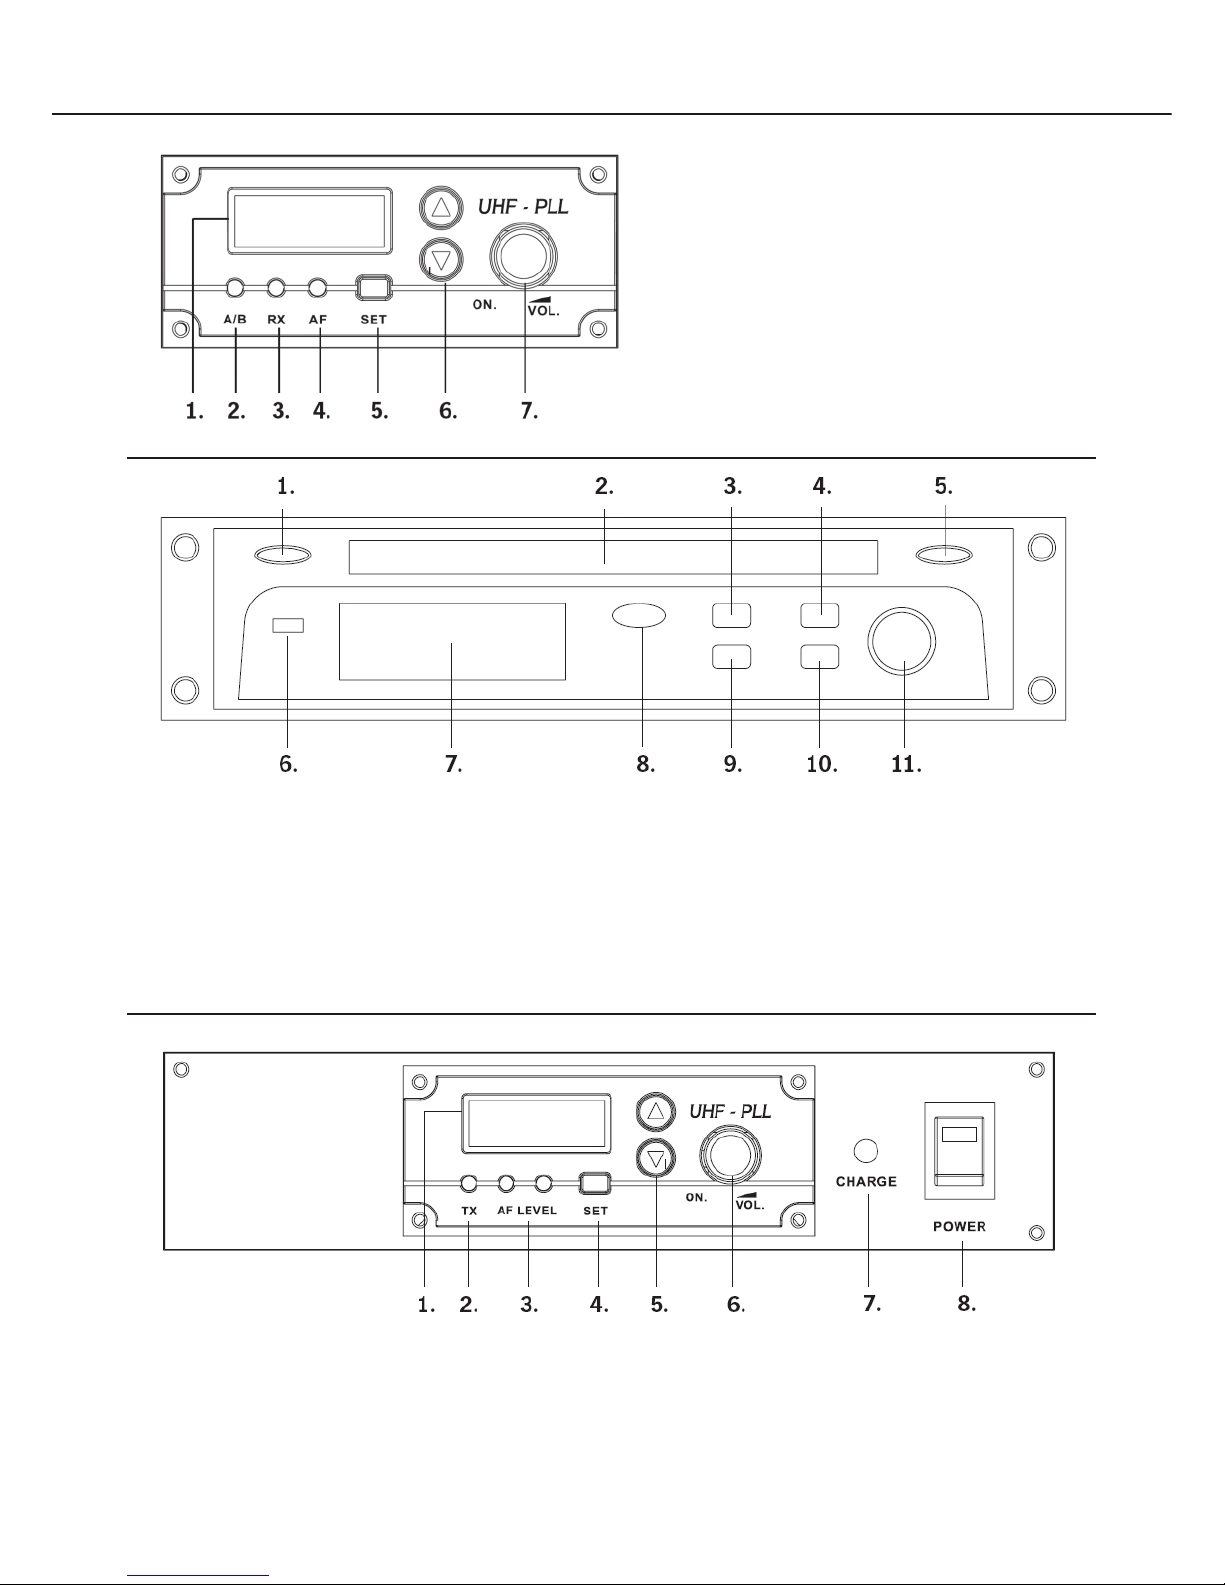
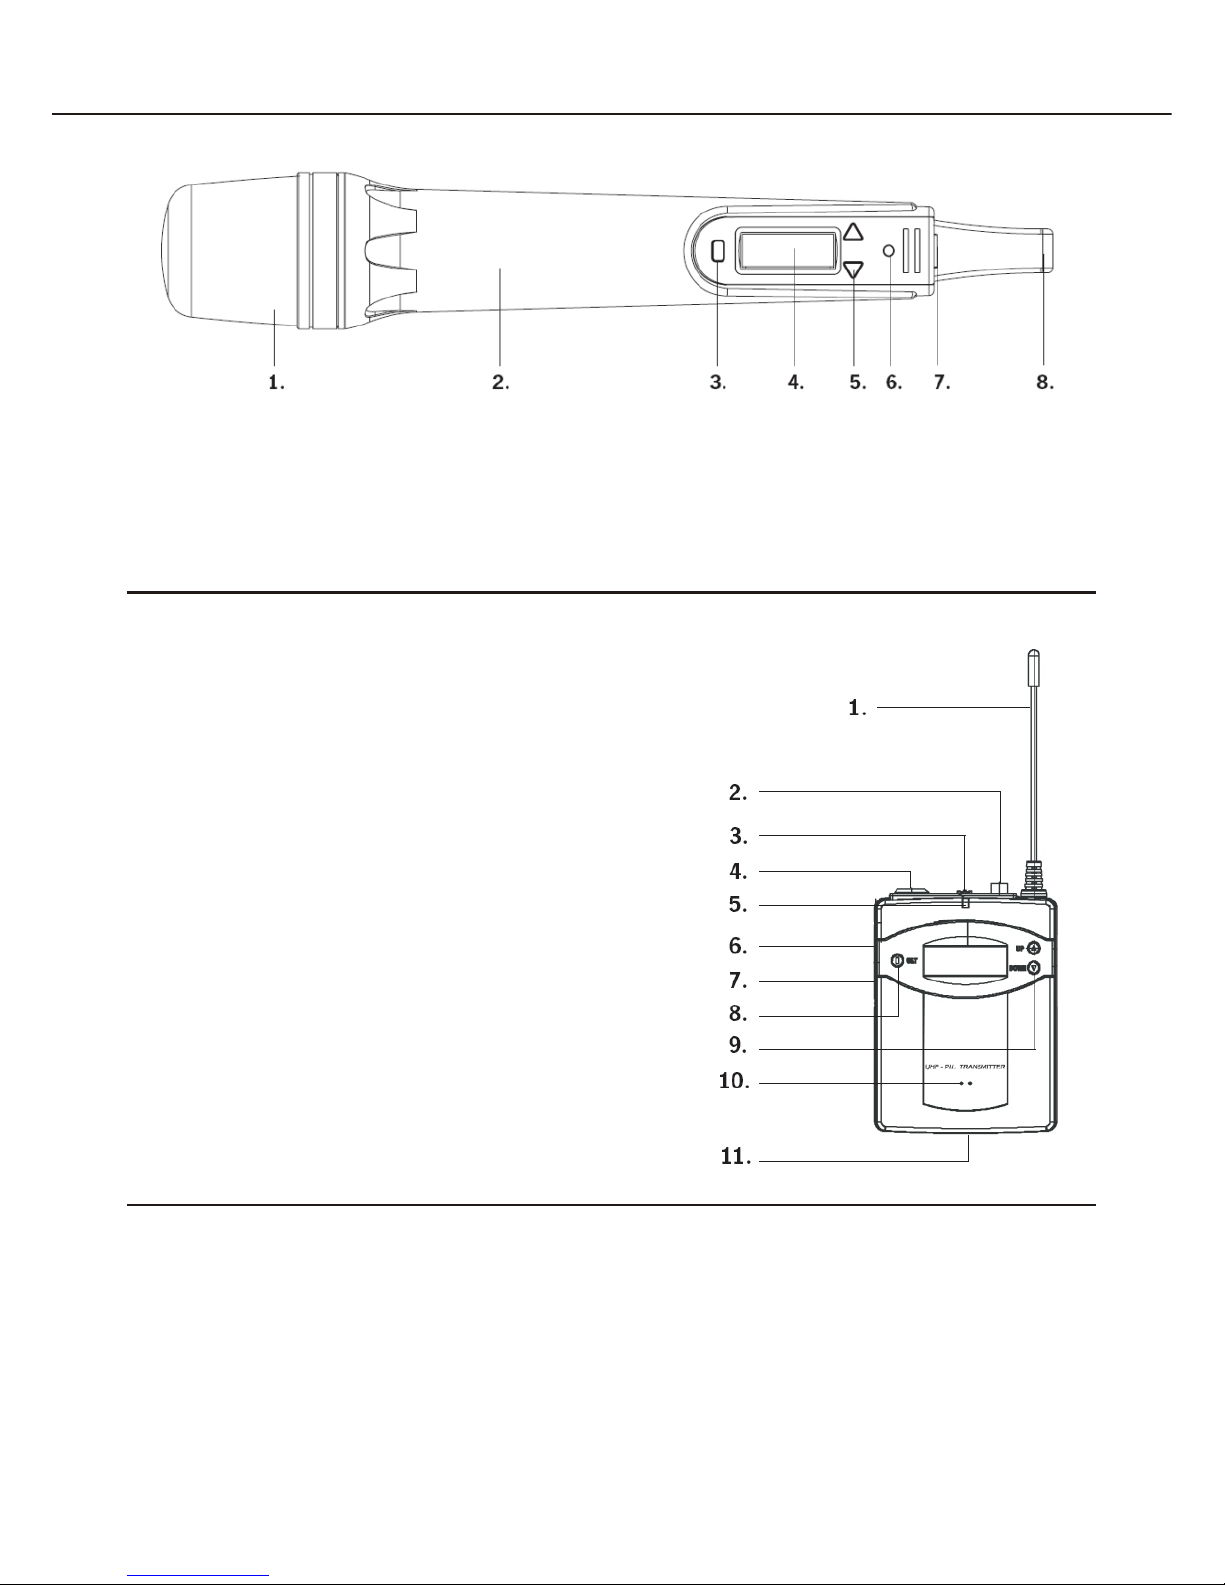
TX-701 Audio Link Transmitter Module - Figure 5.
For larger venues or audiences, the addition of this module allows several units to be used in the same area without
the need for speaker or signal wiring. In this application, you have a master and as many slave units as required for
the venue. The wireless link module is fitted to the master unit which then transmits any audio signal (including
wireless mic, CD player or wired mic) to the slave units, which are fitted with a UHF wireless microphone receiver.
(See page 7 for installation guidelines for this module)
1. On the master unit turn the power switch / volume level control clockwise to turn the transmitter on.
2. The LCD screen will display "On" then revert to the factory default channel (or the channel last selected).
3. To select a channel press the "SET" button. Using the UP / DOWN frequency adjustment buttons, you can select the
desired channel.
4. On the slave unit, turn the UHF receiver module on. Press "SET" and user the UP / DOWN frequency adjustment
buttons to set the unit to the same channel as the master unit.
5. When transmitting audio from the master to slave unit, the TX indicator will light green. The AF indicator displays
audio level when user's are speaking into the microphone or music is playing.
5

Portable PA System
Figure 6: Level Adjustment & Input / Output Module
Figure 7: Digital Echo Module (EM-750)
1. Master volume level
2. Treble level
3. Bass level
4. Wired mic volume level
1. Echo control
2. Repeat control
3. Delay control
4. Wired mic 1 level control
5. Wired mic 2 level control
5. RCA stereo line input
6. RCA stereo line output
7. XLR / 6.35mm TRS wired mic input
8. Speaker out (8 Ohm)
6. Wired mic 1 input (6.35mm TRS)
7. Wired mic 2 imput (6.35mm TRS)
8. Battery charging indicator
9. System power switch
Level Adjustments & Input / Output Connection - Figure 6.
System inputs, outputs and levels can be controlled via this module. Master volume adjusts overall system level from
all inputs (ie: UHF, CD / MP3 player, RCA stereo input and wired microphones). Treble and bass controls effect all
system inputs. When set to half way, sound output will be flat.
RCA stereo jacks are provided for an external audio source. This allows connection of a CD player, iPod or other audio
source.
An RCA output is provided for use with external zone amplifiers or other PA systems if required. This output signal is
combined from all inputs (ie: UHF, CD / MP3 player, RCA stereo input and wired microphones).
If an external speaker is required, it can be connected to the portable PA system via 6.35mm jack. Note: this feature
is designed for 8 ohm minimum impedance speaker. Overall amplifier output will be split between both speakers when
in use.
6

Portable PA System
EM-750 Digital Echo Module (GPA-750WE model only) - Figure 7.
The digital echo module is designed for karaoke requirements where tailoring of sound outputs is required.
1. Turn the power switch & level control clockwise to turn the unit on.
2. Adjust the repeat and delay levels to tailor the amount of echo effect.
3. Two 6.35mm TRS (tip, ring, sleeve) wired microphone inputs are provided on the front panel. The echo effect
operates on these inputs only.
4. Once microphones are connected volume can be adjusted via the mic 1 and mic 2 level controls on the front panel.
Fitting DR-701 UHF Wireless Microphone Receiver Module
1. Ensure portable PA is NOT connected to mains power. Disconnect all input cables.
2. Unscrew the "half width" blanking panel at the top of the rear panel (see figure 2).
3. Slide the UHF wireless microphone module in, ensuring the board slots into the connector at the rear of the empty
expansion bay.
4. Screw the module into the rear panel.
All PA models feature a blanking panel with the system power switch mounted on it (see figure 2). This panel is
optionally replaced by the TX-701 or EM-750 modules.
Fitting EM-750 Digital Echo Module
1. Ensure portable PA is NOT connected to mains power. Disconnect all input cables.
2. Unscrew the blanking panel and disconnect the power cables from the main board.
3. Locate switch SW200 on the main board inside and slide it to "EFFECT" setting.
4. Locate jumpers J201(07P) and CON204 on the main board inside. Connect the power cable for the digital echo
module to J201(07P) and the signal cable to CON204.
5. Screw unit back together.
Fitting TX-701 Audio Link Transmitter Module
1. Ensure portable PA is NOT connected to mains power. Disconnect all input cables.
2. Unscrew the blanking panel and the disconnect the power cables from the main board.
3. Locate switch SW200 on the main board inside and ensure it is set to "NORMAL" (factory default).
4. Locate jumpers J201(07P) and J204 on the main board inside. Connect the power cable for the wireless audio link
transmitter to J201(07P) and the signal cable to J204.
5. Screw unit back together.
Fitting Additional Modules
7

Portable PA System
Transmitter Operation
All portable PA/s equipped with a UHF wireless microphone module are compatible with the EJ-701TS handheld and
EJ-7LT / EJ-7XT bodypack transmitters. All transmitters could be sold separately.
1. Ensure microphone is switched off before inserting batteries.
2. Remove lower housing and battery clip. Insert 2 x AA batteries (alkaline or rechargeable's are recommended).
3. Press and hold the power switch for 2-3 seconds (located on the base of the microphone). The power LED will
illuminate red and "ON" will be displayed on the LCD screen. Note: power switch is more easily accessed with lower
housing removed.
4. A selection switch on the rear of the microphone provides three level settings (mute, mid & high) depending on the
application or environment in which the portable PA is to be used. Mute setting allows microphone to be put on stand-
by without switching the power off.
5. The LCD screen will display the channel selected. To determine which frequency this channel is operating on, press
the UP or DOWN frequency adjustment buttons.
6. Press the frequency set button for 1-2 seconds. The LCD screen will flash the currently selected channel number.
Your can cycle through the channels by pressing the UP or DOWN frequency adjustment buttons. Press the frequency
set button again to lock in your channel selection.
7. The battery status is displayed on the left of the screen. When battery capacity is critical the icon will flash 3 times
before switching the microphone off automatically.
8. To turn the microphone off, press the power switch for 2-3 seconds until the LCD screen displays "OFF".
9. When using with rechargeable NiMH batteries, connect a DC 5V plugpack to the charging port on the base of the
microphone. Charging time is dependant on the capacity of batteries used, typically 10-12 hours charging is required.
If battery icon is flashing when charger is connected, ensure rechargeable batteries are inserted in the microphone.
If batteries have failed both the battery icon and the screen backlight will flash.
During normal charging the battery icon will cycle through the charge "block" icons. Once full capacity is reached the
full battery icon and all "blocks" will be displayed.
Note: microphone is unable to be used during charge process.
EJ-701TS Handheld Microphone Transmitter - Figure 8.
Troubleshooting
Power LED does not illuminate after pressing power switch
Check batteries are charged and inserted correctly.
When pressing power switch, ensure you hold it down for 2-3 seconds
LCD shows "Err" when switching off
Contact your place of purchase for information on resetting your microphone
LCD panel displays garbled informtaion
Remove batteries and re-insert them
No sound output
Check frequency of transmitter is the same as the portable PA receiver
Check volume level of both transmitter and portable PA receiver
Ensure microphone is within range of the receiver
Check for sources of interference, large metal objects ect within range of the microphone
Signal disturbance
When operating two transmitter in the same area, ensure frequencies selected are several channels apart. This helps
to reduce crosstalk between transmitters. Also note that other wireless devices can cause interference, ensure you
adjust your frequency around these devices where possible.
8

Portable PA System
Figure 8: Handheld UHF Wireless Microphone (EJ-701TS)
1. Protective screen head
2. Rubberized body
3. Frequency set button
4. LCD screen
5. Up / Down frequency adjustment buttons
6. LED power indicator
7. Power switch
8. Charging port connection
Figure 9: Bodypack UHF Wireless Transmitter (EJ-7LT / EJ-7XT)
1. Antenna
2. Mute button (top)
3. On / Off switch (top)
4. 3.5mm or 3-pin XLR mic input socket (top)
5. LED power indicator
6. Sensitivity selection switch (side)
7. 3.5mm aux input socket (side)
8. Frequency set button
9. Up / Down frequency adjustment buttons
10. Inbuilt mic
11. Charging jack
9

EJ-7LT / EJ-7XT Bodypack Transmitter
Troubleshooting
Power LED does not illuminate after switching on
Check batteries are charged and inserted correctly
Switch it off when LCD shows "Err"
Please restart the transmitter when LCD shows "Err". If problems still can't be solved, please contact suppliers
or manufacturers.
Check frequency of transmitter is the same as the portable PA receiver
Check volume level of both transmitter and portable PA receiver
Check mute button is not activated
Ensure bodypack is within range of the receiver
LCD panel displays garbled information
Remove batteries and re-insert them.
No sound output
Check for sources of interference, large metal objects etc within range of the bodypack
Signal disturbance
When operating two transmitters in the same area, ensure frequencies selected are several channels apart. This
helps to reduce crosstalk between transmitters. Also note that other wireless devices can cause interference,
ensure you adjust your frequency around these devices where possible.
1. Ensure microphone is switched off before inserting batteries.
5.The LCD screen will display the channel selected. To determine which frequency this channel is operating on, press
the UP or DOWN frequency adjustment buttons.
6.Press the frequency set button for 1-2 seconds. The LCD screen will flash the currently selected channel number.
You can cycle through the channels by pressing the UP or DOWN frequency adjustment buttons. Press the frequency
set button again to lock in your channel selection.
7.The battery status is displayed on the left of the screen. When battery capacity is critical, the icon will flash 3 times
before switching the microphone off automatically.
8.When using with rechargeable NiMH batteries, you can use the HDC-809 charging pod. This allows you to put up to
2 bodypacks on charge at the same time. Charging time is dependant on the capacity of batteries used, typically 10-12
hours charging is required. If battery icon is flashing when charger is connected, ensure rechargeable batteries are
inserted in the microphone. If batteryies have failed both the battery icon and screen backlight will flash.
During normal charging the battery icon will cycle through the charge "block" icons. Once full capacity is reached the
full battery icon and all "blocks" will be displayed.
2. Remove battery clip. Insert 2 x AA batteries (alkaline or rechargeable's are recommended).
3.Switch the top mounted power switch to ON. The power LED will illuminate red and "ON" will be displayed on the
LCD screen.
4. A selection switch on the side of the bodypack provides three level settings (low, mid & high) depending on the
application or environment in which the portable PA is to be used. The mute button allows bodypack to be put on
standby without switching the power off.
Portable PA System
10

Portable PA System
Specifications
Portable PA Amplifier
Sensitivity............................................................................................................................................. ..........95 dB 1 W @ 1 M
Maximum SPL................................................................................................................................................................112 dB
Frequency Responds.........................................................................................................................................20 Hz to 20 kHz
Output Power............................................................................................................................................................50 W RMS
Signal to Noise Ratio.......................................................................................................................................... .........up 70 dB
Inputs..................................................................................................................XLR 3 pin / 6.35 mm TRS(Combo), stereo RCA
Outputs............................................................................................. .............Stereo RCA line out, Speaker out 6.35 mm (8 ohm)
Controls.............................................................................................Master volume, bass, treble, line volume, wired mic volume
Power..................................................................................................................96-264 V AC / 32 V DC, switching power supply
Battery....................................................................................................................................12 V, 2.9 Ah x 2 (sealed lead acid)
Operating Life (fully charged)..........................................................................................................................................3-4 hrs
Charging time................................................................................................................................................................4-6 hrs
Dimensions.................................................................................................................................................300 x 230 x 470 mm
Weight.............................................................................................................................................................................12 kg
Bodypack Transmitter EJ-7LT
Mic Insert................................................................................................................................................................Condenser
RF Output......................................................................................................................................................................10 mW
Spurious Emission..........................................................................................................................................Less than 250 nW
Audio Input...........................................................................................................................................................Mic in, Aux in
AF Controls..................................................................................................................................Mute switch, Hi/Mid/Lo switch
Battery..............................................................................................................1.2 V NiMH rechargeable x 2 or 1.5 V Alkaline x 2
Operating Life (full charged)......................................................................................................11 hrs (NiMH) or 14 hrs (Alkaline)
Dimensions................................................................................................................................................ ......88 x 64 x 24 mm
Weight (with batteries).............................................................................................................................................. ... ....170 g
Handheld Transmitter EJ-701TS
Mic Insert................................................................................................................................ ...............Condenser or dynamic
RF Output......................................................................................................................................................................10 mW
Spurious Emission..........................................................................................................................................Less than 250 nW
AF Controls.................................................................................................................................................Hi/Low/Mute switch
Battery..............................................................................................................1.2 V NiMH rechargeable x 2 or 1.5 V Alkaline x 2
Operating Life (full charged)......................................................................................................11 hrs (NiMH) or 14 hrs (Alkaline)
Dimensions........................................................................................................................................... ...........46 x 264 mmψ
Weight (with batteries)......................................................................................................................................................280 g
Audio Link transmitter Module TX-701
RF Output........................................................................................................................................................... ...........10mW
Spurious Emission..........................................................................................................................................Less than 250 nW
Antenna.......................................................................................................................................................................Internal
Dimensions.....................................................................................................................................................189 x 88 x 37 mm
Weight........................................................................................................................................................................ ....170 g
UHF Wireless Receiver Module DR-701
Antenna mode......................................................................................................................................................... ...Diversity
Spurious Rejection...........................................................................................................................................................70 dB
Adjacent Channel Performance.................................................................................................................... ....68 dB @ 250 kHz
Antenna.......................................................................................................................................................................Internal
Dimensions.....................................................................................................................................................128 x 88 x 37 mm
Weight.............................................................................................................................................................................110 g
Digital Echo Module EM-750
Input Sensitivity..............................................................................................................................................................10 mV
Delay Time................................................................................................................................................. ......340 ms - 110 ms
Audio Input......................................................................................................................................................6.35 mm TRS x 2
Controls.............................................................................................................Echo, repeat, delay, mic1 volume, mic 2 volume
Overall System
Frequency Range.......PLL synthesized control, 740-752 MHz(96 channels), 794-806 MHz(96 channels), 863-865 MHz(16 channels)
Swithcing Bandwidth...............................................................................................................................................Max 12 MHz
Dynamic Range..................................................................................................................................................... .........110 dB
THD..................................................................................................................................................................Less than 0.5 %
Frequency Response (wireless)................................................................................................................... .........70 Hz - 16 kHz
Operating Range......................................................................................................................................50 - 70M (line of sight)
11

Portable PA System
IMPORTANT
Maintenance / Operation Guidelines
Avoid excessive heat
Avoid rough handling
Fully charge portable PA battery
Remove batteries
Replace batteries
Battery terminals
Do not leave transmitters or portable PA receiver in direct sun
for extended periods, in front of heaters or any source of high
temperature.
Ensure battery is fully charged before placing into storage for
Long periods. Ensure battery is charged once per month there-
after to ensure long life and optimum battery reliability.
Remove batteries from transmitter when not in use.
Ensure replacement batteries are the same or equivalent to
existing. Batteries may explode under charge or unit may
malfunction if incorrect batteries are used.
Ensure battery contacts are clean and free of corrosion before
operation. If corrosion occurs, it could be a sign of faulty bat-
teries. Return to your place of purchase if service is required.
Transmitter or portable PA receiver may be damaged if dropped.
12
This manual suits for next models
7
Table of contents
Other Okayo Speakers manuals