manuals.online logo
Brands
  1. Home
  2. •
  3. Brands
  4. •
  5. Oklahoma Sound
  6. •
  7. Outdoor Cart
  8. •
  9. Oklahoma Sound JUMBO PRESENTATION CART PLUS PRC 450 User manual

Oklahoma Sound JUMBO PRESENTATION CART PLUS PRC 450 User manual

1
JUMBO PRESENTATION CART PLUS
JUMBO PRESENTATION CART PLUSJUMBO PRESENTATION CART PLUS
JUMBO PRESENTATION CART PLUS
MODEL # PRC 450 KIT*
*SEE IMPORTANT NOTICE ON PAGE #2
2
Dear Valued Customer,
Although extreme care goes into manufacturing
and packing of this package, mistakes are possi-
ble. If you encounter any missing parts or diffi-
culty in assembly, etc. please call our toll free
customer ser ice line at 1-800-261-4112 for
courteous and immediate resolu'on to your
problem.
Sincerely
Oklahoma Sound
Important No'ce: For customers that ordered the PRC 450, first assemble
the box labeled PRC 400 and then proceed to assemble this box, to the unit.
3
Extra Wide Side Shelf:
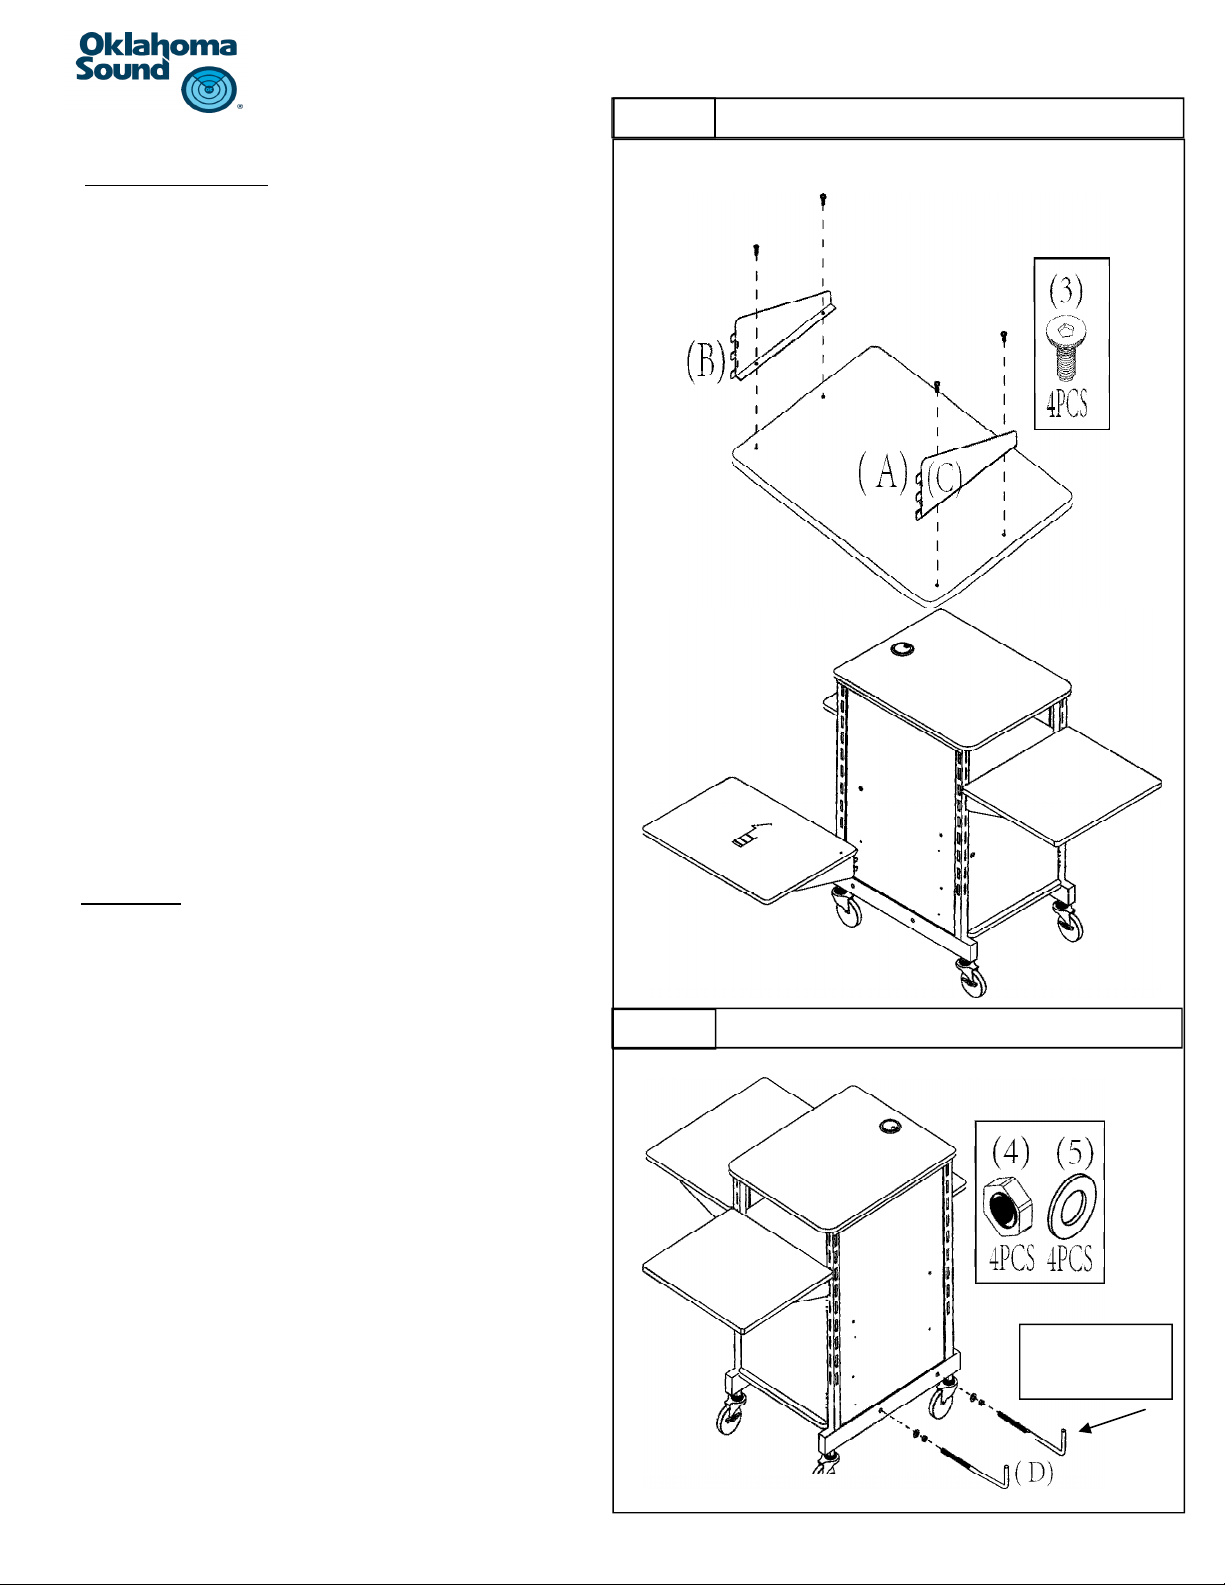
a) Begin by idenfying your side shelf panel #A and laying it
down on a clean and so surface with the holes facing
upwards.
b) Locate the two supporng brac ets #B and #C and lay
them over the panel as shown. The three tabs at the end
of the brac et should be at the edge of the panels as
shown. The two brac ets should be facing inwards as
shown.
c) Align the two holes on the brac ets with the embedded
t-nuts in the panel.
d) Once they are aligned use four bolts #3, two for each
brac et and thread them through the holes on the brac -
et and into the t-nut.
e) Use the hex ey #6 to ghten the blots .
f) To a+ach the adjustable shelf to either side of the unit,
align the three tabs on both brac ets, with the slots on
the edges of the side panels. Once aligned slip it in and
gently push the shelf downwards to loc in place.
CPU Holder:
a) Locate the two parts #D .
b) Begin by first threading one nut #4 on each part all the
way ll they cannot be turned anymore.
c) Slip two washers #5 over the threaded part of part #D
unl the washers are flush with the nuts #4.
d) Proceed by slipping each part #D through the holes locat-
ed on the base rails of the side panels as shown. The CPU
holder can be installed on either side of the unit.
e) Once both part #D have been inserted all the way through
and the washers are flush to the side panel base rails,
thread two more washers, one on each part #D, from the
other side of the metal part #D all the way unl its flush
against the bac side of the base rails of the side panels .
f) Once both washer are in place, thread two nuts part #4,
one on each and secure the nut in place unl it is ght.
Use wrench #7 to ghten the nut.
g) Be sure that both ends of part #D are vercal and straight
up as shown.
STEP 1
STEP 2
Facing straight
up
4
CPU Holder Con'nued:
a) Once both parts #D are secure in place and the ends
are both poinng straight up a 90 degree angle, a+ach
the “U” shaped part #E as shown.
b) Align the two open ends of part #E over the two ends
of both parts #D. The ends of part #E will slip over part
#D.
c) Gently push part #E all the way down.
Power Assembly
a) Idenfy the metal winder part #F and the power strip
part #G.
b) Part #F will slip over the power strip with only the
switch and the outlets accessible with the cord of the
power strip hanging out from the bo+om as shown.
c) To a+ach the enre power assembly to the unit, begin
by locang the two holes on part #F, one on top and
one on bo+om.
d) These two holes will align with the two holes on the
side wall of panel #A as shown in the illustraon.
e) Once the two holes on part #F are aligned with the
holes on the side wall, use the two screws part #1 and
thread them through the hole on the metal winder and
through the side panel.
f) Once the screws are completely threaded through, use
two nuts part #2 and secure the bolt from the inside of
the cabinet.
Step 3
STEP 4
Congratula'ons!!! Your PRC 450 is
now fully assembled!!
5
For these and other OS product please contact your dealer, or:
Olahoma Sound
149 En'n Road, Cli;on N.J. 07014 
 
 Tel : (973) 594-9000
www.oklahomasound.com 
 
 inf[email protected]
Other Sound and Non-Sound Lecterns from Oklahoma Sound
Model #WZD
Model #LSS
Model #SCL

Other Oklahoma Sound Outdoor Cart manuals

Oklahoma Sound 112 User manual

Oklahoma Sound

Oklahoma Sound 112 User manual

Oklahoma Sound PRC 250 User manual

Oklahoma Sound

Oklahoma Sound PRC 250 User manual

Oklahoma Sound MULTI MEDIA CART MMC User manual

Oklahoma Sound

Oklahoma Sound MULTI MEDIA CART MMC User manual

Oklahoma Sound PRC 400 User manual

Oklahoma Sound

Oklahoma Sound PRC 400 User manual

Oklahoma Sound PRC 250 User manual

Oklahoma Sound

Oklahoma Sound PRC 250 User manual

Oklahoma Sound PRC 400 User manual

Oklahoma Sound

Oklahoma Sound PRC 400 User manual

Popular Outdoor Cart manuals by other brands

Ohio Steel 1000P-SD manual

Ohio Steel

Ohio Steel 1000P-SD manual

GroundWork GW-1400-2 quick start guide

GroundWork

GroundWork GW-1400-2 quick start guide

PC Locs Carrier 20 Cart User instructions

PC Locs

PC Locs Carrier 20 Cart User instructions

Power Fist 8904120 user manual

Power Fist

Power Fist 8904120 user manual

Ohio Steel 1000P-SD quick start guide

Ohio Steel

Ohio Steel 1000P-SD quick start guide

Ohio Steel 3040P-SD180 manual

Ohio Steel

Ohio Steel 3040P-SD180 manual

Ohio Steel SU-3040PS manual

Ohio Steel

Ohio Steel SU-3040PS manual

Ohio Steel 3460HATV manual

Ohio Steel

Ohio Steel 3460HATV manual

home star Salvin ZH1411891-W Assembly instructions

home star

home star Salvin ZH1411891-W Assembly instructions

Carromco 96022 Installation, operating and safety information

Carromco

Carromco 96022 Installation, operating and safety information

Venta LW 24 Instructions for use

Venta

Venta LW 24 Instructions for use

LDI Spaces Safco 3045 Assembly instructions

LDI Spaces

LDI Spaces Safco 3045 Assembly instructions

Gorilla Carts GOR-RGC manual

Gorilla Carts

Gorilla Carts GOR-RGC manual

Pentair AQUATRAM 90 Installation and user guide

Pentair

Pentair AQUATRAM 90 Installation and user guide

Blue Hawk DU0001 Assembly instructions

Blue Hawk

Blue Hawk DU0001 Assembly instructions

Vulcan-Hart RS-10 Installation & operation manual

Vulcan-Hart

Vulcan-Hart RS-10 Installation & operation manual

U-Line H-2083 Assembly instructions

U-Line

U-Line H-2083 Assembly instructions

STS CTS02-(EX) Operation and maintenance manual

STS

STS CTS02-(EX) Operation and maintenance manual

manuals.online logo
manuals.online logoBrands
  • About & Mission
  • Contact us
  • Privacy Policy
  • Terms and Conditions

Copyright 2025 Manuals.Online. All Rights Reserved.