Bestimmungsgemäße Verwendung
Die Türkette gewährleistet einen erhöhten Objektschutz, sofern sich ein Wohnungsnutzer innerhalb des
5DXPHVEHȴQGHW
'LH7¾UNHWWHLVWI¾U:RKQXQJVXQG+DXVHLQJDQJVW¾UHQDXV+RO]6WDKO$OXPLQLXPXQG9HUEXQGVWR-
NRQVWUXNWLRQHQJHHLJQHW%HL.XQVWVWRXQG9HUEXQG0DWHULDOLHQPXVVDQGHU0RQWDJHSRVLWLRQHLQ
0HWDOOSURȴOYRUKDQGHQVHLQRGHUHLQH0HWDOOSODWWHDXIGHU.RQWHUVHLWHXQWHUOHJWZHUGHQ
-HGHDQGHUH9HUZHQGXQJJLOWDOVQLFKWEHVWLPPXQJVJHP¦¡(LJHQP¦FKWLJH9HU¦QGHUXQJHQRGHU8PEDX-
WHQGLHQLFKWLQGLHVHU0RQWDJHDQOHLWXQJEHVFKULHEHQVLQGVLQGQLFKW]XO¦VVLJXQGI¾KUHQ]XU%HVFK¦GL-
JXQJGLHVHV3URGXNWV
Sicherheitshinweise
WARNUNG! (UVWLFNXQJVJHIDKU.LQGHUN¸QQHQ.OHLQWHLOH9HUSDFNXQJVRGHU
6FKXW]IROLHQYHUVFKOXFNHQ+DOWHQ6LH.LQGHUYRP3URGXNWXQGGHVVHQ
9HUSDFNXQJIHUQ
WICHTIG! 8QVDFKJHP¦¡H0RQWDJHNDQQ]X6DFKEHVFK¦GLJXQJHQI¾KUHQ0RQWLH-
UHQ6LHGLH7¾UNHWWHDXVVFKOLH¡OLFKZLHLQGLHVHU0RQWDJHDQOHLWXQJEHVFKULHEHQ
9HUZHQGHQ6LHDXVVFKOLH¡OLFKGDVPLWJHOLHIHUWH0RQWDJHPDWHULDO
WICHTIG! 9HUZHQGHQ6LHELWWH.(Ζ1(6SU¾K¸OHR¦5HLQLJHQ6LHKLQXQGZLHGHUGLH
7¾UNHWWHPLWHLQHP7XFK'LH0HFKDQLNLPΖQQHUHQLVWEHUHLWVZHUNVHLWLJDXVUHL-
FKHQGJHIHWWHW$FKWHQ6LHEHLGHU0RQWDJHDXFKGDUDXIGDVVNHLQH+RO]VS¦QHR¦
LQGDV6FKORVVRGHU=\OLQGHUJHK¦XVHJHODQJHQ
Montage
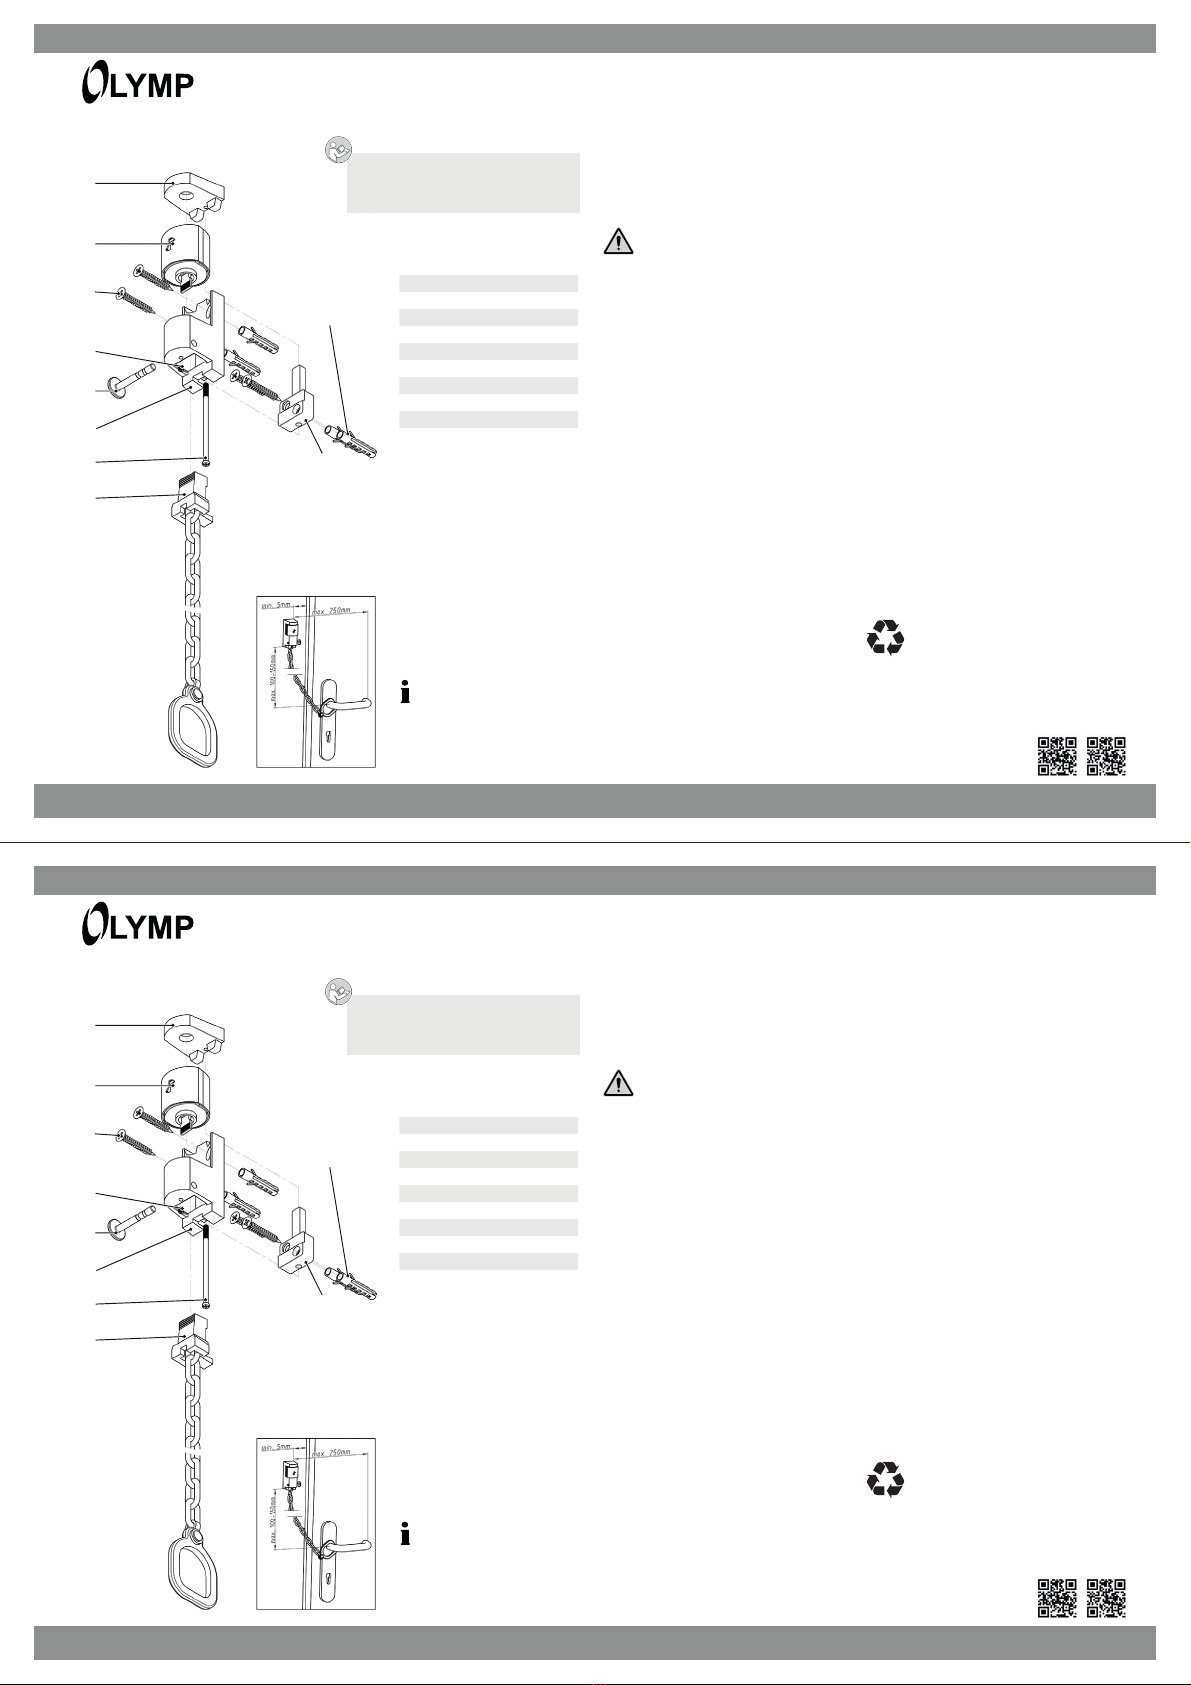
1 'LH6FKORVVHLQKHLWGHU7¾UNHWWHQKDOWHUXQJEHVWHKHQGDXV0RQWDJH8QWHUWHLO6FKORVVJHK¦XVH
=\OLQGHUJHK¦XVHXQG*HK¦XVHDEGHFNXQJGXUFK(QWIHUQHQGHU*HZLQGHVFKUDXEHGHPRQWLHUHQ
'LH0RQWDJHSRVLWLRQGHU6FKORVVHLQKHLWDXVZ¦KOHQ'DV0RQWDJH8QWHUWHLOLQHQWVSUHFKHQGHU3R-
VLWLRQ]XP$QUHL¡HQGHUEHLGHQ%RKUO¸FKHUKDOWHQ%RKUHQ6LHDQVFKOLH¡HQGPLWHLQHP%RKUHUbPP
EHLGH/¸FKHU'¾EHOHLQVHW]HQXQG0RQWDJH8QWHUWHLOPLW6FKUDXEHQEHIHVWLJHQ
'DV6FKORVVJHK¦XVHDXIGDV0RQWDJH8QWHUWHLO]XP$QUHL¡HQGHUEHLGHQ%RKUO¸FKHUDXIVHW-
]HQ%RKUO¸FKHUERKUHQ'¾EHOHLQVHW]HQXQG6FKORVVJHK¦XVHPLW6FKUDXEHQEHIHVWLJHQ
'DV=\OLQGHUJHK¦XVHHLQVHW]HQGLH*HK¦XVHDEGHFNXQJDXIVHW]HQ6FKORVVJHK¦XVHXQG*H-
K¦XVHDEGHFNXQJPLWWHOV*HZLQGHVFKUDXEHYHUVFKUDXEHQ
'HQ+DOWHVWLIWVRLQGDV6FKORVVJHK¦XVHHLQVWHFNHQGDVVGHU.QRSIGHV6WLIWHV]XU7¾U]HLJW'HQ+DO-
WHVWLIWLQ5DVWSRVLWLRQEULQJHQXQGGXUFKGLH0DGHQVFKUDXEHȴ[LHUHQ
'LH7¾UNHWWHPLW5DVWERO]HQLQGDV6FKORVVJHK¦XVHHLQUDVWHQ
'HQ.HWWHQ¾EHUZXUIULQJ¾EHUGHQ+DOWHVWLIWOHJHQ
Montageanleitung
Türkette TK15 / TK20
4
3
9
6
8
2
5
7
10
1
Übersicht
10RQWDJH8QWHUWHLO
2Schlossgehäuse
3Zylindergehäuse
4*HK¦XVHDEGHFNXQJ
5*HZLQGHVFKUDXEH0[PP
60DGHQVFKUDXEH
7Türkette mit Rastbolzen
8Haltestift
96FKUDXEHQ[PP
10 Dübel
Garantie
'LH*DUDQWLH]HLWEHWU¦JW0RQDWH'LH*DUDQ-
WLH]HLWEHJLQQWDE.DXIGDWXP%LWWHEHZDKUHQ6LH
GHQ.DXIEHOHJXQGGLH2ULJLQDOYHUSDFNXQJDXI
Sollte ein Problem auftreten, besuchen Sie unser
5HWRXUHQ3RUWDO50$LP%HUHLFK6XSSRUWDXI
XQVHUHUΖQWHUQHWVHLWHwww.olympia-vertrieb.de
%HLZHLWHUHQ)UDJHQVWHKWΖKQHQXQVHUH+RWOLQH
XQWHUGHU1XPPHUbb.RVWHQDXV
GHPGW)HVWQHW]EHL'UXFNOHJXQJbFW0LQ
PRELOPD[LPDObFW0LQ]XU9HUI¾JXQJ
Olympia Business Systems Vertriebs GmbH
Zum Kraftwerk 1 - 45527 Hattingen
Entsorgung
+HOIHQ6LHGLH8PZHOW]XVFKRQHQXQG
entsorgen Sie das Produkt und die
9HUSDFNXQJVPDWHULDOLHQHQWVSUHFKHQG
GHQORNDOHQ9RUVFKULIWHQ
Mehr Informationen
:HLWHUHΖQIRUPDWLRQHQ]XGLHVHP3URGXNWȴQGHQ
Sie auf http://productip.com/?f=84fc1
KWWSSURGXFWLSFRP"I
2GHUVFDQQHQ6LHGLHVHQ45&RGH
Benötigte Werkzeuge
Ŷ.UHX]VFKUDXEHQGUHKHU
ŶPP%RKUHU
Ŷ0DUNLHUVWLIW$QUHL¡QDGHOR
Lieferumfang
Prüfen Sie die Vollständigkeit der
/LHIHUXQJ
ŶTürkette
Ŷ0RQWDJHPDWHULDO
:LUEHKDOWHQXQVLQKDOWOLFKHXQGWHFKQLVFKHQGHUXQJHQYRU Y$UW1U
/HVHQ6LHGLH0RQWDJHDQOHLWXQJDXIPHUNVDP
durch und beachten Sie die Hinweise bei der
+DQGKDEXQJ%HZDKUHQ6LHGLH0RQWDJH
DQOHLWXQJI¾UHLQHVS¦WHUH9HUZHQGXQJDXI
%HDFKWHQ6LHGLHGDUJHVWHOOWHQ
0RQWDJHDEVW¦QGH
Bestimmungsgemäße Verwendung
Die Türkette gewährleistet einen erhöhten Objektschutz, sofern sich ein Wohnungsnutzer innerhalb des
5DXPHVEHȴQGHW
'LH7¾UNHWWHLVWI¾U:RKQXQJVXQG+DXVHLQJDQJVW¾UHQDXV+RO]6WDKO$OXPLQLXPXQG9HUEXQGVWR-
NRQVWUXNWLRQHQJHHLJQHW%HL.XQVWVWRXQG9HUEXQG0DWHULDOLHQPXVVDQGHU0RQWDJHSRVLWLRQHLQ
0HWDOOSURȴOYRUKDQGHQVHLQRGHUHLQH0HWDOOSODWWHDXIGHU.RQWHUVHLWHXQWHUOHJWZHUGHQ
-HGHDQGHUH9HUZHQGXQJJLOWDOVQLFKWEHVWLPPXQJVJHP¦¡(LJHQP¦FKWLJH9HU¦QGHUXQJHQRGHU8PEDX-
WHQGLHQLFKWLQGLHVHU0RQWDJHDQOHLWXQJEHVFKULHEHQVLQGVLQGQLFKW]XO¦VVLJXQGI¾KUHQ]XU%HVFK¦GL-
JXQJGLHVHV3URGXNWV
Sicherheitshinweise
WARNUNG! (UVWLFNXQJVJHIDKU.LQGHUN¸QQHQ.OHLQWHLOH9HUSDFNXQJVRGHU
6FKXW]IROLHQYHUVFKOXFNHQ+DOWHQ6LH.LQGHUYRP3URGXNWXQGGHVVHQ
9HUSDFNXQJIHUQ
WICHTIG! 8QVDFKJHP¦¡H0RQWDJHNDQQ]X6DFKEHVFK¦GLJXQJHQI¾KUHQ0RQWLH-
UHQ6LHGLH7¾UNHWWHDXVVFKOLH¡OLFKZLHLQGLHVHU0RQWDJHDQOHLWXQJEHVFKULHEHQ
9HUZHQGHQ6LHDXVVFKOLH¡OLFKGDVPLWJHOLHIHUWH0RQWDJHPDWHULDO
WICHTIG! 9HUZHQGHQ6LHELWWH.(Ζ1(6SU¾K¸OHR¦5HLQLJHQ6LHKLQXQGZLHGHUGLH
7¾UNHWWHPLWHLQHP7XFK'LH0HFKDQLNLPΖQQHUHQLVWEHUHLWVZHUNVHLWLJDXVUHL-
FKHQGJHIHWWHW$FKWHQ6LHEHLGHU0RQWDJHDXFKGDUDXIGDVVNHLQH+RO]VS¦QHR¦
LQGDV6FKORVVRGHU=\OLQGHUJHK¦XVHJHODQJHQ
Montage
1 'LH6FKORVVHLQKHLWGHU7¾UNHWWHQKDOWHUXQJEHVWHKHQGDXV0RQWDJH8QWHUWHLO6FKORVVJHK¦XVH
=\OLQGHUJHK¦XVHXQG*HK¦XVHDEGHFNXQJGXUFK(QWIHUQHQGHU*HZLQGHVFKUDXEHGHPRQWLHUHQ
'LH0RQWDJHSRVLWLRQGHU6FKORVVHLQKHLWDXVZ¦KOHQ'DV0RQWDJH8QWHUWHLOLQHQWVSUHFKHQGHU3R-
VLWLRQ]XP$QUHL¡HQGHUEHLGHQ%RKUO¸FKHUKDOWHQ%RKUHQ6LHDQVFKOLH¡HQGPLWHLQHP%RKUHUbPP
EHLGH/¸FKHU'¾EHOHLQVHW]HQXQG0RQWDJH8QWHUWHLOPLW6FKUDXEHQEHIHVWLJHQ
'DV6FKORVVJHK¦XVHDXIGDV0RQWDJH8QWHUWHLO]XP$QUHL¡HQGHUEHLGHQ%RKUO¸FKHUDXIVHW-
]HQ%RKUO¸FKHUERKUHQ'¾EHOHLQVHW]HQXQG6FKORVVJHK¦XVHPLW6FKUDXEHQEHIHVWLJHQ
'DV=\OLQGHUJHK¦XVHHLQVHW]HQGLH*HK¦XVHDEGHFNXQJDXIVHW]HQ6FKORVVJHK¦XVHXQG*H-
K¦XVHDEGHFNXQJPLWWHOV*HZLQGHVFKUDXEHYHUVFKUDXEHQ
'HQ+DOWHVWLIWVRLQGDV6FKORVVJHK¦XVHHLQVWHFNHQGDVVGHU.QRSIGHV6WLIWHV]XU7¾U]HLJW'HQ+DO-
WHVWLIWLQ5DVWSRVLWLRQEULQJHQXQGGXUFKGLH0DGHQVFKUDXEHȴ[LHUHQ
'LH7¾UNHWWHPLW5DVWERO]HQLQGDV6FKORVVJHK¦XVHHLQUDVWHQ
'HQ.HWWHQ¾EHUZXUIULQJ¾EHUGHQ+DOWHVWLIWOHJHQ
Montageanleitung
Türkette TK15 / TK20
4
3
9
6
8
2
5
7
10
1
Übersicht
10RQWDJH8QWHUWHLO
2Schlossgehäuse
3Zylindergehäuse
4*HK¦XVHDEGHFNXQJ
5*HZLQGHVFKUDXEH0[PP
60DGHQVFKUDXEH
7Türkette mit Rastbolzen
8Haltestift
96FKUDXEHQ[PP
10 Dübel
Garantie
'LH*DUDQWLH]HLWEHWU¦JW0RQDWH'LH*DUDQ-
WLH]HLWEHJLQQWDE.DXIGDWXP%LWWHEHZDKUHQ6LH
GHQ.DXIEHOHJXQGGLH2ULJLQDOYHUSDFNXQJDXI
Sollte ein Problem auftreten, besuchen Sie unser
5HWRXUHQ3RUWDO50$LP%HUHLFK6XSSRUWDXI
XQVHUHUΖQWHUQHWVHLWHwww.olympia-vertrieb.de
%HLZHLWHUHQ)UDJHQVWHKWΖKQHQXQVHUH+RWOLQH
XQWHUGHU1XPPHUbb.RVWHQDXV
GHPGW)HVWQHW]EHL'UXFNOHJXQJbFW0LQ
PRELOPD[LPDObFW0LQ]XU9HUI¾JXQJ
Olympia Business Systems Vertriebs GmbH
Zum Kraftwerk 1 - 45527 Hattingen
Entsorgung
+HOIHQ6LHGLH8PZHOW]XVFKRQHQXQG
entsorgen Sie das Produkt und die
9HUSDFNXQJVPDWHULDOLHQHQWVSUHFKHQG
GHQORNDOHQ9RUVFKULIWHQ
Mehr Informationen
:HLWHUHΖQIRUPDWLRQHQ]XGLHVHP3URGXNWȴQGHQ
Sie auf http://productip.com/?f=84fc1
KWWSSURGXFWLSFRP"I
2GHUVFDQQHQ6LHGLHVHQ45&RGH
Benötigte Werkzeuge
Ŷ.UHX]VFKUDXEHQGUHKHU
ŶPP%RKUHU
Ŷ0DUNLHUVWLIW$QUHL¡QDGHOR
Lieferumfang
Prüfen Sie die Vollständigkeit der
/LHIHUXQJ
ŶTürkette
Ŷ0RQWDJHPDWHULDO
:LUEHKDOWHQXQVLQKDOWOLFKHXQGWHFKQLVFKHQGHUXQJHQYRU Y$UW1U
/HVHQ6LHGLH0RQWDJHDQOHLWXQJDXIPHUNVDP
durch und beachten Sie die Hinweise bei der
+DQGKDEXQJ%HZDKUHQ6LHGLH0RQWDJH
DQOHLWXQJI¾UHLQHVS¦WHUH9HUZHQGXQJDXI
%HDFKWHQ6LHGLHGDUJHVWHOOWHQ
0RQWDJHDEVW¦QGH


