Olympia Nova User manual

RConvenient mobile phone with large keys
Nova model
Olympia Business Systems Vertriebs GmbH
Zum Kraftwerk 1
45527 Hattingen
Operating instructions
06.05.2013 gb/gb

Contents
2
Setting Up 3..............................................................................
Operating Elements 6.....................................................................
Getting Started 8.........................................................................
Phone Book 11...........................................................................
Making and Taking Calls 12................................................................
Text Messages (SMS) 14..................................................................
Call Logs 16..............................................................................
Phone Settings 18........................................................................
Network Settings 19.......................................................................
Security Settings 19.......................................................................
Bluetooth 20..............................................................................
Restoring the Factory Settings 20...........................................................
SOS (Emergency Call) Function 20.........................................................
Organizer 21.............................................................................
Multimedia 22............................................................................
User Profiles 23...........................................................................
Selecting Pictures 23......................................................................
Torch 23.................................................................................
Troubleshooting 24........................................................................
Technical Properties 25....................................................................
Safety Information 26......................................................................
Maintenance / Guarantee 27...............................................................

Setting Up
3
Setting Up
Caution: Before you start, please read the safety information on Page 26!
Scope of delivery
The box contains:
1 phone 1 USB connection cable
1 rechargeable battery 1 charging cradle
1 power adapter plug 1 headset
1 quick reference manual
Installing the SIM card
Caution: Risk of swallowing small objects!
The SIM card can be removed.
Small children can swallow them.
1.Switch the phone off.
Caution: Pay attention that the SIM card is not bent or scratched. Prevent any contact with water,
dirt or electrical charges.
Note: The emergency (SOS) function of the phone is completed by SIM card 1. If you only use
one SIM card, it must be inserted in the slot for SIM card 1!
2.Slide the battery compartment cover downwards and remove it. If there is already a battery
inside, remove it.
Note: Your telephone number is carried by the SIM card, not the phone. Therefore, if you use
a SIM card you had in a previous phone, you will keep the same phone number.
3.Slide the SIM card with the golden contacts facing down in the SIM card slot. The SIM card
must be located under the metal retaining bar to be in the correct position.
4.Insert the battery. The golden contacts on the battery must face towards the top left.
5.Replace the battery compartment cover.

Setting Up
4
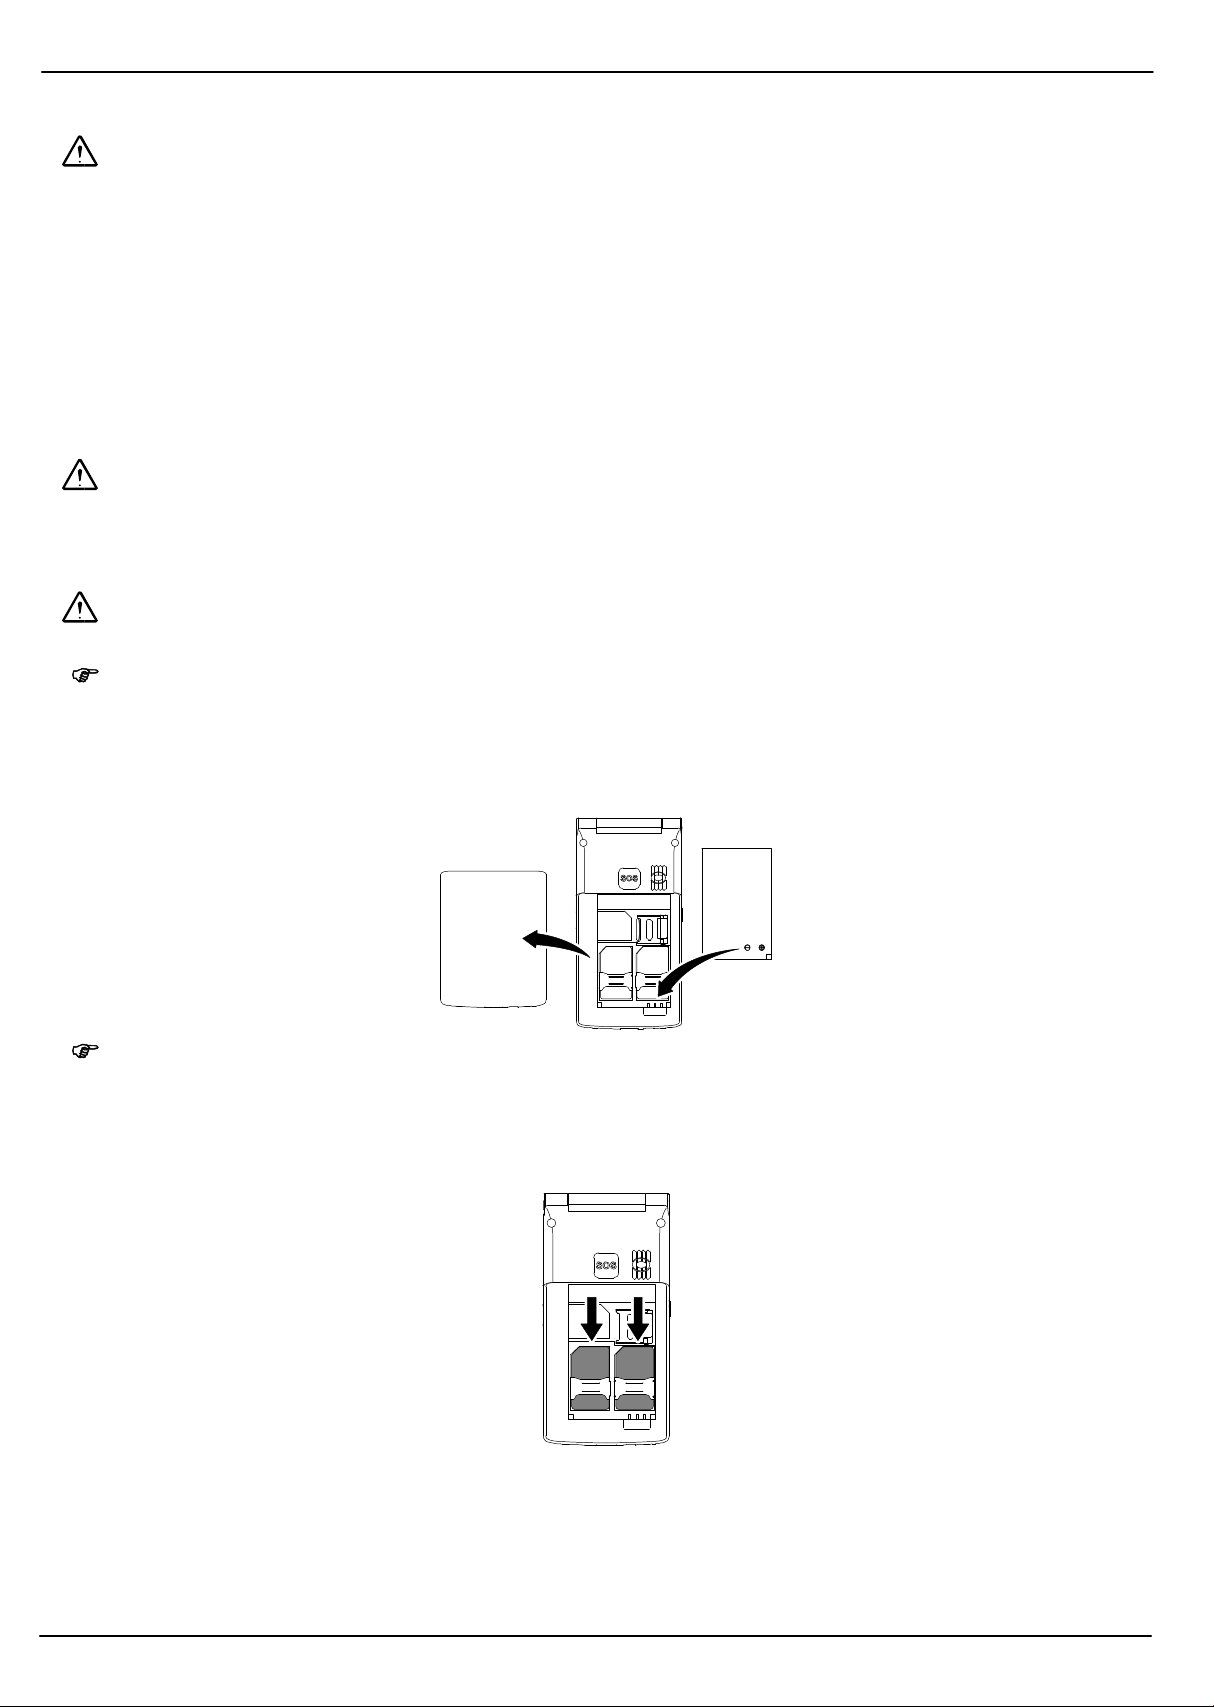
Inserting the microSD memory card
The phone memory can be extended by installing the microSD memory card option.
This increases the quantity of data which can be stored.
1.Open the silver metal clip above the SIM card slots by sliding it gently to
the right until it unlocks with a soft click. Pivot the metal bar up.
2.Lay the microSD memory card with the contacts facing down in the open
compartment. The shape of the compartment corresponds exactly to the
shape of the microSD memory card, meaning that it cannot be inserted
incorrectly.
3.Pivot the metal bar down and draw it gently to the left, using a little force,
until the metal bar snaps quietly into place.
Charging the battery
Attention: For safety reasons, only use the power adapter plug and cable supplied. Other adapters
could damage the phone.
WARNING: Before starting to charge the battery, check that it has been installed properly. Do not
remove the battery while it is being charged. This could damage the phone.
Note: When charging the battery for the first time, it should be charged for at least 4 hours. Some
batteries only reach their full capacity after several complete charge/discharge cycles. If
the battery is fully discharged, it may take some time for the charging process to be indic
ated.
WARNING: Only charge the battery when at room temperature. Do not expose the battery to
heat, direct sunlight or temperatures below 0 °C / above 45 °C.
Connect the charging adapter plug and cable as illustrated in the diagram. For safety reasons, only
use the charging adapter plug and cable supplied.

Setting Up
5
Alternatively, you can use the charging cradle supplied.
Switching the phone on and off
3 sec. Switch the phone on
3 sec. Switch the phone off
Note: Some SIM cards will require you to enter a PIN code. Follow the instructions which appear.
Battery charge status indicator
The current battery charge status is indicated in the display as follows:
Full Half empty Low Empty
When the battery charge is low, a corresponding warning message appears in the display.
Note: Charge the battery.
In cases where the battery charge is extremely low, it is possible that the back-lighting no longer
works and certain functions are no longer available.
When the battery charge drops below the minimum status, the phone switches off automatically.
Checking a network is available
Some networks offer better coverage than others in different areas. The icon on the left-hand side of
the display indicates the availability and strength of a network. The more bars displayed in the icon,
the better the reception quality. The name of the network appears at the centre of the display.
Very good … … … Poor
Note: At certain points of this operating manual, reference is made to "SIM1 settings". Since this
device supports the use of 2 SIM cards (Dual SIM), the settings are also applicable for
SIM2 at the respective points.

Operating Elements
6
1
14
12
11
10
9
87
6
5
4
3
2
13
15
18
16
17
20
19

Operating Elements
7
Operating Elements
1 Earpiece
2 Display
3 Confirm / Picture selection
4 Take incoming call / Confirm
5 - Digit keys 0 - 9
6 Star key / Speed dial number of female contact / Navigate left
7 Torch LED
8 Micro USB port
9 Hash key / Speed dial number of male contact / Navigate right
10 Navigate down
11 End a call / Switch phone on/off
12 Navigation upwards
13 Back / Cancel
14 Open menu / Confirm
15 SOS key (emergency call)
16 Headset port
17 Volume up/down / Navigate up/down
18 Battery compartment cover
19 Loudspeaker
20 Switch torch on/off

Getting Started
8
Function keys
Key Mode Press Press & Hold
Standby Open main menu
/Menu Select submenu
/During call Adjust call volume
Standby Open call logs
Standby Switch phone on/off
Menu Move back / Cancel
During call End call (on-hook)
During call Handsfree function
Standby Select pictures
Getting Started
This chapter provides basic information on using the operating manual and the phone.
Description of operating sequences in the manual
Press the key depicted briefly
2 sec. Press the key depicted for 2 seconds
Hold Press and hold down the key depicted
TEnter numbers or letters
{í} Phone rings
Phonebook Represents text in the display
Indicates icons in the display
Standby mode
All descriptions in this operating manual assume that the phone is in Standby mode. The system
switches to Standby mode by pressing the key, several times if necessary.
Energy-save mode
The phone switches to energy-save mode if no keys have been pressed for a certain time. The
display no longer lights up. Press any key to deactivate Energy-save mode.

1
2
3
Getting Started
9
Softkeys
Different functions are assigned to the softkeys and according to the various menus.
Key lock
The key lock function is intended to prevent other functions being activated inadvertently. Shut the
phone to activate the key lock. The SOS key remains active for use.
Navigating in the menu
All the functions can be accessed via the various menus.
Open the main menu
/Select a submenu
/Open the submenu
/Select a function
/Open the function
//Select and confirm a setting
TUse the keypad to enter numbers or letters
/Confirm the entries
Skip back one level
Cancel the programming and saving processes and return to Standby
mode
Creating phone book entries - example
The way in which to navigate through the menus and define settings is explained by means of the
example Creating phone book entries. Proceed as in this example for all the settings.
Open the main menu
/Phonebook Select the menu
/
Addnewcontact Select the required menu option
/ToSIM1/Tophone Select the menu option
TEnter the name
TEnter the phone number
/Save Save the entry

4
Getting Started
10
Entering text and numbers
The keys on the keypad are also labelled with letters for the entry of text.
The phone provides various methods by which text can be entered. These are used when creating or
editing entries in the phone book, when searching for names in the phone book and when writing text
messages.
Note: Not every method is always available for each application.
Methods of entering text
Change the text input method to enter other characters.
Multi-tap, capital letters
Multi-tap, small letters
Digits 123
Note: In order to toggle between the different input methods, press while entering text.
Multi-tap
In order to enter text in multi-tap mode, press the key labelled with the corresponding letter/character.
If the first character of the group is required, press the key once. If the second character is required,
press it twice, and so on.
To enter two characters assigned to the same key, press the key the respective number of times to
enter the first character. Wait until the cursor skips to the next position and then enter the letter.
Punctuation and special characters
When in Edit mode, press the key. Punctuation marks and special characters are displayed.
Press /to select a character, then press to accept it. You can recall a sequence of
frequently used special characters in Edit mode by pressing the key repeatedly.
Other entries and functions
Enter a space
Delete characters
Hold Delete all characters
/Move the cursor

5
Phone Book
11
Phone Book
The phone book in the phone can store up to 300 entries. You can store other entries on the SIM
card.
SAlways enter phone numbers with the country and area codes.
SWhen the memory capacity is used up, the corresponding message appears when an attempt is
made to store another contact. Before new entries can be stored, old contacts must be deleted.
SThe phone book entries are arranged alphabetically. To skip directly to a required phone book
contact, press the corresponding first letter. Press /to search for entries manually.
Options for phone book entries
In order to open the phone book options, press the following keys:
/Phonebook
Press /to select an entry, then press to select from the following options:
Call Dial the entry selected
Sendtextmessage Compose a text message and send it to the contact +Writing a text
message, Page 14
View View details of the entry selected (name, number)
Edit Edit the contact
Delete Delete the contact
Copy Copy the contact on the SIM card or phone
Move Move the contact on the SIM card or phone
Phone book settings
Press the following keys to display the phone book options:
/Phonebook /Phonebooksettings
Navigate in the menu by pressing the /keys and press to select from the following
menu options:
Preferredstorage Open the list of contacts
Speeddial +Speed dialling, Page 12
Mynumber Enter your own phone number
Memorystatus Display the memory status of the internal memory and SIM card
Copycontacts Copy all entries from the SIM card to the phone or vice versa
Movecontacts Move all entries from the SIM card to the phone or vice versa
Deleteallcontacts Delete all phone book entries

6
7
Making and Taking Calls
12
Speed dialling
Keys -can be set up as speed dialling keys for up to 8 phone numbers.
Note: You can only assign phone numbers which are already stored in the phone book to speed
dialling keys. Also check that the speed dialling function is enabled.
Navigate in the Speeddial menu by pressing the /keys and press to select from the
following menu options:
Status Activate (ON) or deactivate (OFF) the speed dial function.
Setnumbers Assign phone numbers in the phone book to the keys
(keys -) as speed dialling numbers
Assigning speed dialling numbers
To assign phone numbers to a speed dialling key, open the Setnumbers menu and press the following
keys:
/[Digit key] Press the digit key that you wish to set up as a speed dialling key
/ [Contact] Select the phone book entry required and confirm it
When Standby mode is active, press the key to which the phone number is assigned for 3 seconds
and the number is dialled.
Making and Taking Calls
Taking a call
{í}Take the call
Rejecting a call
{í}Reject the call
Ending a call
End the current call
Making a call
TEnter the phone number
Delete the last digit if incorrect
Dial the phone number
Dialling numbers from the call log
Your mobile phone stores the last numbers dialled, calls received and calls missed in a call log.
Open the call log
/ Select an entry and display the options
/Call Select the menu option and dial the contact

Making and Taking Calls
13
Dialling numbers from the phone book
Check that phone numbers are stored in the phone book.
Open the main menu
/Phonebook Open the phone book
/[Select contact] Select the contact and open the options
/Call Select the menu option and dial
Note: To skip directly to an entry, use the digit keys to enter the first letters of the name stored.
If necessary, you must press a key several times in order to enter the respective letters.
Speed dialling
The phone numbers must have been assigned to the speed dialling keys
(+Speed dialling, Page 12).
Activate Standby mode and press:
3 sec. - Press and hold the key in Standby mode
Call female/male contact
The phone number must have been stored as a female / male contact
(+Female / Male contact, Page 20).
3 sec. or Press and hold the relevant key in Standby mode
Talk time display
The duration of a call is displayed in hours, minutes and seconds during the call.
Setting the receiver volume
The volume can be adjusted during a call:
KAdjust the volume as appropriate
Exposure to the receiver earpiece at full volume for a long period could cause ear damage.

8
9
Text Messages (SMS)
14
Text Messages (SMS)
Your phone can be used to transmit and receive text messages. This menu is used to write and
manage your text messages.
Note: It is possible that not all functions described are supported by every mobile service pro
vider. Therefore, please contact your mobile service provider locally for details.
To open the Messaging menu, press the following keys:
/Messaging
Navigate in the menu by pressing the /keys and press to select from the following
menu options:
Writemessage Compose the text message and send it
+Writing a text message, Page 14
Inbox +Inbox, Page 14
Drafts Display draft text messages
Outbox Display text messages not yet sent
Sentmessages Display text messages sent
Deletemessages Delete text messages
SMStemplates Use message templates
SMSsettings +Text message settings, Page 15
Writing a text message
Note: A standard text message contains 160 characters. Extra costs may be incurred for texts
in excess of 160 characters.
To write a text message, press the following keys:
/Messaging /Writemessage
TWrite the text (+ Entering text and digits, Page 10).
Show the options
Navigate in the menu by pressing the /keys and press to select from the following
menu options:
Sendto Send the text message to:
- a contact in the phone book
- a phone number entered
Inputmethod Change the input method (language / upper/lower case)
Inserttemplate Insert a template
Advanced Add phone numbers or names from the phone book
SavetoDrafts Save the text message in the Drafts folder
Inbox
Text messages received are stored in the Inbox folder. Select a text message from the Inbox, press the
key and press the / keys to select from the following menu options:
View View a text message
Reply Write a reply to the text message
Callsender Call the sender of the message
Forward Send the message received to another person
Delete Delete the text message
Deleteall Delete all messages in the Inbox

10
11
12
13
Text Messages (SMS)
15
SavetoPhonebook Save the phone number of the sender in the phone book
Filterby Filter all messages to SIM card (1 or 2) or all messages.
Sent messages
Text messages sent are stored in the Sentmessages menu.
Navigate in the Sentmessages menu to select a text message by pressing the /keys and press
to select from the following menu options:
View View a text message
Forward Send the message received to another person
Delete Delete the text message
Deleteall Delete all messages in the Sentmessages menu
SMS settings
Note: It is possible that not all functions described are supported by every mobile service pro
vider. Therefore, please contact your mobile service provider locally for details.
To open the SMSsettings menu, press:
/Messaging / SMSsettings / SIM1messagesettings
Navigate in the menu by pressing the /keys and press to select from the following
menu options:
Profilesettings +Profile settings, Page 15
Voicemailserver Define the Voicemail server
Commonsettings +Common settings, Page 15
Memorystatus Display the memory status of the phone and SIM card inserted
Preferredstorage Define whether text messages should be stored on the SIM card or in
the phone memory
Profile settings
Navigate in the profile settings in Profile1 using the /keys, select Edit and press to select
from the following menu options:
Profilename Change the profile name
SMSCaddress Change the SMSC number
Note: SMS messages are distributed by a messaging service centre (MSC). If you want to send
and receive text messages, you must enter a service centre number in your mobile phone.
Normally, a number is already preset. You are advised to keep the factory settings.
Validityperiod Define how long attempts should be made to deliver a text.
Messagetype Define the format in which the text message should be sent.
Common settings
Navigate in the Commonsettings menu by pressing the /keys and press to select from the
following menu options:
Deliveryreport Request a report regarding the delivery of text messages
Replypath Define whether a reply message should be transmitted via the same
SMSC
Savesentmessage Save messages sent in the Sentmessages folder

14
15
Call Logs
16
Call Logs
Your mobile phone stores the last numbers dialled, calls received and calls missed in a call log.
Note: If one of the phone numbers received matches an entry in the phone book, the associated
name appears.
/Calllogs Open the call logs.
Use the /keys to navigate in the Callhistory menu and press to select from the following
menu options:
Missedcalls List of calls missed
Dialledcalls List of calls made
Receivedcalls List of calls taken
Deletecalllogs Delete one or all lists
Textmsg.counter List of text messages sent and received
Options for the call logs
Note: The same options are available for all of the call lists.
Open the call log
/Select an entry and display the options
The following menu options are available or selection:
View View details of the entry selected (name, number)
Call Dial the entry selected
SavetoPhonebook Save the contact in the phone book
Editbeforecall Edit the phone number of the contact prior to making the call
Delete Delete the contact
Call settings
Navigate in the Callsettings menu by pressing the /keys and press to select from the
following menu options:
SIM1callsettings +SIM call settings, Page 16
Advancesettings +Advanced settings, Page 17
SIM call settings
Navigate in the SIM1callsettings menu by pressing the /keys and press to select from the
following menu options:
Callwaiting Activate/Deactivate the call waiting option. If the call waiting function
is enabled, an acoustic signal tells you that another call has been
received while you are making a call.
Calldivert +Diverting calls, Page 17
Callbarring Activate/Deactivate the call barring option. This is used to define
whether certain sequences of numbers are automatically rejected
when received or when an attempt is made to dial them.
Lineswitching Switch from line 1 to line 2

16
17
Call Logs
17
Diverting calls
This menu is used to divert incoming calls to another number which you define.
Navigate in the Calldivert menu by pressing the /keys and press to select from the
following menu options:
Divertallvoicecalls Divert all incoming phone calls
Divertifunreachable Divert calls if your phone is outside the range of your network or is
switched off
Divertifnoanswer Divert calls if they are not taken on your phone
Divertifbusy Divert calls when your line is busy
Divertalldatacalls Divert all data calls
Cancelalldiverts Disable all active divert settings
How to divert calls
Select the type of call divert you want to activate in the Calldivert menu and press to select any of
the following menu options:
Activate Enable the call divert function
Deactivate Disable the call divert function
Querystatus Query the status of the call divert function
Advanced settings
Navigate in the Callsettings menu using the /keys to the Advancesettings menu and press the
key to select from the following menu options:
Autoredial Activate/Deactivate automatic redialling. If a phone number called is
engaged or cannot be reached, redialling occurs automatically until
the person called answers. An acoustic signal is sounded and the
number is dialled.
Calltimereminder Set an acoustic signal which is sounded at regular intervals during a
call
Answermode Activate/Deactivate answering a call automatically by pressing any
key / by opening the phone

18
19
20
21
Phone Settings
18
Phone Settings
The Phonesettings menu is used to modify the basic settings such as time, language, etc.
To access the menu, press the following:
/Settings / Phonesettings
Navigate in the menu by pressing the /keys and press to select from the following
menu options:
Timeanddate Define whether the time and date should appear in the display
Schedulepoweron/off Set the respective times at which the phone should be switched on
and off automatically
Language Change the language
Pref.inputmethod Set the preferred input method with which to compose text
+Entering text and digits, Page 10
Display +Display settings, Page 18
Misc.settings Set the brightness and back-light time for the display
Time and date settings
Navigate in the Timeanddate menu by pressing the /keys and press to select from the
following menu options:
Sethomecity Set the capital city
Settime/date + Setting the time and date, Page 18
Setformat The time and date will be updated automatically
Setting the time and date
How to set the time and date in the Timeanddate menu:
/Timeanddate Select the menu option
/HH:MM Enter the time
/YYYY.MM.DD
Enter the date and confirm it
Display settings
Navigate in the Display menu by pressing the /keys and press to select from the
following menu options:
Wallpaper Set the background image
Powerondisplay Set the animation when the phone is switched on
Poweroffdisplay Set the animation when the phone is switched off
Showdateandtime Activate/Deactivate date and time in the display

22
23
24
25
26
Network Settings
19
Network Settings
Open Networksettings and use the key to select the SIM1networksettings menu option, then press
to select from the following menu options:
Networkselection +Network selection, Page 19
Preferences Select preferences for certain network operators
Note: Changes in the Networksettings could result in high costs.
Network selection
Navigate in the Networkselection menu by pressing the /keys and press to select from the
following menu options:
Newsearch Search for available networks
Selectnetwork Select a network manually
Selectionmode Select whether a network will be defined automatically or manually
Security Settings
Navigate in the Securitysettings menu by pressing the /keys and press to select from the
following menu options:
Note: The PIN (Personal Identity Number) and PIN2 codes are 4 to 8-digit numbers. The PIN
and PIN2 codes are given to you, together with the SIM card, by your mobile network pro
vider.
SIM1security + SIM security, Page 19
Phonesecurity + Phone security, Page 19
SIM security
Navigate in the SIM1security menu by pressing the /keys and press to select from the
following menu options:
Note: The PIN (Personal Identity Number) and PIN 2 codes are 4 to 8digit numbers. The PIN
and PIN 2 codes are given to you, together with the SIM card, by your mobile network pro
vider.
PINlock Enable/disable the PIN query when switching the phone on
Note: If you deactivate the SIM lock, you need not enter the PIN after switching the mobile phone
on. It is recommended to leave the SIM lock on to prevent unauthorised persons from us
ing the mobile phone.
ChangePIN Change the PIN. Follow the instructions displayed.
ChangePIN2 Change PIN 2. Follow the instructions displayed.
Phone security
Navigate in the Phonesecurity menu by pressing the /keys and press to select from the
following menu options:
Note: If the phone lock is enabled, you will need to enter the phone lock password every time
you turn on the phone.
Phonelock Enable/Disable the phone lock
Changepassword Change the phone lock password. Follow the instructions displayed.
Note: The phone lock password is set to 1234 at the factory.

27
28
29
30
Bluetooth
20
Bluetooth
The Bluetooth function, a standard for wireless data transfer, can be used to exchange data with
other Bluetooth-capable devices free of charge.
Navigate as follows:
/Settings /Bluetooth /Power
Complete further settings in the Bluetooth menu for Visibility, Mydevice, Devicename: or Advancesettings.
Restoring the Factory Settings
Note: If you restore the factory (default) settings, all the data saved is lost! You must use the
phone lock password (+Page 19) to restore the default factory settings.
Proceed as follows to restore the factory settings:
1.Activate Standby mode and press:
/Settings / Restorefactorysettings
2.Enter the phone lock password and press to confirm.
3.Press again to answer the next prompt.
The phone restarts and the factory settings are restored.
SOS (Emergency Call) Function
The SOS key activates the emergency call function. Press and hold the SOS key for approx. 3 sec. to
trigger an emergency call. An acoustic alarm signal is sounded and the emergency text is sent to the
phone numbers stored for the purpose. After that, the respective phone numbers stored are dialled in
succession in Handsfree mode. You can assign up to 5 phone numbers to the SOS key.
Proceed as follows to assign phone numbers to the SOS key:
/ Settings Select the menu option
/EmergencySettings Select the menu option
/Numberlist Select the menu option
TEnter the phone number and continue or confirm
Female / Male contacts
Use these menu options to store a respective number you can later call by pressing and holding key
(female contact) or (male contact) in Standby mode.
To assign phone numbers to the keys, select Settings/EmergencySettings/FemaleNumber/MaleNumber and
proceed as follows:
TEnter the phone number to be stored and confirm it
Set the phone to Standby mode, press the corresponding key for approx. 2 sec. and the phone
number assigned is dialled.
Table of contents
Other Olympia Cell Phone manuals

Olympia
Olympia NEO User manual

Olympia
Olympia VIVA PLUS User manual

Olympia
Olympia STYLE User manual

Olympia
Olympia Becco User manual

Olympia
Olympia Vitus 2GVitus 4G User manual

Olympia
Olympia BRIO Touch User manual

Olympia
Olympia Chic II User manual

Olympia
Olympia PRIMUS Service manual

Olympia
Olympia SUN User manual

Olympia
Olympia HAPPY II User manual

Olympia
Olympia STYLE User manual

Olympia
Olympia BECCO Plus User manual

Olympia
Olympia PRIMUS User manual

Olympia
Olympia classic User manual

Olympia
Olympia ROCK User manual

Olympia
Olympia Joy Plus User manual

Olympia
Olympia classic User manual

Olympia
Olympia style plus Service manual

Olympia
Olympia TOUCH II User manual

Olympia
Olympia Caro User manual