manuals.online logo
Brands
  1. Home
  2. •
  3. Brands
  4. •
  5. Olympus
  6. •
  7. Heater
  8. •
  9. Olympus JetHeat OLY-J5/3 User manual

Olympus JetHeat OLY-J5/3 User manual

INDUSTRIAL FAN HEATERS
Output: 5Kw, 9Kw, 15Kw 3 HEAT SETTINGS
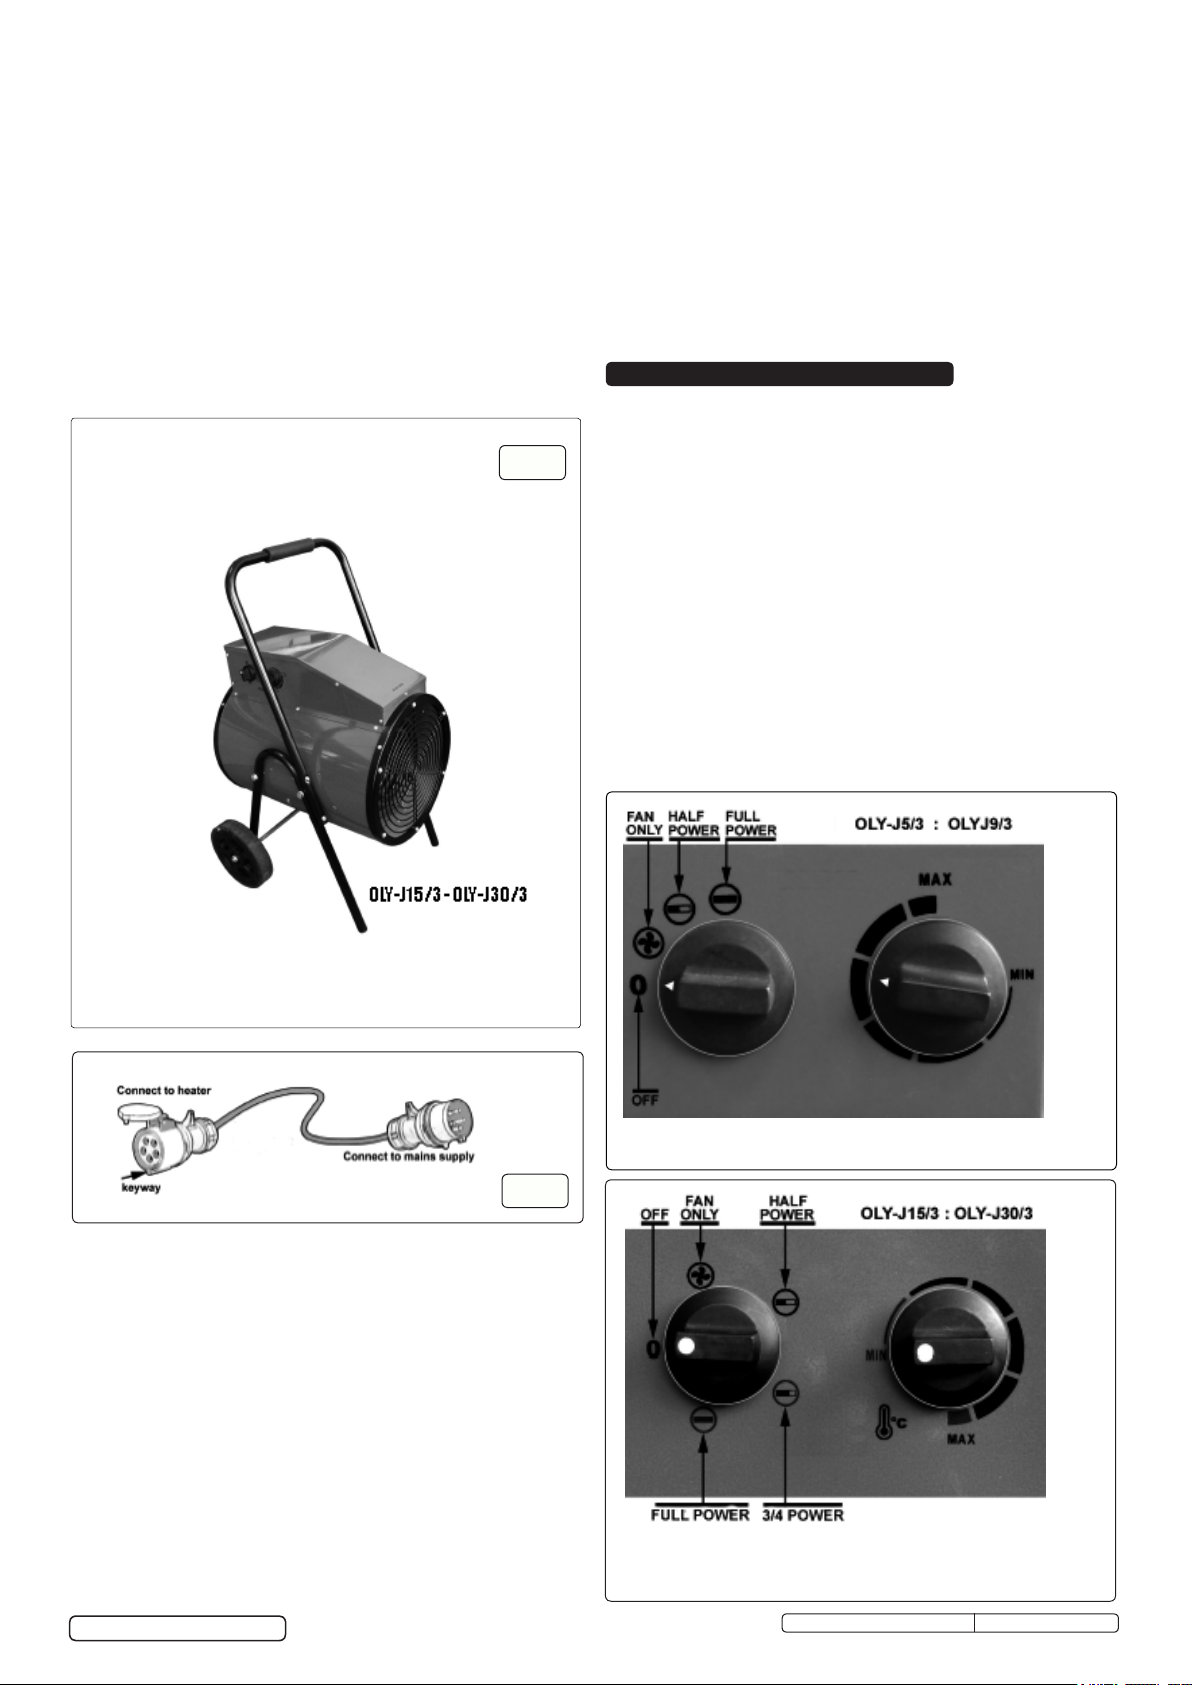
Model Nos: Olympus JetHeat OLY-J5/3, OLY-J9/3, OLY-J15/3
1.2. GENERAL SAFETY
1.2.1. MAINTENANCE PRECAUTIONS
WARNING! Disconnect the heater from the mains power



1.2.2. POSITIONING OF HEATER
WARNING! DO NOT use the heater near flammable material
liquids, solids, gases or compressed gas cylinders etc.
DO NOT place the heater close to a bath, wash basin, shower,
swimming pool or any other water-filled area or wet surface.
DO NOT place the heater up against any surface such as a
wall, door or furniture etc.
DO NOT place the heater immediately below any electrical
outlet.
Position the heater at least a minimum of 0.5mtr at the rear
and sides, and 2mtr at the front, from any walls or objects.
DO NOT place the heater on a raised surface or anywhere
where it could topple over.
Original Language UK English
1.1. ELECTRICAL SAFETY
WARNING! ELECTRICAL INSTALLATION OF THE HEATER
TO A 3-PHASE 415 VOLT SUPPLY MUST ONLY BE
CARRIED OUT BY A QUALIFIED ELECTRICIAN.
Make sure the power supply cable is correctly connected
to the earth. It is the user’s responsibility to read,
understand and comply with the following:
You must check all electrical equipment and appliances to
ensure they are safe before using. You must inspect power
supply leads, plugs and all electrical connections for wear and
damage. You must ensure the risk of electric shock is
minimised by the installation of appropriate safety devices. An
RCCB (Residual Current Circuit Breaker) should be
incorporated in the main distribution board. You must also read
and understand the following instructions concerning electrical
safety.
1.1.1. The Electricity At Work Act 1989 requires all portable
electrical appliances, if used on business premises, to be tested
by a qualified electrician, using a Portable Appliance Tester
(PAT), at least once a year.
1.1.2. The Health & Safety at Work Act 1974 makes owners of
electrical appliances responsible for the safe condition of the
appliance and the safety of the appliance operator. If in any
doubt about electrical safety, contact a qualified electrician.
1.1.3. Ensure insulation on all cables and the product itself is safe
before connecting to mains power supply.
1.1.4. Ensure that cables are always protected against short circuit
and overload.
1.1.5. Regularly inspect power
supply, leads, plugs and all
electrical connections for
wear and damage,
especially power
connections, to ensure that
none are loose.
1.1.6. Important: Ensure the
voltage marked on the
product is the same as the
electrical power supply to
be used. A three phase
plug must be fitted to this
1.1.7. DO NOT pull the powered appliance by the power cable.
1.1.8. DO NOT pull power plugs from sockets by the power cable.
1.1.9. DO NOT use worn or damage leads, plugs or connections.
Immediately replace or have repaired by a qualified electrician.
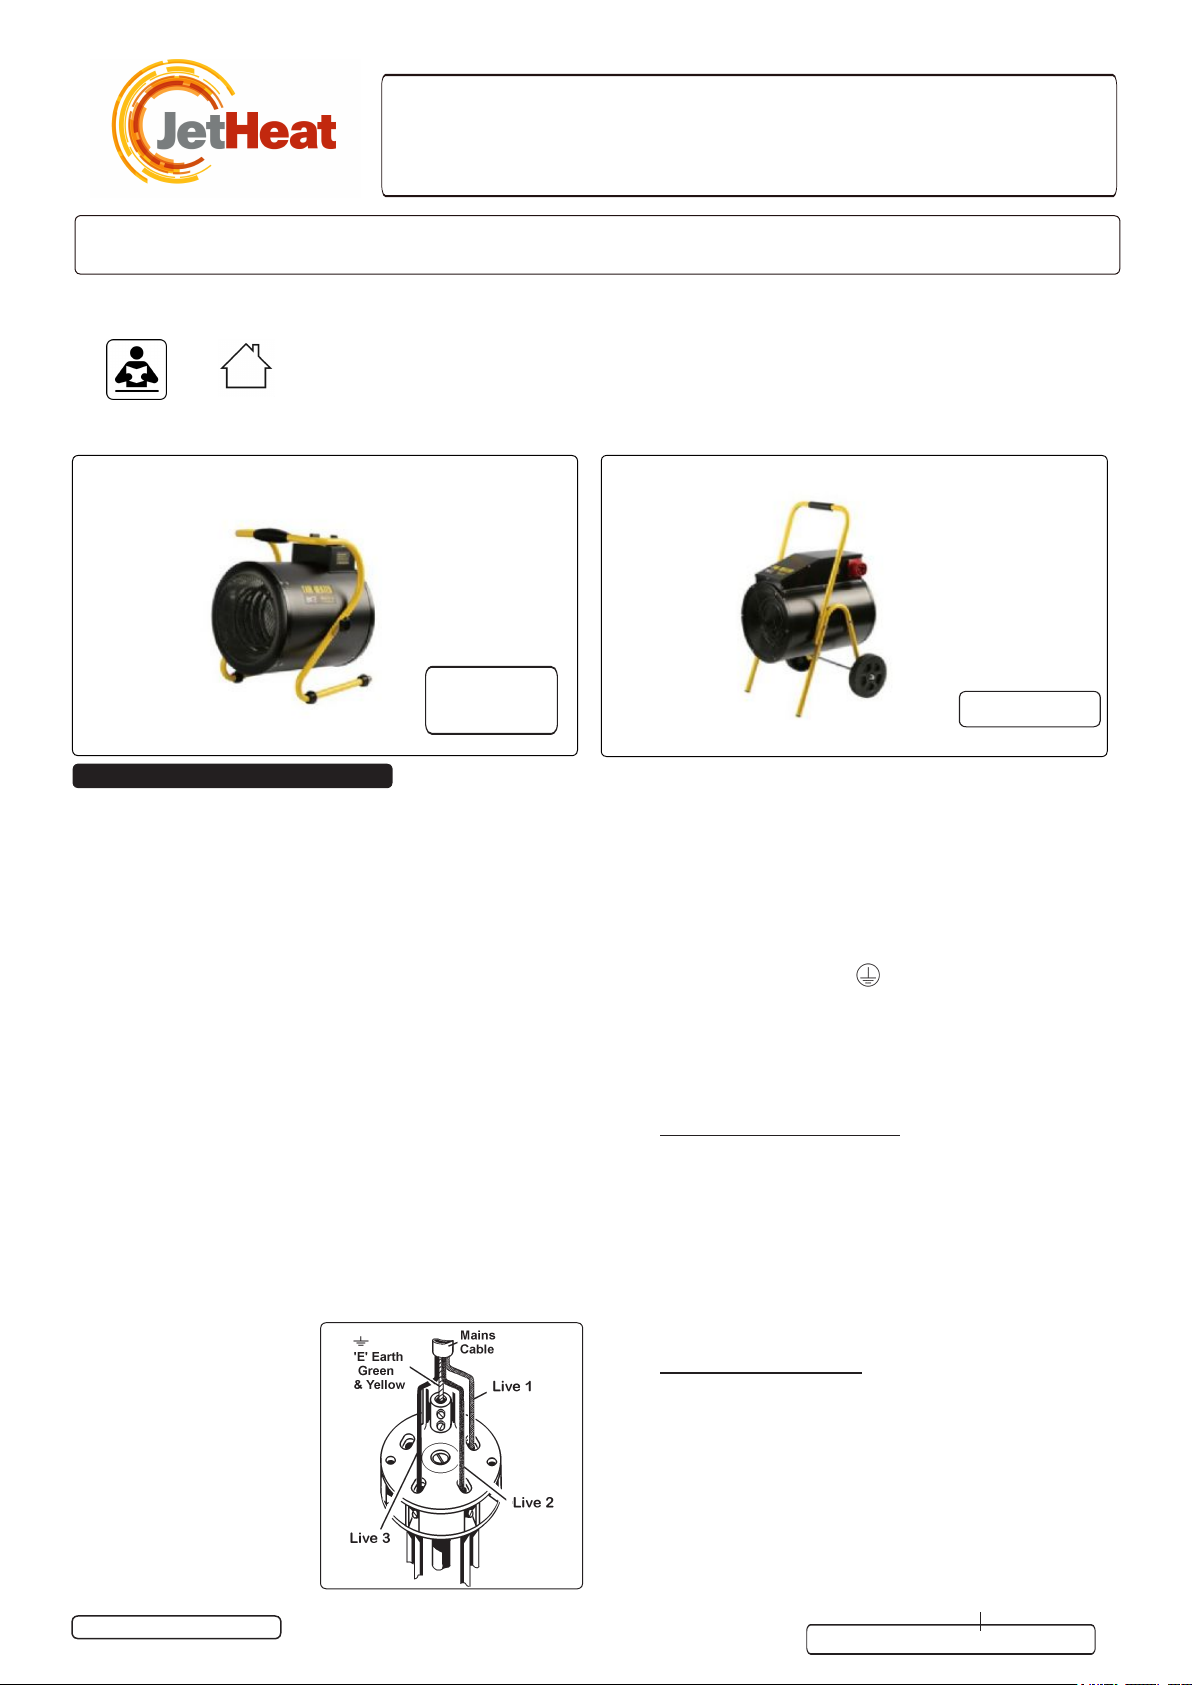
1.1.10. This product must be fitted with a 3-phase plug according
to the diagram, and will require a minimum of 16Amps per
phase for OLY-J5/3 and OLY-J9/3, the OLY-J15/3 is 32Amps for
the 15Kw. You must contact a qualified electrician to ensure
an appropriately fused supply is available. Connect GREEN/
YELLOW wire to earth (E) terminal. Connect the live wires
to live 1, 2 and 3. When completed, check that there are no
bare wires, that all wires have been connected correctly, that
the cable external insulation extends beyond the cable
restraint and that the cable restraint is tight.
1. SAFETY
IMPORTANT: PLEASE READ THESE INSTRUCTIONS CAREFULLY. NOTE THE SAFE OPERATIONAL REQUIREMENTS, WARNINGS & CAUTIONS. USE THE PRODUCT
CORRECTLY AND WITH CARE FOR THE PURPOSE FOR WHICH IT IS INTENDED. FAILURE TO DO SO MAY CAUSE DAMAGE AND/OR PERSONAL INJURY AND WILL
INVALIDATE THE WARRANTY. KEEP THESE INSTRUCTIONS SAFE FOR FUTURE USE.
Refer to
Instructions
Indoor Use
Only
Olympus OLY-JetHeat | Issue 2) 17/08/16
OLY-J15/3
OLY-J5/3
OLYJ9/3
Thank you for purchasing a Olympus Industrial Appliances JetHeat product. Manufactured to a high standard, this product will, if used
according to these instructions and maintained properly, give you years of trouble free performance.
© Olympus Industrial Appliances UK
appliance.
supply before servicing or performing any maintenance.
Servicing or maintenance must only be carried out by an
authorised service agent.
Check that the heater is in sound condition and good working
order. Take immediate action to repair or replace damaged
parts.
Use recommended parts only. Unapproved parts may be
dangerous and will invalidate the warranty.
DO NOT attempt to repair a damaged heater, contact an
authorised service agent.
MANUAL FOR
4. ASSEMBLY (OLY-J15/3 ONLY)
1.2.3. OPERATIONAL PRECAUTIONS
The heater must only be used by people who have read these
instructions and have been trained in its use.
DO NOT obstruct the air inlet and outlet sections of the heater.
DO NOT cover the heater.
DO NOT touch the heater casing or grille when first switched
off, as these will be very hot and will take time to cool.
DO NOT get the heater wet or use in areas of high
condensation.
DO NOT allow the power lead to touch hot surfaces.
DO NOT connect the heater to a timer device or other
equipment than can automatically switch the heater on or off.
If an extension cable is required it must be of the same cross
section as the heater cable. It must be as short as possible
and fully unwound.
DO NOT connect other appliances to the same mains socket as
the heater.
1.2.4. COMMON SENSE PRECAUTIONS
DO NOT operate the heater when you are tired or under the
influence of alcohol, drugs or intoxicating medication.
DO NOT stand on the heater.
DO NOT use the heater with wet hands or when there is water
on the power cord.
Ensure that the heater is correctly turned off when not in use
and store in a safe, dry, childproof location.
DO NOT use the heater for anything other than its intended
purpose. It is designed to provide heat in enclosed areas larger
than 4m³, such as workshops and other industrial areas. It is
not suitable for drying clothes or laundry.
Electric fan heaters for industrial applications. JetHeat Model
Numbers: OLY-J5/3 & OLY-J9/3 feature two heat settings and
fan only option. Model No. OLY-J15/3 features three heat
settings and adjustable thermostat control with fan only option.
Auto cooling system to prevent unit from overheating during
use. A totally dry heat with no condensation, no gas, no fumes,
no smell. Ideal for workshops and garages. Model No. OLY-
J5/3 & OLY-J9/3 are supplied with three phase power cable
and plug. Model No. OLY-J15-3 supplied with three phase
plug (extension lead required).
Model No: ..... OLY-J5/3...OLY-J9/3...OLY-J15/3
Class: ............IPX4. ........ IPX4 ......... IPX4
Max. Power:........ 5000W. .......9000W ....... 15000W
Supply: .........415V-16A. .....415V-16A ...... 415V-32A
Heat Settings: ....2500/5000W. .. 4500/9000W ....5000/10000/15000W
Setting Range
Thermostat:....... 0 - 40ºC. ......0 - 40ºC ........0 - 40ºC
Size (mm): .....315x330x400. .....350x405x460 .... 495x520x860
fig.
fig.
fig.
4.1. ASSEMBLY OF THE LEGS. (See fig.1)
4.1.1. On either side of the heater body there are two threaded inserts
(B) for mounting the 'V' shaped leg frames (A). Note that the
axle hole at the shorter end of the 'V' frames should be
orientated towards the back of the heater.
4.1.2. Take two M8 x 40mm bolts (D) and slide a plain washer (C) onto
each one. Insert a bolt through each of the mounting holes on
the leg frame and slide a split washer (E) over each protruding
bolt. Align the bolts with the two threaded inserts (B) on the
heater body and screw them down securely.
4.1.3. Mount the other 'V' frame to the other side of the heater body in
the same way.
4.2. ASSEMBLY OF THE WHEELS. (See fig.2)
4.2.1. Take the axle rod (F) and insert it through the holes in the 'V'
frames so that the threaded rod ends protrude equally either
side. Retain the axle rod in this position by inserting a split pin
(G) through the holes situated just on the inside of each leg
frame.
Original Language UK English
IMPORTANT!
This unit is designed to raise the ambient temperature
of an entire room, the temperature of the air coming out of the
front of the heater will be warmer than the general temperature
of the room, but there may not be a significan increase owing to
the large volume of air passing over the element. For the same
reason, the element is hot during operation, but does not glow.
The room temperature depends on room size, insulation and
ambient temperature, which will increase as the room warms.
2. INTRODUCTION
3. SPECIFICATION
Olympus OLY-JetHeat | Issue 2) 17/08/16
© Olympus Industrial Appliances UK
4.2.2. Slide a plain washer (H) over each end of the axle rod, followed
by a wheel (J) followed by anther plain washer (H).
4.2.3. Screw a nyloc nut (L) onto each end of the axle by hand until it
begins to bite. Hold one nut steady with a 19mm spanner and
progressively tighten each nut until it bottoms out on the thread.
4.3. ASSEMBLY OF THE HANDLE. (See fig.3)
4.3.1. Slide a plain washer over each of the four M5 x 50mm bolts
supplied.
4.3.2. Lay the 'U' shaped handle frame onto the front face of the leg
frames and align the two holes at each end of the handle frame
with the two holes in each leg frame. Insert two bolts at each
joint as indicated in fig.3.
4.3.3. Whilst continuing to support the handle frame slide a plain
washer (P) followed by a split washer (T) onto the end of each
protruding bolt and retain them with a nut (S). Tighten all four
nuts with an 8mm spanner. 5. OPERATION (ALL HEATERS)
5.1. Position heater in an upright position on a firm surface and at a
safe distance from any obstructions, flammable substances etc.
Keep to a minimum of 0.5mtr clearance at the rear and sides,
and 2mtr clearance at the front.
5.2. Connect the heater to a suitable mains supply.
5.3. Referring to either fig.6 or fig.7, set the thermostat dial to the
maximum setting (fully clockwise).
5.4. The heater will switch on when the power setting selector is set
to one of the power settings.
NOTE: It will take up to three minutes for the heater to reach
optimum temperature.
5.5. Once the room reaches the required temperature, turn the
thermostat dial slowly counter-clockwise until the thermostat
clicks, leave the dial in this position and the room temperature
will be maintained at this setting. The heater will continue to
operate until the power switch is turned to the OFF position.
5.6. For fan only operation, turn the power/fan selector to the fan
only setting and set the thermostat to its minimum setting.
5.7. When not in use, disconnect the heater from the mains supply.
Store it in a safe, dry, childproof location.
fig.
fig.
Original Language UK English
4.4. CONNECTING OLY-J15/3 TO MAINS SUPPLY
4.4.1. The OLY-J15/3 heater is supplied with a protected 5 pin
4.4.2. Before connecting the OLY-J15/3 to the mains ensure that the
selector switch is set to OFF and the thermostat is set at
minimum.
4.4.3. Hold open the protective cover on the socket connector on the
extension lead as shown above and present it to the heater
connector in the correct orientation so that the spigot on the
heater connector passes into the keyway on the socket
connector. Push the socket connector fully home.
4.4.4. Connect the other end of the extension cable to the mains
supply.
restricted. If the temperature of the front grille reaches 45ºC a
a thermal cutout will operate, turning off the heating elements.
When the fan has cooled the unit to 40ºC, normal thermostatic
operation will resume.
4.5.2. AUTO COOLING. It is recommended that the thermostat should
be set to the minimum to cool the unit prior to switching off. If
the unit is switched off when operating at full temperature, and
the front grille has reached 45ºC, the time delay thermostat will
keep the fan running to cool down the unit. When the front grille
has cooled to 40ºC the fan will stop running.
4.5.3. NOTE: Auto cooling will only function if the unit is plugged
into the mains and the mains is ON.
fig.
fig.
connector mounted on the side of the control housing. In order
to connect to the mains it will be necessary to have the
extension cable shown in fig.5 made up by a qualified
electrician. (This cable is available from your supplier part no.
OLY-CAB/1.6/15KW.) The cable should be no shorter than
1.6m and no longer than 3.0m.
Olympus OLY-JetHeat | Issue 2) 17/08/16
© Olympus Industrial Appliances UK
4.5. OLY-J15/3 THERMOSTATIC PROTECTION.
4.5.1. The OLY-J153 has a thermal cut out to prevent the unit
from overheating for any reason, especially if the air input is
WARNING! Before attempting any maintenance, ensure that the unit
is unplugged from the mains power supply and that it has cooled down.
6.1. Clean the heater with a soft dry cloth only. DO NOT use
abrasives or solvents.
6.2. Periodically check the heater grille to ensure that it is not
blocked. No other maintenance is necessary. If a problem with
the heater is experienced, or if the power lead or plug is
damaged, contact your local authorised service agent for repair.
DO NOT dismantle or tamper with the heater, as this may be
dangerous and will invalidate the warranty.
NOTE: It may take up to three minutes for the heater
elements to reach optimum temperature. This is normal
and not a fault state.
6. MAINTENANCE
Environmental Protection
Recycle unwanted materials instead of disposing of them as waste. All tools, accessories and packaging should be sorted,
taken to a recycling centre and disposed of in a manner which is compatible with the environment.
When the product becomes completely unserviceable and requires disposal, drain off any fluids (if applicable)
into approved containers and dispose of the product and the fluids according to local regulations.
WEEE Regulations
Dispose of this product at the end of its working life in compliance with the EU Directive on
Waste Electrical and Electronic Equipment (WEEE). When the product is no longer required, it must be disposed
of in an environmentally protective way. Contact your local solid waste authority for recycling information.
NOTE: It is a Martin Industries Limited policy to continually improve products and as such we reserve the right to alter data, specifications and component
parts without prior notice. IMPORTANT: No liability is accepted for incorrect use of this product.
WARRANTY: Guarantee is 12 months from purchase date, proof of which will be required for any warranty claim.
01234 841221
01234 852662
10 Grisedale Court, Woburn Road
Industrial Estate, Kempston, Bedfordshire,
MK42 7EE,United Kingdom
www.orionair.co.uk
Original Language UK English
info@orionair.co.uk
Olympus OLY-JetHeat | Issue 2) 17/08/16
CE Rated
© Olympus Industrial Appliances UK
UK Distributor: Orion AC & R Limited
7.WARRANTY
Your product is guaranteed for a period of 12 months from the
date of purchase.
Please register your product warranty online at
www.martinindustries.co.uk. Here you will find the Terms & Conditions of
Warranty that apply to your product and an online registration form.
Please retain your original receipt and all packaging as they will be
required for a claim under warranty or if the product needs to be
collected for repair.
IMPORTANT: No liability is accepted for incorrect use of this product.

This manual suits for next models

2

Other Olympus Heater manuals

Olympus JetHeat OLY-J3/1 User manual

Olympus

Olympus JetHeat OLY-J3/1 User manual

Popular Heater manuals by other brands

Lumme LU-FH713B user manual

Lumme

Lumme LU-FH713B user manual

Purmo YALI PARADA PLUS Installation and operating manual

Purmo

Purmo YALI PARADA PLUS Installation and operating manual

BST HEATING BST-Series manual

BST HEATING

BST HEATING BST-Series manual

Siemens DE 1113415 Installation and operating instructions

Siemens

Siemens DE 1113415 Installation and operating instructions

Haverland RC 6 E Installation and instruction manual

Haverland

Haverland RC 6 E Installation and instruction manual

Phoenix PELLET HEATER user manual

Phoenix

Phoenix PELLET HEATER user manual

Stanley ST-40-GFA-E instruction manual

Stanley

Stanley ST-40-GFA-E instruction manual

Truma Trumatic E 2400 E Operating and installation instructions

Truma

Truma Trumatic E 2400 E Operating and installation instructions

Eldom HR40 Instructions for use

Eldom

Eldom HR40 Instructions for use

Oceanic OCS30 Assembly and operating manual

Oceanic

Oceanic OCS30 Assembly and operating manual

EQUATION BH-1701T Assembly, Use, Maintenance Manual

EQUATION

EQUATION BH-1701T Assembly, Use, Maintenance Manual

2VV ESSENSSE NEO VCES3 AC Series Installation

2VV

2VV ESSENSSE NEO VCES3 AC Series Installation

OYPLA Home 3680 user manual

OYPLA Home

OYPLA Home 3680 user manual

Vitek VT-2063 Manual instruction

Vitek

Vitek VT-2063 Manual instruction

cecotec ReadyWarm 9850 Force Rotate instruction manual

cecotec

cecotec ReadyWarm 9850 Force Rotate instruction manual

EINHELL IHS 2000 operating instructions

EINHELL

EINHELL IHS 2000 operating instructions

Heinner HCH-L1500RD instruction manual

Heinner

Heinner HCH-L1500RD instruction manual

Kunft KCH3606 instruction manual

Kunft

Kunft KCH3606 instruction manual

manuals.online logo
manuals.online logoBrands
  • About & Mission
  • Contact us
  • Privacy Policy
  • Terms and Conditions

Copyright 2025 Manuals.Online. All Rights Reserved.