Omegawave COACH User manual

COACH
USER GUIDE

1
TABLE OF CONTENTS
TABLE OF CONTENTS ............................................................................................................................................ 1
WELCOME ............................................................................................................................................................... 2
QUICKSTART GUIDE............................................................................................................................................... 4
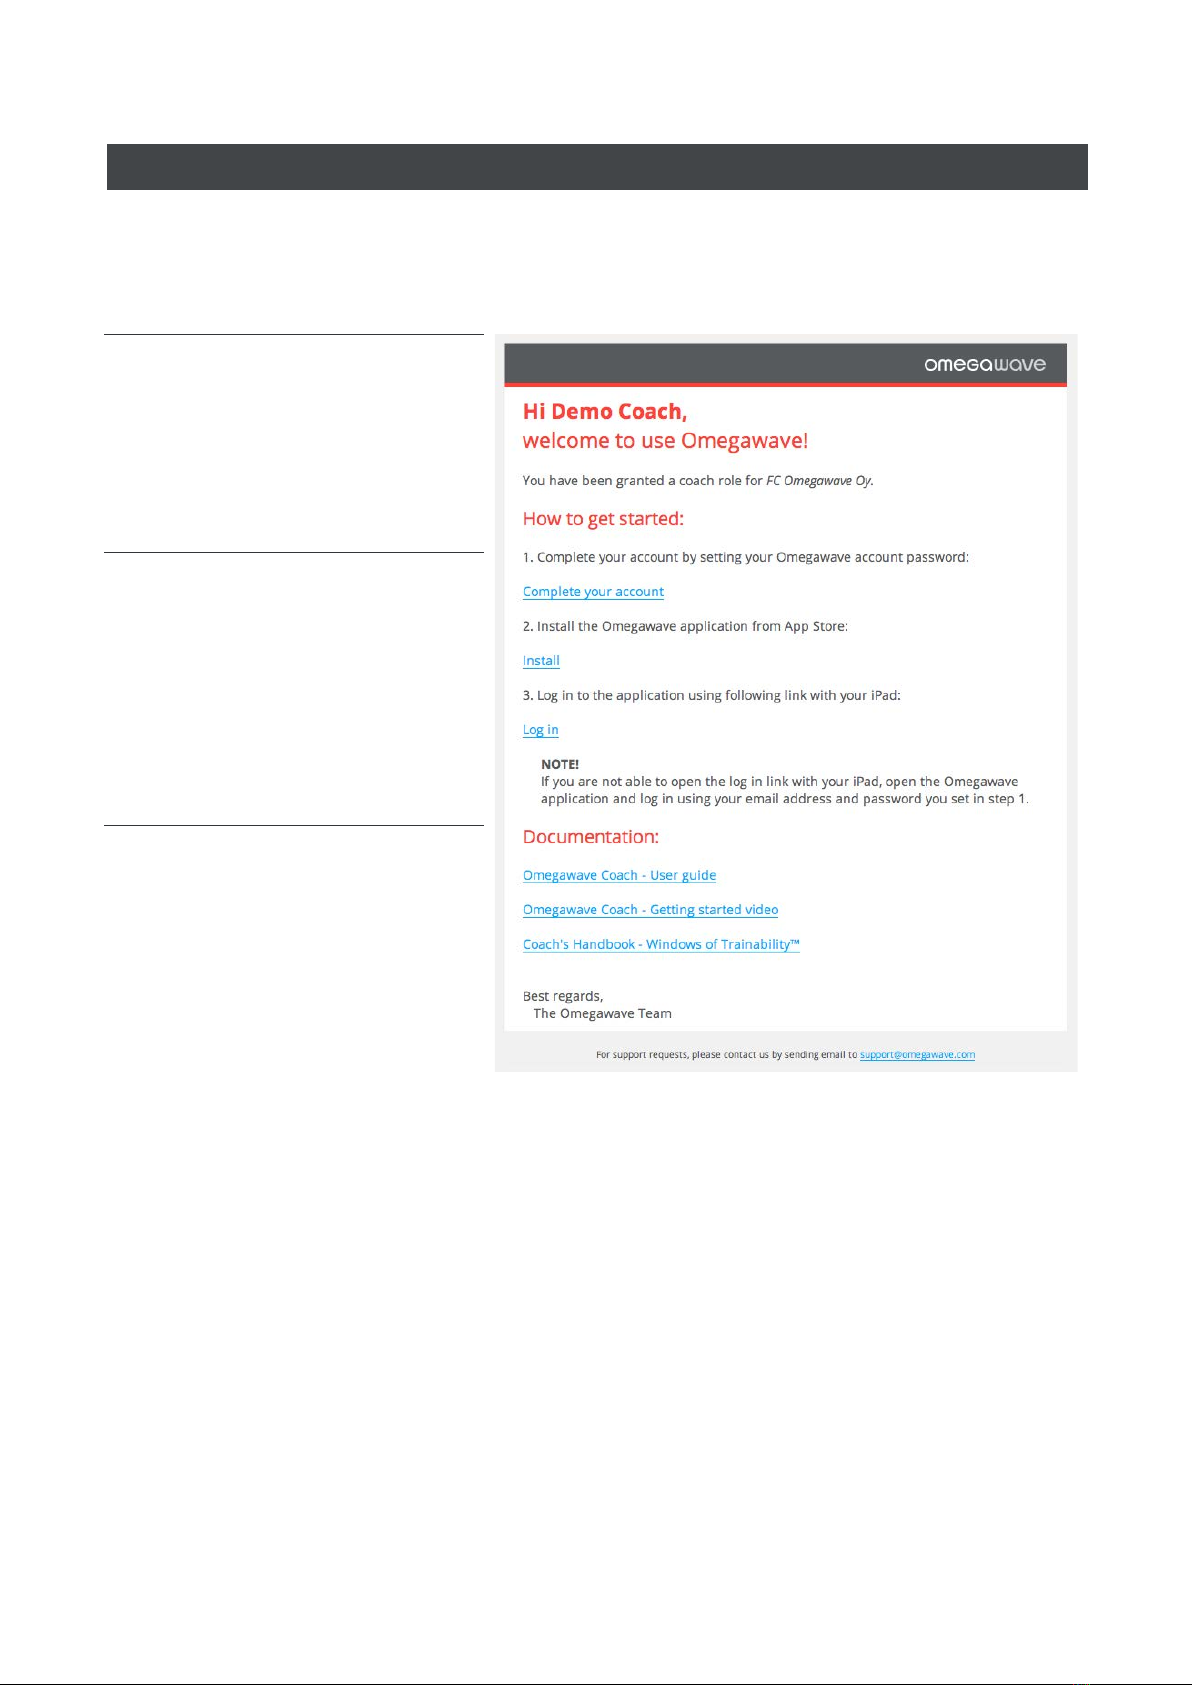
GETTING STARTED EMAIL ..................................................................................................................................... 5
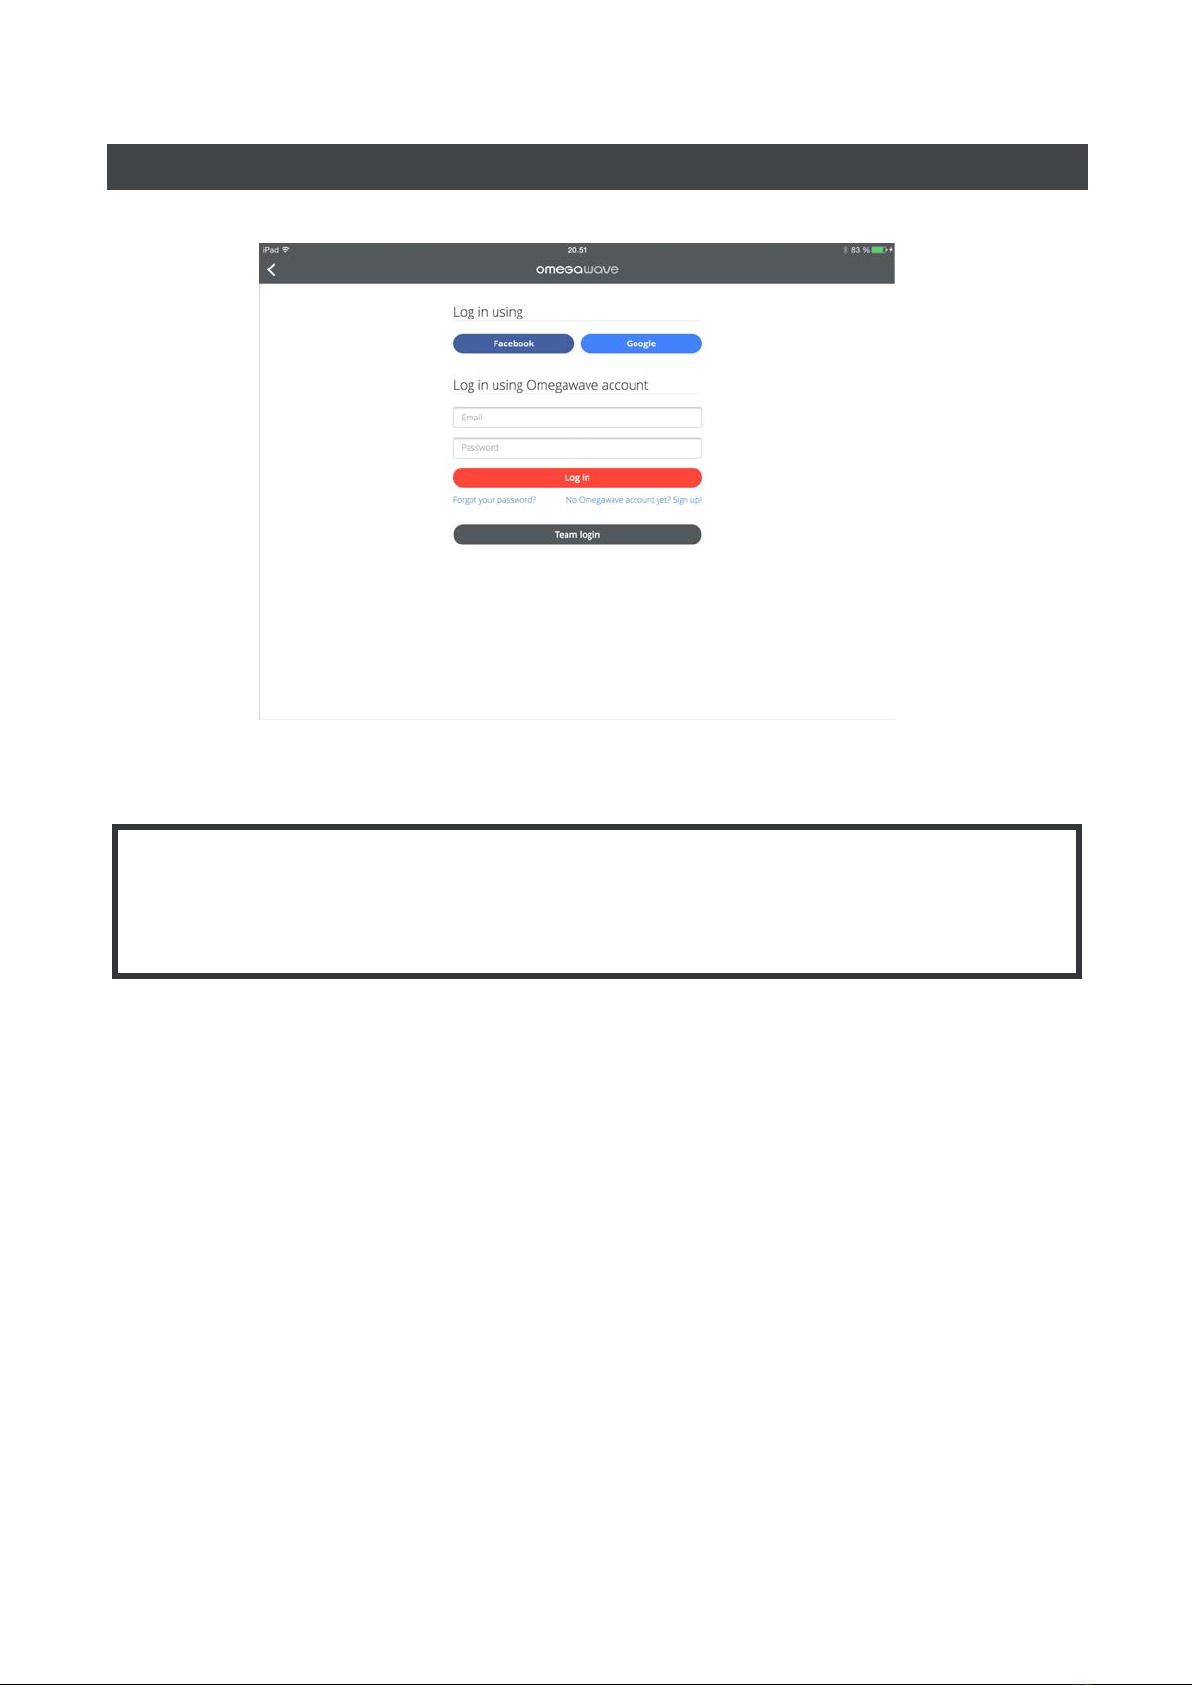
LOGGING IN TO THE APPLICATION ..................................................................................................................... 6
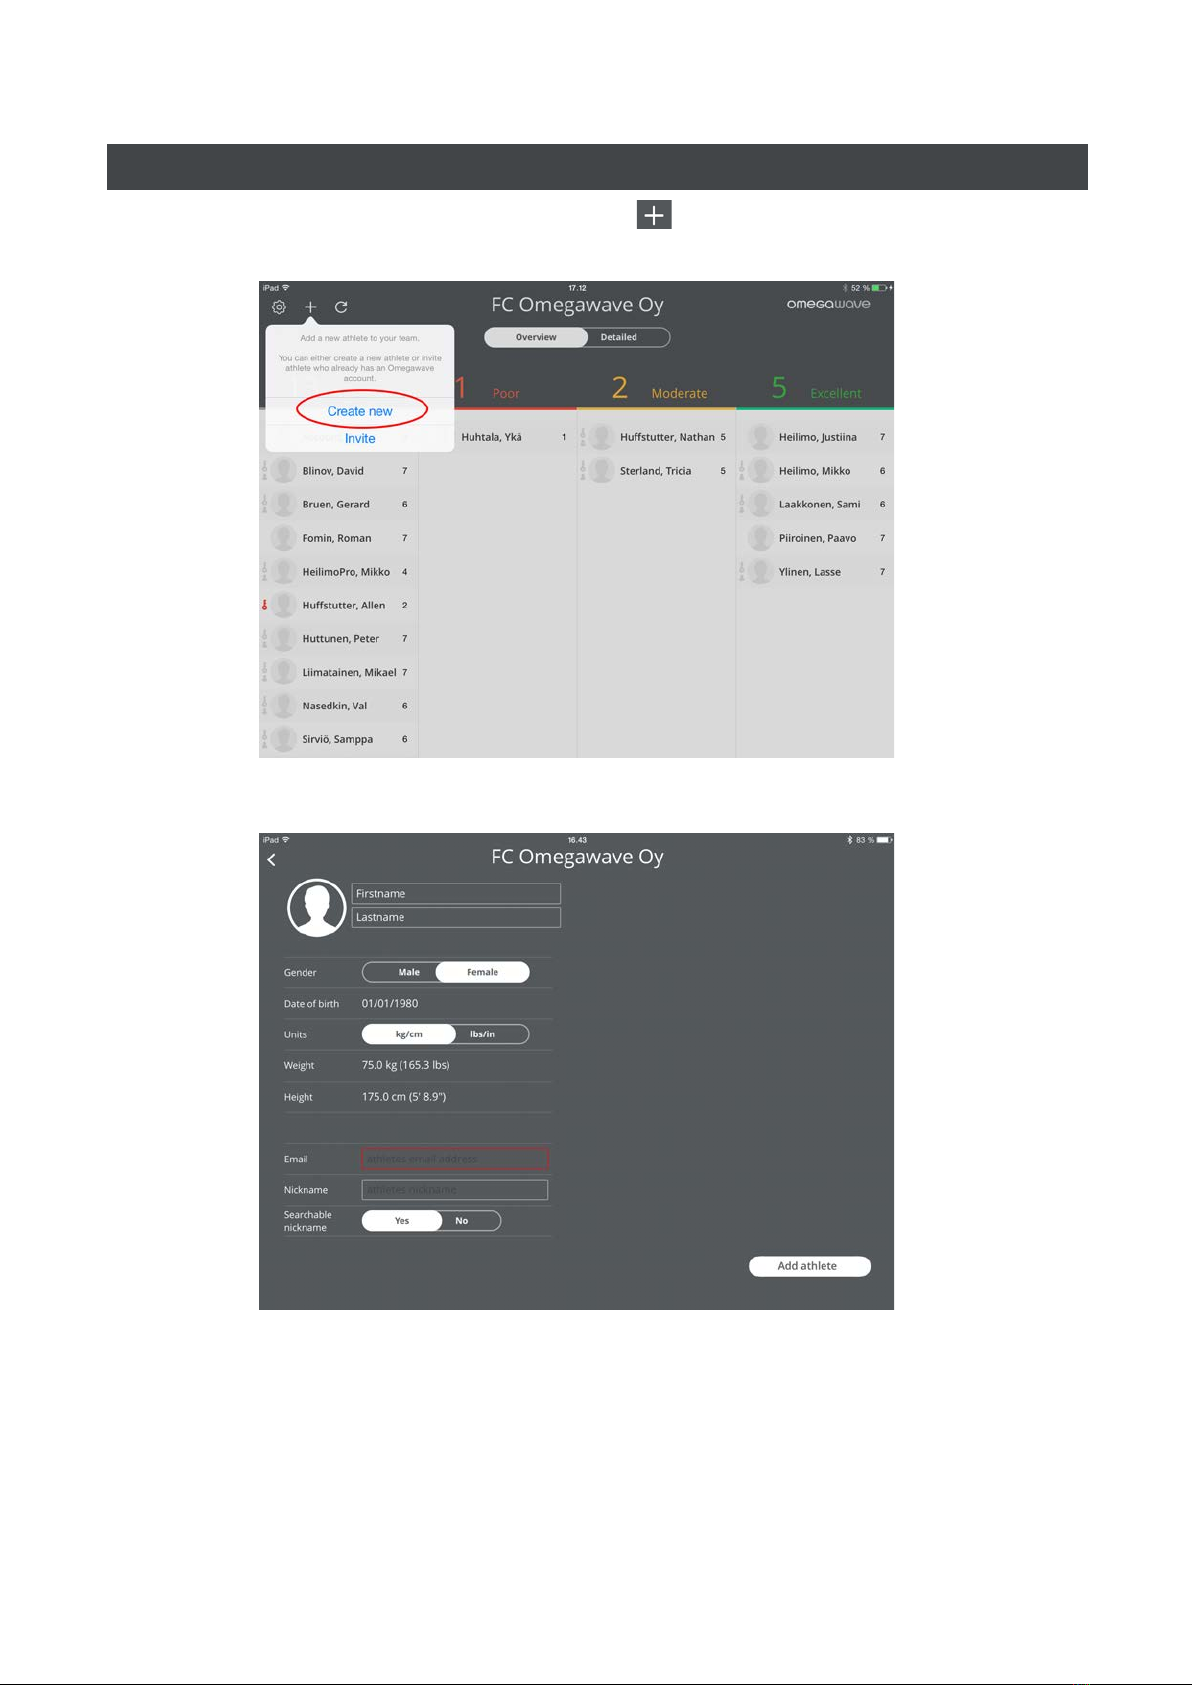
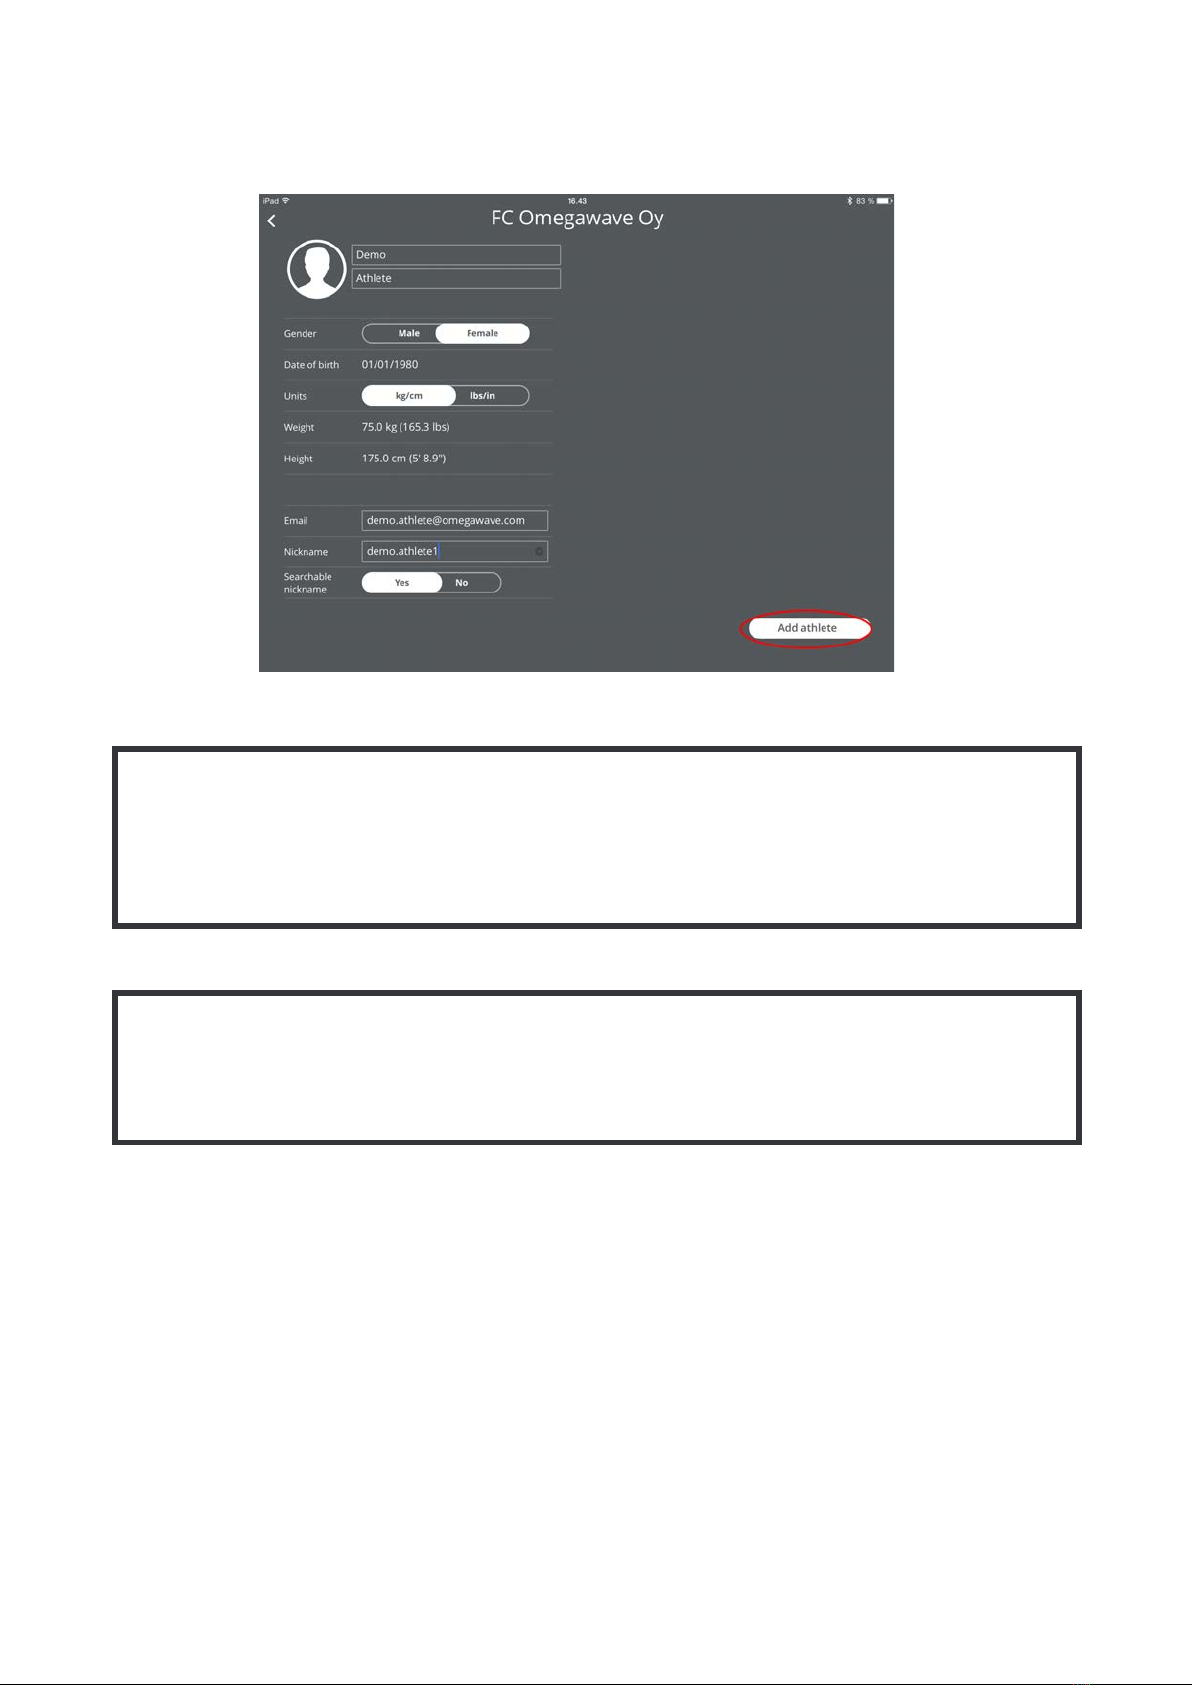
CREATING ATHLETES ............................................................................................................................................. 7
ALLOCATING LICENSES TO ATHLETES................................................................................................................. 9
INVITING ATHLETES ............................................................................................................................................. 11
GROUPING ATHLETES ......................................................................................................................................... 13
REMOVING ATHLETES ......................................................................................................................................... 15
MANAGING YOUR SUBSCRIPTIONS AND LICENSES ........................................................................................ 16
CHANGING BETWEEN TEAMS............................................................................................................................. 20
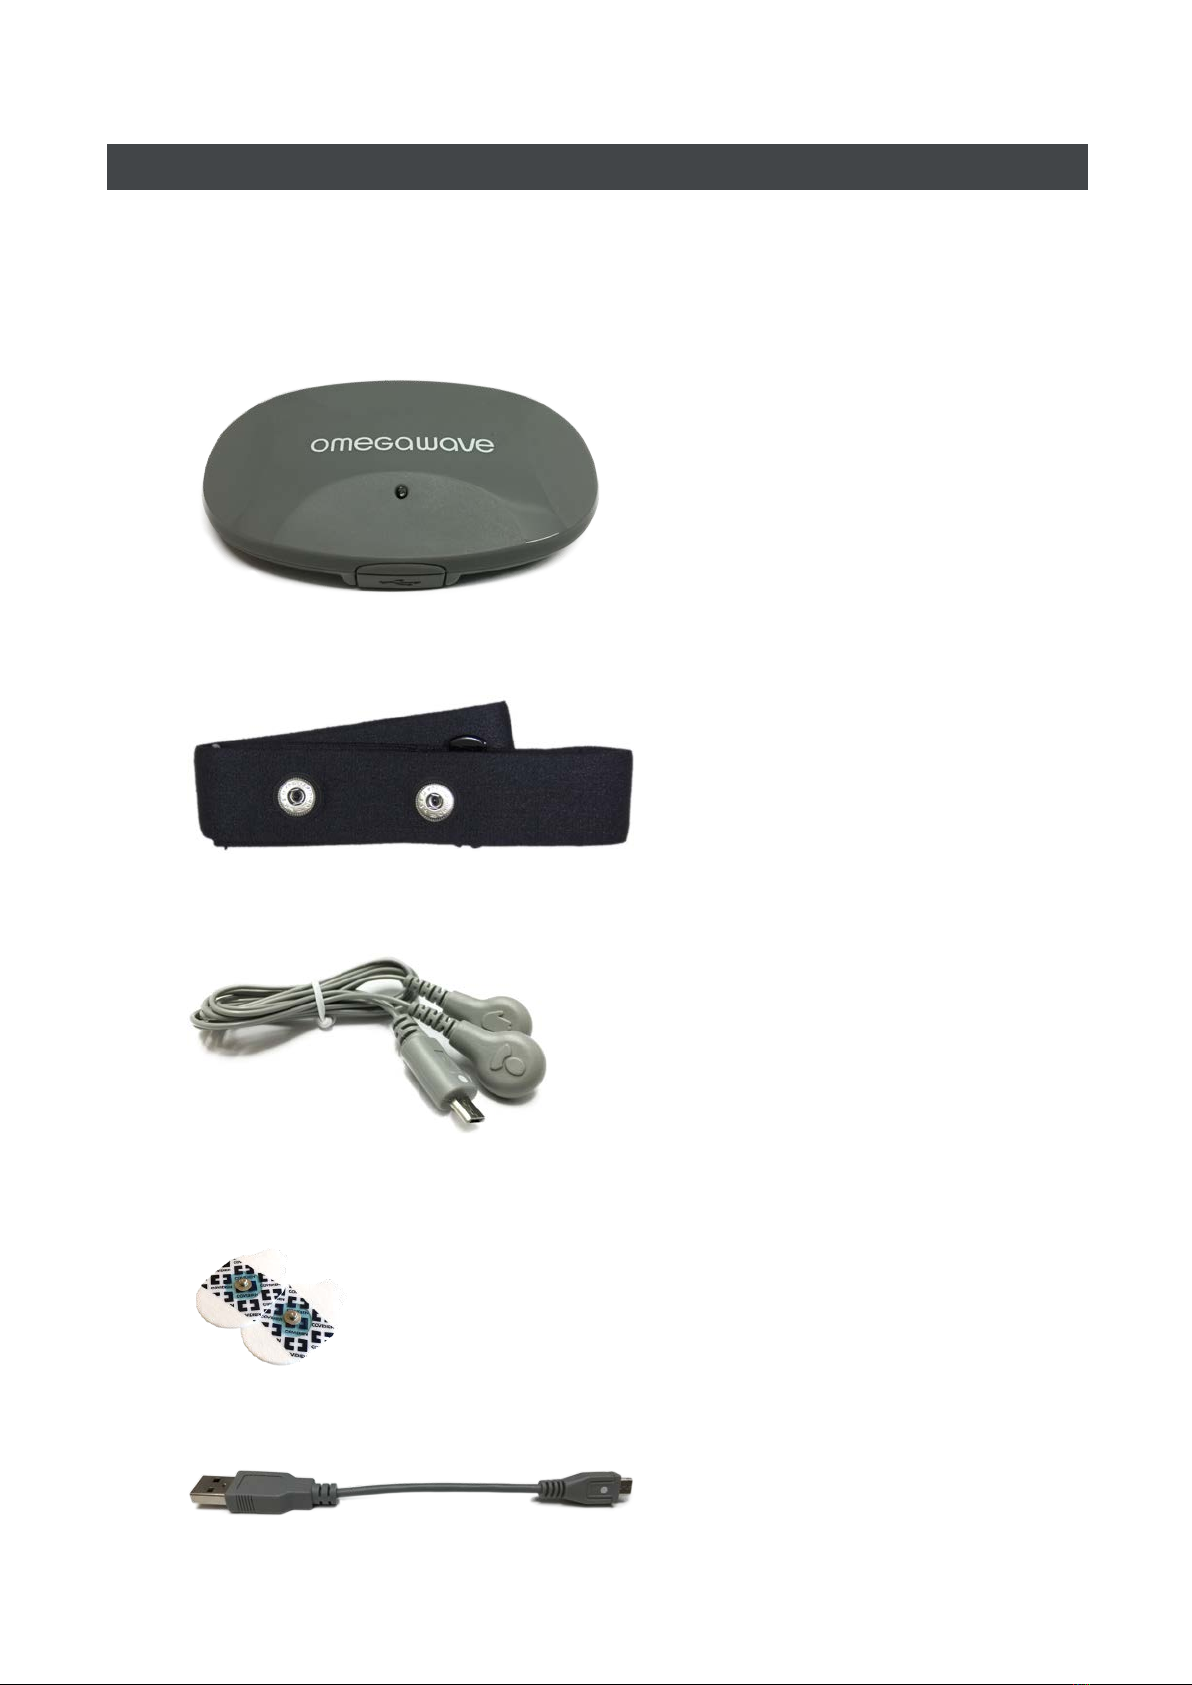
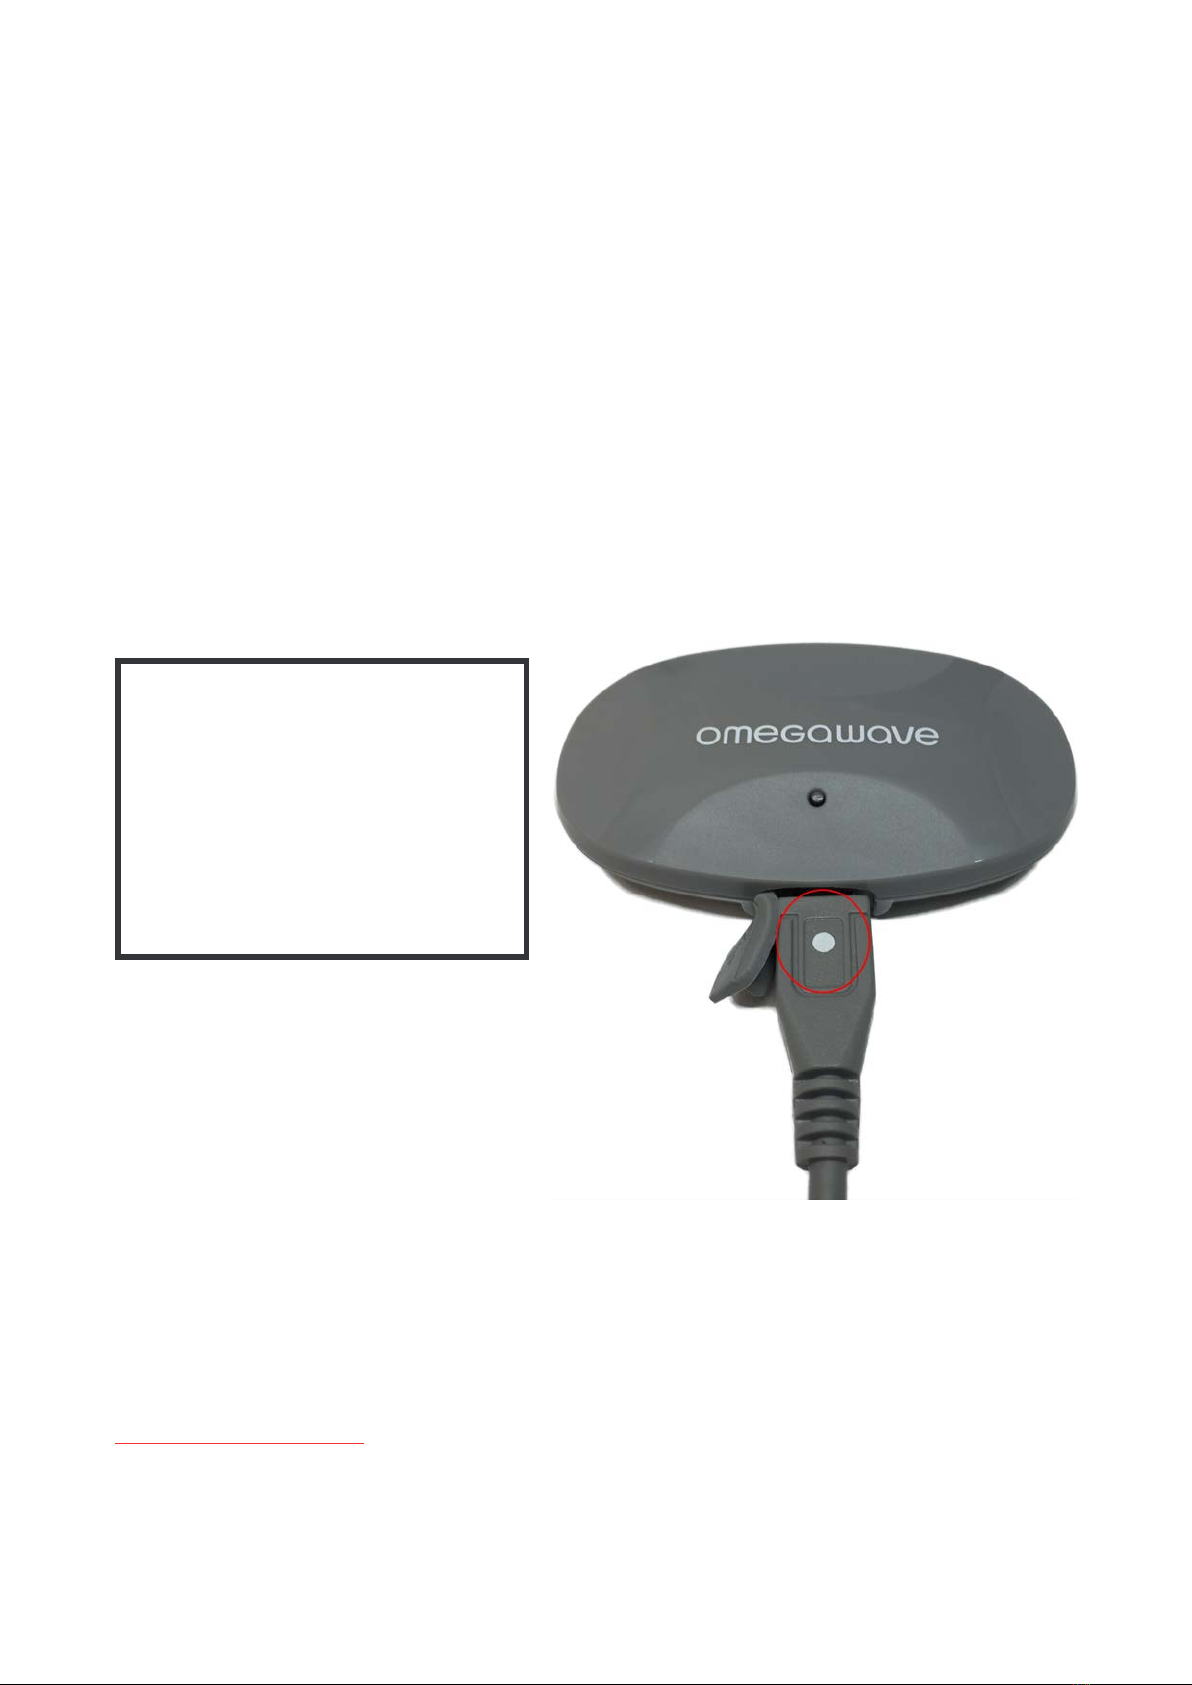
USING THE MEASUREMENT HARDWARE .......................................................................................................... 21
PAIRING THE SENSOR WITH YOUR IPAD........................................................................................................... 24
MEASURING – QUICK GUIDE .............................................................................................................................. 26
MEASURING – DETAILS........................................................................................................................................ 27
MEASUREMENT TROUBLESHOOTING TIPS....................................................................................................... 33
TEAM ANALYSIS – OVERVIEW.............................................................................................................................. 34
TEAM ANALYSIS – DETAILED VIEW..................................................................................................................... 35
ATHLETE ANALYSIS .............................................................................................................................................. 36
FAQ ........................................................................................................................................................................ 46
REGULATORY INFORMATION ............................................................................................................................. 49

2
WELCOME
Thank you for purchasing the Omegawave Coach! Let’s start by reviewing what is inside your package:
• Omegawave Bluetooth Low Energy (BLE) sensor. Model name: OW-CB2.
Simultaneously measures both an electrocardiogram (ECG) and Direct Current (DC) Potential of
the Brain.
• ECG chest strap(s)
• DC Potential cable
• Pre-gelled electrodes for DC Potential measurement
• Micro-USB charging cable

3
In order to use the Omegawave Coach App, you will need to have an iPad with iOS 8.0 or a newer and
have downloaded the Omegawave App from the App Store.
Please check the following:
• Ensure that your iPad has an active Internet connection via WLAN or mobile data (3G/4G).
• Please fully charge the sensor before first use by connecting the micro-USB cable to a computer
or USB compatible power source and attaching it to the sensor.
o A red light on the sensor will appear to indicate that the sensor is being charged. Once
the light turns off, the sensor is fully charged. A full charge will take approximately one
hour.
o If charging via a wall outlet, use a USB compatible power adapter (not included with the
product). Make sure that the adapter is specified with the following voltage and current
values: "output 5V DC, 0.5A - 2A max".
IMPORTANT!
Please ensure that the white dot on the
charging cable aligns with the sensor LED
as illustrated.
Please do not force the cable into the
sensor, otherwise you may break the
sensor’s micro-USB connector.
Support:
If you have any questions or need technical assistance, please contact us by sending an email to:
support@omegawave.com

4
QUICKSTART GUIDE
To start using Omegawave Coach follow the next steps to setup your team
1. Check the getting started email
a. The email contains instructions about downloading the Omegawave app, setting your
Omegawave password and logging into the app
2. Log in to the application
3. Create your athletes
4. Allocate licenses to your athletes
a. A license is needed in order to measure an athlete
5. Group your athletes
a. Tags are used for grouping your athletes
6. Setup the hardware
7. Study the Omegawave measurement protocol
Daily usage
• Tap the synchronize button to download your athletes’ daily measurements
• Team overview provides a snapshot of your athletes based on their latest measurements:
o Athletes are automatically sorted into three groups: excellent, moderate and poor
o If an athlete hasn’t completed a measurement during a current day, he/she is placed
into the group not measured
• Team detailed view allows you to compare athletes based on their Central Nervous, Cardiac,
Energy Supply Systems and Overall Readiness scores
o You can also use tags to filter the athlete list
• From an athlete’s result view, you can see his/her full measurement history including all of the
associated indices

5
GETTING STARTED EMAIL
After purchasing the Omegawave Coach, you will receive an email containing instructions on how to get
started. Open the email with your iPad’s Mail application if possible.
1. Set your Omegawave account
password
Click the link Complete your account
and type in the password you want to
use with your Omegawave account.
2. Install the Omegawave application
The Install link will automatically direct
you to the AppStore to install the
Omegawave application.
You will need to have an iPad with iOS
8.0 or newer.
3. Log in to the Omegawave
application
If you opened the email using your iPad,
you can click the Log in link to log in
automatically without the need to input
your email and password.
If you are not able to open the log in link
with your iPad, open the Omegawave
application and log in using Omegawave
authentication. Type in your email
address and the password you set in
step 1.

6
LOGGING IN TO THE APPLICATION
Open the Omegawave application and tap the Start button.
Use your email address and password to log in.
NOTE!
If you forget your Omegawave account password, you can request a new one from the login screen
by tapping Forgot your password.

7
CREATING ATHLETES
You can create a new athlete by tapping the add button in the team view and selecting Create
new.
This will open an empty athlete profile view. Fill in the personal data for an athlete.
Email field is optional. Athlete will get an email that allows him/her to set Omegawave account
password and automatic log in link to Omegawave application. Email is sent after a license has been
given to athlete.
Nickname and searchable nickname fields are for future use, but need to be filled in now. Searchable
nickname simply means that the athlete can be found using his/her nickname.

8
When you have filled all fields, tap Add athlete to create the athlete.
The athlete has now been added to your team.
NOTE
When the athlete has been created, a license is not automatically given to the athlete. Remember
that a license is needed to complete measurements. See the next chapter on how to allocate
licenses.
IMPORTANT!
Omegawave’s algorithms need to know the athletes’ gender, date of birth, weight and height in order
to calculate certain results. It is important that you always keep their personal data up to date.

9
ALLOCATING LICENSES TO ATHLETES
The athlete will need a license before he/she can complete measurements. You are also not able to
measure the athlete with your iPad before the license is given.
From the athlete’s profile tap the Give button to assign a license.
After the license has been successfully given, you will see the athlete’s license status changed from No
license to License set, note that your available licenses will have decreased by one.

10
When the license has been given, agetting started email is sent to the athlete’s email address. The email
contains instructions on how to set an Omegawave password, install the Omegawave application and
log into the application.
IMPORTANT!
If you mistyped the athlete’s email address and thus the athlete did not receive the getting started
email, do the following:
• Enter the correct email address in the athlete’s profile view and tap Save
• Remove the license from the athlete by tapping Remove from the Athlete license status box
• Give the license back to the athlete by tapping Give from the Athlete license statusbox
=> The getting started email is re-sent to the new address
NOTE
If you do not have any licenses available, you need to request more licenses or take a license away
from one of your licensed athletes. You can see how many free licenses you have from the Athlete
license status box: “You have XX licenses available”.
See “Managing your subscriptions and licenses” chapter for more detailed instructions.

11
INVITING ATHLETES
If the athlete already has Omegawave account, you can invite him/her to your team. One example is
an athlete who is already using Omegawave Personal.
IMPORTANT!
When you invite an athlete, the data sharing relationship is established between the athlete and you,
not with your team. This means that the other coaches in your team cannot see the athlete. If other
coaches want to see the same athlete, they will have to separately invite the athlete from their Coach
app.
You can invite an athlete by tapping the button in the team view and selecting Invite.

12
Fill in the athlete’s email you want to invite to your team. You can also write a personal message which
is included in the invitation email the athlete receives. When ready, tap Send invitation.
The invited athlete will receive an email containing the invitation request. If the athlete accepts the
invitation, you can see him/her under your team.

13
GROUPING ATHLETES
Tags can be used for grouping your athletes.
What does a tag mean?
• A tag functions like a filter. By creating tags, you can create filtered groups and use them to
view subsets of your athletes.
• A tag can be any short description, e.g. “A-team”, “injured” or a specific position.
• You can filter your athletes using tags in the team detailed view.
• You can assign one or more tags for each athlete.
IMPORTANT!
• Tags are coach-specific, only you can see the tags you have created and assigned to athletes
• You cannot modify an existing tag name
• You cannot delete a created tag
How to assign tags?
Select one athlete from the team view and tap Profile to open the athlete’s profile.
To create a new tag, tap Specify new tag and add button. Choose a tag name and tap the add button
. The new tag is created and allocated to the athlete. You can create multiple tags for the athlete at
the same time. When you have finished assigning tags, tap Save button.

14
How to manage existing tags?
When you open the athlete’s profile, you will see all of the tags you have created for your athletes.
Highlighted tags are the ones assigned to the athlete, e.g. Injured in the example below. If you want to
remove a tag from the athlete, tap on the remove button inside the tag. When you have finished
making changes, tap Save button.

15
REMOVING ATHLETES
You can remove created and invited athletes from your team by opening the athlete profile page and
making sure that the athlete does not have a team athlete license. Tap Remove from Team button to
remove the athlete from your team.
IMPORTANT!
If you remove an athlete, you are not able to undone this action.

16
MANAGING YOUR SUBSCRIPTIONS AND LICENSES
You can see your subscriptions’ from the team view by tapping the settings button .
On the right side of the settings view you can see all subscriptions connected to your Omegawave
account. If you are the main subscription owner for your team, you should see separate subscriptions
for athletes and coaches.
Requesting more coach or athlete licenses
If you need more licenses for athletes or coaches, you can request more by tapping the button.
You need to read and agree to the Terms and Conditions before proceeding. You can add 1, 5 or 10
licenses to your subscription by tapping the corresponding button.

17
The additional licenses will be added to your subscription after you have confirmed the request. The
additional licenses will be billed according to your contract. Confirm your request by tapping Confirm
button.
Managing athlete licenses
Each athlete needs to have a valid license before he/she can use the Omegawave app to conduct
assessments himself/herself and/or to be directly measured using your iPad.
From the team Overview you can see information about the status of the athletes’ license.

18
The athlete icon provides information about the status of the athletes’ license:
The team athlete license is assigned
The athlete is using a license given by another coach or the athlete is
using his/her own Omegawave Personal license
No license is assigned
You can manage athlete’s license by selecting individual athlete from the team view and then opening
the athlete’s profile.
You can give a license for the athlete by tapping the Give button.

19
If the athlete has your team’s athlete license, you can remove it by tapping the Remove button.
If the athlete has his/her own valid personal license or given by another coach, you cannot remove it.
But you can give your team’s athlete license to him/her if needed. You might need to do this e.g. if the
athlete’s personal license does not allow DC Potential measurement.
Managing coach licenses
If you want to add a coach to your team or remove a coach from your team, contact us by sending an
email to: support@omegawave.com
Other manuals for COACH
1
Table of contents