Omitec OmiSmoke User manual

Part Number - I311592
English - Issue 2
© Omitec 2003
OmiSmoke
Operating Instructions
Part Number - I311592
English
Issue 2
© Omitec 2003


Contents
3
Introduction
Introduction ............................................................................................ 5
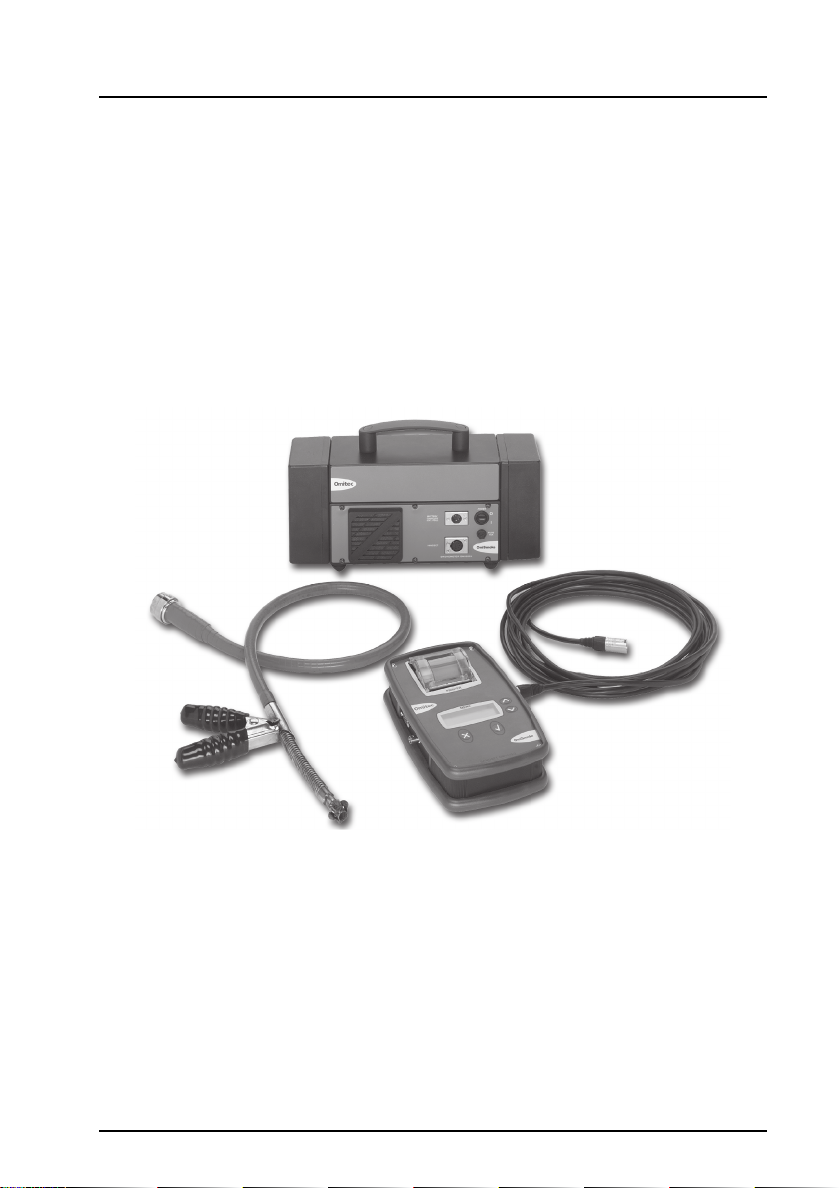
OmiSmoke Components........................................................................ 6
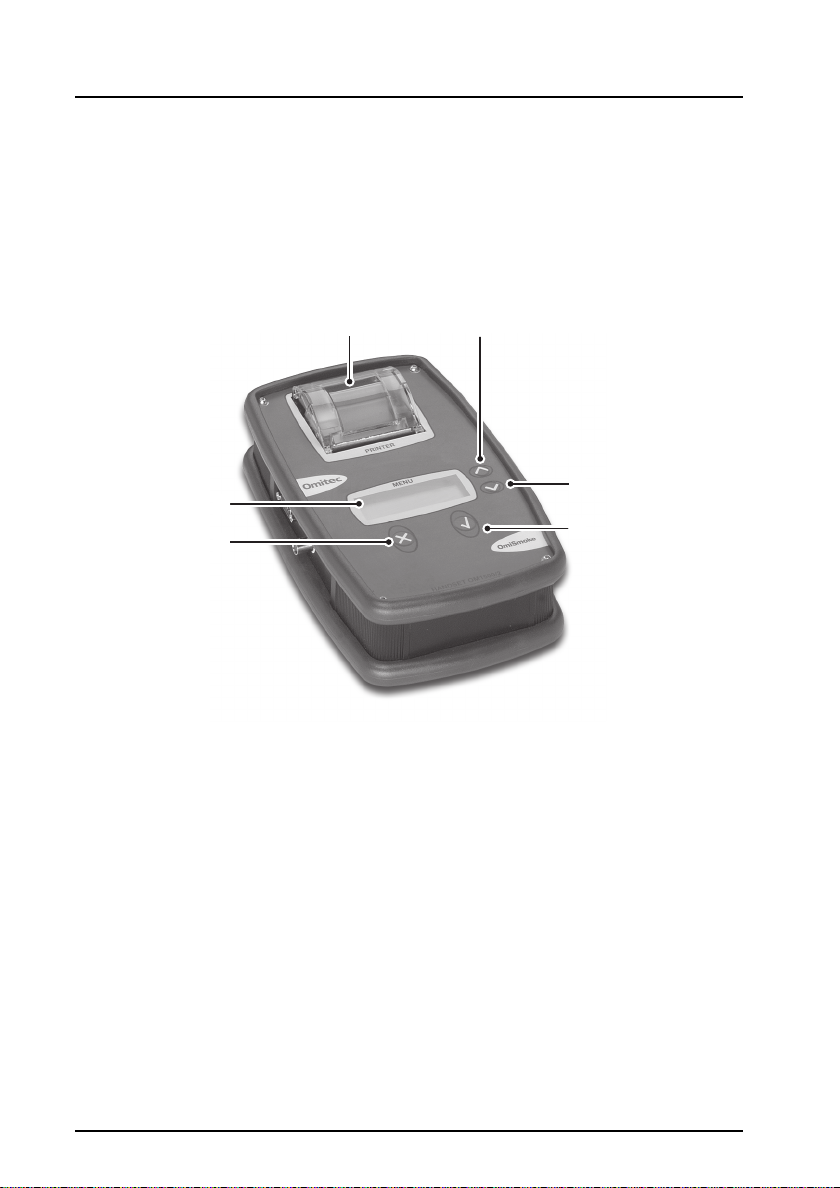
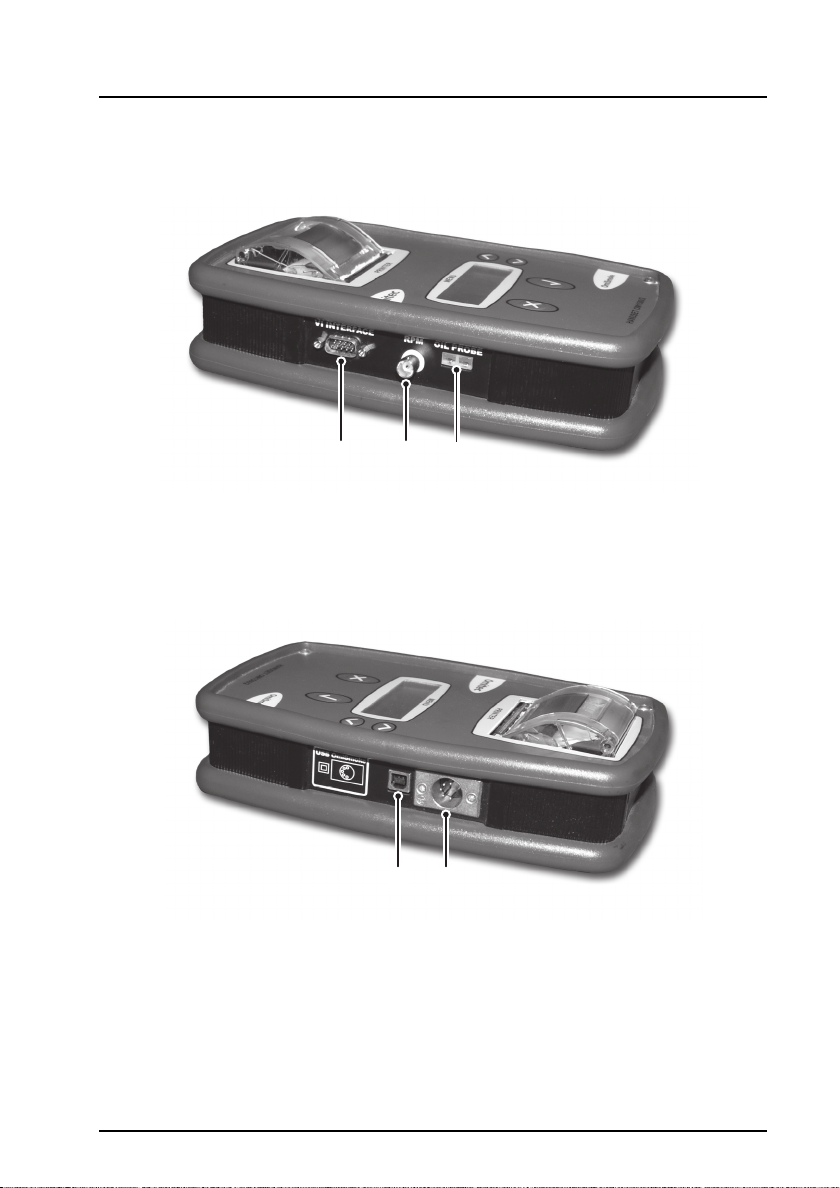
Handset ............................................................................................. 6
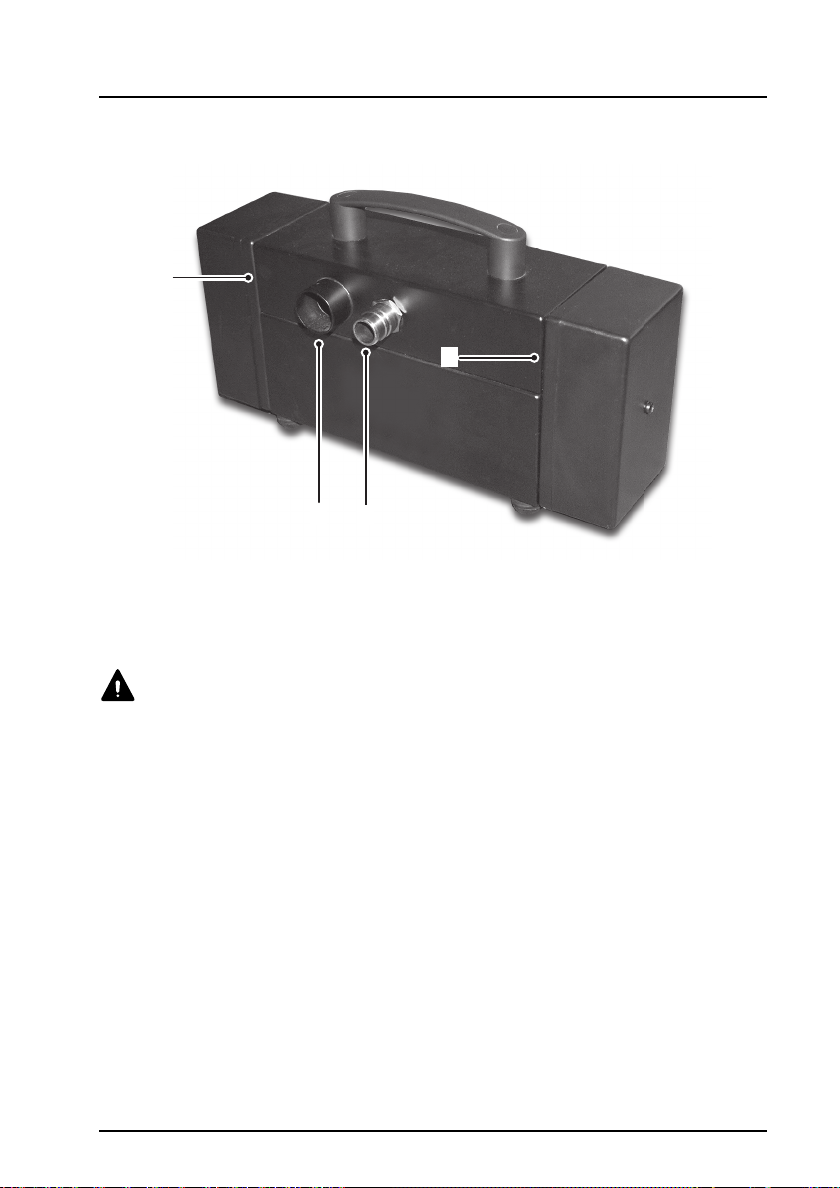
Smokemeter ...................................................................................... 8
Sample hose.................................................................................... 10
Inserting sample hose probe ........................................................... 11
Engine oil temperature sensor probe .............................................. 12
Setting the sensor probe depth gauge ............................................ 13
Safety Precautions............................................................................... 14
Getting Started
PC Based Systems .............................................................................. 15
System requirements....................................................................... 15
Loading software ............................................................................. 15
Battery Charging .................................................................................. 15
Emissions Testing Using the Handset ................................................. 16
Emissions Testing Using the PC ......................................................... 17
PC Navigation Short-cut Buttons ......................................................... 18
Test Procedures
Preparation of Vehicle Prior to Tests ................................................... 19
Checks on Vehicle Before Tests ..................................................... 19
Visual Test ........................................................................................... 19
Metered Smoke Test ........................................................................... 19
MOT FAS Test Procedure ................................................................... 20
Category of Vehicle ......................................................................... 21
RPM Probe ...................................................................................... 21
Smart Card ...................................................................................... 22
Test Type......................................................................................... 23
Reduced Pollution Certificate (RPC) - (Category B only) ................ 24
Oil Temperature Measurement (Category A only)........................... 24
Insert Pipe into Exhaust................................................................... 26
FAS Test Procedure ........................................................................ 27
Fast Test (Category A only)............................................................. 27
Results and Print ............................................................................. 28

Contents
4
Peak Test ............................................................................................. 30
Peak Test Quick Summary of Events .............................................. 31
Continuous Test ................................................................................... 32
Continuous Test Quick Summary of Events .................................... 33
Linearity Test (Calibration Verification Check) ..................................... 34
Diagnostics........................................................................................... 36
Smoke Head Info ............................................................................. 36
Smoke Readings ............................................................................. 38
Smoke Raw Data............................................................................. 39
Printer Test ...................................................................................... 40
Clock Setup Mode................................................................................ 41
Calibration ............................................................................................ 42
Cleaning and Maintenance
Cleaning ............................................................................................... 43
Cleaning the smokemeter ................................................................ 43
Cleaning the handset....................................................................... 43
Cleaning the linearity check filter ..................................................... 43
Cleaning Optics ............................................................................... 44
Maintenance......................................................................................... 45
Calibration........................................................................................ 45
Replacing the printer paper ............................................................. 45
Replacing the battery ....................................................................... 45
Troubleshooting
OmiSmoke Error and Warning Messages............................................ 46
Parts List
Spares.................................................................................................. 49
Option Accessories .............................................................................. 49

Introduction
5
Introduction
Introduction
The OmiSmoke diesel smoke meter (DSM) is an exhaust smoke analyser for diesel
vehicles and is available as both a stand-alone and PC-based unit. It is an opacimeter
device working on the partial flow principle.
The OmiSmoke is approved by the Vehicle Inspectorate Executive Agency for MOT
testing on the following classes of vehicle:
•Category A - Cars and Light Commercial Vehicles (MOT classes 4 and 7)
•Category B - Public Service Vehicles, Private Buses and Heavy Goods Vehicles
(MOT Class 5 and 6)
OmiSmoke consists of two portable units; the smokemeter, which contains the
measurement electronics, and the handset, which is equipped with a 4 button keypad,
LCD display and a printer. The two units are connected by a single 7 meter cable.
The smokemeter is designed to run for intermittent operation on an internal 12V
200W battery, or using the AC adapter if prolonged supply operation is required. The
smokemeter can be charged when not in use by leaving the AC adapter connected.
OM0378

Introduction
6
OmiSmoke Components
Handset
The handset displays the results from each test on the LCD. Progress through the
tests is indicated on the LCD, while the 4 buttons allow for menu navigation and option
selection.
1. Test results printer
2. LCD
3. ‘Up’ Navigation button
4. ‘Down’ navigation button
5. ‘Accept’ button
6. ‘Reject’ button
OM0381
1 3
2
65
4

Introduction
7
There are 5 connectors located on the sides of the handset:
1. Engine oil temperature sensor connector
2. Engine RPM sensor (OmiSpeed) BNC connector
3. 9-pin D type VI Card reader input
1. Smokemeter 5-pin XLR connector
2. USB port
OM0379 123
OM0380 12

Introduction
8
Smokemeter
The smokemeter houses the measurement components of OmiSmoke.
1. Receiver optics cover
2. Air intake
3. 4-pin XLR power connector
4. 5-pin XLR handset connector
5. Fuse
6. Power switch
7. Transmitter optics cover
8. Carry handle
9. Exhaust measuring chamber
OM0382
1 73
6
8
2 4 5
9

Introduction
9
1. Exhaust smoke outlet
2. Exhaust sample probe input
3. Air knife vents
Do not obstruct the air knife vents whilst running the OmiSmoke
smokemeter.
Note: The battery access cover is located on the underside of the smokemeter.
OM0383
3
3
1 2

Introduction
10
Sample hose
The exhaust probe collects gas samples from the test vehicle exhaust, which are then
analysed by OmiSmoke.
Take care to avoid contact with the exhaust system when inserting or
removing the sample hose. The exhaust system will be hot and severe
burns could occur.
OM0384

Introduction
11
Inserting sample hose probe
Place the probe into the exhaust following the quick guide below:
The probe should never be placed directly behind a bend in the exhaust pipe or close
to the silencer or expansion box. It should attach using the securing clamp, which will
ensure a minimum insertion.
OM0478

Introduction
12
Engine oil temperature sensor probe
Category A tests prefer the measurement of the test vehicle’s engine temperature.
The engine temperature sensor probe measures engine oil temperature in the sump
of the test vehicle, providing an accurate reading of the temperature of the engine.
The probe connects to the OmiSmoke handset using the Oil Temperature Probe
socket.
To monitor the engine temperature of the vehicle after it’s warm-up period, prior to an
emissions test, the sensor probe must be inserted into the engine oil dipstick
aperture. First remove and clean the engine oil dipstick of the vehicle.
NEVER insert the probe into the dipstick aperture without first setting the
depth gauge, and take care not to insert the probe any further than the
gauge allows. Serious damage to the engine could result.
OM0373

Introduction
13
Setting the sensor probe depth gauge
The sensor probe is fitted with a depth gauge to prevent the probe from being inserted
too far (which could cause serious damage to the engine). Move the rubber sleeve on
the probe, so that the distance between it and the end of the probe, is equal to the
length of the dipstick (see illustration). Insert the probe (up to the depth gauge) into
the dipstick aperture.
Do not attempt to insert the engine temperature probe while the engine is
running. Moving engine parts may cause personal injury or come in
contact with the probe, or its cable, resulting in damage to the probe and
to the engine.
Take care not to come into contact with hot engine parts when inserting or
removing the engine temperature probe from the engine oil dipstick
aperture - serious burns may occur.
Take care when removing the engine temperature probe after an
emissions test. The probe may be extremely hot and could cause serious
burns.
Remove the oil temperature probe prior to carrying out an emission test.
Do not rev/accelerate the engine with the temperature probe inserted into
sump. Increased vibration may cause it to move and cause damage.
NOTE: Always clean the probe after use and clean the dipstick before re-inserting into
the engine.
OM0375

Introduction
14
Safety Precautions
Exhaust gases are poisonous and contain carbon monoxide, which can
cause unconsciousness and can be fatal - NEVER start or leave the test
vehicle engine running in an unventilated area.
•
DO NOT handle the OmiSmoke exhaust probe tip, or place the exhaust probe
on plastic or combustible surfaces after the test procedure. The probe may
become extremely hot during the test and could cause burns and a risk of
fire.
•
Take care when handling the Oil Temperature probe after the test procedure.
The probe’s metal sheath may become extremely hot during the test and
could cause burns.
•
Prolonged contact with engine oil may cause serious skin disorders,
including dermatitis and cancer of the skin. Avoid unnecessary contact with
engine oil and wash thoroughly after contact.
•
When fitting or removing the engine speed measuring device, ensure that
the engine is switched off and allow the engine to cool. Be aware that on
some vehicle’s the engine cooling fan may commence operating AFTER the
engine has been switched off.
•
Ensure that any test leads will not foul any moving part of the engine. Also
keep leads away from engine cooling fans and any hot engine components.
•
Take care with the vehicle electric systems when using an Ignition Pulse
Speed measurement probe, as many modern high energy ignition systems
are potentially dangerous.

Getting Started
15
Getting Started
PC Based Systems
System requirements
The minimum PC system requirements to load the OmiGas/OmiSmoke Techcenter
software are:
•Windows 98, ME, 2000 or XP
•Pentium 133 processor or higher
•32 MB RAM
•10 MB of free disk space
•1024 X 768 minimum screen resolution
•CD ROM drive
•Serial com port capable of 115200 baud rate
•USB 1.1 or later
Loading software
Full instructions on loading the software are included with the software CD.
To load the software onto your machine, first insert the CD into the drive. The program
should then auto-run. If it doesn’t, select ‘Run’ from the ‘Start’ menu and browse to
the appropriate CD drive and select the file ‘Setup.exe’ to start the installation
process. Follow the on-screen instructions to complete the loading sequence, then
reboot when prompted.
Battery Charging
The smokemeter is designed to run for intermittent operation on an internal 12V
200W battery, or using the AC adapter if prolonged supply operation is required. The
smokemeter can be charged when not in use by leaving the AC adapter (battery
charger) connected.
1. Ensure charger is switched off before connection to the smokemeter.
2. Connect the charger power lead to the battery charger XLR socket.
3. Connect the charger to the mains supply and switch on.
4. After charging, ensure the battery charger is switched off before disconnecting.
Note: The battery charger is designed to revert to a ‘trickle’ charge mode after the
battery has been fully charged. It is safe, therefore to leave the charger attached
during a normal working day.
Do not leave the AC adapter/ battery charger connected for prolonged
periods.

Getting Started
16
Emissions Testing Using the Handset
OmiSmoke emissions testing can be undertaken by using the handset or a PC (using
the OmiGas/OmiSmoke Techcenter software).
Navigation through the emissions test software using the handset is assisted by the
on-screen information and prompts which are displayed throughout the testing
procedure. To scroll up and down through the menus press the ‘Up and ‘Down’
buttons until the required option is highlighted. To select the highlighted option, press
the ‘Tick’ button, or to reject press the ‘Cross’ button. Each successive menu
displayed on the handset will provide a number of options from which the technician
may choose.
During a test procedure, the handset will display screens which inform the technician
what the OmiSmoke analyser is currently doing. These screens do not provide
options for the technician to select and are simply a commentary on the procedure.

Getting Started
17
Emissions Testing Using the PC
OmiSmoke emissions testing can be undertaken by using a PC (using the
OmiGas/OmiSmoke Techcenter software) or the handset.
OmiSmoke can be added to the PC based OmiGas/OmiTechcenter system at any
time, simply by connecting the ‘combo’ cable (OM1500/10) between the OmiSmoke
handset socket and the auxiliary serial interface socket on the rear of the OmiGas unit
(OM4500/1).
The PC system will need to recognise new hardware for the OmiSmoke. To achieve
this, return to the main menu and select ‘ABORT’. The software will then re-establish
communication and the message ‘Configuring Analyser - Please Wait’ will appear.
This will then bring up the new ‘Combined Menu’, where the Smokemeter button will
be added.
Navigation through the emissions test software using the PC, is assisted by the
on-screen information and prompts which are displayed throughout the testing
procedure. Each successive menu displayed on the PC will provide a number of
options from which the technician may choose, using the ‘virtual’ buttons on the
screen. Selecting an option is achieved by pointing to the relevant button with the
mouse cursor and pressing the left hand mouse button to select.
During a test procedure, the PC will display screens which inform the technician what
the OmiSmoke analyser is currently doing. These screens do not provide options for
the technician to select and are simply a commentary on the procedure.

Getting Started
18
OmiSmoke Main Menu
PC Navigation Short-cut Buttons
In the top right of the PC display, there are five short-cut buttons to aid the technician
with software navigation. These buttons function as follows:
Select to view the screen last displayed.
Select to return to the current screen if you have used the ‘back’ button to
view a previous screen.
Select to print the data for the current emissions test.
Select to access the OmiSmoke help files, if you need assistance or
clarification during an emissions test.
Select to close the OmiSmoke Techcenter program. An emissions test can
still be carried out, but only by using the handset.

Test Procedures
19
Test Proc edures
Preparation of Vehicle Prior to Tests
This is a guidance note, similar to that which will be found in the Vehicle and Operator
Services Agency (VOSA) inspection manual.
Checks on Vehicle Before Tests
As a general precaution, check:
1. That the vehicle has enough engine oil.
2. The coolant level is correctly topped up.
3. There is sufficient fuel to carry out the test.
4. There are NO defects or suspected faults. It is advised to seek advice from a
qualified automotive service engineer and have them rectify any faults in
advance of the test.
5. Confirm the engine is at normal operating temperature.
For cars and light commercial vehicles (Category A) it is preferred to use an oil
temperature probe inserted into the dipstick tube of the engine.
6. There are no obvious signs that the fuel injection pump governor has been
tampered with (e.g. seals are in place).
7. The condition of the camshaft belt (where visible).
8. Raise engine to around 2500 rpm or half the maximum engine speed, if it is
lower. Hold it steady for 30 seconds to ensure the system is properly purged.
9. Raise engine speed slowly to establish operation of governor, by monitoring
engine speed and its stabilised maximum.
Visual Test
Applies to all cars and light commercial vehicles up to and including 3500 Kg, first
used before 1st August 1979 (Category A).
The test will be a visual one, it does not require a diesel smoke meter test. Follow the
visual inspection outlined in the VOSA inspection manual.
Metered Smoke Test
Applies to all cars and light commercial vehicles up to and including 3500 Kg, first
used after 1st August 1979 (Category A). This also applies to all heavy goods vehicles
and large passenger vehicles.
The vehicle must be tested using a metered smoke test.

Test Procedures
20
MOT FAS Test Procedure
Before carrying out a MOT FAS test or any other FAS test, the engine must
first be verified safe and sound to proceed, and be running at normal
operating temperature. See section ‘Preparation of Vehicle Prior to Tests’
for suggested full checks.
The MOT FAS TEST is a procedure that follows the statutory requirements of the
Diesel Exhaust emission test as described in the current Vehicle and Operator
Services Agency Inspection Manual, and is approved for testing the following:
The MOT FAS test also offers Reduced Pollution Certificate (RPC) testing within the
Category B menu.
The OmiSmoke will measure the Free Acceleration Smoke (FAS) output over the
whole speed range of an engine (no load from idle up to cut-off speed) where the
engine is accelerated against its own inertia.
A schedule of up to 6 accelerations will be prompted, leaving a gap of 10 seconds
between each. The engine should be at idle before the start of each test.
The OmiSmoke will automatically calculate a Pass or a Fail and print the result.
From the Main Menu, the operator can select which test is required, by scrolling down
the menu using the up and down buttons, and confirming the selection by pressing
the tick key.
(a) Car and Light Commercial Vehicle testing (Class II, IV & VII) CAT A
(b) Private bus testing (Class V) CAT B
(c) Public Service Vehicle (Class VI) CAT B
(d) Heavy Goods Vehicle CAT B
(e) Single Vehicle approval CAT A
Table of contents
Other Omitec Test Equipment manuals
Popular Test Equipment manuals by other brands

Powerfix Profi
Powerfix Profi HG00920 manual

Tektronix
Tektronix 323 instruction manual

Keysight Technologies
Keysight Technologies U3042AM04 User's and service guide

Helmut Singer Elektronik
Helmut Singer Elektronik 2467B manual

3M
3M 900AST Series instruction manual

Sharps Comliance
Sharps Comliance 10501 Instructions for use