OMS TENERIFE Series User manual

1
Use and maintenance manual
AUTOMATIC SLICING MACHINE
Edition January 2016
EN

2
INTRODUCTION
This manual has been created in order to provide customers with all the
information about the machine and the safety standards related to it, in
addition to the use and maintenance instructions that enable it to be used
in the best way possible, ensuring it remains efficient over time.
This manual should be delivered to the persons in charge of using the
machine.
The machines are subject to possible updates, so may feature different
details from the ones depicted. This possibility does not in any way
compromise the content of the manual.
Our company thanks you for choosing this product and remains at your
disposal for any further information.
CONTENTS
CHAPTER 1 INFORMATION ON THE MACHINE ...................................... 6
1.1 GENERAL PRECAUTIONS........................................................... 6
1.2 SAFETY DEVICES INSTALLED ON THE MACHINE .......................... 8
1.2.1MECHANICAL SAFETY DEVICES ................................................. 8
1.2.2 ELECTRICAL SAFETY DEVICES ................................................... 8
1.3 DESCRIPTION OF THE MACHINE ................................................ 9
1.3.1GENERAL DESCRIPTION ........................................................... 9
1.3.2CONSTRUCTION CHARACTERISTICS .......................................... 9
1.3.3COMPOSITION OF THE MACHINE ..............................................10
CHAPTER 2 TECHNICAL DATA............................................................. 12
2.1 DIMENSIONS, WEIGHT, SPECIFICATIONS..................................12
CHAPTER 3 RECEIVING THE MACHINE ............................................... 14
3.1 SHIPPING THE MACHINE .........................................................15
3.2 CHECKING THE PACKAGING UPON RECEIPT ...............................16
3.3 DISPOSING OF THE PACKAGING...............................................16
CHAPTER 4 INSTALLATION ................................................................ 17
4.1 POSITIONING THE MACHINE ....................................................17
4.2 ELECTRICAL CONNECTION.......................................................17
4.2.1SLICING MACHINE WITH SINGLE PHASE MOTOR ........................17
4.2.2SLICING MACHINE WITH THREE PHASE MOTOR .........................17

3
4.3 WIRING DIAGRAMS ................................................................18
4.3.1WIRING DIAGRAM OF THE THREE PHASE SYSTEM ......................18
4.3.2WIRING DIAGRAM OF THE SINGLE PHASE SYSTEM .....................19
4.4 GENERAL OPERATION CONTROL ...............................................20
CHAPTER 5 USING THE MACHINE....................................................... 20
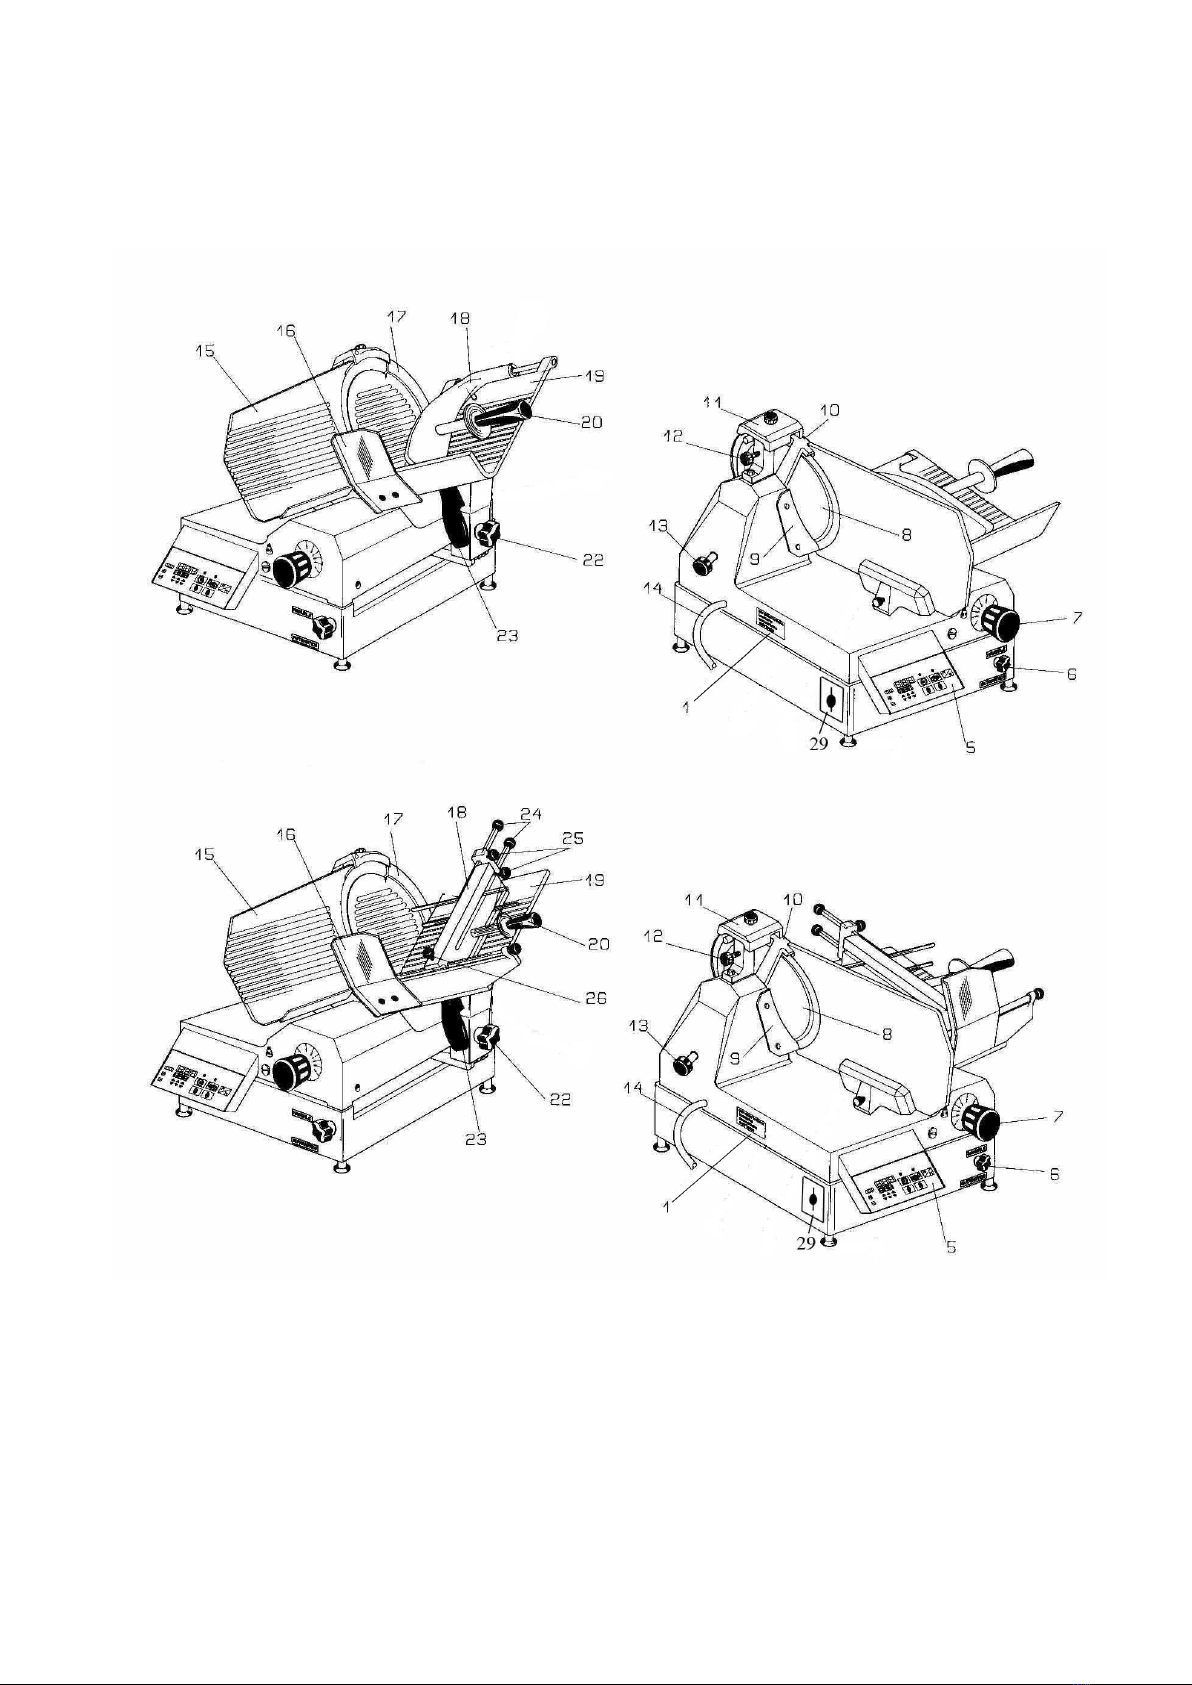
5.1 CONTROLS.............................................................................20
5.2 OPERATION............................................................................21
5.2.1MANUAL OPERATION...............................................................21
5.2.2COMPLETE AUTOMATIC OPERATION..........................................21
5.2.3SEMIAUTOMATIC OPERATION ..................................................21
5.3 LOADING AND CUTTING THE PRODUCT .....................................22
5.3.1NORMAL TRAY ........................................................................22
5.3.2TRAY WITH CONTROL RODS ....................................................23
5.3.3TRAY WITH SPECIAL ARM ........................................................24
5.4 SHARPENING THE BLADE.........................................................25
CHAPTER 6 ROUTINE CLEANING ........................................................ 26
6.1 GENERAL INFORMATION..........................................................26
6.2 HOW TO CLEAN THE SLICING MACHINE ....................................26
6.2.1CLEANING THE PRODUCT HOLDER TRAY....................................26
6.2.2CLEANING THE BLADE, THE BLADE GUARD AND THE RING ..........27
6.2.3CLEANING THE SHARPENER .....................................................28
6.2.4CLEANING THE SLICE DEFLECTOR ............................................28
CHAPTER 7 MAINTENANCE................................................................. 29
7.1 GENERAL INFORMATION..........................................................29
7.2 MAINTENANCE .......................................................................29
7.2.1BELT .....................................................................................29
7.2.2FEET .....................................................................................29
7.2.3POWER CABLE........................................................................29
7.2.4 BLADE ...................................................................................29
7.2.5WHEELS ................................................................................29
7.2.6LUBRICATING THE SLIDING GUIDES.........................................30
CHAPTER 8 DEMOLITION AND DISPOSAL........................................... 30

5
INDEX OF FIGURES
Figure 1 - Overview of the slicing machine ................................................11
Figure 2 - Overall dimensions ..................................................................12
Figure 3 - Description of the packaging .....................................................15
Figure 4 - Marking on the packaging.........................................................16
Figure 5 - Data plate - Serial number .......................................................17
Figure 6 - 400 V three phase wiring diagram with 5P plug ...........................18
Figure 7 - 230 V single phase wiring diagram with SCHUKO plug..................19
Figure 8- Location of the controls .............................................................20
Figure 9 - Overview of the slicing machine with normal tray ........................22
Figure 10 - Overview of the slicing machine with control rod tray .................23
Figure 11 - Overview of the slicing machine tray with special arm ................24
Figure 12 - Blade sharpening - initial operation ..........................................25
Figure 13 - Sharpening operation ............................................................25
Figure 14 - Returning the sharpening unit to the rest position......................25
Figure 15 - Carriage view ........................................................................26
Figure 16 - Detaching the blade guard .....................................................27
Figure 17 - Cleaning the blade with the cloth .............................................27
Figure 18 - Positioning the blade extraction jig ..........................................28
Figure 19 - View of the slice deflector .......................................................28
Figure 20 - Lubrication Points ..................................................................30

6
CHAPTER 1INFORMATION ON THE MACHINE
1.1 GENERAL PRECAUTIONS
The slicing machine must only be used by trained personnel who must be
fully aware of the safety standards contained in this manual.
In the event of staff turnover, ensure that training is provided.
Although safety devices are installed on the machine at hazardous spots,
do not place hands near the blade or the moving parts.
Before performing any cleaning or maintenance, unplug the machine from
the mains.
When performing maintenance or cleaning on the slicing machine (and
when the protection devices are therefore removed), carefully evaluate
the residual risks.
During maintenance or cleaning, stay focused on the operations in
progress.
Do not use corrosive or flammable substances to clean the slicing
machine. Use mild disinfectants specific for food equipment.
For cleaning, follow the instructions given in Chapter 6 “Routine cleaning”
carefully.
Do not wash the slicing machine with jets of high pressure water or
submerge it in water or other liquids.
Regularly monitor the condition of the power cable. A cable that is worn or
not intact in any way represents a serious electrical hazard.
Do not pull the slicing machine cable or the slicing machine itself in any
way in order to unplug it!
Do not use the slicing machine when, after repeated sharpening, the
external diameter of the blade has been reduced by 10 mm.
If you believe or note that the slicing machine is malfunctioning, do not
use it, do not attempt to repair it directly and contact the “Service
Centre”.

7
Do not use the slicing machine for frozen products, meat and fish with
bones and non-food products.
Do not leave the slicing machine exposed to adverse weather conditions:
sun, rain, spray, ice, humidity.
If the slicing machine is not used, unplug it from the mains.
If the machine remains unused for long periods, before using it again,
have it checked by a “Service Centre”.
Caution! Never cut the product near the end without the aid of the
product pusher arm and do not assume positions where body parts
could come into direct contact with the blade.

8
1.2 SAFETY DEVICES INSTALLED ON THE MACHINE
1.2.1 MECHANICAL SAFETY DEVICES
As regards safety devices of a mechanical nature, the slicing machine
described in this manual complies with the Machinery Directive 2006/42/EC
and the EN 1974 standard (Slicing machines, safety and hygiene
requirements), which envisages the following (see 1.3.3):
-removable blade guard
-irremovable fixed blade guard ring around the blade to protect the area
not used during cutting
-product pusher that cannot be completely overturned
-product pusher knob
-hand guard made of transparent plastic secured to the product holder tray
-carriage that can only be removed when the slice thickness control dial
and the ribbed thickness gauge tray is set to “0” and when the carriage is
positioned at the start of the run at the operator side. In these conditions,
the mechanical lock intervenes and it is possible to remove the product
holder tray.
N.B: In accordance with paragraph 1.7.2 “Warning of residual risks” of
Annex 1 of the Machinery Directive 2006/42/EC, it should be noted
that the blade guard ring, in the sharpening area, does not totally
eliminate the risk of being cut. While reducing the extent of the risk,
the ring is made in compliance with European Standard EN 1974.
1.2.2 ELECTRICAL SAFETY DEVICES
Safety devices to protect against electrical hazards have been added in accordance
with:
-EN 60335-1 standards
-EN 60335-2-64 standards
-the Low Voltage Directive 2014/35/UE
-the Electromagnetic Compatibility Directive 2014/30/UE
A relay is inserted in the control circuit and, in the event of an accidental
power cut, requires the slicing machine to be restarted (reset) intentionally.

9
1.3 DESCRIPTION OF THE MACHINE
1.3.1 GENERAL DESCRIPTION
The range of CE automatic professional slicing machines has been designed and
created by our company, with the specific aim of ensuring:
-maximum safety during use, cleaning and maintenance;
-maximum hygiene, obtained through a meticulous selection of materials
that come into contact with food, and the removal of corners in the part of
the slicing machine that comes into contact with the product, sin order to
ensure easy and thorough cleaning as well as easy disassembly;
-maximum cutting precision thanks to the cam mechanism;
-maximum cutting capacity from 0 to 14 mm;
-sturdiness and stability of all components;
-quietest possible operation thanks to the belt drive;
-reduction of noise emissions below 70 dB;
-easy handling.
1.3.2CONSTRUCTION CHARACTERISTICS
The professional slicing machines in the range listed above are made of an
aluminium alloy which guarantees contact with food (hygiene) and ensures that
it is not attacked by acids and salts as well as giving a high level of resistance to
oxidation.
The blade, made of hardened steel, ensures precise, clean cutting of the
product.
Most other components are made of:
-ABS
-Lexan
-AISI 430 or 304 steel

10
1.3.3 COMPOSITION OF THE MACHINE
Normal tray
Tray with adjustable rods

11
Tray with special arm
Figure 1 - Overview of the slicing machine
1
Data plate –serial number
17
Blade guard
5
Control panel
18
Product pusher arm
6
Manual/automatic selector
19
Product holder tray
7
Graduated dial
20
Product pusher knob
8
Blade
22
Tray lock knob
9
Removable slice deflector
23
Carriage movement grip
10
Irremovable fixed blade guard ring
24
Control rods
11
Blade sharpening device
25
Rod lock knobs
12
Sharpener lock knob
26
Product pusher lock knob /
Sliding tray lock knob
13
Blade guard rod
27
Adjustable edge
14
Power cable
28
Sliding tray
15
Thickness gauge tray(ribbed)
29
\
On/off switch
16
Hand guard

12
CHAPTER 2TECHNICAL DATA
2.1 DIMENSIONS, WEIGHT, SPECIFICATIONS
Figure 2 - Overall dimensions

13
OVERALL DIMENSIONS AND TECHNICAL SPECIFICATIONS (Fig. 2)
LINOSA
390
TGI
810
600
700
600
450
370
72
230
0,50
0,50
0-14
240
215x280
CAUTION: The electrical specifications for which this machine has been designed are shown on a plate affixed to the
back. Before connection, see 4.2 - electrical connection.
370
TGI
810
600
700
600
450
370
71
230
0,50
0,50
0-14
240
210x280
350
TGI
810
600
700
600
450
370
70
230
0,50
0,50
0-14
240
200x280
KEA
350
TGSPI
690
540
600
500
350
315
57
270
0,34
0,34
0-14
240
205x260
330
TGI
690
540
600
500
350
315
54
270
0,34
0,34
0-14
230
195x260
300
TGI
690
540
600
500
350
315
50
270
0,34
0,34
0-14
215
190x260
LIPARI
370
TG
790
585
675
580
400
370
71
220
0,50
0,50
0-14
250
210x280
350
TG
790
585
675
580
400
370
70
220
0,50
0,50
0-14
240
200x280
TENERIFE
330
TGN
690
540
620
480
340
310
43
275
0,31
0,31
0-14
230
195x250
300
TGN
690
540
620
480
340
310
41
275
0,31
0,31
0-14
215
190x250
MACHINE MODEL
*A
B
C
D
E
mm
kg
rpm
HP
HP
mm
mm
mm
Length
Width
Height
Distance between feet
Carriage run
Weight
Blade rpm
Single phase motor
Three phase motor
Cutting thickness
Round cutting capacity
Cutting capacity H x L
Dimensions in mm

14
OVERALL DIMENSIONS AND TECHNICAL SPECIFICATIONS (Fig. 2)
CAUTION: The electrical specifications for which this machine has been designed are shown on a plate affixed to the back.
Before connection, see 4.2 - electrical connection.
REDONDA
370
TGDVI
770
565
600
600
420
380
47,5
215
0,50
0,50
0-15
260
210x300
350
TGDVI
770
565
600
600
420
380
47,5
215
0,50
0,50
0-15
250
200x300
REDONDA
370
TGDV
770
565
600
600
420
380
47,5
210
0,50
0,50
0-15
260
210x300
350
TGDV
770
565
600
600
420
380
47,5
210
0,50
0,50
0-15
250
200x300
NISIDA
370
TGN
770
560
600
600
420
380
47
210
0,50
0,50
0-15
260
210x300
350
TGN
770
560
600
600
420
380
47
210
0,50
0,50
0-15
250
200x300
MACHINE MODEL
*A
B
C
D
E
mm
kg
rpm
HP
HP
mm
mm
mm
Length
Width
Height
Distance between feet
Carriage run
Weight
Blade rpm
Single phase motor
Three phase motor
Cutting thickness
Round cutting capacity
Cutting capacity H x L
Dimensions in mm

15
CHAPTER 3RECEIVING THE MACHINE
3.1 SHIPPING THE MACHINE
The slicing machine leaves our warehouses carefully packed. The packaging
consists of:
a) sturdy cardboard outer box;
b) the machine;
c) two cardboard inserts to keep the machine very stable;
d) blade extraction jig (supplied on request);
e) this manual;
f) small bottle of oil;
g) two shock guards
Figure 3 - Description of the packaging

16
In addition to the conventional symbols, the following are shown on the packaging:
-Machine model
-Machine serial number
-Volts
-Gross weight
Figure 4 - Marking on the packaging
3.2 CHECKING THE PACKAGING UPON RECEIPT
Upon receipt of the package, if it has no external damage, open it to
check that all the material is inside (Fig. 3). If, on the other hand, upon
delivery, the package shows signs of having been mishandled, knocked
or dropped, it is necessary to point out the damage to the carrier, and
send a detailed report concerning the damage sustained by the machine
within 3 days of the delivery date indicated on the documents.
Do not overturn the packaging!! When handling the machine, ensure
that it is held firmly in the 4 corners (keep it parallel to the floor).
3.3 DISPOSING OF THE PACKAGING
The packing materials (cardboard, any wooden pallets, protective nylon
and shockproof guards) must be disposed of separately according to
current regulations in the country of installation.

17
CHAPTER 4INSTALLATION
4.1 POSITIONING THE MACHINE
The surface on which the slicing machine must be installed must take into
account the support dimensions shown in the technical tables (depending
on the model), and therefore be sufficiently large, should be well levelled,
dry, smooth, robust and stable and at a height of 80 cm from the ground.
4.2 ELECTRICAL CONNECTION
4.2.1 SLICING MACHINE WITH SINGLE PHASE MOTOR
The slicing machine is equipped with a power cable with a cross section of
3x1 mm2, length of 1.5 m and a “SCHUKO” plug (or specific plug for the
country of destination) to be connected to an outlet in line with EEC
standards. Connect the 230 Volt 50 Hz slicing machine, interposing a 10A,
In = 0.03 A RCD/circuit breaker.
At this point, ensure that the earthing system is in perfect working order.
Also check that the type of current indicated on the identification plate
(Fig. 5) is consistent with the voltage (V) and frequency (Hz) of the
power line.
Figure 5 - Data plate - Serial number
4.2.2 SLICING MACHINE WITH THREE PHASE MOTOR
The slicing machine is equipped with a power cable with a cross section of
5 x 1 mm2and length of 1.5 m.
Connect the slicing machines to the 400 Volt 50 Hz three phase mains
using a CEI plug (red), interposing a 10A, In = 0.03 A RCD/circuit
breaker. At this point, ensure that the earthing system is in perfect
working order. Also check that the type of current indicated on the
identification plate (Fig. 5) is consistent with the voltage (V) and
frequency (Hz) of the power line. Before connecting the machine
permanently to the three phase supply line, check the direction of
rotation of the blade by briefly pressing the start blade button then
pressing the stop blade button (Fig. 8).

18
The direction of rotation of the blade must be anti-clockwise looking at
the slicing machine from the blade guard side. If the direction of rotation
is incorrect, reverse two wires of the three phases of power in the plug
(N.B. do not move the BLUE wire = neutral). It is advisable have this
operation carried out by trained personnel.
The three-phase motors on professional CE slicing machines can operate
with both 230V three-phase voltage and with 400 V voltage.
Unless otherwise specified, connections are made for 400 V power. In
order to adapt to 230 V three phase power, request the intervention of
the “SERVICE CENTRE”.
4.3 WIRING DIAGRAMS
4.3.1WIRING DIAGRAM OF THE THREE PHASE SYSTEM
Figure 6 - 400 V three phase wiring diagram with 5P plug

19
4.3.2 WIRING DIAGRAM OF THE SINGLE PHASE SYSTEM
Figure 7 - 230 V single phase wiring diagram with SCHUKO plug

20
4.4 GENERAL OPERATION CONTROL
Before testing, make sure that the tray is fully locked, then try operation,
proceeding as follows:
1. turn the ON/OFF switch to “ON” (Fig. 1)
2. press the start blade button (Fig. 8) and check that the blade is moving.
Press the stop blade button and check that the blade comes to a halt;
CHAPTER 5USING THE MACHINE
5.1 CONTROLS
Figure 8- Location of the controls
1 Carriage run selector
6/b Stop carriage
2 Manual/auto slice counter selector
7/b Slice no. setting keys
3 Slice counter display
8 Selector: A manual
4 Start blade
Bautomatic
5 Start carriage
6/a Stop blade
This manual suits for next models
21
Table of contents
Other OMS Kitchen Appliance manuals