One Rehab Borgarelli 9000 Series User manual

B9500 MOBILITY SCOOTER
NEW SERIES
USER MANUAL
“A SUBLIME COMBINATION OF POWER, SPEED & COMFORT”
WARNING! Failure to heed the warnings in this owner’s manual may result in personal injury.
CAUTION! Failure to heed the cautions in this owner’s manual may result in damage to your scooter

2
C O N T E N T S
1.
INTRODUCTION……………………………………………………………………………………….
4
2.
SAFETY…………………………………………………………………………….........................
5
3.
SPECIFICATIONS……………………………………………………………………………………….
8
4.
YOUR SCOOTER………………………………………………………………………………………..
10
5.
BATTERIES AND CHARGING………………………………………………………………………
14
6.
OPERATION………………………………………………………………….…..........................
18
7.
COMFORT ADJUSTMENTS………………………………………………………………………..
20
8.
BASIC TROUBLESHOOTING……………......……………………………………………………
22
9.
CARE AND MAINTENANCE…………………...…………………………...…………………….
24
10.
WARRANTY…………..............................………………………………………...............
25

3
I n t r o d u c t i o n
Congratulations on the purchase of your new B9500 Mobility Scooter! The advanced design and attractive
styling of the B9500 ensures many years of enhanced trouble-free mobility. Correct use improves your
mobility and quality of life.
Your safety is important to us.
Please read and follow all instructions in this manual before operating your scooter. Complete
understanding of these operating instructions, prior to driving your scooter, is essential for your safety
and enjoyment.
No liability can be taken by us for personal injury or damage to property arising from the failure of any
person and/or user of this scooter to follow the instructions and recommendations either contained in
this manual, in other scooter-related literature issued by the manufacturer; or displayed on the scooter
itself.
This Owner’s Manual was compiled from the latest specifications and product information pertaining at
the time of publication. We reserve the right to make such changes as become necessary. Changes to
our products may cause slight variances between illustrations and explanations shown in this manual, to
the product purchased by you.
If you feel incapable of safely following the instructions and or recommendations contained in this manual,
or experience any problems with your B9500 which you are unable to resolve, please contact your
authorized dealer for assistance.
Feedback
With our ongoing product development, we appreciate your feedback with any questions, comments or
suggestions. Please contact us through www.onerehab.co.uk

4
2. S A F E T Y
SAFETY PRECAUTIONS
■Lock your seat into place and remove the key before you get on or off your scooter.
■Lock the seat into position before you operate your scooter.
■Do not operate your scooter with the seat in the reclined position (if so equipped).
■Make certain that the tyres are inflated to 30 pounds per square inch (psi). Overinflating a tyre can
cause it to explode, resulting in personal injury or damage to your scooter.
■Do not operate your scooter if you are taking medication which may impair your ability to operate
your scooter in a safe manner.
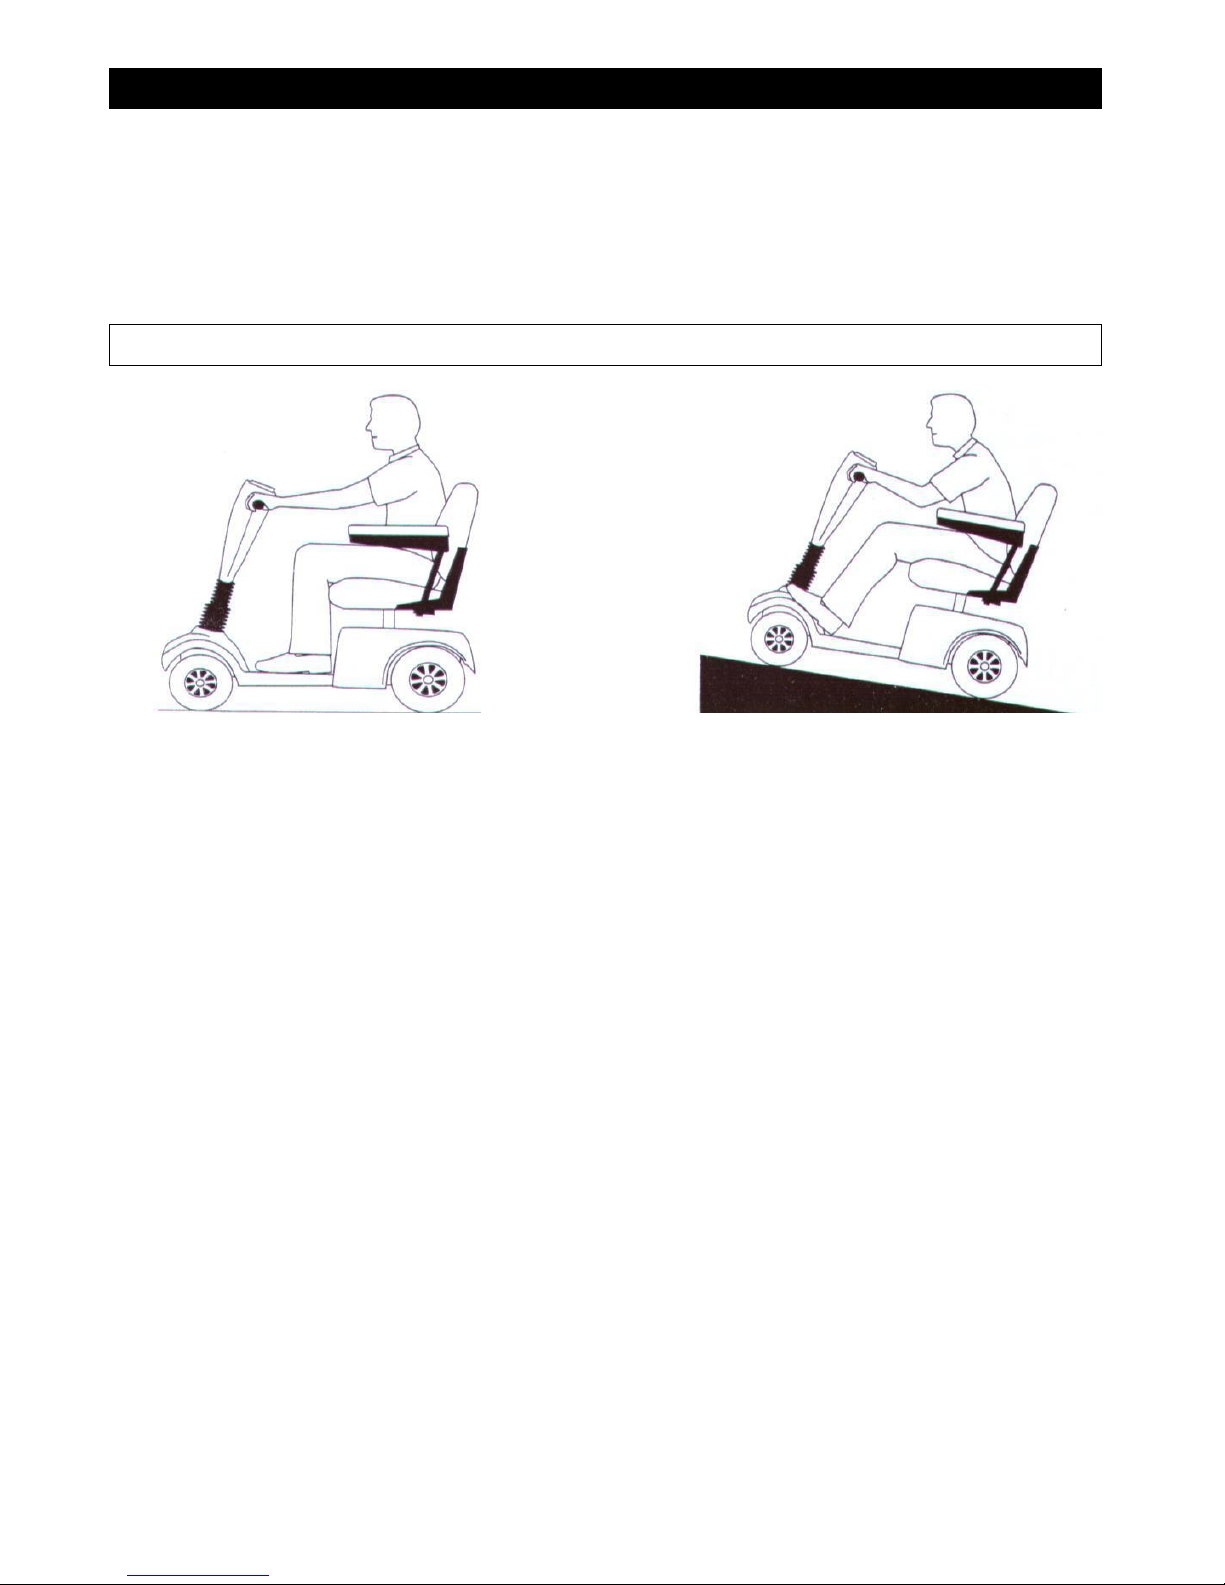
■Do not drive your scooter across the side of an incline or diagonally up or down an incline; avoid
stopping whilst driving on inclines.
■Keep both hands on the tiller and your feet on the floorboard at all times while operating your scooter.
This driving position gives you the most control over your vehicle.
■Proceed with extreme caution when driving near raised surfaces or unprotected ledges or drop-offs
(kerbs, porches, stairs, etc.)
■Drive slowly when turning.
■Secure the batteries before loading your scooter into another vehicle for transport.
■Disconnect the batteries if you are not going to operate your scooter for more than 48 hours.
■Do not operate or store your scooter where it may be exposed to inclement weather conditions such
as rain, snow, mist, and below-freezing temperatures. Attempting to operate your Scooter in such
conditions may damage the electronics and potentially result in loss of control.
■Always protect batteries from freezing temperatures and never charge a frozen battery. This damages
the battery and may cause personal injury. Attempting to charge a battery in freezing conditions does
not prevent a battery from freezing.
■Do not expose the electronics to any type of moisture at any time. Such exposure may damage the
electronics. Never attempt to ride a scooter that has been exposed to moisture until it has dried
thoroughly.
■Never sit on your scooter when it is being used with any type of lift/elevation product. Your scooter
was not designed with such use in mind, and any damage or injury incurred from such use is not the
responsibility of the manufacturer.

5
2. S A F E T Y
Until you are familiar with the operation of your scooter, please practice in a wide and open area such as
a park, with your scooter set at the lowest speed setting. To prevent the possibility of falling off your
scooter while driving bear in mind the status of the driving motion, such as accelerating, stopping, turning,
reversing, up-and-down ramps etc.
RAMPS AND OTHER INCLINES
Be careful while driving up ramps and inclines.
■Take wide turns with your Scooters front wheels around any tight corners. If you do that, the Scooter
rear wheels will follow a wide arc. Do not cut the corner short as this may result in personal injury.
■When driving down a ramp, keep the Scooter’s speed adjustment dial (see IV. “Your Scooter”) set to
the tortoise (slowest speed setting) to ensure safely controlled descent.
■Never drive your Scooter across the side of a hill or diagonally up or down a hill, and do not stop, if
possible, while driving up or down an incline.
■Avoid sudden stops and starts.
Figures 1 and 2 illustrate your scooter’s stability and its ability to climb grades under various weight loads
under controlled testing conditions.
160 kg
8.7%
100 kg
10.5%
80 kg
12.3%
Figure 1. Maximum Recommended Incline Angles

6
2 . S A F E T Y
These tests were conducted with the scooter’s seat in the highest position and adjusted backward on the
seat base to its farthest rearward position. Use this information as a guideline. Your scooter’s ability to
travel up any incline is affected by your weight, your scooter’s speed, your angle of approach to the
incline, and your scooter’s setup.
WARNING! Do not exceed the incline guidelines or any other specifications presented in this manual.
■When you approach an incline, it is best to lean forward. See figures 2 and 3. This shifts your centre of
gravity towards the front of the scooter for improved stability.
DRIVING SURFACES
Your scooter was designed to provide optimum stability under normal driving conditions; dry, level
surfaces composed of concrete or asphalt.
■Your scooter can safely be used on lawns and in park areas when permitted.
■Avoid tall grass that can become entangled in the axles.
■Packed soil and gravel, such as driveways or roads, will present no problem for your scooter.
■Avoid loosely packed gravel and sand.
■If unsure about a surface it is best avoided.
SAFETY PRECAUTIONS
■Do not operate your new scooter for the first time without completely reading and understanding this
owner’s manual.
■Do not carry passengers on your scooter.
■Do not leave the key in the switch when your scooter is unattended.
Figure 2. Normal Driving Position
Figure 3. Increased Stability Driving Position

7
3. S P E C I F I C A T I O N S
Figure 4. Dimensions of Scooter B9500

8
3. S P E C I F I C A T I O N S

9
4 . Y O U R S C O O T E R
Your scooter is electrically motorized and designed to give you greater mobility and is suitable for use
both indoors and outside. Your scooter is designed to travel primarily on smooth surfaces. For easy
transportation or storage, you can disassemble your scooter into seven components. See figure 5.
CONTROL CONSOLE ASSEMBLY
The control console assembly houses all the controls needed to drive your scooter, including the key
switch, the speed adjustment dial, the throttle control lever, the battery gauge, the horn button, and the
light switch. See figure 6.
Do not expose the control console assembly to moisture. In the event that the console does become
exposed to moisture, do not attempt to operate your scooter until the control console assembly has
thoroughly dried.
Key Switch
■Fully insert the key into the key switch and turn to power up (turn on) your scooter.
■Turn and remove the key to power down (turn off) your scooter.
Speed Adjustment Dial
This adjustment dial allows you to preselect and limit your scooter’s top speed.
■The image of the tortoise represents the slowest speed setting.
■The image of the hare represents the fastest speed setting.
Turning Signal Button (L / R)
■When turning to the left, press the left button to give a signal.
■When turning to the right, press the right button to give a signal.
Rear Section
Front Section
Rear Shroud
Seat
Basket
Batteries
Figure 5. Seven Scooter Components

10
4 . Y O U R S C O O T E R
Throttle Control Lever
This lever allows you to control the forward and reverse speed of your scooter up to the maximum speed
pre-set on the speed adjustment dial.
■Place your right hand on the right handgrip and your left hand on the left handgrip.
■Use your right thumb to push the right side of the lever to disengage your scooter’s brake and move
forward.
■Release the lever and allow your scooter to come to a complete stop before pushing the left side of
the lever to move in reverse.
■When the throttle is completely released, it automatically returns to the centre “stop” position and
engages the brake.
Battery Gauge
Whenever the scooter is powered up (switched on), this metre gives an approximate reading of the
battery voltage.
Hi-Lo Speed Switch
■Move this switch to the Hi position when driving in open areas or on the road.
■Your scooters top speed is limited to 8 mph (miles per hour).
■Move this switch to the Lo position when driving in restricted areas
or on footpaths. Your scooters top speed is restricted to 4 mph.
Figure 6. Control Console Assembly
Horn Button
Turning Signal
Button (Right)
Throttle Control
(Forward)
Battery Gauge
Speed Adjustment Dial
Hazard Button
Turning Signal
Button (Left)
Throttle Control
(Backward)
Status Light
Headlight Button

11
4 . Y O U R S C O O T E R
Horn Button
■This button activates a warning horn.
Light Button
■This button activates the headlight system.
■Press once to activate, press again to deactivate.
Turning Signals (L/R)
■Press left/right turning signal button once before make a left/right turn.
■Press once to activate, press again to deactivate.
Hazard Button
■This button activates both front and rear turning signals simultaneously.
■Press once to activate, press again to deactivate.
REAR SECTION
The batteries, the electronic controller module, the main circuit breaker (reset button), the manual
freewheel lever, and the motor/transaxle assemblies are located on the rear section of the scooter. See
figure 8.
Batteries
Electronic Controller
Module
Rear Bumper
Anti-tip Wheels
Motor/Transaxle
Assembly
Main Circuit Breaker
(Reset Button)
Free Wheel Lever

12
4 . Y O U R S C O O T E R
Batteries
The batteries store the electrical energy to power the scooter. Please see the section on: “Batteries and
Charging” later in this manual.
Electronic Controller Module
The electronic controller module is located behind the batteries towards the rear of the scooter. This
module receives electrical signals from the console controls and sends power to the motor, the brakes,
the headlight, and the optional lighting system.
Main Circuit Breaker
When the voltage in the scooter’s batteries becomes low or the scooter is heavily strained because of
excessive loads or steep inclines, the main circuit breaker may “trip”to protect your scooter’s motor and
electronics from damage.
■The main circuit breaker is mounted on the rear section of the scooter. See figure 8.
■The main circuit breaker reset button pops out when the breaker “trips”.
■When the breaker “trips”, the entire electrical system of your scooter is shut down.
■Allow 60 seconds then press the reset button to reset the breaker.
■If the breaker “trips”frequently, you may need to charge your batteries more often. You may also
need to have your authorized scooter dealer perform a load test on the batteries.

13
4 . Y O U R S C O O T E R
Manual Free-wheel Lever
Engaging the free-wheel lever will enable the scooter to be pushed manually, (for instance to make small
adjustments when parking).
WARNING! Before placing your scooter in or out of freewheel mode, make certain that the key is
removed from the key switch. Even though the motor of the scooter is disengaged from the drive
system when the scooter is put in manual freewheel mode, the motor can still run if the throttle lever is
pushed. Never sit on a scooter when it is in freewheel mode. NEVER ENGAGE THE FREEWHEEL LEVER
WHILST THE SCOOTER IS ON AN INCLINE.
■The manual freewheel lever is located on the offside rear of the scooter. See figure 8.
■Pulling the free-wheel lever upwards will disable the drive and brake system and engage the
free-wheel mode.
■You will then be able to push your scooter.
■Pushing the free-wheel lever downwards will engage the drive and brake system and take the scooter
out of free-wheel mode.
Motor/Transaxle Assembly
The motor/transaxle assembly consists of a geared transmission and differential. This one piece, direct
drive, fully sealed assembly, provides quiet operation with maximum power and long life. See figure 8.
Anti-Tip Wheels
The anti-tip wheels are an integral and important safety feature of your scooter. NEVER REMOVE OR
MODIFY THE ANTI-TIP WHEELS ON THE SCOOTER AS THIS MAY RESULT IN SERIOUS INJURY OR DEATH
See figure 8.

14
5 . B A T T E R I E S A N D C H A R G I N G
Your scooter uses two long-lasting, 12-volt deep-cycle batteries that are sealed and maintenance free.
■Fully charge the batteries prior to using the scooter for the first time.
■FULLY CHARGE THE BATTERIES AT LEAST ONCE A WEEK AS FAILURE TO DO SO WILL SIGNIFICANTLY
DAMANGE THE BATTERIES. This is essential REGARDLESS OF THE SCOOTER’S USE.
FOLLOW THESE EASY STEPS TO CHARGE THE BATTERIES SAFELY
1. Position scooter close to a standard electrical socket.
2. Remove the key from the key switch.
3. Make certain that the manual free-wheel lever is in the down (drive) position.
4. Plug the charger output cable into charging socket on scooter.
5. Extend the charger power lead and plug into the wall outlet.
6. We recommend charging the batteries for at least 8 - 14 hours.
7. When the batteries are fully charged, the orange LED light on the charger will turn to green.
8. When the batteries are fully charged, unplug the charger power lead from the electrical socket and
unplug cable from charging socket.
9. Place charger in a safe place for future use.
BATTERIES AND CHARGING - FREQUENTLY ASKED QUESTIONS (FAQS)
Can I use a different charger?
For the safest, most efficient, and balanced charging of the scooter’s batteries, we highly recommend the
simultaneous charging of both batteries together using the original battery charger.
What do the LEDs on the battery charger indicate?
The battery charger is equipped with two Light Emitting Diodes (LEDs) that indicate the charging status of
the batteries. The red LED indicates the battery charging is in progress. The green LED indicates the
batteries are fully charge.
How often must I charge the batteries?
■If the scooter is used daily, charge it every night. We recommend that you charge your scooter’s
batteries for 8 to 14 hours after daily use.
■If you use your scooter once a week or less, charge its batteries at least once a week for 12 to 14
hours at a time.
■Keep your scooter’s batteries fully charged. Leaving your batteries partially discharged will damage
the batteries.
■Avoid deeply discharging your scooter’s batteries. If batteries become completely discharged recharge
them as soon as possible.
■Do not charge the batteries for more than 24 consecutive hours.

15
5 . B A T T E R I E S A N D C H A R G I N G
How can I get maximum range or distance per charge?
■Always fully charge your scooter’s batteries prior to your daily use.
■Maintain 30-35 psi (pounds per square inch) of air in all of your scooter’s tires.
■Plan your route ahead to avoid adverse terrain such as hills and uneven surfaces.
■Maintain an even speed while driving
What type and size of battery should I use?
We recommend deep-cycle batteries that are sealed and maintenance free. Both sealed lead-acid (SLA)
and gel cell are deep-cycle batteries that offer similar performance in your scooter. Do not use wet-cell
batteries, which have removable caps.
CAUTION! Do not remove the caps from sealed batteries. Water cannot be added to sealed batteries.
Cap removal voids the battery warranty and may cause damage to the batteries and to your scooter.

16
5 . B A T T E R I E S A N D C H A R G I N G
Use these specifications to reorder deep-cycle batteries:
Type:Deep-cycle (sealed lead-acid or gel cell)
Voltage:12-volts each
Amperage:75 AH
Approx Size: 260mm x 170mm x 206mm
To change a battery
1. Remove seat and rear shroud. Please see Figure 9. “Disassembly and Assembly.”
2. Remove the battery tie-down strap.
3. Disconnect the battery cables from the electronic controller module.
4. Disconnect the battery cables from the battery terminals.
5. Remove the old battery.
6. Place a new battery in the battery well.
7. Connect the red battery cable to the positive (+) battery terminal.
8. Connect the black battery cable to the negative (-) battery terminal.
9. Reconnect the battery cables to the electronic controller module.
10. Fasten the battery tie-down strap.
11. Replace rear shroud and seat.
Why do my new batteries seem weak?
Deep-cycle batteries employ a different chemical technology than is used in car batteries, nickel-cadmium
batteries (NiCad), or in other common battery types. Deep-cycle batteries are specifically designed to
provide power, drain down their charge, and then accept a relatively quick recharge.
We work closely with battery manufacturers to provide batteries best suited to the scooter’s specific
electrical demands. During shipping, the batteries may encounter temperature extremes that may
influence their initial performance. Heat diminishes the charge on the battery; cold slows the available
power and extends the time needed to recharge the battery.
It may take a few days for the temperature of your scooter’s batteries to stabilize and adjust to their new
room or ambient temperature.
More importantly, it takes a few charging cycles (a partial drain followed by a full recharge) to establish
the critical chemical balance that is essential to a deep-cycle battery’s peak performance and long life.
5 . B A T T E R I E S A N D C H A R G I N G
The following steps will maximise the batteries` life and efficiency:
1. Fully recharge any new battery prior to its initial use. This charging cycle brings the battery to about

17
88% of its peak performance level.
2. Operate your new scooter in familiar and safe areas. Drive slowly at first, and do not travel too far from
your home or familiar surroundings until you have become accustomed to your scooter’s controls and
have maximised the capacity of the batteries.
3. Fully recharge the batteries. They should now be at over 90% of their peak performance level.
4. Operate your scooter again.
5. Fully recharge the batteries again.
6. After four or five charging cycles, the batteries are able to receive a charge of 100% of their peak
performance level and are able to last for an extended period of time.
How can I ensure maximum battery life?
Fully charged deep-cycle batteries provide reliable performance and extended battery life. Keep your
scooter’s batteries fully charged. Batteries that are regularly and deeply discharged, infrequently charged,
or stored without a full charge may be permanently damaged, causing unreliable performance and limited
life. Such damage is not covered by warranty.
How should I store my Scooter and its batteries?
If you plan on not using your scooter for an extended period of time, it is best to:
■Fully charge its batteries prior to storage.
■Disconnect the battery harnesses from the electronic controller module.
■Store your scooter in a warm, dry environment.
■Avoid storing your scooter where it will be exposed to temperature extremes.
WARNING! If your scooter’s batteries do become frozen, do not attempt to charge them.
Cold or frozen batteries should be allowed to warm up for several days prior to recharging.
For prolonged storage, you may wish to place several boards under the frame of your scooter to raise the
scooter off of the ground. This takes the weight off the tyres and prevents the possibility of flat spots
developing.
What about public transportation?
If you intend to use public transportation while using your scooter, you must contact in advance the
transportation provider to determine their specific requirements.
6 . O P E R A T I O N
GETTING ON YOUR SCOOTER
1. Make certain that the key is removed from the key switch.

18
2. Stand at the side of your scooter.
3. Pull forward the seat lock lever and rotate the seat until it is facing you.
4. Make certain that the seat is locked securely in position.
5. Position yourself comfortably and securely in the seat.
6. Pull forward the seat locking lever and rotate the seat until you are forward facing.
7. Make certain that the seat is locked securely in position.
8. Make certain that your feet are safely on the floorboard.
9. Follow the checklist below. Familiarize yourself with this checklist, since some of the checks must be
performed before getting on your scooter.
PRE-RIDE ADJUSTMENTS AND CHECKS
■Have you fully charged the batteries? Please see section 5. Batteries and Charging.
■Is the manual freewheeling lever in the drive (down) position? Please see section 4. Your scooter.
Never leave the manual freewheel lever pulled up unless you are pushing your scooter.
■Is your proposed path clear of people, pets, and obstacles?
■Have you planned your route to avoid adverse terrain and as many inclines as possible?
■Are you positioned comfortably in the seat? Please see “Getting on your scooter,” above.
■Is the seat at the proper height? Please see 7. Comfort Adjustments.
■Is the seat locked securely in place? Please see 7. Comfort Adjustments.
■Is the tiller handle at a comfortable setting and locked securely in place? Please see 7. Comfort
Adjustments.
■Is the key fully inserted into the key switch? Please see 4. Your scooter.
■Is the speed adjustment dial set to a slower setting? Please see 4. Your scooter.
■Are you grasping the handgrips with a thumb resting on each side of the throttle control lever? Please
see 4 “Your scooter.”
OPERATING YOUR SCOOTER
After planning your route:
■Adjust the speed adjustment dial on the control console assembly to your desired level of speed.
■Press your thumb against the appropriate side of the throttle control lever. The electric brake
automatically disengages and the scooter accelerates smoothly to the speed pre-selected at the speed
adjustment dial.
6 . O P E R A T I O N
FORWARD OR REVERSE DRIVING
■Pull on the left handgrip to steer your scooter to the left.
■Pull on the right handgrip to steer your scooter to the right.
■Move the tiller to the centre position to drive straight ahead.

19
■To slow down partially release the throttle control lever.
■To stop fully release the throttle control lever.
■The electric brake automatically engages when your scooter comes to a stop.
NOTE: The rear wheel drive transaxle gives your scooter maximum traction with minimal steering effort
GETTING OFF YOUR SCOOTER
1. Bring your scooter to a complete stop.
2. Remove the key from the key switch.
3. Pull forward the seat lock lever and rotate the seat until you are facing toward the side of your scooter.
4. Make certain that the seat is locked securely in position.
5. Carefully and safely get out of the seat and stand to the side of your scooter.
6. You may wish to leave the seat facing to the side to facilitate getting on your scooter the next time you
are going to operate it.
7 . C O M F O R T A D J U S T M E N T S
TILLER ANGLE ADJUSTMENT
You can adjust the tiller to many positions. The tiller adjustment lever locks the tiller in place. This
mechanism enables you to rotate it and change its position. Push the lever down and adjust the tiller to
the required position and release the lever.

20
SEAT HEIGHT ADJUSTMENT
The seat can be repositioned to five
different heights. See figure 10.
1. Remove the seat from your scooter. See
section 9. “Disassembly and Assembly.”
2. Use the ring to pull and remove the ball
detent pin from the lower seat post.
3. Raise or lower the upper seat post to the
desired seat height.
4. While holding the upper seat post at that
height, match up holes in the upper and
lower seat posts.
5. Fully re-insert the ball detent pin.
6. Replace the seat.
7 . C O M F O R T A D J U S T M E N T S
FRONT-TO-BACK SEAT ADJUSTMENT
Reposition the seat backward or forward by pulling
up the Release lever.
Tiller Adjustment Lever
Figure 9. Tiller Angle Adjustment
Seat Pedestal
Upper Seat post
Locating Holes
Ball Detent Pin
Figure 10. Seat Height Adjustment
Release Lever
Seat Lock Lever
Other manuals for Borgarelli 9000 Series
1
This manual suits for next models
1
Table of contents
Other One Rehab Scooter manuals