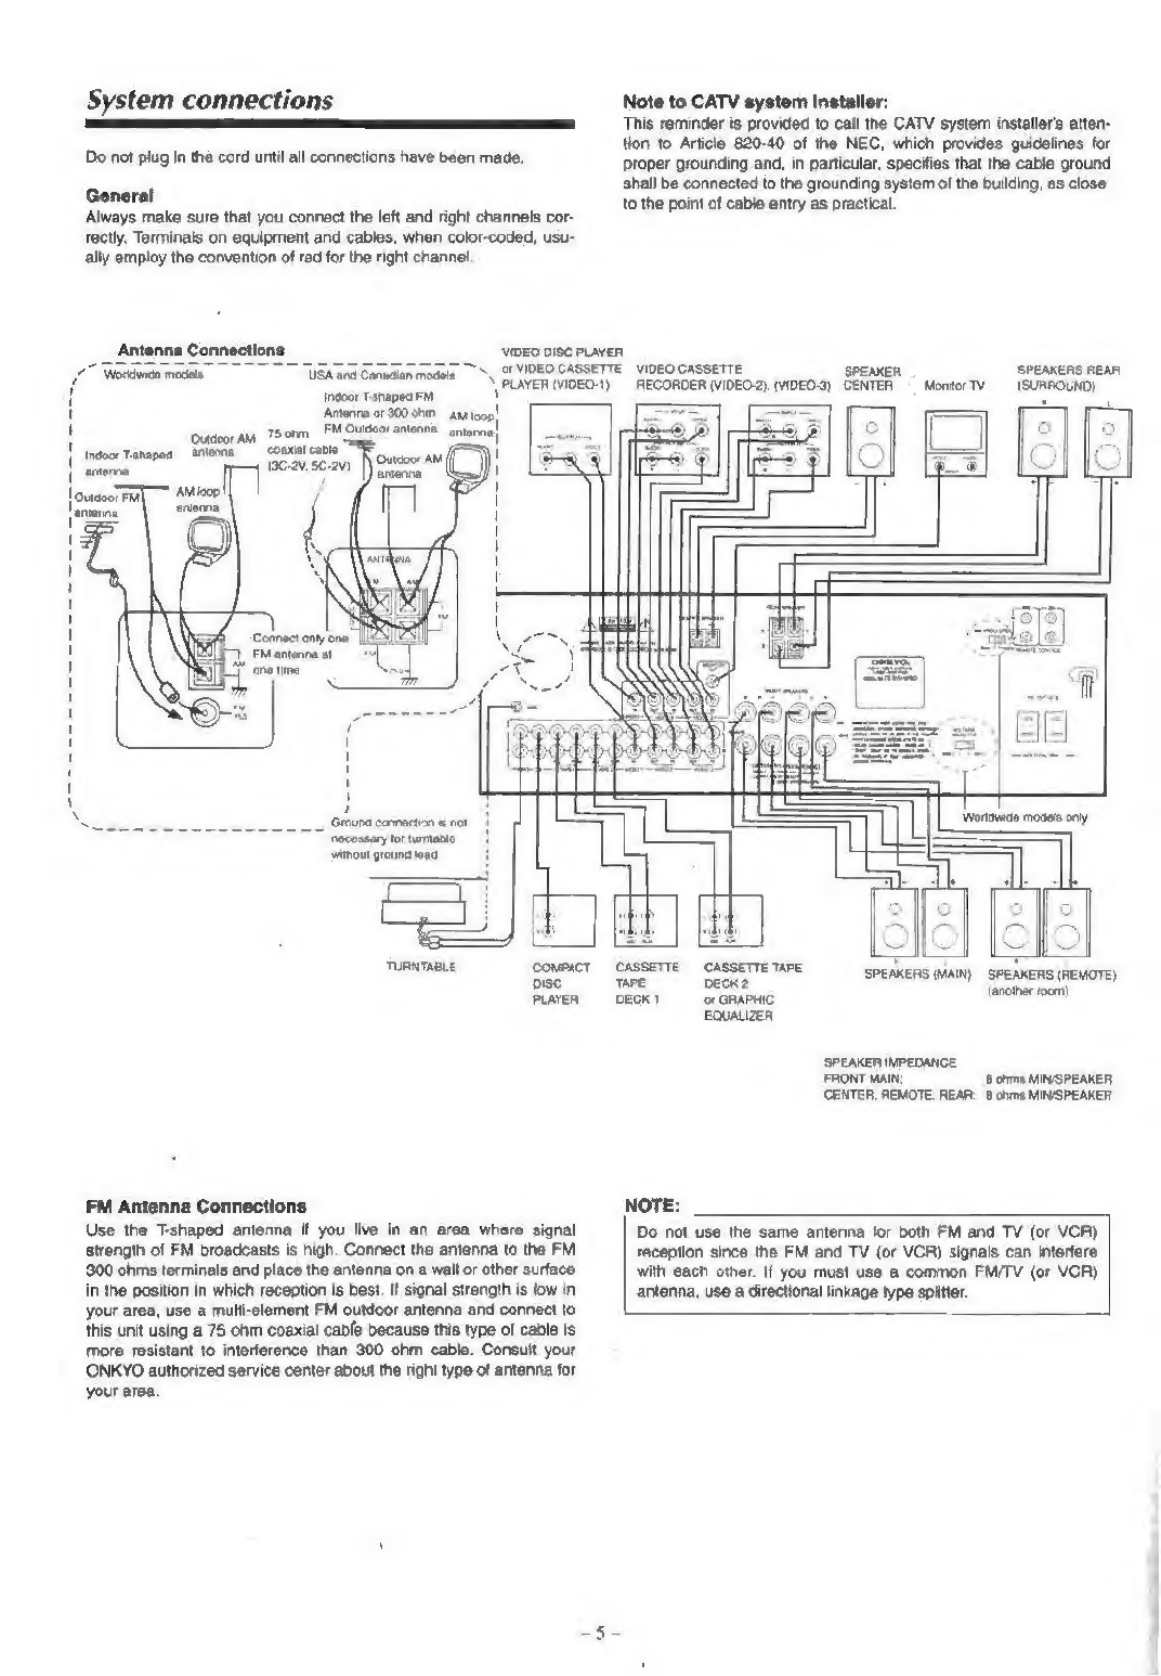
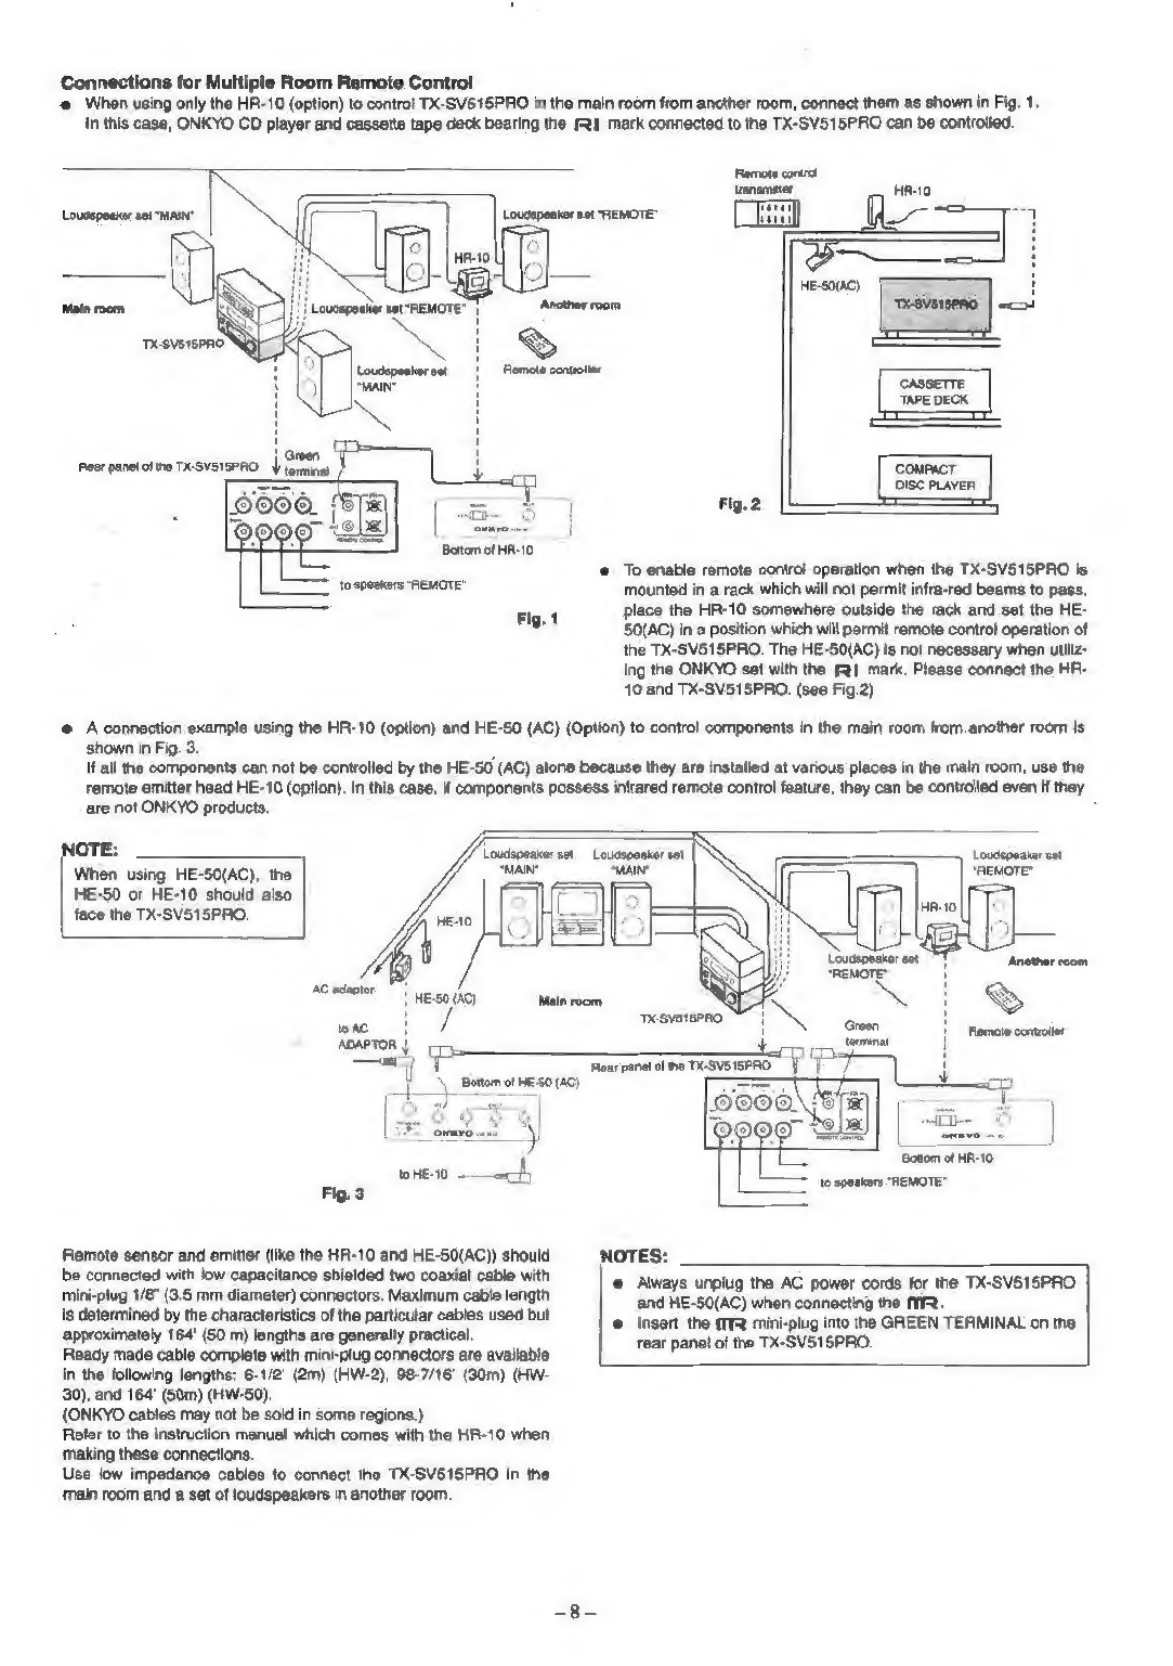
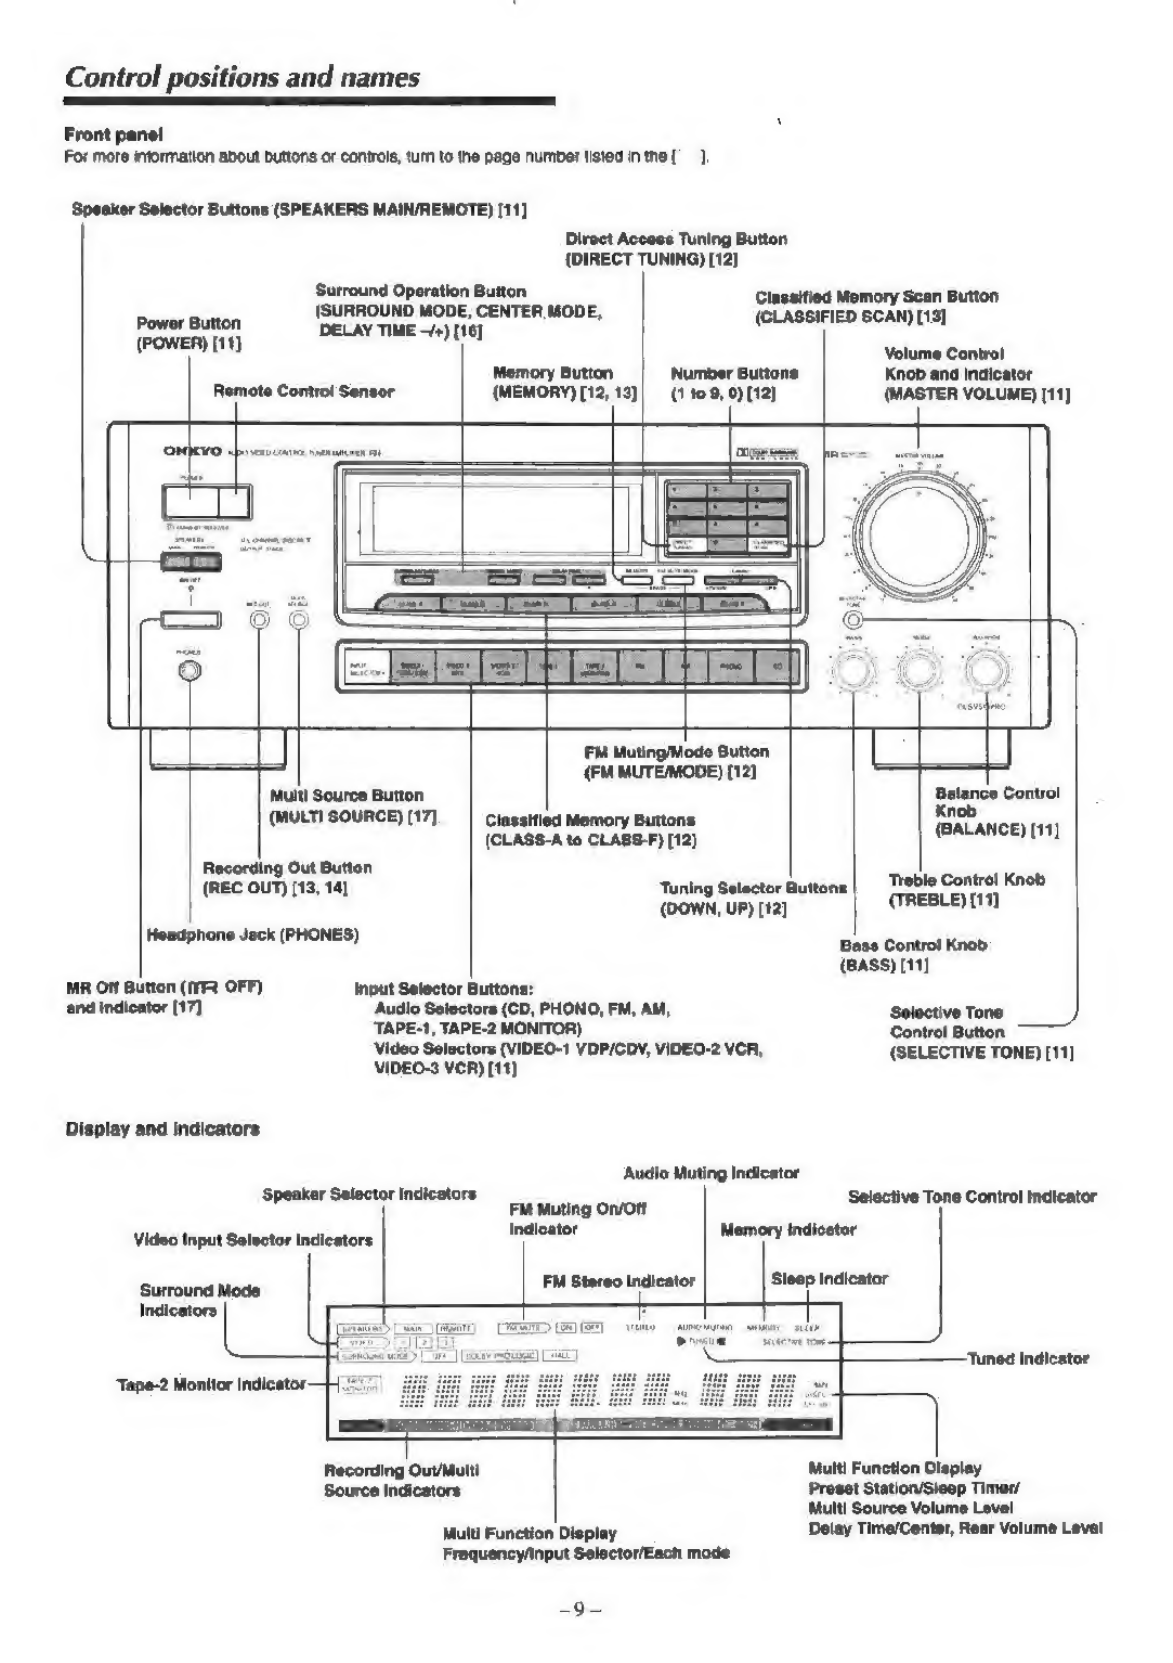
Onkyo TX-SV515SPRO User manual

TX-SV515SPRO
Audio
Video
Control
Tuner
Amplifier
Instruction
Manual

«
Congratutations
on
your
purchase
of
the
ONKYO
TX-SV515PRO
Tuner-Ampiitier.
@
Please
read
this
manual
thoroughly
belore
making
connections
and
turning
power
on.
@
Following
the
instructions
in
this
manual
will
enable
you
to
obtain
optimum
performance
and
listening
enjoy:
ment
from
your
new
TX-SV515PRO.
@
Please
retain
this
manual
for
future
reference.
Important
safeguards
Precautions...
Before
using
this
unit.
Features.
Explanation
..
System
connections...
Control
positions
and
names.......
Operations.
Use
of
Surround
mode...
Listening
to
devices
connected
to
the
TX-SV515PRO
in
another
room.
Troubleshooting
guide
Specifications
....
CONTENTS
:
CAUTION:
“TO
REDUCE
THE
RISK
OF
ELECTRIC
SHOCK,
DO
NOT
REMOVE
COVER
(OR
BACK).
NG
USER-SERVICEABLE
PARTS
INSIDE
REFER
SERVICING
TO
QUALIFIED
SERVICE
PERSONNEL”
RISK
OF
ELECTRIC
SHOCK
DO
NOT
OPEN
@
The
lightning
flash
with
axvowhead
symbol,
within
an
equilateral
iriangle,
is
intended
to
aler!
the
user
to
the
presence
of
Uninsulaled
“dangerous
voltage”
within
the
product's
enclosure
that
may
be
o!
sufficient
mag-
nitude
to
constitute
a
risk
of
electhic
shack
to
persons
©
The
axctamation
point
within
an
equilateral
thangle
vs
intorded
to
alor
the
usar
to
the
presence
of
important
operating
and
maintenance
(servicing)
Instructions
in
ihe
lterature
accompanying
the
appkance
Important
safeguards
1,
Read
Instructions
—
Al!
the
safety
and
operating
Instructions
snould
be
read
before
the
appliance
is
operated
2.
Retain
instructions
~
The
saloty
and
operating
instructions
should
be
retained
for
future
reference:
3,
Heed
Warnings
-
Ail
warnings
on
the
appliance
and
in
the
eoorating
instructions
should
be
adhered
to.
4.
Follow
Instructions
-
Ai)
operaiing
and
use
instructions
should
be
fol-
lowod,
5.
Water
and
Moisture
—
The
appliance
should
not
be
used
near
water
for
example,
roar
a
bathtub,
washbows.
kitchen
sink.
laundry
12b,
in
a
wet
basement,
or
near
a
swinvraing
pool,
and
the
like,
6.
Carts
and
Stands
-
The
appliance
should
be
usert
only
with
a
cart
or
sland
thatis
recommended
ty
the
manulacturet.
6A.
An
appliance
and
cart
comb:nation
should
be
moved
with
care.
Quick
stops.
exces-
sive
force,
and
uneven
surfaces
may
cause
the
appianice
and
cart
combination
to
overtur’
PORTABLE
CART
WARNING
5
Sarasa
Zt
7.
Wall
or
Gelling
Mounting
-
The
appliance
should
be
mounted
to
a
wall
0°
celing
only
a»
<ecommended
by
the
manutacturer.
“WARNING”
“TO
REDUCE
THE
RISK
OF
FIRE
OR
ELECTRIC
SHOCK,
DO
NOT
EXPOSE
THIS
APPLIANCE
TO
RAIN
OR
MOISTURE”
@
For
models
having
power
cords
with
a
polarized
piug.
CAUTION:
To
PREVENT
ELECTRIC
SHOCK,
MATCH
WIDE
BLADE
OF
PLUG
TO
WIDE
SLOT,
FULLY
INSERT.
©
Sur
les
modéles
dont
la
fiche
est
polarisée.
ATTENTION:
Pour
EviteR
LES
CHOCS
ELECTRIQUES,
INTROOUIRE
LA
LAME
LA
PLUS
LARGE
DE
LA
FICHE
DANS
LA
BORNE
CORRESPONDANTE
DE
LA
PRISE
ET
POUSSER
JUSQU
AU
FOND.
8.
Ventilation
~The
appliance
should
be
situated
so
that
its
location
or
position
does
not
interfere
with
its
proper
ventilation
For
example.
the
appliarice
should
not
be
situated
ona
bed,
sota,
rug,
oF
similar
surtace
what
May
block
the
vantilation
openings:
or,
placed
in
a
Duin
installaon,
Such
as
a
bookcase
O°
cabinel
that
may
mpede
the
flow
of
ait
through
the
ventilation
openings
9.
Heat
—
Tho
appliance
should
no
situated
away
from
heat
sources
Such
as
racialors,
heat
registers,
stoves,
or
other
appliances
(including
amplifi-
ers)
Ihat
produce
heat
10,
Power
Sources
-
The
appliance
should
be
connected
to
a
power
sup:
py
only
of
the
type
described
in
the
operating
instructions
or
as
marked
‘on
the
apphance
11.
Polarization
—
It
the
appance
1s
provided
a
polarized
plug
having
on
blade
wider
than
the
other,
please
read
the
following
information:
The
golarization
of
the
plug
is
@
safety
teawwre:
The
polarized
plug
will
oni
fit
the
outlet
one
way.
Ifthe
plug
does
nat
fi
fully
into
the
outlet,
ty
reversing
‘Lt
there
is
stil
trouble,
the
user
should
Seek
the
services
of
a
quatilied
electrician,
Under
no
circumstances
should
the
user
attempt
to
deteat
the
polarization
of
the
plug.
12,
Power-Cord
Protection
-
Power-supply
cords
should
bo
routed
s0
that
they
are not
likely
10
be
walked
on
or
pinched
by
items
placed
upon
oF
against
them,
paying
particular
attention
to
cords
at
plugs,
conve:
rience
receptacles,
and
the
point
where
they
exit
from
the
appliance.
13,
Cleaning
~
The
appliance
shouW’
be
cieaned
only
as
recommended
by
Me
manufacturer
14,
Power
Lines
~
As
outdoor antenna
should
be
located
away
irom
power
Wines.
15,
Nonuse
Periods
-
The
pawer
cord
of
the
appiance
should
be
unplugged
{tom
the
cullat
when
left
unused
lor
a
Jong
panod
ef
time

16.
Object
and
Liquid
Entry
-
Care
should
be
taken
so
that
objects
do
ot
fall
ang
liquids
are
not
spied
into
the
enclosure
through
openings
17,
Damage
Requiring
Service
—
Tho
apsliance
should
be
serviced
by
qualified
Service
personnel
when:
A
The
power-supply
cord
or
the
plug
has
been
damaged:
or
B.
Objects
nave
fallen,
of
liquid
has
heen
spilled
into
the
appliance:
or
©.
The
appliance
has
bean
oxposed
to
rain;
or
D_
The
appliance
does
not
appear
to
operate
normally
or
exhibits
2
marked
change
in
pertormance.
or
E.
The
appliance
has
been
dropped,
or
the
enclosure
damaged,
18:
Servicing
—
The
user
should
not
attempt
to
service
the
appliance
‘beyond
that
described
in
the
operating
instructions.
A¥
other
servicing
should
be
relered
to
qualified
seivice
personnel.
19.
Outdoor
Antenna
Grounding
-
i
an
outside
antenna
is
connected
to
the
receiver,
be
sura
the
antenna
systam
ss
grounded
so
as
‘0
provide
some
proteciion
agains!
voltage
surges
and
bull
up
static
charges
Article
810
o!
the
National
Electrical
Code,
ANSI/NFPA
70,
provides
information
with
regard
to
proper
grounding
of
the
mast
and
supporting
structure,
‘grounding
of
the
loadin
wire
to
an
antenna
discharge
unit,
size
of
ground-
Ing
conductors,
location
of
the
antenna-discharge
unit,
connection
ta
grounding
electrodes,
and
requirements
tor
the
grounding
eleciroue,
See
Figure
73.1
Precautions
@
Warranty
Card
The
serial
number
is
written
on
the
rear
panel
of
this
unit.
Copy
the
serial
number
and
model
number
onto
your
warranty
cara
and
keep
itn
a
sate
place,
2,
Recording
Copyright
Recording
of
copyrighted
material
for
other
than
personal
use
is
illegal
without
permission
of
the
copyright
holder.
3.
AC
Fuse
The
fuse
is
located
inside
the
chassis
and
Is
not
user
service
able.
If
power
does
not
come
on,
contact
your
ONKYO
service
center.
4.
Care
From
time
to
time
you
should
wipe
off
(te
front
and
rear
panels.
and
the
cabinet
with
a
soft
cloth
For
heavier
dirt,
dampen
a
soft
cloth
in
a
weak
solution
of
mild
detergent
and
water
or
a
mild
ammonia
cleaner,
wring
@
out
dry,
and
wipe
off
the
dirt.
Following
this.
dry
immediately
with
a
clean
cloth.
Do
not
use
rough
mate:
fial,
thinners,
alcohol
or
other
chemical
sctvents
or
cloths
since
these
could
damage
the
finish
or
remove
the
panel
lettering,
5S.
Power
BEFORE
TURNING
ON
POWER
FOR
THE
FIRST
TIME.
READ
THE
FOLLOWING
SECTION
CAREFULLY.
@
Some
modeis
are
designed
for
use
only
with
the
power
supply
voltage
of
the
region
where
they
are
sold
U.S.A.
and
Canadian
models:
AC
120V,
60Hz
Worldwide
models
120
and
220V
switchable,
50/60Hz
Before
using
this
unit
1.
Supplied
Accessories
‘AM
loop
antenna
x
|
T-shaped
FM
antenna
»
1
FIGURE
73.1:
EXAMPLE
OF
ANTENNA
GROUNDING
AS
PEA
NATIONAL
ELEC-
TRICAL
CODE
ANTENNA
tEAG
IN
—————
wine
ra
GROUND
ANTENNA
DISCHARGE
UNIT
(NEC
SECTION
810-20),
ee
EQUIPMENT
AS
sed
GROUND
CLAMPS,
POWER
SERVICE
GROUNDING
ELECTRODE
SYSTEM
[NEC
ART
260,
PART
H)
NEC
—
NATIONAL
ELECTRICAL
CODE
S2898A,
©
Voltage
Selector
(Rear
Panel)
Worldwide
models
are
equipped
with
a
voltage
selector
to
con:
form
with
(ocal
power
supplies.
Be
sure
{o
set
this
switch
to
match
the
voltage
of
the
power
supply
in
your
area
before
turning
the
power
switch
on
Voltage
is
changed
by
sliding
the
groove
in
the
switch
with
a
screwdriver
to
the
right
oF
left,
Confirm
that
the
switch
has
been
moved
all
the
way
to
the
right
or
left
before
turning
the
power
switch
on,
Models
without
a
volt:
age
Selector
can
only
be
used
in
areas
where
the
power
supply
is
the
same
as
that
of
the
unit.
(a
]
220VU
a
Acze0v
2200
120%
atACt2oy
120
©
Tuning
Step
Frequency
Switch
(Rear
Panel)
Worldwide
models
aro
equipped
with
@
switch
that
controls
the
AM
(SkH2/10kHz)
band
tuning
steps.
Be
sure
to
set
this
switch
to
match
the
tuning
step
trequency
In
your
area
Ss
Ye
Remote
control
transmitter
<1
Batteries
«
2
eo
aa
FRI
remote
control
cable
«
1

2.
Transmitter
Battery
Insertion
@
If
the
remote
control
transmitter
does
not
operate
even
though
front
panel
controls
function
normally,
the
batteries
should
be
Teplaced.
Use
only
batteries
listed
in
the
following
chart
Type
Voltage
Size
AA
Noa
1.5V
RE
UM-3
NOTES:
1,
Do
not
leave
an
expired
battery
in
the
caso
as
it
may
leak
or
damage
the
baitery
case,
2.
When
inserting
the
batteries,
be
sure
the
(+)
and
(-)
ends
are
properly
aligned
3.
Do
not
use
nickol-cadmium
(rechargeable)
batteries.
Precautions
when
using
batteries
4,
Do
not
use
one
specified
(manganese)
battery
and
one
alka-
@
The
remote
control
transmitter
is
powered
by
two
batteries.
line
Battery
at
the
same
time.
Before
using
this
unit
for
the
first
time,
insert
the
two
batteries
5.
Replace
both
batteries
at
once;
do
not
use
one
old
and
one
(included)
as
shown
in
the
diagram.
new
battery
togather
©
Average
battery
life
Is
about
one
year
This
period
may
be
shorter
depending
on
the
frequency
of
use
and
environment
(temperature
and
humidity)
in
which
the
remote
control
transmit-
teris
used
Using
the
remote
control
transmitter
1.
The
batteries
of
the
remote
control
transmitter
must
be
replaced
periodically.
2.
This
unit
uses
infrared
rays,
Therefore,
commands
may
not
be
received
properly
if
the
trent
panel
of
this unit
is
exposed
to
‘bright
light
To
prevent
this
from
occurring,
place
this
unit
so
that
itis
not
directly
exposed
to
bright
light.
3.
It
this
unit
is
placed
inside
an
audio
rack
behind
a
glass
door,
the
door
should
not
have
colored
glass
or
have
any
decorations
on
it,
since
this
couk
shorteh
the
range
ot
prevent
commands
trom
being
recewed.
4.
The
transmitter
operates
up
lo
a
distance
of
about
five
meters
(16
ao
feet).
The
transmitting
window
must
always
be
pointed
at
the
reception
window
when
a
command
is
sent
to
the
TX-SV51SPRO.
ye
/
Va
(16
wer)
5. If
this
remote
control
transmitter
does
not
operate
properly,
con-
i
a
firm
that
the
batteries
are
not
dead.
If
the
probiem
persists,
con-
As
tact
your
ONKYO
Service
Center.
Remote
contd
transminer
Remole
sensor
approx’
Sm
Features
rary
Plenty
of
Clean
Power
©
Plenty
of
continuous
power
(Front:
8Ow/ch
into
8
ohms
with
No
More
than
0.08%
THD
in
stereo
mode,
Center,
55
watts
in
surround
mode;
Rear:
20w/ch
in
surround
mode)
and
discrete
amplifier
blocks
for
each
channe!
of
the
front,
center
and
rear
speakers
ensures
clean
sound
from
any
source.
®
Dolby
Pro-Logic
Surround
Sound
System
Creates
a
muii-dimensional
soundstage
with
better
channel
separation.
localization,
imaging
and
dialogue
that
comes
directly
trom
cen-
ter
stage.
The
result
is
sound
effects
comparable
to
that
of
high-class
theaters.
Multiple
Room
Remote
System
and
Multi
Source
Selector
It
you
have
an
additional
pair
of
speakers
in
another
room,
you
can
operate
your
TX-SV515PRO
from
tha
other
room
(with
the
optional
HR-10W
remote
sensor),
as
well
as
control
nan-ONKYO
video
components,
such
as
your
TV
or
VCR
from
another
room
(with
dptional
HE-SOAC
emitter
and
HE-10
emitter
head).
You
cas)
also
play
different
sources
simultaneously
for
multiple-room
entertainment
Direct
Access
Tuning
40-Station
Random
Preset
Tuning
Six-Class
Classified
Memory
Connection
Facilities
for
Three
Video
Components
Selective
Tone
Contro!
Recording
Selector
I
Compatible
Remote
Control
Included

Explanation
oo
Surround
System
Many
motion
pictures
produced
in
the
last
decade
have
been
released
in
“Dolby
Stereo"
sound,
with
music,
dialogue,
and
panned
effects
com-
ing
from
the
3-channel
{ront
soundstage,
and
surround
effects
and
ambience
emmanating
from
the
sides
and
rear
of
the
theater.
These
four
channels
are
encoded,
or
matrixed,
into
a
two-channel
DOLBY
STEREO
release,
and
decoded
in
the
theater
by
a
professional
DOLBY
STE-
REO
MP
(Motion
Picture)
decoder.
These
surround
sound
effects
are
‘hidden’
in
the
two-channel
stereo
movie
release,
and
decoded
in
the
the-
ater
by
special
Dolby
equipment.
These
same
two-channel
motion
picture
masters
are
used
tor
production
of
steréo
VHS,
VHS
Hi-Fi,
Bela
Hi-Fi,
and
stereo
Laser
Vision
discs
that
you
can
buy
or
rent
at
your
video
store,
The
TX-SV515PRO
incorporates
the
Dolby
Pro
Logic
Surround
Circuit,
which
is
designed
to
emu-
late
the
audience
experience
found
in
DOLBY
STEREO
theaters.
Like
DOLBY
SURROUND,
DOLBY
PRO
LOGIC
SURROUND
is
capable
of
creating
a
mult-dimensional
soundstage,
but
with
the
increased
channel
separation
it
gives
a
far
greater
sense
of
‘movement”
and
sound
focal-
ization.
Just
like
in
the
theater,
the
addition
of
the
active
center
channel
ensures
that
ail
audience
members
hear
dialogue
coming
from
its
on-
screen
sources
regardless
of
seating
position.
Since
tha
TX-SV515PRO
is
equipped
with
front
amplifiers,
center
amplifier
and
rear
(surround)
amplifiers,
Dolby
Pro
Logic
Surround
and
Hall
effects
can
all
be
produced,
You
can
enjoy
the
feeling
of
a
movie
theater
of
concert
hall
in
your
own
room.
To
reproduce
thase
effects,
rear
(sur-
round)
speakers
and
center
speaker
are
necessary.
The
placement
of
these
speakers
is
important,
You
can
experiment
with
various
positions
and
locations
to
find
the
best
placemert
for
optimum
sound
quality
in
your
room,
Examples
of
Speaker
Placernent
A
B
="
\
=a
a
LEFT
RIGHT
|
fp
a)
PENG
APS
\
(
ew
/
(XOX)
i
——
}
\,
eee
USTENER
/
J
ucer
\\ustener_/
aca
WJ
—_
=
j
c:
7
ran
i
ee
eer,
Li
r
ait
\
With
the
rear
(surround)
speakers
facing
the
wall,
the
reverberation
etfect
amplifies
the
“surround”
effect
for
a
more
“live”
sound.
Try
|
and
see!
©
Dolby
Pro
Logic
Surraund
When
using
a
video
cassette
tape
or
a
video
disc
that
have
the
DOLBY
STEREO
or
DOLBY
SURROUND
trade
mark,
you
can
achieve
the
same
kind
of
sound
in
your
room
that
you
experience
ina
movie
theater.
In
the
Dolby
Pro
Logic
Surround
mode,
three
modes
are
available
according
to
the
type
of
center
speaker
used.
1,
Normal’
When
a
small
speaker
is
used
on
the
center
channel,
signals
of
100
Hz
or
more
are
oulput
from
the
center
speaker,
and
signals
of
100
Hz
or
less
are
split
between
the
front
Land
R
channels.
2.
Wide
band:
When
the
center
speaker
is
approximately
the
same
size
as
the
left
and
right
front
speakers,
it
operates
throughout
the
full
frequency
range.
3.
Phantom;
When
no
center
speaker
is
used,
the
center
channel
signal
is
split
between
the
front
L
and
R
speakers,
producing
the
same
results
as
found
with
a
center
speaker.
©
Hall
The
same
kind
of
sound
that
you
experience
in
a
theater
or
concert
hall
and
the
natural
expansion
of
sound
can
be
achieved
with
a
music
source
Hall
mode
would
be
best
suited
to
jazz
and
classical
Multiple
Room
Remote
System
(mR)
The
ONKYO
HR-10(W)
Remote
Sensor
(sold
separately)
greatly
increases
system
flexibility.
Used
with
your
TX-SV515PRO,
the
HR-10(W)
allows
you
to
control
speakers
even
when
you
are
not
in
the
same
roorn
as
the
TX-SV515PRO.
In
addition
to
basic
functions
like
spaaker
on-off
and
volume
and
so
on,
you
can
aiso
control
most
ONKYO
CD
Players,
Cassette
Decks
and
Digital
Audio
Tape
Decks
that
use
the
(Remote
Interactive)
system;
Adding
an
HE-50(AC)
Remote
Emitter
(also
available
as
an
option)
allows
you
to
control
even
the
non-ONKYO
components
in
your
home
entertainment
system
from
a
separate
room
When
the
HE-50(AC)
is
being
used
'o
control
more
than
one
device
trom
a
distance
but
the
infrared
beams
from
the
HE-50(AC)
remote
control
transmitter
alone
will
not
reach these
devices.
connect
an
HE-10
(remote
miter
head)
to
the
HE-50(AC),
and
set
it
up
to
be
aimed
at
the
devices
lo
be
controlled
The
HW-2
cable
6-1/2"
(2m)
is
attached
with
the
HE-
10.
Up
to
three
HE-10
units
car
be
used
with
this
equipment.
Manutactured
under
license
{rom
Dolby
Laboratories
Licensing
Corporation
Additionally
licensed
under
one
or
more
of
the
following
pat-
onis:
U.S,
numbers
3,632,886,
3,746,792
and
3,959,590,
Canadian
numbers
1,004,603
and
1,037,877.
“Dolby”
and
the
double-D
symbol
(1
are
trademarks
of
Dolby
Laboratories
Licensing
Corporation,

System
connections
es
Do
not
plug
in
the
cord
until
all
connections
have
been
made,
General
Always
make
sure
that
you
connect
the
left
and
right
channels
cor-
reotly,
Terminals
on
equipment
and
cables,
when
color-coded,
usu-
ally
employ
the
convention
of
red
for
the
right
channel
Antenna
Connections
Worldwada
mods
Indoor
Tshaped
FM
Note
to
CATV
system
installer:
This
reminder
is
provided
to
call
the
CATV
system
installer’s
atten-
tion
to
Article
820-40
of
the
NEC,
which
provides
guidelines
for
proper
grounding
and,
in
particular,
specifies
that
the
cable
ground
shalll
be
connected
to
the
grounding
system
of
the
building,
as
close
to
the
point
of
cable
entry
as
practical.
VIDED
DISC
PLAYER,
or
VIDEO
CASSETTE
|
PLAYER
(VIDEO-1)
SPEAKERS
REAR
(SURROUND)
VIDEOCASSETTE
SPEAKER
RECORDER
(VIDEO2)
(VIDEO)
CENTER
©
Montor
TV
Antenna
oF
309
Oh
AS
loop!
cuter
Ag
7Botm
FM
Ouidoo!
antenna
ertonne
antenna
5
‘coaxial
cabto
=
Indoor
T-anaped
(90-2V,
§€:2V)
antorna
1°]
(J)
|
\
1
1
i
'
'
i
i
1
i
1
1
i
Connect
only
one
FMantenna
at
without
ground
lead
TURNTABLE
compsct
pise
PLAYER:
FM
Antenna
Connections
Use
the
Tshaped
antenna
if
you
live
in
an
area
where
signal
strength
of
FM
broadcasts
is
high.
Connect
the
antenna
to
the
FM
300
ohms
terminals
and
place
the
antenna
on
a
wall
or
other
surface
in
the
position
in
which
reception
is
best.
If
signal
strength
is
low
in
your
area,
use
a
multi-element
FM
outdoor
antenna
and
connect
to
this
unit
using
a
75
ohm
coaxial
cabfe
because
this
type
o!
cable
is
more
resistant
to
interference
than
300
ohm
cable.
Consult
your
ONKYO
authorized
service
center
about
the
right
type
of
antenna
for
your
area.
CASSETTE
CASSETTE
APE
sre
aKERS
(HAR)
SPEAKERS
(REMOTE)
DECK)
or
GRAPHIC
em
eovaLlzen
ercaxenirepance
FRONT
vat
$
orm
MNVSPEAKER
CENTER,
REMOTE.
REAR.
chne
MIVSPEAKER
NOTE:
Do
not
use
the
same
antenna
for
both
FM
and
TV
(or
VCR)
reception
since
the
FM
and
TV
(or
VCR)
signals
can
interfere
with
each
other.
if
you
must
use
a
common
FM/TV
(or
VCR)
antenna,
use
a
directional
linkage
type
splitter.
w

>
a
noe
Derr
age
wea
To
receiver
To
TV
(or
VOR)
Antenna
and
Speaker
(CENTER
and
REAR)
Connections
@
Press
down
the
lever
(D
inset
tne
wire
into
the
hol,
&
Foturn
tno
loves
o
its
onginal
position
“i
§
am
4
@
AM
Antenna
Connections
An
AM
loop
antenna
is
included
in
the
insiailation
instructions
bag.
Take
out
the
connection
line
and
connect
it
to
the
AM
antenna
termi-
nals.
This
loop
antenna
can
be
placed
on
top
of
any
stable
surface
or
attached
to
a
wall,
Try
several
positions
to
determine
which
gives
the
best
reception,
Be
sure
the
antenna
Is
nol
near
a
speaker,
power
cord,
television
sot,
VCR,
or
motorized
appliances.
When
using
an
external
AM
antenna,
do
not
remove
the
loop
antenna;
connect
both
antennas
to
the
AM
antenna
terminals.
AM
loop
antenna
assembly
Gonnect
1o
ne
AN
antenna
terminals
“fel
*
.
take
out
the
connection
tino
Bong
in
the
rovers
diracton,
®
‘4.
With
the
antenna
on
top
of
any
stante
surtace
emacs
|
-
>
ces
NOTE:
AM
reception
is
easily
affected
by
television
sets
and
VCRs.
Therefore,
AM
reception
may
be
poor
if
this
unit
is
placed
too
close to.
a
TV
or
a
VCR.
Speaker
Connections
(SPEAKERS)
1,
The
speakers
that
are
to
be
in
the
same
room
as
the
TX-
SV515PRO
should
be
connected
to
the
“MAIN”
speaker
terminals.
Different
set
of
speakers
located
in
another
room
(or
the
samme
room)
should
be
connected
to
the
"REMOTE"
speaker
terminals,
Af
you
want
to
use
the
surround
effects,
connect
the
center
speaker
tothe
“CENTER”
speaker
terminals,
and
the
rear
(surround)
speak-
ers
to
the
“REAR”
speaker
terminals,
2,
When
connecting
speakers,
proper
polarity
is
important.
Always
connect
the
(+)
terminal
(red)
on
this
equipment
to
the
(+)
termi-
nal
on
the
speaker
and
the
(-)
terminal
(black)
on
this
equipment
to
the
(-)
terminal
on
the
speaker.
3,
Do
not
connect
a
single
speaker
in
parallel
to
the
right
and
left
channel
outputs.
4.
Use
speaker
cables
that
have
a
low
impedance
and
that
are
as
short
as
possible.
@
Altach
speaker
cables
to
the
rear
panel
speaker
terminals
with
care.
being
sure
that
connections
are
made
firmly
and
that
there
is
No
possibility
of
a
short
circult
ocourring,
Compact
Disc
Player
or
Other
Component
Connections
(cD)
Connect
the
output
of
the
CD
player
or
an
additional
audio
compo-
nent
lo
the
CD
jacks.
An
ONKYO
CD
player
with
remote
control
that
has
the
RI
mark
can
be
operated
by
the
TX-SV515PRO.
(Please
refer
to
“Connections
lor
Remote
Control.)
For
more
details,
refer
to
your
CD
player
instruction
manual.
Turntable
Connections
(PHONO)
Connect
the
output
of
the
turntable
to
the
PHONO
jacks.
Be
sure
to
connect
the
ground
(earth)
lead wire
from
the
turntable
to
the
ground
terminal
(GND).
Lack
of
proper
ground
connection
will
cause
hum.
Turntables
not
provided
with
GND
wires
do
not
need
to
be
connected.
1.
Place
the
turntable
on
a
firm
shelf
or
deck
froe
from
vibrations
(especially
those
generated
by
the
speaker
system).
If
the
turnta-
ble
is
permitted
to
pick
up
Such
unwanted
vibrations,
not
only
with
the
performance
of
the
unit
drop,
but
distortion
in
the
bass
frequencies
and
nowiling
in
the
speakers
may
also
occur.
2.
Check
the
turntable
instruction
manual
for
any
other
precautions.
3.
The
loud
noises
that
occur
when
connecting
or
disconnecting,
replacing
the
cartridge
or
lowering
the
tonearm
could
damage
the
speakers.
Always
turn
the
power
switch
off
before
making
connections
Tape
Deck
and
Graphic
Equalizer
Connections
(TAPE-1,
TAPE-2)
1,
This
unit
has
faciities
for
two
tape
decks.
If
you
are
using
only
one
tape
deck,
connect
il
to
the
TAPE-1
jacks.
If
you
have
two
tape
decks,
connect
one
to
the
TAPE-1
jacks
and
the
other
to
the
TAPE-2
jacks.
2.
Connect
the
output
of
the
tape
decks
to
the
TAPE-1
and
TAPE:2
“PLAY”
jacks,
Connect
the
input
of
the
tape
decks
to
the
TAPE-1
and
TAPE-2
“REC”
jacks
of
tho
unit.
For
more
dotails,
reter
to
your
tape
deck
instruction
manual,
3,
To
connect
a
graphic
equalizer,
100,
use
the
TAPE-2
jacks
and
connect
the
second
tape
deck
to
the
tape
jacks
of
the
equalizer.
(See
the
figure)
To
connect
a
graphic
equalizer
and
second
tape
deck
to
the
TAPE-2
jacks.
To
TAPE-2
"REG"
jacks
of
TX-SV515P
RO
To
TAPE-2
“PLAY?
lacks
of
TX-SVS1SPRO
Graphic
equalizer
Second
tape
deck
4.
I you
have
an
ONKYO
tape
deck
with
the
I
remote
control
Jack,
connect
it
to
the
TAPE-1
jacks.
Piease
refer
to
the
section
"Connections
for
Remote
Control”
regarding
connection
of
the
remote
control
cable.

Video
Disc
Player
(or
Video
Cassette
Player)
Connections
(VIDEO-1)
Connect
the
VIDEO
outpul
of
the
video
disc
player
to
the
TX-
SV515PRO
(VIDEO)
VIDEO.1
“IN"
jack
and
the
AUDIO
output
to
the
(AUDIO)
VIDEO-1
“IN”
jack.
The
VIDEO-1
jack
is
only
for
playback,
there
is
no
OUT
jack.
For
more
details,
reler
to
the
video
disc
player
instruction
manual.
Video
Cassette
Recorder
Connections
(VIDEO-2,
3)
4.
Connect
the
VIDEO
output
of
the
VCR
to
the
rear
panel
(VIDEO)
VIDEO-2,
3
“IN”
jack
and
the
VIDEO
input
of
the
VCR
to
the
rear
panel
(VIDEO)
VIDEO-2,
3
“OUT”
jack.
Then
connect
the
AUDIO
‘output
of
the
VCR
to
the
(AUDIO)
VIDEO-2,
3
L
and
R
“IN”
jacks.
Finally,
connect
the
AUDIO
input
of
the
VCR
to
the
(AUDIO)
VIDEO-2,
3
L
and
R
“OUT*jecks.
When
using
a
playback-only
VCR,
only
the
output
connections
need
to
be
performed.
For
more
details,
refer
to
the
VCR
instruction
manual
TV
Connections
(MONITOR)
1.
Connect
the
TV
VIDEO
input
to
the
TX-SV515PRO
“MONITOR
OUT".
jack.
There
is
no
need
to
perform
an
audio
connection
since
sound
will
be
sent
directly
from
the
TX-SV51SPRO
to
the
speaker
systems.
The
TX-SV515PRO
does
not
have
an
RF
converter.
Therefore,
it
can
be
used
with
only
a
monitor
TV
equipped
with
a
video
input
jack.
‘Since
the
television
set,
tuner
(FM/AM)
section
of
this
unit
can
cause
interference
that
may
disrupt
sound
andlor
picture
quality,
the
TV
and
TX-SV515PRO
and
their
respective
connection
cables
should
be
placed
as
far
apart
as
possible.
The
use
of
a
common
TV/FM
antenna
is
not
recommended
(see
antenna
sec-
tion).
2
3.
AC
Outlets
@
SWITCHED:
These
outlets
are
switched
on
and
off
by
the
Power
button
on
the
front
panel
and
remote
control
transmitter.
Capacity
is
total
120
watts.
Connections
for
Remote
Control
(REMOTE
CONTROL)
©
A
cassette
tape
deck,
and
compact
disc
player
that
have
the
ONKYO
FRI
mark
can
be
operated
using
the
accessory
remote
control
transmitter
with
the
TX-SV515PRO.
TXSVS15PRO
Ri
acwort
conrad
compact
DISC
PLAYER
RI
piwore
conto
REMOTE
CONTROL
CASSETTE
TAPE
DECK
I
mary
Connect
a
remote
contro!
cable
to
the
Diack
jack
win
the
FRE
mark
‘An
RE
romote
control
cable
equipped
with
a
1/8"
(3.6m)
damator
miniature
tworconductor
phone
plug
Is
atiached
10
the
TX-SV51SPRO
end
to
CD
player,
with
the
FRE
mark,
To
use
an
ONKYO
compact
disc
player
and
cassette
tape
deck
with
the
RU
mark,
insert
the
accessory
remote
control
cable
plug
into
the
REMOTE
CONTROL
jack.
As
far
as
connecting
sequence
is
concerned,
it
doesn’t
matter
whather
the
cable
is
connected
from
the
TX-SV51SPRO
to
the
cassette
tape
deck
or
to
the
compact
disc
player,
The
remote
control
transmitter
is
operated
by
facing
it
towards
the
remote
control
sensor
of
the
TK-SV515PRO.
NOTES:
@
To
enable
remote
contiol
operation,
the
audio
connection
cables
and
the
remote
control
cable
should
be
connected
between
the
units
@
The
remote
control
of
the
TX-SV515PRO
cannot
be
used
to
operate
an
ONKYO
turntable:

Connections
for
Multiple
Room
Remote
Control
‘@
When
using
only
the
HR-10
(option)
to
control
TX-SV515PRO
in
the
main
room
from
ancther
room,
connect
them
as
shown
in
Fig.
1.
In
this
case,
ONKYO
CD
player
and
cassette
tape
deck
bearing
the
FI
mark
connected
to
the
TX-SV515PRO
can
be
controlled.
Remote
coetrat
tansmater
HR40
ican
=|
%
Louuspeaker
set"MAIN'
HE-5O(AC)
]
Fig.2
Bottom
of
HR-10
@
To
enable
remote
control
operation
when
the
TX-SV515PRO
is
to
speakers
“EMOTE
mountad
in
a
rack
which
will
not
permit
infra-red
beams
to
pass,
Fig.
place
the
HR-10
somewhere
outside
the
rack
and
set
the
HE-
50(AC)
in
a
position
which
will
permit
remote
control
operation
of
the
TX-SV515PRO.
The
HE-50(AC)
is
nol
necessary
when
utliz~
ing
the
ONKYO
set
with
the
FI
mark.
Please
connect
the
HA-
10
and
TX-8V515PRO.
(see
Fig.2)
©
A
connection
example
using
the
HR-10
(option)
and
HE-50
(AG)
(Option)
to
contro!
components
in
the
main
room
from
another
room
Is
shown
in
Fig.
3.
;
if
all
the
components
can
not
be
controlled
by
the
HE-S0
(AC)
alone
because
they
are
installed
at
various
places
in
the
main
room,
use
the
remote
emitter
head
HE-10
(option).
in
this
case,
I
components
possess
infrared
remote
control
feature,
thay
can
be
controlled
even
if
they
are
not
ONKYO
products,
NOTE:
When
using
HE-50(AC),
the
HE-50
or
HE-10
should
also
face
the
TX-SV515PRO,
Loudspeaker
sot
Loudspnaker
sot
“MAIN
“Maine
Loudepoaier
cot
"REMOTE"
se
eaoee
|
HE-50
(AC)
‘Main
room
wo
vesvateeng
SN
ADAPTOR
|
4
\,_
Bottom
of
HE:80
(AC)
ar
ear
paral
ofthe
TRSVSTSPRO
;
aa
j
Bottom
of
HR-10
to
speakers
“REMOTE”
Fig.
3
Remote
sensor
and
emitier
(like
the
HR-10
and
HE-50(AC))
should
NOTES:
be
connected
with
low
capacitance
shieided
two
coaxial
cable
with
z
mini-plug
1/8"
(3.5
mm
diameter)
connectors.
Maximum
cable
length
2
pal
beret
bbsrteiuae
eked
rane
TRSNELSERO
is
determined
by
the
characteristics
of
the
particular
cables
used
but
@
Ingort
the
E172
mini-plug
into
the
GREEN
TERMINAL
on
the
approximately
164’
(0
m)
lengths
are
generally
practical,
rear
panal
of
the
TX-SV51
5PRO.
Ready
made
cable
complete
with
mini-plug
connectors
are
available
in
the
following
lengths:
6-1/2’
(2m)
(HW-2),
98-7/16'
(30m)
(HW-
30),
and
164°
(50m)
(HW-50),
(ONKYO
cables
may
not
be
sold
in
some
regions.)
Refer
to
the
instruction
manual
which
comes
with
the
HR-10
when
making
these
connections.
Use
low
impedance
cables
to
connect
the
TX-SV515PRO
in
the
main
room
and
a
set
of
loudspeakers
in
another
room.

Control
positions
and
names
Front
panel
For
more
information
about
buttons
or
controls,
turn
to
the
page
number
listed
inthe[
‘Speaker
Selector
Buttons
(SPEAKERS
MAIN/REMOTE)
[11]
Direct
Access
Tuning
Button
(DIRECT
TUNING)
[12]
Surround
Operation
Button
Classified
Memory
Scan
Button
(SURROUND
MODE,
CENTER
MODE,
(CLASSIFIED
SCAN)
[13]
Power
Suton
DELAY
TIME
-/+)
[16]
(ROWER
I")
Volume
Control
Memory
Button
Number
Buttons
Knob
and
indicator
Remote
Control
Sensor
(MEMORY)
[12,
13]|
(1
10.9,
0)
[12]
(MASTER
VOLUME)
[11]
ONFEVO
fesse
isin0,
nannanncenn
|
|
exsvsfinc
T
FM
Muting/Mode
Button
(FM
MUTE/MODE)
[12]
Multi
Source
Button
Bolence
Control
(MULTI
SOURCE)
[17]
Classified
Memory
Buttons
“4
(CLASS-A
to
CLASS-F)
[12]
(BALANCE)
(11)
Recording
Out
Button
(REC
OUT)
[13,
14]
Tuning
Selector
Buttons
|
Treble
Control
Knob
(OOWN,
UP)
[12]
(TREBLE)
{11}
Headphone
Jack
(PHONES)
Base
Corkrol
Kadi:
(BASS)
[11]
MR
Off
Button
(fT
OFF)
input
Selector
Buttons:
and
indicator
[17]
‘Audio
Selectors
(CD,
PHONO,
FM,
AM,
‘Selective
Tone
TAPE-1,
TAPE-2
MONITOR)
Control
Button
———~
Video
Selectors
(VIDEO-1
VDP/CDV,
VIDEO-2
VCR,
(SELECTIVE
TONE)
[11]
VIDEO-3
VCR)
[11]
Display
and
indicators
Audio
Muting
Indicator
‘Speaker
Selector
Indicators
‘Selective
Tone
Control
Indicator
FM
Muting
On/ort
Indicator
Memory
indicator
Video
input
Selector
Indicators
Sleep
Indicator
Surround
Mode
FM
Stereo
Indicator
Indicators
aa
‘Tuned
indicator
‘Tape-2
Monitor
indicator
Recording
Out/Multi
Multi
Function
Dispiay
Source
Indicators
Preset
Station/Sleep
Timar/
‘Multi
Source
Volume
Level
Multi
Function
Display
Delay
Time/Center,
Rear
Volume
Level
Frequency/input
Selector/Each
mode
abs:

Remote
control
transmitter
RC-252S
Power
Button
(POWER)
——
Input
Selector
Buttons
(CD.
PHONO,
TUNER,
VIDEO-1, VIDEO-2,
VIDEO-3,
TAPE-1,
TAPE-2)
+
When
the
TUNER
button
is
pressed,
the
station
which
was
received
previously
is
recalled.
Selection
of
AM
or
FM
should
be
done
on
the
main
unit.
Sleep
button
(SLEEP)
(Remote
control
transmitter
only)
Press
to
set
the
power
off
timer.
The
sleep
timer
is
a
function
which
button
off
the
power
to
the
sysiem
from
the
time
it
is
set.
When
this
button
is
pressed,
"80
MIN"
is
displayed
for
5
seconds,
and
the
power
goes
off
90
rrinules
later,
Each
time
the
button
is
pressed
during
§
seconds,
the
limer
setting
changes,
by
10
minute
intervals,
such
as
80, 70,
60
...,
While
the
sleep
timer
is
operating,
the
[SLEEP]
indicator
is
lit.
If
the
sleep
button
is
pressed
during
this
time,
the
amount
of
time
remaining
on
the
slosp
timer
\s
displayed,
and
il
the
button
is
pressed
during
that
display.
10
minutes
will
be
subtracted
from
that
time.
Ii
the
button
is
pressed
when
the
panel
display
shows
10
minutes
or
less,
the
sleep
timer
is
cancelled,
and
the
power
is
not
turned
ott
b
Speaker
Selector
Butions
(SPEAKERS
MAIN/REMOTE)
‘Multi
Source
Button
(MULT!
SOURCE)
Multi
Source
Level
Up/Down
Buttons
CD
Operation
Buttons
(CD)
(MULTI
SOURCE
UP/DOWN)
These
buttons
are
used
to
operate
an
These
buttoris
can
be
used
to
adjust
the
level
of
ONKYO
CD
piayer
with
ihe
FI
Mark.
tha
speakers
connected
to
the
‘AEMOTE"
=:
Press
this
button
to
play
the
CD
player.
speaker
terminals
(perhaps
in
another
room)
IE
Press
this
button
to
pause
the
CD
play
when
the
MULTI
SOURCE
mode
is
selected
(Ihe
back.
To
resume
disc
play,
press
the
MULT
SOURCE]
indicator
is
iit),
When
one
of
PLAY
button
the
buttons
is
pressed
in
the
Mult
Source
modo
DISC
:
Press
to
use
for
sequential
selection
of
the
display
shows
the
level
for
wo
seconds.
The
discs
in
the
order
they
were
loaded
on
indication
for
the
Sub
Room
output
lovel
ranges
the
CD
changer.
from
the
minimum
of
(--
09
GB),
-78,
-77
..-1
Press
this
button
to
stop
the
CD
player.
fo
the
maximum
of
(0.
dB).
Indications
include
we
Press
this
button
to
go
back
to
the
MUL
TF
for
multi
source
level,
These
level
set-
beginning
of
the
current
track
and
again
tings
can
be
memorized.
to
skip
back
to
the
previous
track.
bei
Press
this
butlon
to
skip
to
the
nex!
sThinat-Operatn
autions
CRUNK
face
i
=
CLASS.
Class
selector
button
ooo
|a\S
PRESET
UP/DOWN:
Preset
memory
DOWN/
og
|
a
UP
buttons
——
“
am
|
Test
Tone
Button
(TEST)
Saarale
I
a
—
Operation
Buttons
(DECK-A,
DECK-B)
felts:
peralae:
han:
{Dolly
(Efe.
Tope
:
pig
7
These
buttons
control
ONKYO
double
cassette
Surround
mode
has
been
selected
as
the
cic
tape
decks
that
can
be
remote
contiolled.
Use
peice
&
oeuare
set
Pala
eee
the
DECK-B
bultons
to
control
single
cassette
uc
ih
order
tape
decks
with
the
FE
mark.
levels
used
by
the
Front.
Center,
and
Rear
ON
ue
tet
)
Gite
{Wien
ie
letpressed,
he
racordtha
speakers,
Please
follow
the
procedure
described
above
to
do
this
matching,
Press
the
TEST
button
again
after
tinishing
adjustment
stand-by
mode
is
entered,
The
tape
plays,
moving
trom
nght
to
left,
or,
in
the
recording
siand-by
mode,
recording
begins
Interrupts
all
operations,
The
tape
plays,
moving
from
left
to
-_
‘Surround
Mode
Button
(SURROUND
MODE)
Gelay
Time
Button
(DELAY
TIME)
7
Center
Level
Up/Down
Buttons
(CENTER
LEVEL
UP/DOWN)
——
Rear
Level
Up/Down
Buttons
(REAR
LEVEL
UP/DOWM)
These
buttons
are
used
to
adjust
the
volume
in
the
Surround
mode.
When
one
of
the
buttons
is
pressed
in
the
Surround
mode,
the
display
shows
the
level
for
two
seconds.
For
the
Surround
mode,
the
indication
for
the
center
or
rear
ranges
from
the
minimum
of
(--
0¢
4B), -60,
-40
..0,
+1,
...
to
the
maximum
ot
(+12
dB).
In
the
DOLBY
PRO
LOGIC
and
HALL
modes,
different
values
can
be
stored.
~10-
fight,
of,
in
the
recording
stand-by
mode,
recording
begins.
Fast
forward
from
right
to
teft,
Fast
forward
from
left
to
right
44a
Audio
Muting
Button
(MUTING)
This
buttcn
temporarily
switches
off
the
sound
from
the
speaker
or
headphone.
Pressing
this
button
will
operate
the
TX-
SV515PRO
audio
muting
circuit.
The
audio
muting
indicator
*MUTING’
will
flash,
Pressing
the
button
again
or
using
the
POWER
button
on
the
remote
contro!
transmitter
to
turn
the
power
on
will
turn
off
the
audio
muting.
*
Pressing
this
button
Goes
not
mute
the
sound
of
the
multi
source,
Press
the
SPEAKERS
REMOTE
button
to
mute
the
sound
of
the
multi
source
Volume
Buttons
(VOLUME
UP/DOWN)

Operations
To
listen
to
your
favorite
Source
)
POWER
@)
SPEAKERS
and
HEADPHONES
()
MASTER
VOLUME
©
The
button
pressed
is
shown
in
display.
For
FM
or
AM,
the
band
and
the
frequency
are
shown
in
display.
©
Confirm
that
the
TAPE-2
MONITOR
indicator
is
off
wien
a
source
other
than
the
TAPE-2
has
been
selected.
Also
check
the
audio
muting
is
off.
@
Sian
play
of
the
selected
input
source.
®
Follow
the
operating
instructions
of
that
unit
©
If
FM
or
AM
Is
selected,
please
rofer
to
the
section
“Tuner
Reception”
@
Adjust
the
MASTER
VOLUME
Control
knob
to
the
appropriate
level
@
Adjust
the
Tone
Controls
to
oblain
the
desired
tone
setting,
NOTE;
@)
Input
Selector
Buttons
®
Starting
Source
Selected
in
@®
6)
Tone
Controls
(7)
Press
the
POWER
button
to
tun
on
the
power,
®
Press
the
MAIN
button
of
the
speaker
selector
buttons.
The
[MAIN]
indicator
will
be
lit.
When
using
headphones,
use
the
jack
located
under
the
MR
OFF
button,
Stereo
headphones
with
a
standard
binaural
plug
can
be
connected
here
(Sound
from
the
front
MAIN
speakers
is
output.)
The
sound
from
the
headphones
in
the
Surround
Mode
May
be
different
from
that
which
is
obtained
from
speakers.
The
sound
in
the
headphones
may
seom
relatively
far-away.
@
Press
one
of
the
desired
Input
Selector
button
(CD,
PHONO,
FM,
AM,
TAPE-1,
TAPE-2
MONITOR,
VIDEO-1,
2,
3)
Make
sure
thal
the
connections
between
the
input
sources
are
correct
Atter
selecting
VIDEO-1
or
VIDEO-2,
or
VIDEO-3
you
can
play
the
images
of
the
selected
video
source
while
listening
to
the
sound
of
another
source.
(CD,
TUNER,
PHONO,
TAPE-1
or
2)
In
such
case,
the
setting
of
the
video
selector
button
is
indl-
cated
by
the
lit
video
input
selector
indicator.
Memory
Preservation
This
unit
does
not
require
memory
preservation
batteries.
A
built
in
memory
power
back-up
system
preserves
the
contents
of
the
memory
during
power
failures
and
even
when
the
unit
is
unplugged.
The
unit
must
be
plugged
in
in
order
to
charge
the
back-up
system.
The
memory
preservation
petiod
after
the
unit
has
been
unplugged
varies
depending
on
climate
and
placement
of
the
unit.
On
the
average,
memory
contents
are
projected
over
a
period
of
a
few
weeks
after
the
last
time
the
unit
has
been
unplugged.
This
period
is
shorter
when
the
uni
is
exposed
1
a
highly
humid
climate
Explanation
of
the
buttons
1
Power
button
(POWER)
and
Siand-by/Received
indicator
‘The
Stand-by/Recewed
indicator
comes
on
whan
the
AC
power
cord
for
this
unit
has
been
inserted
in
an
outlet.
This
indicates
that
the
TX-SV51SPRO
is
standing
by
ter
operation.
Pressing
the
POWER
button
or
remote
control
POWER
button,
the
main
unit
will
come
on,
and
power
will
ba
supplied
from
the
AC
autlet
to
the
rear
panel,
This
indicator
then
goes
off.
The
indicator
also
lights
whena
signal
is
received
trom
the
remote
control
unit,
Speaker
Selector
butions
(SPEAKERS
MAIN/REMOTE)
and
indicators
You
can
operate
the
SPEAKER
SELECTOR
trom
the
front
panel
or
with
the
remote
control.
When
the
MAIN
and/or
REMOTE
is
ON,
the
MAIN,
REMOTE
of
the
SPEAKER
indicator
will
be
lit,
@
MAIN
speakers
button;
The
front
speakers
connected
to
the
“MAIN”
speaker
terminals
and
the
speakers
connected
to
the
“CENTER,
and
"REAR"
speaker
terminals
can
al
be
switched
on
or
off
at
the
same
time.
©
HEMOTE
speakers
button:
The
source
you
selected
using
the
MULTI
SOURCE
will
be
output
from
the
REMOTE
speakers.
When
you
select
the
MULTI
SOURCE
mode,
the
MULTI
SOURCE]
indi-
cator
will
be
Jit,
then
you
can
switch
the
speakers
oonnected
to
the
“REMOTE”
speaker
terminals
on
or
off.
However,
they
cannot
be
tuned
on
ina
mode
other
than
the
Multi
Source
mode.
When
the
REC
OUT
mode
is
selected,
or
during
surround
play-
back,
these
speakers
will
be
automatically
switched
off
'S
Master
Volume
Contro!
Knob
(MASTER VOLUME)
Use
the
MASTER
VOLUME
control
knob
to
adjust
the
volume
of
the
front
main,
center
and
rear
(surround)
speakers,
at
the
same
time.
Turn
clockwise
to
incr2ase
the
volume
level.
The
volume
can
be
adjusted
manually
and
by
the
remote
control
transmitter's
VOLUME
UP/DOWN
buttons.
The
MASTER
VOLUME
control
knob
rotates
when
the
volume
is
adjusted
by
remote
control.
When
you
adjust
the
volume
with
the
remote
control
check
the
‘evel
by
looking
at
the
indicator
on
the
knob
as
it
rotates.
For
fine
adjustment
of
center
and
rear
speaker
volume
in
comparison
to
front
speaker
volume,
use
the
remote
Control
transmitters
CEN-
TER
LEVEL
UP/DOWN
or
REAR
LEVEL
UP/DOWN
buttons
You
can
adjust
the
level
of
the
REMOTE
speakers
by
using
the
‘only
UP/DOWN
buttons
of
the
MULT]
SOURCE
LEVEL
on
the
remote
control.
Tone
and
Balance
Controls.
®
Bass
Control
Knob
(BASS)
Adjust
to
strengthen
or
weaken
bass
response.
(Not
effective
tor
the
center,
rear
speakers
and
multi
source
signal.)
Treble
Control
Knob
(TREBLE)
Adjust
to
strengthen
or
weaken
treble
response.
(Not
effective
for
the
center,
rear
speakers
and
multi
source
signal.)
*
TREBLE
and
BASS
are
effective
for
the
Land
R
of
the
front
Speakers,
The
best
effect
trom
DOLBY
PRO
LOGIC
SUR-
ROUND
can
be
obtained
when
equal
settings
are
used
for
the
sound
from
the
UR
front
speakers
and
tha
sound
from
the
center
speaker
for
the
middie
and
treble
ranges.
@
Balance
Control
Knob
(BALANCE)
Use
the
Balance
Control
Knob
(BALANCE)
to
adjust
the
relative
volume
levels
of
the
left
and
right
of
MAIN
speaker
systems.
This
adjusts
the
relative
volume
level
of
the
front
MAIN
speaker
sys-
tems,
@
Selective
Tone
Control
button
(SELECTIVE
TONE)
and
indi-
cator
Switching
on
this
button
lights
up
the
indicator
and
creates
a
clear
reproduction
quality
of
the
ultra
low
frequencies
and
high
frequencies.
(Not
effective
for
the
rear
speakers
and
multi
source
signal.)

Tuner
Reception
Press
the
FM
or
AM
Input
Selector
button
and
make
sure
thal
the
TTAPE-2
MONITOR
indicator
is
off
and
audio
muting
is
off.
1
Tuning
with
the
TUNING
buttons
TUNING
DOWN
upe
To
tune
In
an
FM
or
AM
station
not
stored
in
the
memory,
press
one
of
the
Tuning
selector
buttons.
If
you
press
UP,
the
frequency
Is
Increased.
Pressing
DOWN
decreases,
Note
that
the
fre-
quoncy
is
changed
in
SOkHz
stops
in
FM
and
10(9)kHz
stops
in
AM
when
the
Tuning
selector
button
is
pressed
in
single
steps.
If
this
button
is
pressed
continuously
tor
more
than
0.5
seconds,
the
auto
tuning
mode
is
entered,
and
frequencies
are
scanned
automatically.
When
a
broadcast
signal
is
received.
scanning
stops
and
that
frequency
is
displayed.
I!
a
different
frequency
Is
desired,
press
the
button
once
again.
@
Scanning
will
not
stop
for
broadcasts
weak
enough
to
be
sup-
pressed
by
the
muting
circuit.
To
receive
a
weak
FM
broad-
cast,
set
the
MUTE/MODE
button
to
the
OFF
position
and
select
the
frequency
of
the
desired
broadcast
station.
@
Receiving
a
station
by
inputting
the
frequency
for
the
sta-
tion
directly
(Direct
Tuning)
If
the
frequency
for
the
desired
station
Is
known,
Input
the
fre-
quency
number
directly.
@
Number
Buttons
o
,
i
000
J
@
FM,
ees)
@)
DIRECT
TUNING
(1)
Press
the
AM
or
FM
button
of
the
Input
selector
buttons.
(2)
Press
the
DIRECT
TUNING
button.
_
@
"will
flash
for
16
seconds
in
the
Frequency
display,
@
Input
the
desired
fraquency
number
by
using
the
Number
but-
fons
while
the
cursors
are
flashing.
For
instance,
it
you
wish
to
receive
the
station
of
88.10MHz,
pross
the
Number
but-
tons,
8,
8,
1
and
0.
©
When
receiving
AM
broadcast
with
a
9kHz
step,
use
the
same
procedure
as
described
in
step
(3)
above.
With
10kHz
stops,
inputting
a
number
fo
the
10kHz
digit
will
set
the
1kHz
digit
automatically
to
0.
‘@
If
the
desired
frequency
set
in
this
operation
does
not
exist,
the
frequency
which
is
the
nearest
and
lower
than
the
desired
frequency
will
be
received.
If
the
frequency
set
Is
not
in
the
receive
frequency
range,
the
frequency
flashes
for
two
seconds
and
then
the
previous
frequency
will
be
displayed.
‘®
If
a
wrong
frequency
has
been
set,
press
the
DIRECT
TUNING
button
and
start
again.
How
to
use
the
FM
Muting/Mode
button
(MUTE/MODE)
Inthe
Muting
ON
(STEREO)
selting,
FM
stereo
reception
is
pos-
sible
and
the
muting
circuit
suppresses
interstation
noise
and
weak
FM
stations,
In
the
OFF
(MONO)
setting,
interstation
noise
will
be
heard
and
even
weak
FM
stations
can
be
received.
(Mut-
ing/Mode
operation
is
eftective
for
only
FM
reception.)
MEMORY
—
FM
MUTE/MODE.
\—
ERASE
—
©
The
Stereo
indicator
will
light
up
if
the
broadcast
is
being
received
in
stereo.
The
Stereo
indicator
will
not
light
up
if
the
broadcast
is
monaural
or
too
weak
to
be
received
in
Stereo.
Classified
Memory
Function
The
memory
can
be
divided
(classified)
for
different
users
or
pro-
grams
of
stations.
NOTE:
‘There
are
times
when
frequencies
are
lett
in
the
machine's
mem-
‘ory
from
the
final
testing
done
prior
to
shipment.
if
this
is
the
case
with
your
TX-SV515PRO,
cancel
unnecessary
preset
sta-
tions
according
to
"How
to
cancel
memorized
stations”
and
memorize
desired
frequencies.
1H
How
to
classify
stations
With
this
model,
six
classes
(CLASS
A
to
F)
are
available
and
stations
can
be
memorized
in
any
class,
A
total
of
40
stations
can
be
memorized
in
classes
from
A
to
F.
Although
the
same
sta-
tion
can
be
memorized
in
different
classes,
the
memory
number
tor
the
station
will
differ
depending
on
the
order
in
which
the
sta-
tion
is
memorized
in
the
classes.
(1)
Tune
in
the
desired
station
(see
section
on
“Tuner
Recep-
tion’).
(2)
Press
the
MEMORY
button,
@
The
MEMORY
indicator
will
flash
for
8
seconds.
(3)
Press
the
desired
Classified
Memory
button
(one
of
buttons
A
toF).
.
The
siation
is
memorized
in
the
selected
class
with
the
memory
number
which
is
the
smallest
of
the
unoccupied
numbers
in
the
class.
By
repeating
the
operations
above,
up
to
40
stations
can
be
memorized.
it
an
attempt
is
made
to
memorize
41
slations
or
more,
"FULL"
will
be
displayed
indicating
that
no
more
stations
can
be
memorized.
How
to
cancel
memorized
stations
Retrieve
the
class
number
you
want
to
cancel
(see
“How
to
retrieve
memorized
stations")
and
then
press
the
MUTE/MODE
button
while
holding
down
the
MEMORY
button.
Another
station
can
be
memorized
with
the
memory
number
which
has
been
cancelled.
MEMORY
=
FM
MUTE/MODE
es
5

@
How
to
retrieve
memorized
stations
(@)
Press
the
Classified
Memory
button
for
the
desired
class.
It
remote
control
is
used,
the
class
next
to
the
present
one
is
retrieved
when
the
CLASS
button
is
pressed.
@
The
memory
number
(station)
which
was
being
received
before
the
olass
is
retrieved
will
be
received.
(2)
There
are
several
methods
to
proceed
after
the
above
opera-
tions
are
carried
out.
Use
any
of
the
following
methods.
a.
Pressing
the
same
Classified
Memory
button
again
per-
mits the
nex!
preset
memory
number
(station)
to
be*
received.
'b,
Input
the
memory
number
you
wish
to
receive
by
using
the
Number
buttons.
@
ifthe
memory
number
consists
of
2
digits,
input
two
num
bers,
immediately
one
after
the
other.
For
instance,
when
inputting
"15",
“15”
will
not
be
registered
if
you
wait
more
than
one
second
before
inputting
“5”,
resulting
in
only
“1
being
registered.
©
if
a
number
other
than
a
number
trom
1
to
40,
or
a
number
which
has
not
been
memorized
's
input,
the
number
flashes
for
2
seconds
and
then
the
number
which
was
dis
played
before
will
be
displayed.
©
Ita
number
between
t
and
4
Is
pressed,
the
display
and
station
are
changed
1
second
later,
©.
Press
the
CLASSIFIED
SCAN
button
@
Stations
memorized
in
the
present
ciass
will
be
scanned
in
a
order
and
the
corresponding
memory
number
will
flash
in
the
Preset
station
display
at
each
scan.
After
the
iast
memory
number
of
the
class
is
reached,
scanning
starts
again
from
the
first
memory
number
of
the
class,
Pressing
the
CLASSIFIED
SCAN
button
again
stops
scanning.
d.
When
the
PRESET
UP
or
COWN
button
of
the
remote
controller
is
pressed,
the
memory
number
of
the
class
cur-
rently
being
received
will
be
incremented
or
decremented.
Keeping
pressing
the
button
increments
or
decrements
continuously.
After
the
maximum
or
minimum
number
is
reached,
the
next
class
or
one
before
the
present
class
will
be
entered.
Tape
Recording
With
the
TX-SV515PRO
you
can
pertorm
recording
while
listening
to
the
sound
of
another
source
through
speakers
or
headphones;
Make
all
connections
between
the
tape
deck
and
the
unit
as
shown
in
the
System
Connections
diagram,
@
When
recording
a
tape
while
the
multiple
room
remote
control
is
connected,
turn
on
ITFR
OFF
(the
MR
OFF
indicator
will
light)
to
disable
remote
control
operation
from
other
rooms.
™
Recording
and
dubbing
to
a
tape
deck
connected
to
TAPE-1
(When
recording
the
source
you
are
listening
to)
(@@)
REc
out
Source
required
Source
selected
in
(1)
@
Starting
tape
@
Starting
deck
recording
Bouts
selected
in
(1)
@pr
ress
ine
input
selector
bution
to
select
the
source
to
be
recorded.
(Other
than
TAPE-1)
Op
ress
the
REC
OUT
button.
on
the
display
flashes
for
8
seconds.
®
Press
the
REC
OUT
button
again
while
the
[REC
OUT
Indica-
tor
is
Hashing
Os
REC
OUT)
and
[SOURCE]
will
light,
and
the
indication
of
the
source
selected
by
the
Input
selector
button
will
be
marked
with
a
red
frame.
tart
the
device
selected
in
stop
(i),
while
setting
the
tape
deck
connected
fo
TAPE-1
to
recording
mode.
Set
the
proper
recording
level
using
the
controls
on
the
tape
deck
used
for
recording.
Never
change
the
positions
of
any
controls
(bass,
treble,
etc.)
on
this
unit
during
recording
and
dubbing
operations.
NOTES:
Pressing
the
\nput
selector
button
during
recording
will
change
the
source
being
recorded,
When
the
TAPE-2
MONITOR
indicator
is
on,
only
TAPE-2
can
be
recorded
and
if
the
input
selector
is
changed,
the
red
frame
of
TAPE-2
will
not
change.

(When
recording
a
source
diferent
from
the
one
you
are
listening
to)
(o)
Bross
the
REC OUT
button,
[REC
OUT
on
the
display
will
flash
for
8
seconds.
®
Press
he
input
selector
button
for
the
source
to
be
recorded
while
the
[REC
OUT>
indicator
is
flashing.
(Otner
than
TAPE-1)
©
[REC
OUT)
will
light
and
the
indication
of
the
source
selected
willbe
marked
with
a
red
frame.
This
source
will
be
output
irom
the
REC
OUT
jacks
of
TAPE-1,
VIDEO-2
or
VIDEO-3.
The
source
you
are
listening
to
does
not
change.
(@
Start
the
source
device
selected
in
step
(2),
and
start
recording
‘on
the
tape
deck
connected
to
TAPE-1
NOTE:
@
REC
OUT
@
Source
required
@
If
FMor
AM
|s
selected
on
the
tuner
(as
described
in
step
(2)
above)
and
the
input
selector
is
set
to
Something
other
than
‘Tape
Deck
Source
selected
in
2)
TUNER,
the
tuner's
frequency
and
class
displays
will
be
shown
for
5
seconds,
During
this
time
a
tuner
preset
station
@
Starting
tape
@&
Starting
can
be
selected.
deck
recording
Source
selected
in
(2)
I
Recording
and
dubbing
to
a
tape
deck
connected
to
TAPE-2
(1)
Press
the
input
selector
button
of
the
source
to
be
recorded.
(Other
than
TAPE-2)
2)
Put
a
blank
tape
in
TAPE-2.
ss
Start
playing
back
the
device
selected
in
step
(1),
and
start
@
Source
required
recording
on
TAPE-2.
@
When
the
TAPE-2
MONITOR
button
is
in
the
OFF
position,
the
source
signals
can
be
monitored
through
the
speakers
or
the
headphones.
It
tape
dack
2
has
thres
heads,
the
just-
recorded
signals
can
be
monitored
(when
the
TAPE-2
MONI-
TOR
button
is
in
the
ON
position).
Reter
to
the
tape
deck
instruction
manuals
for
more
details.
@
Sot
the
recording
‘evel
using
the
controls
on
the
tape
deck
used
for
recording.
Never
change
the
positions
of
any
con-
frols
(bass,
treble,
etc.)
on
this
unit
during
recording
and
dub-
bing
operations,
co
oo
=
°
Source
selected
in
(1)
Tape
Deck
@
Start
playback
@
Insert
blank
Tape
@
Start
recording
ing
the
Graphic
Equalizer
@)
Connect
the
graphic
equalizer
to
the
TAPE-2
jacks
on
the
rear
panel
@
fa
second
tape
deck
is
used,
connect
it
to
the
tape
jacks
on
the
graphic
equalizer.
(@
Press
the
TAPE-2
MONITOR
bution.
‘®
Follow
the
graphic
equalizer
operating
instructions,
@
To
rocord
an
equalized
signal,
use
tape
deck
2
(connected
to
the
equalizer)
for
recording
a

VCR
recording
Data
can
be
recorded
from
Video
Disc
Players,
Video
camcorders,
and
Video
Casette
Recorders
to
Video
Cassette
recorders
connected
to
VIDEO-2,
3.
Connect
the
VCR
to
VIDEO-2,
and/or
VIDEO-3.
(When
recording
the
source
being
played
back)
@
@
Rec
out
co
o
1)
Source
required
fi
cle
°
Source
selected
in
(1)
@
Starting
Source
selected
in
VCR
(VIDEO-2
and/or
VIDEO-3)
@
Staning
VCR
recording
(When
recording
a
source
different
‘rom
the
one
being
played
back)
@
REC
ouT
@
Source
required
‘Source
salected
In
(2)
VCR
(VIDEO-2
and/or
VIDEO-3)
@©
Starting
@
Starting
VCR
Source
selected
recording
in@)
Mixing
video
and
audio
for
VCR
recording
(Press
the
input
Selector
button
to
select
the
video
equipment
(VIDEO-1,
2,
3)
to
be
used
when
playing
the
video.Press
the
REC/PAUSE
button
on
the
VCR
(VIDEO-2
or
3)
that
will
be
doing
the
recording,
@Press
the
REC
OUT
bution
and
Inpul
Selector
button
(CD,
PHONO,
FM,
AM,
TAPE-1,
TAPE-2)
to
select
the
audio
source.
©
The
picture
will
be
loft
as
is.
Only
the
audio
will
be
changed,
3)
Start
operation
of
the
equipment.
(The
picture
will
be
recarded
from
the
video
source,
ant
the
sound
from
the
audio
source
Select
the
source
to
be
recorded
with
the
input
selector
button.
2
reas
the
REC
OUT
button.
[REC
OUT)
on
the
display
will
flash
for
8
seconds.
®
Press
the
REC
OUT
button
again
while
the
[REC
OUT
is
flash-
ing.
e@
[(RECOUT
and
[SOURCE]
will
light
and
the
source
selected
with
the
input
selector
will
be
marked
with
a
red
frame.
@
Start
the
source
selected
in
stap
(D,
and
start
recording
the
VCR
connected
to
VIDEO-2
and/or
VIDEO-3
®
Press
REC
OUT
button,
[REC
OUT)
OUT)
on
the
display
will
fash
for
8
seconds,
®
Pres
the
Inpul
selector
button
of
the
source
to
be
recorded
while
he
[REC
OUT)
indicator
is
flashing
©
[REC
OLT)
wiilllight,
and
the
source
selected
will
be
marked
with
a
red
frame.
@
Start
the
source
selected
in
step
@),
and
star!
recording
the
VCR
connected
to
VIDEO-2
and/or
VIDEO-3.
-15-

Use
of
Surround
mode
_
1
Surround
Mode
button
(SURROUND
MODE)
and
indicators
Use
this
button
in
conjunction
with
the
sound
source
being
repio-
duced,
This
will
rotate
one
step
at
a
time
through
the
following
pattern
each
time
this
button
is
pressed.
(DOLBY
PROLOGIC
-»
HALL
~»
OFF
(Bypass)
—
DOLBY
PRO
LOGIG
When
the
sound
source
features
the
DOLBY
SURROUND
trademark,
HALL
+
Create
a
concert-nall
effect.
OFF
(Bypass)
When
you
are
not
using
surround
sound.
When
this
Is
pressed,
no
sound
Is
produced
trom
the
center
and
rear
(surround)
speakers.
These
modes
can
be
changed
with
the
remote
control
transmit-
ter
by
using
the
SURROUND
MODE
button
©
When
you
press
and
hold
down
the
SURROUND
MODE
but-
ton,
the
name
of
each
mode
will
be
shown
on
the
display
for
2
seconds
in
turn.
7
@
In
the
SURROUND
MODE
each
selected
source
along
with
the
Input
selector
source
is
automatically
stored,
and
conse-
quently
recalled
when
that
input
selector
source
is
selected,
*
When
the
SURROUND
MODE
js
set
to
HALL,
the
center
‘Speaker
does
not
produce
sounds.
Delay
Time
button
(DELAY
TIME
-f+)
and
Indicator
You
can
change
the
delay
time
for
the
sound
from
the
rear
(sur~
round)
speakers.
Pressing
this
button
changes
the
delay
time
every
5
msec
during
@
period
of
15
to
30
msec
in
Dolby
Pro
Logic.
and
Hall
surround.
@
When
you
press
and
hold
down
the
DELAY
TIME
button,
“DELAY”
and
the
dalay
time
will
be
shown
for
3
seconds
on
the
display,
Dolby
Surround
delay
lime
is
specitied
at
20msec.
It
is
recom:
mended
that
inital
Dolby
Surround
delay
be
set
at
20msec,
and
adjustment
to
either
15
or
30
1s
possible
via
the
control.
By
adjusting
the
delay
time,
and
carefully
adjusting
Master
Volume
Level,
Center
Volume
Level
and
Rear
Volume
Level,
the
appar
ent
acoustic
size
of
your
listening
room
can
be
enlarged
or
reduced
Adjustable
delay
time
allows
you
to
tailor
the
acoustic
size
of
your
listening
environment
to
match
the
sonic
characteris:
tics
of
the
audio
program.
Use
a
longer
delay
for
larger
acoustic
‘spaces,
such
as
concert
halls,
cathedrals,
eto.
Use
a
shorter
delay
to
simulate
the
size
of
a
small
club
or
cabarel.
Respective
delay
limes
can
be
memorized
for
DOLBY
PRO
LOGIC
and
HALL
This
operation
can
also
be
pertormed
using
the
delay
time
button
of
the
remote
control
transmitter,
NOTE:
Z
1!
you
are
in
surround
mods
and
change
the
delay
time,
but
the
fear
(surround)
speakers
are
not
connected,
nothing
will
happen
However,
even
under
these
conditions,
each
time
Ihe
delay
time
button
and
surround
mode
button
are
pressed,
front
speaker
muting
will
occur
and
sound
will
disappear
momentarily,
This
1s
|
nota
malfunction
®
Center
Mode
button
and
indicator
(CENTER
MODE)
Use
this
button
setting
according
to
the
size
of
the
center
speaker
for
the
Dolby
Pro
Logic
Surround
NORMAL
;
Use
this
setting
when
a
small
enclosure
center
‘speaker
ts
ullized
WIDE
BAND
©
Use
this
setting
when
a
speaker
similar
to
the
left
and
right
stereo
speakers
is
utilized.
PHANTOM
;
When
a
center
speaker
is
not
present.
©
When
you
press
and
hold
down
the
CENTER
MODE
button,
the
name
of
each
mode
will
be
shown
on
the
display
for
3
seconds
jn
turn
—16
Adjusting
the
Dolby
Pro
Logic
Surround
Level
All
the
operations
can
be
controlled
by
the
remote
control
trans+
miter.
Functions
No}
(4)
to
(6)
are
operated
only
by
the
remote
‘control
transmitter.
\D
Select
a
source
encoded
with
Dolby
Surround.
(2)
Use
the
SURROUND
MODE
bution
to
select
Dolby
Surround
mode.
(@
Next,
use
the
MASTER
VOLUME
to
set
the
volume
to
the
desired
listening
position
(4)
Press
the
TEST
butten
on
the
remote
control
transmitter
©
“TES
T™
will
appear
on
the
display,
and
pink
noise
will
bo
output
for
1.5
seconds
from
each
of
the
Lat,
Genter,
Right,
and
Rear
(in
that
orden)
speakers.
When
the
center
mode
is
PHANTOM,
this
will
be
output
in
the
following
order:
Lett,
Lett
+
Right,
Right.
and
Rear
(S)
Use
the
remote
control
CENTER
LEVEL
UP/DOWN
button
to.
adjust
the
volume
of
the
center
speaker,
and
REAR
LEVEL
UP/DOWN
button
to
adjust
the
volume
of
the
rear
speakers.
Set
the
front,
rear,
and
center
speakers
to
the
same
volume.
(©)
Press
the
TEST
button
to
cancel
the
pink
noise

Listening
to
devices
connected
to
the
TX-SV515PRO
in
another
room
@
TX-SV515PRO
allows
you
to
listen
to
the
desired
performance
in
another
room
(sub
room)
while
listening
to
the
playback
of
a
device
located
in
the
main
room.
To
do
this,
connect
the
speakers
in
another
room
to
the
FRONT
SPEAKERS
REMOTE
terminals
on
the
TX-SV515PRO,
@
Remote
control
from
another
room
can
be
done
by
employing
the
ONKYO
multiple
room
remote
system
(412).
Refer
to
the
connections
for
multiple
room
remote
control,
Be
sure
to
operate
the
remote
control
unit
directing
to
the
remote
sensor
unit
HR-10,
©
The
following
steps
(except
step
(1)
)
can
be
performad
using
the
ramote
control
unit.
It
is
recommended
that
the
adjustments
described
below
be
done
in
the
main
room
in
advance,
sinc
play
of
the
TX-SV5152RO.
(@
MR
OFF
@)
MULTI
SOURCE
=
‘o)
Source
required
®
Speaker
Selector
REMOTE
(@)
MULTI
SOURCE
UP/DOWN
NOTES:
@
The
surround
mode
will
be
turned
OFF
(Bypass)
when
MULT!
SOURCE
is
used.
©
The
source
indicated
by
the
input
selector
will
be
output
from
the
TAPE-!
and
2,
and
VIDEO-2
and
3
REG
OUT
terminals.
©
Press
the
REC
OUT
button
to
change
the
MULT]
SOURCE
mode
to
the
Surround
mode
or
REG
QUT
selector
modes.
is
not
possible
to
operate
the
remote
control
unit
in
another
room
while
watching
the
dis-
Make
sure
that
recording
is
not
being
carried
out
before
setting
the
TX-SV51SPRO.
()
Turn
the
MR
OFF
button
OFF
(
IMR
indicator
is
tured
off.)
@)
Press
the
MULT]
SOURCE
bution,
©
[REC
OUT
indicator
will
be
turned
off
and
the
indicator
will
flash
for
8
seconds
@
While
this
is
flashing,
use
the
input
selector
button
to
select
the
desired
source.
e
will
light
and
the
selected
source
will
be
marked
with
a
red
frame.
©
If
tuner
is
selected
with
MULT!
SOURCE
and
the
input
selec-
tor
is
set
to
something
other
than
TUNER,
the
tuner's
fre-
queney
and
class
displays
will
be
shown
for
5
seconds.
During
this
time
a
tuner
preset
station
can
be
selected.
@
Adjust
the
level
using
the
MULTI
SOURCE
UP/DOWN
buttons
of
the
remote
control
transmitter.
©
MULTI
and
the
level
will
be
indicated
on
the
display.
It
is
recommended
that
the
Jevel
be
set
lower
in
advance
in
the
main
room
(~78
16
-76d8),
@
Press
the
REMOTE
button
of
the
SPEAKERS
to
illuminate
the
REMOTE]
indicator.
©
Press
the
MAIN
button
to
turn
off
the
[MAIN]
Indicator
if
you
ate
not
listening
the
sound
in
the
main
room
When
changing
the
source,
be
sure
to
press
the
MULTI
SOURCE
button
before
pressing
the
input
selector
button.
Pressing
the
input
selector
button
without
first
pressing
the
MULTI
SOURCE
button
will
change
the
source
in
the
main
room.
MR
Off
button
(MR
OFF)
and
indicator
Use
this
button
for
tape recording
or
for
the
surround
sound
modes.
It
is
used
to
disable
control
of
the
ONKYO
MR
system
via
the
remote
control
unit
in
another
room.
Pressing
this
button
‘will
iIluminate
the
indicator,
and
control
from
another
room
will
be
disabled,
Pressing
the
button
again
will
turn
the
indicator
off,
and
‘control
from
another
room
will
be
enabled,
NOTES:
©
If
the
multi
source
is
selected,
the
MR
OFF
automatically
turned
OFF.
©
It
the
multi
source
is
selected
for
REC
OUT,
and
the
SUR-
ROUND
MODE
key
is
selected,
the
MR
OFF
automatically
turned
OFF.
@
You
can use
the
remote
control.
transmitter
supplied
with
this
‘Tuner
Amplifier
to
operate
the
source
devices
selected
for
the
multi
source
if
they
are
an
ONKYO
CD
or
cassette
deck
bearing
the
RI
mark,
@
There
is
a
remote
control
unit
RC-MA1H
for
the
sub
room,
which
is
sold
separately.
@
Installment
of
the
remote
sensor
unit
HR-10
and
te
remote
‘emitter
unit
HE-50(AC)
Is
required
to
control
non-ONKYO.
devices
from
another
room
(sub
room).
Operate
the
remote
con-
tro!
unit
included
with
the
device
by
directing
the
control
unit
toward
the
HR-10
installed
in
another
room
(sub
room).
@
It
@
problem
occurs,
use
the
TX-SV515PRO’s
tront
panel
con-
trols
to
verify
that
the
problem
is
with
the
remote
controller.
It
there
is
no
problem
when
operating
the
TX-SV51SPRO.
directly,
check
the
batteries
in
the
remote
controller
first
bofore
assuming
that
there
1s
a
controller
malfunciton.
NOTES:
@
The
source
may
be
changed
or
recording
being
done
on
the
TX-SV515PRO
may
be
interrupted
when
operations
are
done:
in
the
another
room,
Press
the
MR
Off
button
to
disable
the
control
from
another
room,
(The
MR
indicator
will
be
illumi-
nated.)
@
Some
non-ONKYO
remote
contro!
transmitters
cannot
be
used.
-17-

Troubleshooting
guide
NOTE:
If
a
problem
cocurs,
first
cperata
the
unit
using
the
front
panel
controls
to
confirm
that
it
is
not
due
to
a
malfunction
(or
worn
out
batteries)
of
the
remote
control
transmitter.
Trouble
Cause
Remedy
No
power.
@
Power
cord
is
disconnected,
@
There
is
external
noise
in
the
com-
puter
circuits
of
the
TX-SV515PRO.
AC
fuse
blown,
‘©
Connect
power
cord.
‘@
Turn
the
power
button
off
and
then
on
again
or
remove
the
AC
plug
from
the
outlet
and
then
plug
it
again.
Contact
your
ONKYO
service
center.
Power
but
no
sound.
‘Tape
monitor
switch
on
Audio
muting
switch
on.
Bad
connections.
Amplifier
protection
circutry
has
been
activated.
Switch
to
off
‘Switch
to
off
by
remote
control
transmitter
Check
connections,
speaker
leads,
etc.
Contact
your
ONKYO
service
center.
Hum,
low-frequency
noise
Poor
of
no
input
ground.
Poor
or
no
phono
motor
ground,
@
The
placement
of
the
audio
connec-
tion
cable
on
the
rear
panel
is
not
cor-
rect.
Check
outer
conductor
of
input
plugs.
@
Check
for
proper
ground
connection,
@
Adjust
the
placement
of
the
cables
to
reduce
hum.
Howling
when
the
volume
is
turned
up.
@
Turntable
and
speakers
are
too
close
together.
@
Move
them
farther
apart.
Rough
or
scratchy
sound.
High
range
is
no!
clear.
©
Stylus
of
pick-up
is
worn,
©
Stylus
tip
is
dinty.
@
Treble
control
too
high.
‘@
Replace.
Clean,
Turn
treble
control
down.
AM
stations
carmot
be
received.
@
AM
loop
antenna
js
not
attached.
‘@
Connect
the
included
AM
loop
antenna
to
the
‘AM
antenna
terminals.
Buzzing
noise
on
AM
(particularly
con-
‘spicuous
at
night
or
with
weak
stations).
@
Noise
from
electrical
apparatus
such
as
fluorescent
lamp,
@
Move
AM
loop
antenna
to
different
position.
©
Set
up
outdoor
AM
antenna.
High-pitehed
noise
or
buzzing
noise
on
W.
@
Noise
from
TV
sot.
®
Place
tho
AM
loop
antonna
as
far
as
possiblo
from
the TV.
‘®
Move
unit
away
trom
TV
set.
Crackling
noise
on
AM,
FM.
@
Noise
caused
by
turning
fluorescent
lamp
on
and
off.
@
Noise
from
automobile
ignition
©
Move
antenna
as
tar
as
possible
from
the
fiuo-
rescerit
lamp.
®
Install
an
FM
outdoor
antenna
as
far
as
possi-
ble
from
the
road,
©
Change
the
position
or
direction
of
the
outdoor
antenna,
FM
tuned
and
stereo
Indicators
light
but
sound
is
distorted
and
stereo
separation
Is
bad,
@
Station
is
too
strong.
©
Multiple
reflection
of
the
radio
waves
because
of
tall
buildings
or
moun-
tains,
@
Change
to
T-shaped
antenna.
®
Use
antenna
which
has
better
directivity
and
select
a
point
where
the
distortion
is
least
FM
tuned
indicator
and
stereo
Indicator
flicker
and
hiss
is
heard
on
FM.
@
Station
is
100
weak.
@
Stereo
FM
broadcasts
cover
only
about
half
the
distance
of
an
ordinary
broadcast,
@
Install
an
outdoor
FM
antenna.
©
Change
the
position
or
direction
of
the
outdoor
antenna
No
station
is
recalled
when
a
preset
key
is
pressed.
@
The
power
cord
has
been
unplugged
for
along
time.
©
The
memory
contents
ara
lost.
Store
all
sta~
tions
again,
The
multiple
room
remote
system
does
not
operate.
‘®
Connection
is
wrong.
®
The
MR
OFF
button
on
the
TX-
SV515PRO
Is
engaged,
(The
MR
OFF
indicator
will
ight.)
@
Check
the
connection
again.
@
Press
the
MR
OFF
button.
(The
MR
OFF
indi-
cator
will
be
turned
OFF)
Front
panel
controls function
but
remote
control
transmitter
does
not.
@
No
batteries
in
remote
control
trans~
miter.
©
Batteries
have
worn
out.
©
Insert
batteries.
©
Replace
batteries.
‘Also refer
to
the
respective
instruction
manuals
of
the
video
dise
player,
video
cassette
recorder,
TV
monitor,
etc.,
being
used,
The
tuning
steps
by
which
the
tuned
frequency
changes
on
each
band
have
been
set
al
the
factory
to
the
proper
value
for
the
country
where
each
unit
is
to
be
sold.
It
you
use
the
unit
in
a
country
where
a
different
tuning
step
is
required
or
if
the
broadcast
frequencies
In
your
country
‘change
so
that
you
can
not
tune
in
radio
stations
precisely,
contact
your
authorized
ONKYO
Service
Center,
~
18

Specifications
AMPLIFIER
SECTION
Powor
Output,
Front
oe
a
as
£80
watts
per
channel
min.
RMS.
at
ohms,
both
channels
driven.
(rom
20
Hz
to
20,000
Hz,
with
'no
more
than
0.08%
total
harmonic
distortion
[Surround
mode
and
Multi
sourc
Front
UR
and
center
channels
'§5
watts
per
channel
min.
RMS,
at
8
ohms,
1,000
Hz
with
no
more
than
0.08%
total
harmonic
distortion.
Rear
or
Remote
channels
20
watts
por
channel
min.
RMS.
at
8
ohms
1,000
Hz
with
no
more than
0.8%
total
harmonic
vistortion,
Total
Harmonic
Distortion’
0.08%
at
rated
power
(FRONT)
IM
Distortion:
0.08%
at
rated
power
(FRONT)
Damping
Factor.
{60
at
8
ohms
(FRONT)
Sensitivity
and
Impedance:
Phono:
2.5
mV/50 kohms
‘CD
MTape
Play:
150
mVi50
kohms
Tape
Rec:
150
mVi22
kohms
Phono
Overload:
120
mV
IMS.
at
1,080
Hz,
0.5%
THD,
Froquency
Response:
20
t0
30,000
Hz,
+/-1
48
RIAA
Deviation:
20
10
20,000
Hz.
+/-0.8
dB
Tone
Controt:
BASS.
4/10
dB
at
100
Hz
TREBLE:
©
+/-10
dB
a!
10,000
Hz
Signal
to
Noise
Ratio:
PHONO:
80.48
(IHF
A.
5
mV
input)
CDITAPE:
100.48
(IHF
A)
Muting:
90
6B
VIDEO
SECTION
Signal
sensitivity
and
impedance
\VDPAVCR
input,
output:
1
Vp-p,
75
ohms
TUNER
SECTION
FM:
Tuning
Range:
87.5
—
108.0
MHz
(50
kHz
steps)
Usable
Sensitivity:
Mono:
11.2
081,20)
Stereo:
17.2
481,
4.0uV
50dB
Quieting
Sensitivity:
Mono:
17
2d8f.
40nV
Steroo:
97.2
dB1,4014V
Capture
Ratio:
1508
Image
Rejection
Flatio:
40.08
IF
Rejection
Rati
90
dB
Signal-to-Noise
Ratio:
Mono:
7348
Stereo:
67
dB
‘Altemate
Channel
Attenuation:
65.48
‘AM
Suppression
Ratio:
50
08
Total
Harmonic
Distortion
Mono:
0.15%
Stereo:
0.25%
Frequency
Response:
30
—
15,000
Hz
+/-1,5.08
Stereo
Separation:
45
B
at
1
kHz/90
JB
i
100
—
10,000
Hz
Muting
Level:
17.2
dB,
4.0
nV
GENERAL,
Powor
Supply:
USA
&
Canadian
models
‘ACI20
V,
60
Hz
Worlcwide
models
120
and 220
V
switchable,
50/60
Hz
455
»
170
x
388
mm
A7-AB/IB"
x
6-11/16"
=
16-5/16"
19.5
kg
(29.8
lbs)
Dimensions
(W
»
Hx
0):
Weight:
AM:
Tuning
Range:
USA
&
Canadian
models
530
—
1710
kHz
(10
KHz
Steps)
Worldwide
models
531
—
1602
kHz
(9
kHz
steps)
Usable
Sensitivity
30
nV
Image
Rejection
Ratio:
4008
IF
Rejection
Ratio:
40.08
Signal-to-Noise
Ratio:
40.
dB
Total
Harmonic
Distortion:
07%
‘Specifications
and
features
are
subject
to
change
without
notice.
follow
the
procedure
batow.
1.
Press
and
noid
down
the
CO
bution.
then
press
the
POWER
button.
2.
“Test-"
ts
displayed
on
the
display
for
approximately
5
seconds.
3.
This
device
employs
a
microcomputer
to
perform
various
functions
and
operations.
If
interference
generated
by
an
external
power
supply,
radio
waves,
or
other
electrical
source
results
in
an
accident
which
causes
the
specified
operations
and
lunctions
to
operate
abnormally.
To
perform
a
reset,
please
‘While
“Tast-"
‘s
displayed,
unplug
the
TX-SV515PROs
power
cord
trom
its
AC
outlet.
then
“Test-"
will
disappear.
Preset
memory
and
parameters
stored
in
memory,
such
as
surround
are
initialized
and
will
return
to
the
factory
settings.
ONKYO
CORPORATION
International
Division:
2-1,
Nisshin-cho,
Neyagawa-shi,
Tel:
0720-31-8133
Fax:
0720-34-1340
ONKYO
U.S.A
CORPORATION
200
Williams
Drive,
Ramsey,
N.J.
07446,
U.S.A
Tol:
201-825-7950
Fax:
201-825-8150
‘SN
29341810Y
OSAKA
572,
JAPAN.
107960
Table of contents
Other Onkyo Amplifier manuals

Onkyo
Onkyo A-08 User manual

Onkyo
Onkyo M-5010(B) User manual

Onkyo
Onkyo 9555 - A Amplifier User manual

Onkyo
Onkyo MCA1120 User manual

Onkyo
Onkyo A-933 User manual

Onkyo
Onkyo M-5000R User manual

Onkyo
Onkyo FR-N3X User manual

Onkyo
Onkyo FR-X7A User manual

Onkyo
Onkyo A-9210 User manual

Onkyo
Onkyo M-588F Quick start guide