Onthemuv miniTread User manual

Congratulations on purchasing your new Onthemuv®miniTREAD® !!
Please be sure to read this entire Owner’s Manual as it contains pertinent
information about service, care, and safety instructions about the product.
Owner’s Manual
Onthemuv.com
support@Onthemuv.com
310.873.3133


Before You Begin .......................................................................................4
Safety Instructions................................................................................. 4-5
Equipment Warning/Caution Labels.......................................................6
Equipment Specifications ........................................................................6
Equipment and Safety Warnings.............................................................6
Emergency Stop.......................................................................................6
Supervised Use ........................................................................................6
About Your Onthemuv®miniTREAD®......................................................7
Key Component List......................................................................................7
Assembly Instructions ...................................................................................7
Getting Started...........................................................................................8
Operating your miniTREAD®..........................................................................8
How to sit while using the miniTREAD®........................................................8
Adjusting the Seat Height..............................................................................8
Incorrect and Correct Posture while using the miniTREAD®.........................9
Using the Chair Wheel Stoppers ...................................................................9
How to use your Remote Control................................................................10
Setting the Remote Control.........................................................................10
How to Adjust your Speed ..........................................................................10
Start........................................................................................................10
Speed Control ........................................................................................10
Stop........................................................................................................10
Incline Adjustment.......................................................................................11
How to use the Incline Mechanism .............................................................11
Emergency Stop/Reset Button....................................................................11
Care and Storage .....................................................................................11
miniTREAD®Maintenance......................................................................11
Carrying your miniTREAD®.....................................................................11
MUV ®Towards Fitness miniTREAD®Program ....................................12
Current Exercisers..................................................................................12
New Exercisers.......................................................................................12
Parts List ...................................................................................................13
Ordering Replacement Parts .................................................................13
Customer Service ....................................................................................13
Warranty & Disclaimer ...................................................................... 14-15
TABLE OF CONTENTS
Walk while seated!

BEFORE YOU BEGIN
SAFETY INSTRUCTIONS
4
Welcome to Onthemuv®! Purchasing your miniTREAD®is a step towards health!
Before you begin, it’s important that you familiarize yourself with this important
information on safety and use of the miniTREAD®so you and your loved ones do
not get hurt.
For an audio version of the Owner’s Manual, please refer to our Onthemuv
YouTube Channel. For a large print version of the Owner’s Manual, please go to
www.Onthemuv.com.
1. WARNING: Before beginning any exercise program, you should consult with your doctor.
It is recommended that you undergo a complete physical examination.
2. DANGER: NEVER STAND ON THE miniTREAD®! Use ONLY while safely seated.
Failure to follow all warnings may result in serious injury or death.
3. WARNING: Read this Owner’s Manual in its entirety prior to use to reduce the risk
of serious injury.
4. WARNING: Connect this product to a properly grounded outlet only. See Grounding
Instructions.
5. GROUNDING INSTRUCTIONS: This product must be grounded. If it should malfunction
or breakdown, grounding provides a path of least resistance for an electric current to
reduce the risk of electric shock. This product is equipped with a cord having an
equipment-grounding conductor and grounding plug. The plug must be plugged into
an appropriate outlet that is properly installed and grounded in accordance with all local
codes and ordinances.
6. DANGER: Improper connection of the equipment-grounding conductor can result in a
risk of electric shock. Check with a qualified electrician or serviceman if you are in doubt
as to whether the product is properly grounded. Do not modify the plug provided with the
product — if it will not fit the outlet, have a proper outlet installed by a qualified electrician.
Make sure the product is connected to an outlet having the same configuration as the plug.
No adapter should ever be used with this product.
7. Operate the miniTREAD®on a solid, level surface.
8. Use the miniTREAD®ONLY for the intended use as described in this Owner’s Manual.
Do not modify the equipment or use attachments not recommended by the manufacturer.
Do not use any accessories that aren’t specifically recommended by the manufacturer,
these might cause injuries or cause the unit to fail.
9. When using the miniTREAD®always sit with the knees below the hips. Please refer to the
posture guide on pages 8 and 9. If you experience any pain or discomfort, please consult
your physician prior to continuing use.
10. Work within your recommended exercise level, do NOT work to exhaustion. If you feel
any pain or abnormal sensation, STOP YOUR WORKOUT and consult your physician
immediately. Begin exercising carefully to avoid injury. If you feel any pain, STOP!
Pain is NOT gain!
Please adhere to the following safety guidelines and cautions:
Walk while seated!

11. Warm-Up and Cool Down walk: If you’re exercising for more than 5-minute increments at a
time, start slowly for the first minute or two before you increase the speed. Then repeat the
same process when you’ve finished. Get familiar with the miniTREAD®. Start out slowly and
refer to our MUV®TOWARDS FITNESS miniTREAD®program for recommended guidelines.
12. The miniTREAD®equipment is not intended for use by young children or pets. Please keep
children under the age of 13 and pets away from the miniTREAD®when it is in use. Close
supervision is necessary when this product is used near children or persons lacking
understanding or capacity to use it safely and independently.
13. Children should be supervised to ensure that they do not play with the product.
14. Indoor use only. Do not use outdoors.
15. Make sure there is adequate space available around the miniTREAD®.
16. Do not operate where aerosol (spray) products are being used or where oxygen is being
administered.
17. STOP the miniTREAD®before raising or lowering the incline.
18. Do not carry the miniTREAD®by the supply cord or use cord as a handle.
19. Make sure the cords are safely and securely placed away from the feet to avoid tripping.
20. Do not place any object on the moving tread and keep clothing free and clear of all moving
parts. Never drop or insert any object into any opening.
21. The miniTREAD®is designed for use wearing shoes or slippers. Do not wear loose pants
over ankles, ankle jewelry or high heels while using the miniTREAD®.
22. Excessive heating can occur and cause fire, electric shock, or injury to persons. Do not
operate under a blanket or pillow.
23. CONSUMER USE ONLY: The Onthemuv®miniTREAD®though compact and portable, is
built for consumer use only and can withstand up to 80 pounds of leg load. Maximum
user weight: 300 lbs.
24. To reduce the risk of burns, fire, electric shock, or injury to persons: The miniTREAD®
should never be left unattended when plugged in.
25. To disconnect, turn all controls to the off position, then remove plug from outlet.
26. Always unplug the Electrical Cord when the miniTREAD®is not in use, before cleaning and
before taking any parts off or putting any part on the miniTREAD®.
27. Never operate the miniTREAD®if it has a damaged cord or plug, if it is not working properly
or if it has been dropped or damaged. Return the miniTREAD®to a service center for
examination and repair.
28. To prevent shock, keep all electric components, such as the motor, cord, and switch away
from water.
29. Call Customer Service at 310-873-3133 for replacement label, manual, video or questions.
5
Walk while seated!

6
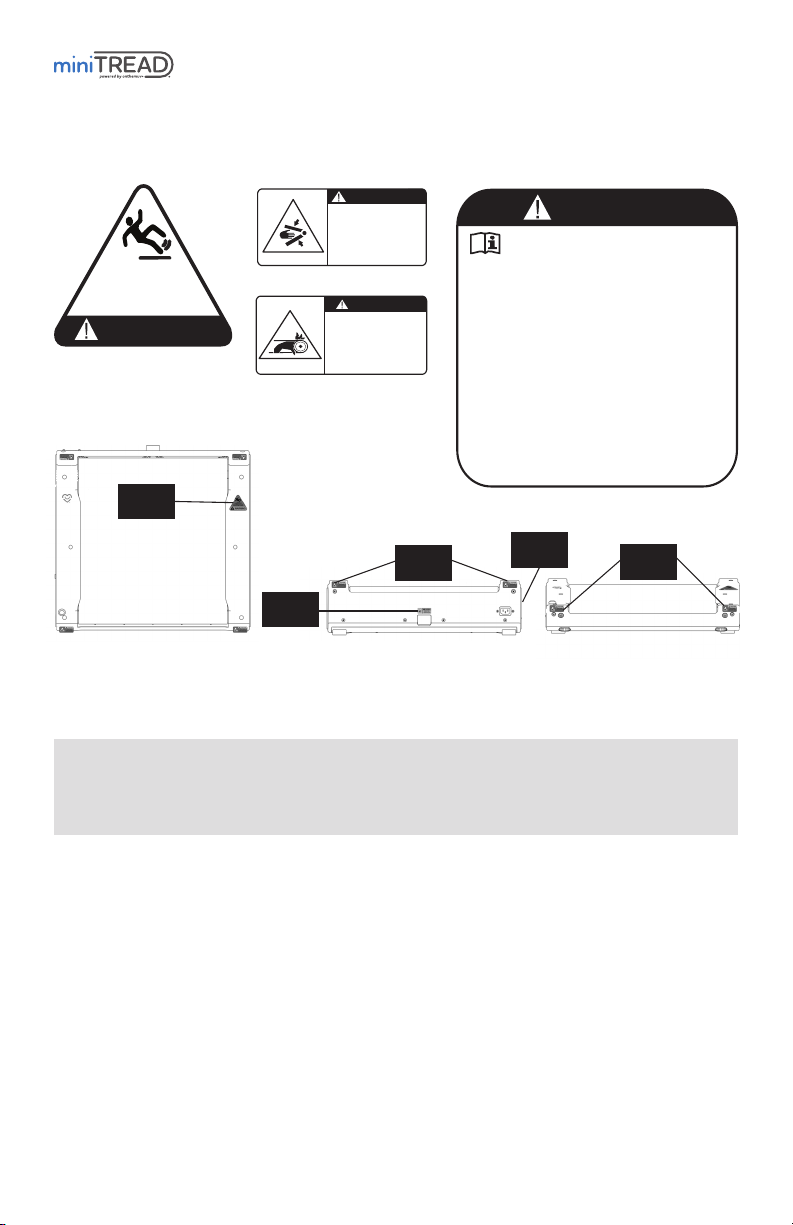
EQUIPMENT WARNING/CAUTION LABELS
EQUIPMENT AND SAFETY WARNINGS
Emergency Stop
The RED Emergency Stop Button on the bottom left of the equipment will immediately halt the
miniTREAD®equipment if pressed. To reset after use, wait 30 seconds and press the GREEN
Start Button twice to restart the unit. Alternatively, turn the Power Switch OFF for a few
seconds and then back on.
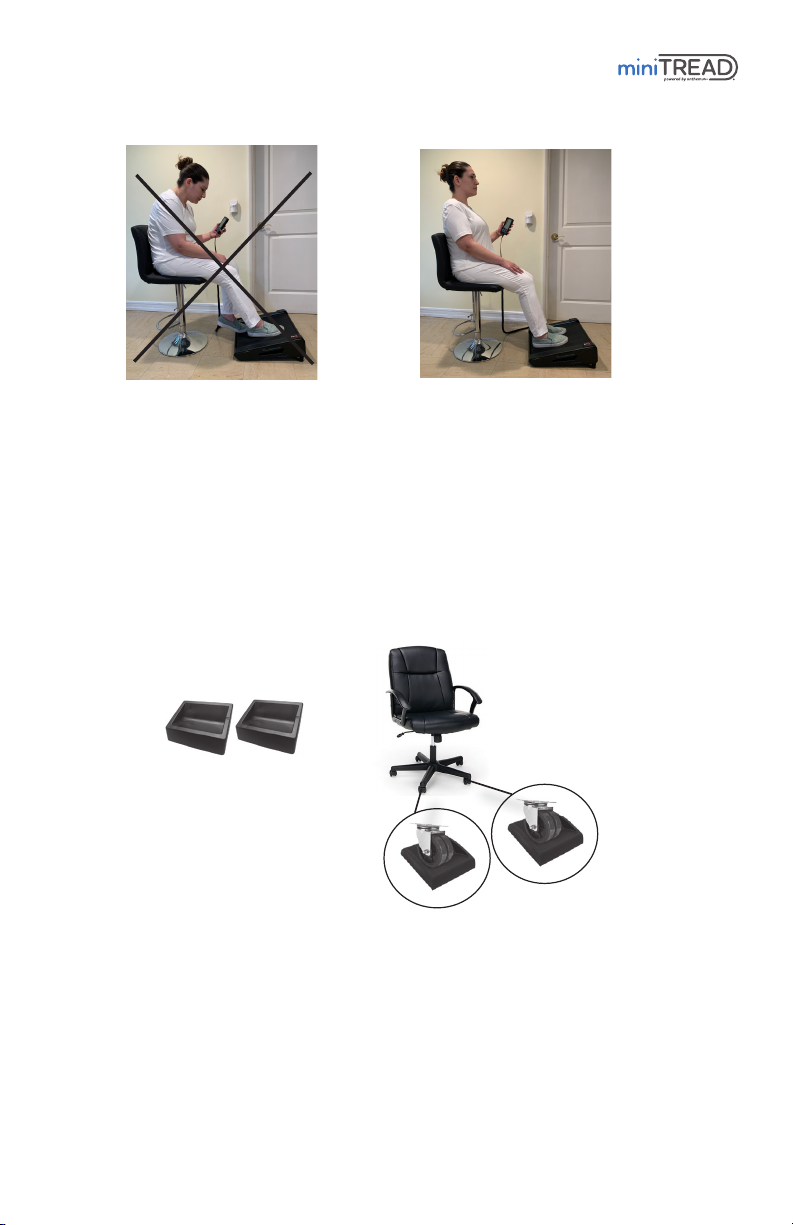
Supervised Use
If your medical provider has not cleared you for independent use of the miniTREAD®equipment,
have balance issues or muscle weakness, please make sure you are supervised by a caregiver
while using the miniTREAD®. This is for your own safety. Again, NEVER STAND on the
miniTREAD®. Use while safely seated in a properly positioned chair.
See below for placement of the following Warning/Caution labels on your unit.
EQUIPMENT SPECIFICATIONS
APPROXIMATE
Length ... 18.82” (47.8 cm)
Width ..... 19.84” (50.4 cm)
Height .........5.51” (14 cm)
Weight 23.6 lbs. (10.7 kg.)
Maximum Weight Capacity
of user: 300 lbs. (136 kg.)
Maximum Leg Load Weight
on unit: 80 lbs. (36 kg.)
WARNING LABEL 3 1 locationWARNING LABEL 1 1 location
CAUTION LABEL 1 4 locations
WARNING LABEL 2 1 location
WARNING
SHEAR POINT
Keep hands and
feet away from
moving parts.
CAUTION
PINCH POINTS
Keep hands
away from
moving parts.
WARNING
LABEL 2
CAUTION
LABEL 1
FRONT VIEW
CAUTION
LABEL 1
WARNING
LABEL 3
BACK VIEW
WARNING
LABEL 1
TOP VIEW
Standing on unit
could result in
injury, falling, or death.
Use only while seated.
WARNING
Standing on unit
could result in
injury, falling, or death.
Use only while seated.
READ AND FOLLOW THE SAFETY INSTRUCTIONS
STATED IN THE OWNER’S MANUAL AND VIDEOS
PRIOR TO USE. FAILURE TO DO SO AND IMPROPER USE OF
THIS MACHINE CAN RESULT IN SERIOUS INJURY OR DEATH.
1. As with all exercise equipment, consult a physician prior
to use and stop if you feel faint, dizzy or exhausted.
2. Always exercise in control. Begin exercising carefully
and to avoid injury, NEVER STAND on the miniTREAD®.
Use ONLY while safely seated.
3. Max user weight 300 lbs.
4. Max leg load on unit 80 lbs.
5. Keep body and clothing free and clear of all moving parts.
6. Keep children under the age of 13 away from machine.
7. Replace this label if damaged, illegible or removed.
8. Call Customer Service at 310-873-3133 for replacement
label, manual, video or questions.
9. Unit is for consumer use only.
WARNING
(located on side of unit)
Walk while seated!

7
ABOUT YOUR Onthemuv®miniTREAD®
The Onthemuv®miniTREAD®is used from a seated position and the motion can best be
described as a hybrid of a miniature Treadmill and a Bike, so your calves, hamstrings, quads
and core are all engaged. The motorized movement helps keep you motivated for continued
use and movement becomes automatic — almost like being on autopilot.
The miniTREAD®calculates Steps, Distance, Calories, Speed and Time Spent. The Onthemuv®
miniTREAD®weighs just 23.6 lbs. and can be easily transported to your workplace or in your
home environment.
Key Component List - Standard Parts Included:
Pre-assembled
Onthemuv®miniTREAD®
#5 Allen Wrench
(for adjusting
the Belt when/if
necessary).
Power Cord,
which plugs into
any standard
electrical outlet.
Assembly Instructions
We’ve made it easy for you! Minimal assembly is required.
Motorized miniTREAD®:
1. Remove the miniTREAD®, Power Cord, Remote Control, Remote Control Cord and
#5 Allen Wrench from the box.
2. Place the miniTREAD®, with the belt side up and the on/off switch on the left side, on a
level, horizontal and firm surface, for example, in front of your chair in your TV room or
under your desk or kitchen table.
3. It is important that the miniTREAD®is kept on a solid, level surface. Please use the
Leveling Feet and adjust the miniTREAD®to accommodate for minor variations. If the
unit is not on a solid, level surface, user may need to adjust the Belt periodically as it
may lean to one side or the other. Once balanced, periodically check and continue to
use the Leveling Feet to ensure balance is maintained. If you find the Belt moves to
one side, please refer to our: Onthemuv YouTube Channel, for video instructions on
Belt Adjustment.
4. Plug in the Power Cord to the rear of the unit and to the wall into any standard outlet.
The Power Cord will work on both 110V/220V.
5. Plug in the Remote Control Cord to both the Remote and the miniTREAD®. You may
plug in the Remote Cord to the Remote and the miniTREAD®using either side of the
Cord. The Remote Plug is located on the left side panel of the unit.
Remote
Control
Remote
Control
Cord
Leveling Feet
(located on the back of
unit on both sides)
Walk while seated!

8
How to sit while using the miniTREAD®
Find your correct sitting height, then adjust the distance of the miniTREAD®from your seat.
WARNING
NEVER STAND on the miniTREAD®. Use while safely seated ONLY.
If your hips are lower than your knees, your chair is too low. It may
be difficult to extend your legs and/or may feel unstable. If you
have an adjustable chair, raise the chair seat to create the correct
hip flexor to knee alignment as shown in Step 2. If your chair is
not adjustable, use a seat cushion to adjust your height.
One goal of the miniTREAD®equipment is to engage the Core
(abdomen) muscles. This can be accomplished by sitting up
straight. If you need a seat cushion to help support your back,
please refer to our website.
Adjusting the Seat Height
Step 1: Sit in a chair, with the miniTREAD®on the floor
in front of you, your feet in the center of the
miniTREAD®Belt. You can sit forward and upright
on the chair or, with your back supported against
the chair back.
Step 2: If you are sitting at the correct height, your knees
will be slightly BELOW your hip flexors.
GETTING STARTED
There are several adjustments you will need to make prior to using the miniTREAD®:
1. Adjust the height of your Seat for optimal leg movement and comfort.
2. Adjust the Distance of the miniTREAD®from your chair to be comfortable.
3. Increase or decrease the Speed of the miniTREAD®Belt using the Remote Control.
Operating your miniTREAD®
1. Turn ON the Power Switch (located at the back left side) by pushing the Button on
the left side of the miniTREAD®. The Power Switch will light up when on.
2. Press the GREEN ‘O’ Button to turn on the Remote.
3. Use the BLUE Up and Down Arrows to increase or decrease the Speed of the
miniTREAD®.
4. Use the RED ‘X’ Button to stop the miniTREAD®from operating.
5. Turn off the Power Switch when done with your session.
Walk while seated!

9
Using the Chair Wheel Stoppers
If you are using the miniTREAD®on a chair with wheels, your chair may move. We offer Wheel
Stoppers as an accessory, available on our website.
Place the Chair Wheel Stoppers under the front most wheels on your chair. Position
the Wheels so they are to the right and left of the miniTREAD®— a wheel should
not be centered, or your feet may hit it during use.
INCORRECT
POSTURE
CORRECT
POSTURE
Incorrect and Correct Posture when using the miniTREAD®
Chair Wheel Stoppers
(optional accessory)
Walk while seated!

10
Setting the Remote Control
The Remote can be set for mph/miles or kph/km, (with mph/miles being the default setting).
User may switch to kph/km by pressing the GREEN and RED Button simultaneously BEFORE
pressing the GREEN GO Button. This preference may only be set when the miniTREAD®
is stationary, prior to starting the Remote.
How to Adjust your Speed
Start
Once you have your seat height adjusted, use the Remote, press the GREEN Start Button
to turn on the miniTREAD®Belt to the first increment of .3 mph.
Speed Control
Increase or decrease the Speed of the miniTREAD®using the Remote. Begin to ‘walk’ placing
one foot in front of the other. Press the BLUE ‘up arrow’ to incrementally increase the Speed
and the BLUE ‘down arrow’ to decrease the Speed. Make sure you can comfortably ‘walk’
with your feet out in front of you. The miniTREAD®should be a minimum of 6” in front of the
chair. Using the miniTREAD®should be comfortable.
– Feet should not kick under the chair or behind your knees while in use.
– When legs are outstretched the knees should not be fully extended.
The Belt Speed ranges from .3 mph, which is very slow, up to 3 mph. It’s important to slowly
increase Speed and wait a minimum of 10 seconds between each increase until you have found
your comfortable Speed. If you find the miniTREAD®is moving too quickly, press the BLUE
‘down arrow’ immediately to reduce the Speed or the RED arrow to STOP. If needed, you can
place your feet on either side of the miniTREAD®or on the floor until it is at your desired Speed.
The Remote function enables you to personalize your walk every time you use the miniTREAD®.
As you get stronger and fitter, you can continue to use the Remote to adjust the Speed with an
easy click of a Button!
Stop
Press the RED STOP Button on the Remote to STOP the unit and make any appropriate
adjustments. The GREEN START Button will restart the unit, and your results will be saved.
To clear the results and reset, press the RED STOP Button twice.
What should your miniTREAD®walk feel like?
• Thewalkingpatternshouldbecomfortable.
• UsingtheminiTREAD®should feel like you are walking comfortably…while seated.
• YoushouldNOT feel any pain in your hips, knees, ankles or your back. If you feel any
discomfort, adjust the placement of the miniTREAD®, the chair or the Posture Cushion(s),
or discontinue use.
Walk while seated!
How to use the Remote Control
Results will Scan
and Display:
•Calories
•Distance
•Steps
•Time
•Speed
GREEN: Start
BLUE ARROW: Speed Up
BLUE ARROW:
Speed Down
BUTTON:
Step Count/Calories
#BUTTON:
Time/Distance
RED: Stop

11
CARE AND STORAGE
Your Onthemuv®miniTREAD®has been designed to require minimum maintenance. To ensure
optimal function, we recommend the following:
miniTREAD®Maintenance
1. Keep the miniTREAD®clean! For optimum performance, it’s important to avoid dust
and dirt from accumulating between the miniTREAD®and the Belt. If dirt accumulates,
the miniTREAD®Belt may not operate as smoothly.
2. Please keep the unit covered (a small towel should do the trick) and stored
in a dry area. Store after use. It’s a good idea, though not necessary, to store the
miniTREAD®unplugged and away from children and high traffic areas.
3. Safely store your miniTREAD®with Cords out of reach.
4. Store away from humidity. Do not keep near water.
5. Always unplug your miniTREAD®when not in use.
Carrying your miniTREAD®
The miniTREAD®is equipped with a
Recessed Carrying Handle on both
sides of the unit for portability.
Incline Adjustment
How to use the Incline Mechanism
1. To Open: Release Incline Latch to lift the
miniTREAD®until it snaps into place.
2. To Close: Release Incline Latch and push down
on the miniTREAD®until it snaps into place.
3. miniTREAD®must be on a hard surface to close.
Emergency Stop/Reset Button
The RED Emergency Stop/Reset Button on your miniTREAD®will be triggered if an
excessive amount of weight is sensed on the unit or if a user presses it as an Emergency Stop.
The Remote will display an error message “EO”. To reset the unit, press the RED Emergency
Stop/Reset Button once again, wait 30 seconds and press the GREEN Start Button on
the Remote twice. Alternatively, the user may turn OFF the Power Switch, wait a few seconds,
turn the miniTREAD®back ON and begin using.
miniTREAD® Front View
Incline Latch
(Lift gently and release
to open and close
Incline Mechanism)
Power
Socket
Recessed
Carrying Handle
WARNING
STOP the miniTREAD®BEFORE OPENING OR CLOSING THE INCLINE.
The natural incline of the miniTREAD®equipment is at approximately 8 degrees. A user may
increase this incline to 14 degrees by releasing the BLUE Incline Latch on the front of
the unit. Once released, gently pull up on the unit to snap it into place and then operate the
miniTREAD®as indicated. To CLOSE the Incline, pull up on the BLUE Incline Latch once
again, place one hand on each side of the unit and gently press down until it snaps into place.
Occasionally, this may be a little more difficult on carpet. Should you experience difficulty when
closing the BLUE Incline Latch on carpet, simply place a ruler or a book under the sides of
the unit and try again. Make sure both sides of the unit
have snapped closed prior to starting it back up again.
Walk while seated!

12
MUV®TOWARDS FITNESS miniTREAD®PROGRAM
Once you can walk 5 minutes in a day, begin to add time to your daily walk in 1- minute
increments until you are walking for 10 -15 minutes consecutively; the pace you set is up to
you, and always adjustable, using the Remote to increase or decrease your Speed. You can
also break it up as it works best for your schedule. Remember, you can use the miniTREAD®
when you watch TV, working while seated at your desk or during a designated exercise time.
Regardless of your fitness acumen, be sure to go through the steps of adjusting your seat
height and distance of the miniTREAD®from your chair each time you use it.
Day Walking Time # Times per day Total walking time per day
1
2
3
4
5
1 minute
1 minute
1 minute
1 minute
1 minute
Once
Twice
Three
Four
Five
1 minute
2 minutes
3 minutes
4 minutes
5 minutes
Current Exercisers
If you have been regularly exercising, you can use the miniTREAD®any time you want. We
suggest to get used to how it feels and functions, that you start with 5 -15 minute blocks
(or less) and increase your time by 5 minutes until you work up to the time you desire.
New Exercisers
If you’re just starting out, or re-starting to move again after 6 months or more, you want to
ease into using the miniTREAD®the first couple of weeks. There is a slight learning curve
to walking while seated, which challenges your muscles differently than walking while
standing. We suggest the following, adjusting Speed as needed each session:
Day 1: Walk for 1 minute at a comfortable pace; Start slowly depending upon your
doctor’s recommendation and your comfort level.
If you’ve been inactive for six months or more, you may want to start with our
“Welcome Back to Fitness” sample program:
Walk while seated!

13
PARTS LIST
1 20-MMT1 Onthemuv®miniTREAD®1
2 20-MMTPC miniTREAD® Power Cord 1
3 20-MMTRC Remote Control 1
4 20-MMT-RCC-6 Remote Control Cord 1
5 5-Allen Wrench #5 Allen Wrench 1
6 20-MMT-BELT miniTREAD® Belt 1
7 20-MMT1-OM Onthemuv®miniTREAD® 1
Owner’s Manual
ITEM # PART# DESCRIPTION QTY
ORDERING REPLACEMENT PARTS
To order replacement parts, email us at support@Onthemuv.com.
When ordering replacement parts, please contact our Customer Service Department, at
310.873.3133, Monday through Friday - 10:00 am to 4:00 pm, PT.
IMPORTANT: You must have your Serial Number and this Owner’s Manual ready when
calling for parts.
Serial #: ____________________________
PLEASE ALSO PROVIDE THE FOLLOWING INFORMATION:
1. Name, Mailing Address and Telephone Number
2. Date of Purchase
3. Where Product was Purchased
4. Model Number
5. Part Order Number and Description
45
2
CUSTOMER SERVICE
How may we help you? If you have any questions regarding your Onthemuv®miniTREAD®,
please call our Customer Service Specialists at 310.873.3133 or email us at:
support@Onthemuv.com.
We pride ourselves in excellent customer service. We are committed to offering top quality
merchandise with a 100% money back guarantee if you are not completely satisfied within
30 days of date of purchase.
3
6
1
7
Congratulationson purchasing your new Onthemuv®miniTREAD® ! !
Pleasebe sure to read this entire Owner’s Manual as it contains pertinent
informationabout service, care, and safety instructions about the product.
Owner’s Manual
Onthemuv.com
310.873.3133
Walk while seated!

14
WARRANTY & DISCLAIMER
Warranty is good and available to the original purchaser only as noted by Onthemuv®invoice and is not
transferable nor assumable. Onthemuv®cannot warrant products that have been abused, neglected and or
poorly maintained. All equipment should be reviewed at the time of delivery for damage, breakage, loosening
of nuts and bolts, components and or any other moving parts. Any and all claims for warranty must be
received in writing within 60 days of defect. Do not alter, modify or redesign any Onthemuv®products or use
any replacement parts or materials other that those components original to Onthemuv®as it will limit the
warranty and liability of Onthemuv®. Onthemuv®reserves the right to change, replace or modify products,
parts, accessories and or design without notice. Deposits on cancelled orders will be subject to handling and
restocking charges.
WHAT IS COVERED
Onthemuv®Inc. warrants that under normal, personal, residential use, the Onthemuv®miniTREAD®is free
from defects in material or workmanship. Parts are warranted for one (1) year from the date of purchase.
WHO IS COVERED
The original purchaser or any person receiving the Product as a gift from the original purchaser.
WHAT WE WILL DO TO CORRECT COVERED DEFECTS
Onthemuv®Inc. obligation under this warranty is limited to replacing the defective part(s); or at its option,
repairing or replacing (or refund in its sole discretion) the product.
We will ship to you any new or rebuilt replacement part or component, or, at our option, replace the Product.
Such replacement parts are warranted for the remaining portion of the original warranty period.
WHAT IS NOT COVERED
Any failures or damage caused by unauthorized service, misuse, negligence, accidents, improper or
unauthorized alterations, installation or modification, debris resulting from any construction activities in the
Product’s environment, rust or corrosion as a result of the Product(s) location, failure to follow manufacturer’s
direction for use or storage, improper maintenance, vandalism, usage for commercial or rental purposes, or
“ordinary wear and tear”, or by failure on your part to use, operate and maintain the Product as set out in
your Owner’s Manual. This warranty does not cover any separately sold items, parts, or accessories.
OWNER’S MANUAL
It is VERY IMPORTANT THAT YOU READ THIS OWNER’S MANUAL before operating the Product. Remember
to perform the periodic maintenance requirements as specified in the Owner’s Manual to assure proper
operation and your continued satisfaction.
HOW TO GET PARTS & SERVICE
Customer Support Services: Support@Onthemuv.com.
For service call 310.873.3133. Monday through Friday from 10:00 am to 4:00 pm, Pacific Standard Time, and
provide your name, address and the model number of your Product. Customer Support will tell you how to
get a replacement part, or, should you have the Extended Warranty advise you on how and where to ship the
Product for service.
CLAIM PROCEDURES
Claims for defective merchandise must be made within ONE year from invoice date. Claims for missing
parts must be made within 60 calendar days after the merchandise is received. Any claim for defective
merchandise returns must be packed in original packaging. We reserve the right to specify that items be
returned to the original warehouse for inspection or be inspected by our representative in the field. Pictures
are required to claim defective merchandise, along with a copy of the original invoice. If the claim is justified,
the item(s) or part(s) will be repaired or replaced or a credit will be issued. It is our policy to replace parts
whenever possible.
Walk while seated!

15
Before shipping:
1. Obtain a serial number from the product serial label.
2. Securely pack your Product (use the original shipping carton, if possible).
3. Write the serial number on the outside of the carton.
4. Insure the Product, and
5. Include a letter explaining the defect or problem and a copy of your proof of purchase
if you believe the service is covered by warranty.
There are no other warranties other than expressly set forth herein. Any implied warranty of merchantability
or fitness for a particular purpose is limited to the duration of this warranty. No agent or retailer of the
Onthemuv®miniTREAD®has authority to modify this warranty in any respect.
Onthemuv®SHALL NOT BE HELD LIABLE FOR INDIRECT OR CONSEQUENTIAL DAMAGES ARISING
OUT OF USE OR PERFORMANCE OF THIS PRODUCT. These include – but are not limited to – loss of use
of the product; loss of time, enjoyment, or revenue; inconvenience; installation or removal costs; or other
incidental or consequential damages.
EXCLUSIVE WARRANTY
THIS LIMITED WARRANTY IS IN LIEU OF ALL OTHER WARRANTIES OF ANY KIND EITHER EXPRESSED
OR IMPLIED, INCLUDING BUT NOT LIMITED TO THE IMPLIED WARRANTIES OF MERCHANTABILITY AND
FITNESS FOR A PARTICULAR PURPOSE, AND ALL OTHER OBLIGATIONS OR LIABILITIES ON OUR PART.
We neither assume nor authorize any person to assure for us any other obligation or liability concerning
the sale of this Product. Under no circumstances shall we be liable under this warranty, or otherwise, of
any damage to any person or property, including any lost profits or lost savings, for any special, indirect,
secondary, incidental or consequential damages of any nature arising out of the use of or inability to use
this Product.
EFFECT OF STATE LAWS
This warranty gives you specific legal rights and you may have other rights, which vary, from state to state.
This warranty is valid in the U.S. and Canada only. Some states do not allow the exclusion or limitation
of implied warranties or of liability for incidental or consequential damages, so the above limitations or
exclusions may not apply to you.
CHANGES IN WARRANTY NOT AUTHORIZED
No one is authorized to change, modify or extend the terms of this limited warranty.
EXTENDED WARRANTY
You may purchase the Extended Warranty for your motorized miniTREAD®or self-powered Sitmill®equipment
within 2 weeks of purchase. Refer to our website for additional information, or return to the original point of
purchase with the original receipts and they will assist you in purchasing your Extended Warranty.
OUR PLEDGE TO YOU
Our Products are designed and manufactured to the highest standards. Onthemuv®wants you completely
satisfied with our Products and will do everything possible under the terms of this warranty to keep you
secure in knowing you have bought the best!
Manufactured and Distributed by: Onthemuv®Inc., Los Angeles, California, USA
Warranty service address may differ and will be provided upon approved Return Authorization.
For warranty support, keep the original proof of purchase and record the following information:
Serial Number _________________________________________________________
Date of Purchase _______________________________________________________
Purchase Location______________________________________________________
To register your Product Warranty, go to www.Onthemuv.com/register.
Walk while seated!

© 2020 Onthemuv®Inc. All rights reserved.
Onthemuv®, MUV®, Sitmill®and miniTREAD®are registered trademarks of Onthemuv®Inc.
Patents: www.Onthemuv.com/patents
No part of this booklet may be reproduced in any form, by any means,
electronic, mechanical or otherwise, without the express written
consent of the copyright holder.
20-MMT1-OM
Walk while seated!
Table of contents