Ooni CSA User manual

Gas Burner
for Ooni Karu 12
CSA
Manual


Gas Burner
for Ooni Karu 12
EN ....................................................... 2
ES...................................................... 15
FR......................................................28
Contents
1

EN
WARNING
To reduce the risk of fire, burn hazard or other injury, read
this safety manual carefully and completely before using this
appliance.
WARNING
Before cleaning, make sure the gas supply and control knob is
in the OFF position and that the burner and oven has cooled.
DANGER
Never operate this appliance unattended. If a fire should occur,
keep away from the appliance and immediately call your fire
department. Do not attempt to extinguish an oil or a grease
fire with water.
DANGER
If you smell gas:
• Shut o gas to the appliance
• Extinguish any open flame
• If odor continues, keep away from the appliance and
immediately call your gas supplier or your fire department.
Failure to follow these instructions could result in fire,
explosion or burn hazard which could cause property damage,
personal injury or death.
WARNING
FOR OUTDOOR USE ONLY.
WARNING
a. Keep the fuel supply hose away from any heated surface(s).
b. The use of alcohol, prescription or non-prescription drugs
may impair the consumer’s ability to properly assemble or
safely operate the appliance.
c. Keep children and pets away from the appliance at all times.
d. Do not move the appliance when in use.
e. This appliance is not intended for and should never be used
as a heater.
WARNING
Spiders and insects can nest inside the burner of the appliance
and disrupt gas flow. Inspect the burner at least once a year.
WARNING
When using a match to light the appliance, make sure to use
the included matchstick holder.
WARNING
Do not store this appliance indoors unless the gas cylinder is
disconnected.
WARNING
Do not store gas cylinder in a building, garage or any other
enclosed area and keep out of reach of children at all times.
WARNING
This appliance is not intended to be installed in or on
recreational vehicles and/or boats.
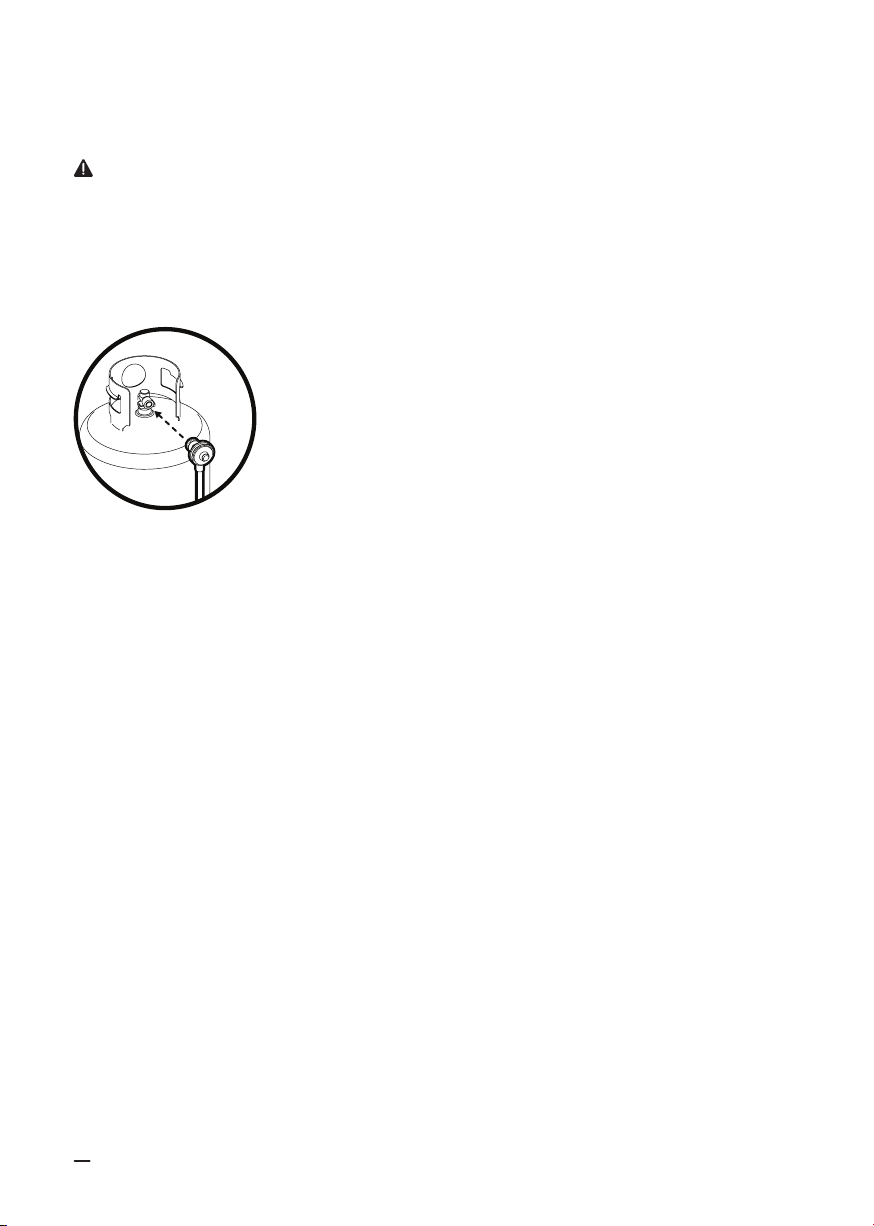
WARNING
Check all gas supply fittings for leaks before each use. Do not
use the appliance until all connections have been checked and
do not leak.
WARNING
Do not smoke while leak testing. Never leak test with an open
flame.
WARNING
When lighting, keep your face and hands as far away from the
appliance as possible.
WARNING
Minimum clearance from sides of unit to combustible
construction is 610mm (24 inches).
Minimum clearance from back of unit to combustible
construction is 915mm (36 inches).
WARNING
This instruction manual contains important information
necessary for the proper assembly and safe use of the
appliance. Read and follow all warnings and instructions before
assembling and using the appliance. Follow all warnings and
instructions when using the appliance. Keep this manual for
future reference.
WARNING
This manual states that an oven, fryer or broiler shall not be
used on or under any apartment or condominium balcony or
deck.
WARNING
This appliance is not intended to be installed in or on a boat.
This appliance is not intended to be installed in or on a
recreational vehicle.
WARNING
Keep the fuel supply hose away from any heated surface(s).
2

Stand to side when relighting - never look directly into the oven or at the flame.
Gas regulator supplied may not be suitable for use in your territory or region, please refer to your local
regulations for more information.
WARNING
This manual includes an instruction to clean and inspect the
hose before each use of the appliance. If there is evidence of
abrasion, wear, cuts, or leaks, the hose must be replaced prior
to the appliance being put into operation. The replacement
hose assembly shall be that specified by the manufacturer.
WARNING
This appliance shall be used only outdoors, and shall not be
used in a building, garage, or any other enclosed area.
WARNING
This manual includes a list of required parts necessary for the
safe operation of the appliance, directions for proper assembly
and for assembly of installed parts and accessories supplied
with the appliance, and proper procedures for gas leak testing.
WARNING
The appliance should not be located or used under overhead
unprotected combustible construction materials or surfaces.
For a grill, fryer or broiler, the minimum clearance shall be at
least 10ft (3m) from any structure or combustible material.
WARNING
Make sure the legs on Ooni Karu 12 are fully extended before
use.
WARNING
To prevent shock, Do not to touch the electrode tip when
igniting the burner.
WARNING
Ensure the chimney vent are fully open during use.
WARNING
Do not adjust the chimney vent during use.
WARNING
Keep away from hot exhaust gases coming from the chimney.
WARNING
Please ensure there is a distance of at least 3.5” / 90mm
between the edges of any of the oven legs and the edge of the
table surface.
LP GAS CYLINDER WARNING
1. Do not store spare liquid propane gas cylinder under or near
this appliance.
2. Never fill the cylinder beyond 80 percent capacity.
3. Liquid propane cylinder must be fitted with an OVERFILL
PROTECTION DEVICE (OPD).
4. If the information above is not followed exactly, a fire
resulting in death or serious injury may occur.
5. This manual states that the installation must conform with
local codes or, in the absence of local codes, with the
National Fuel Gas Code, ANSI Z223.1/NFPA 54, Storage and
Handling of Liquefied Petroleum Gases, ANSI/NFPA 58; or
Natural Gas and Propane Installation Code, CSA B149.1;
Propane Storage and Handling, CSA B149.2
3

Step 1
Install hose pipe (if required)
Step 1a
Tighten with suitable wrenches
Step 1b
Tighten with suitable wrenches then follow Step 1c.
Step 1c
Tighten with suitable screwdriver.
Regulators and hose connections will vary depending on your region.
If your Ooni Gas Burner for Ooni Karu 12 has a threaded female hose end follow Step 1a.
If your Ooni Gas Burner for Ooni Karu 12 has a threaded barb and regular hose with a hose clip follow Step 1b
then 1c.
If your Ooni Gas Burner for Ooni Karu 12 has a regular hose with a hose clip follow Step 1c.
If your Ooni Gas Burner for Ooni Karu 12 has the hose preinstalled continue to Step 2.
Tighten counter-clockwise in EU.
4

Step 2
Remove the door and fuel tray and ensure the chimney vent is open
5

Step 3
Remove draft defender plate
6

Step 4
Add Ooni Gas Burner for Ooni Karu 12
Secure but do not over-tighten screws
7

Step 6
Connect to gas canister
Regulators will vary depending on region.
QCC1 gas regulator
This gas fitting is clockwise. Make sure that the tank is completely switched off and screw the
regulator as far as possible into the gas tank valve.
Connecting the liquid propane gas cylinder
1. The cylinder valve should be in OFF position.
2. Make sure the burner valve is in OFF position.
3. Inspect the valve connections, port and regulator assembly. Remove debris and inspect the hose for damage.
4. When connecting the regulator assembly to the valve, use your hand to tighten the nut clockwise until it stops.
Use of a wrench could damage the quick coupling nut and result in a hazardous situation.
5. Open the cylinder valve fully by turning the valve counter-clockwise.
6. Before lighting the oven, use a soap and water solution to check all connections for leaks.
7. If a leak is found, turn the cylinder valve OFF, and do not use the oven until local liquid propane dealer can
make repairs.
Disconnecting the liquid propane gas cylinder
1. Turn the oven burner valve OFF and make sure the oven is cool.
2. Turn the liquid propane cylinder valve OFF by turning clockwise until it stops.
3. Detach the regulator assembly from the cylinder valve by turning the quick coupling nut counter-clockwise.
4. Place dust cap for cylinder valve outlet whenever the cylinder is not in use.
WARNING
• Please always keep the gas bottle in upright position.
• The size for 20 lbs LP gas cylinder is 12.2 inches in diameter and 17.9 inches tall
• If the appliance is not in use, the gas must be turned o at the supply cylinder.
• The cylinder used must include a collar to protect the cylinder valve.
• The minimum distance for the appliance and the 20lb gas tank is 40 inches apart.
8

Leak testing
General
Although the gas connections of the appliance are leak tested prior packing and shipment, a complete test must
be performed at the installation site.
Before each use, check all the gas connections for leak testing using the procedure listed below. If the smell of
gas is detected at any time, you should immediately stop using and check the entire system for leaks.
Before testing
Make sure all packing material has been removed from the appliance.
Make a solution of one part liquid detergent and one part water. You will need a spray bottle, brush or rag to apply
the solution to the fittings.
To test
1. Turn the burner valve OFF.
2. Turn the liquid propane cylinder valve on counter-clockwise to open the valve.
3. Apply the soap solution to all gas fittings. Soap bubbles would appear where a leak is present.
4. If a leak is present, immediately turn the gas supply OFF and tighten leaky fittings.
5. Turn the gas back ON and recheck.
6. Should the gas continue to leak from any of the fittings, turn the gas supply OFF and contact customer service.
9

1. Turn on the gas at the gas canister.
2. Push in and turn the button counter-clockwise until it clicks. Do not turn too quickly.
From press to click should take about 3 seconds
3. Hold in button for 5 seconds, then release.
Step 6
Ignition
Maximum power Minimum powerOff
Stand clear of the oven when igniting - ensure nobody is within 1 metres (3ft) of the front of the oven.
Maintain arms length from the oven when igniting, and do not lean over the oven when igniting.
10

1. If not, turn o the gas and go back to Step 6.
2. If the burner still does not ignite go to Step 8.
Step 7
Verify that the gas burner has on
11

If the burner still does not ignite; turn the gas on and light using a match and the supplied
match holder through the front of the oven. Hold it in front of the burners. Press and turn
the knob as described in Step 6.
Step 8
Ignition – using a match
If the flames go out turn off the gas and wait 5 minutes before reigniting
Always route the gas hose away from the oven. The hose must not touch the oven body
12

Troubleshooting
Problem Possible cause Prevention / Solution
My oven isn’t getting hot enough 1. Empty gas bottle
2. Cracking or leaking on the hose
3. Regulator improperly fixed
4. Operation in extreme conditions
1. Check the gas bottle is full, even a
bottle with little gas inside may aect
the gas burner performance
2. Ensure there is no cracking or leaking
on the hose
3. Ensure the regulator is properly
fixed to the gas bottle and the hose
is firmly attached to the gas burner
tightened using appropriate sized
wrenches as outlined in the instruc-
tion manual
4Your gas burner and oven should not
be used in extreme conditions (eg
high wind)
My gas burner will not ignite 1. Improper set-up
2. Empty gas bottle
3. Cracking or leaking from the hose
4. Improper lighting technique.
5. Regulator improperly fixed
6. Improper alignment of the sparker
1. Ensure the chimney cap is removed
and the ceiling vents and chimney
vent are open. The door should be
open.
2. Check the gas bottle is full, even a
bottle with little gas inside may aect
the gas burner performance
3. Ensure there is no cracking or leaking
on the hose
4. Turning the dial too quickly may
prevent the gas burner from lighting.
5. Ensure the regulator is properly
fixed to the gas bottle and the
hose is firmly attached to the gas
burner tightened using appropriate
sized wrenches as outlined in the
instruction manual
6. Reposition the sparker tip so it is
2-3 mm away from the front of the
burner cap.
My flame is too yellow / too blue Variation in the environment, the food
you cook, ambient temperature and
condition of your Ooni oven may eect
the colour of your flame
The colour of your flame will
not aect the taste or quality of
your food.
My FSD is not functioning correctly There may be soot build up on my FSD
probe
Ensure the gas burner and gas supply is
switched o, wait for the burner to cool
down, gently clean the probe and burner
holes with damp cloth, leave the burner
to fully dry before re-lighting.
Gas burner for Ooni will not maintain
it’s flame
1. Lack of oxygen
2. Oven placed on an uneven surface
1. Open the chimney vent of your Ooni
Pro to encourage better airflow
through the oven
2. If your Ooni is on a slant when set up,
the oxygen will not flow as well. Try
to set up on a flat surface.
I can hear a ‘roaring sound’ coming
from the Gas burner and my flames are
very weak
Flame is burning within the ventures Switch o the gas supply and the gas
burner immediately, wait 5 minutes and
relight the gas burner.
13

Ooni Limited, Unit 5 Bishopsgate Business Park, 189 West Main Street,
Broxburn, West Lothian, Scotland, EH52 5LH
Ooni Karu 12 Gas Burner / Brûleur à gaz Ooni Karu12
LP Rate Input / Taux d'entrée (BTU/H)
Components / Composant Orifice size / Taille de l'orifice
Main burner / Brûleur principal 0.85 17500
ANSIZ21.89-2017 CSA 1.18-2017
Outdoor Cooking Specialty Gas Appliance /
Cuisiner en plein air spécialisés appareils à gaz
Stand to side when relighting - never look directly into the oven or at
the flame.
Colóquese a un lado cuando vuelva a encenderlo, nunca mire
directamente al horno o a la llama.
Tiens-toi sur le côté lors du réallumage. Ne regarde jamais directement
la flamme ou l'intérieur du four.
For outdoor use only. If stored indoors, detach and leave cylinder outdoors.
Do not store spare LP-gas cylinder under or near the appliance.
Never fill the cylinder beyond 80 percent full.
If the information beyond is not followed exactly, a fire causing death or serious injury may
occur.
Minimal clearance from sides and back of the unit to combustible construction, 36 inches
from the sides and 36 inches from the front.
Do not use the appliance under overhead combustible surfaces.
CAUTION: Use only the gas pressure regulator supplied with this appliance.
This regulator is set for an outlet pressure of 11iwc.
Turn o the LP supply at cylinder when appliance is not in use.
This appliance is not intended for commercial use.
LIGHTING INSTRUCTION - TO LIGHT THE BURNER
Read all instructions before lighting
Make sure the control knob is in OFF position, and then turn the liquid propane cylinder
valve ON by slowly turning counterclockwise.
Push in and slowly turn the control knob anticlockwise until you hear a click and the
burner ignites.
If the burner doesn't light, turn the knob OFF, wait 5 minutes and repeat the lighting.
EN
Pour une utilisation extérieure seulement. Si l'appareil est rangé à l'intérieur, retirez le cylindre
et laissez-le à l'extérieur.
Ne rangez pas le cylindre à gaz de rechange LP sous l'appareil ou à proximité.
Ne remplissez jamais le cylindre à plus de 80 % de sa capacité.
Le non-respect des consignes ci-dessus pourrait causer un incendie mortel ou de blessures
graves.
Le dégagement minimum entre les côtés de l'unité et une construction combustible est de
36 po des côtés et de 36 po du devant.
N'utilisez pas l'appareil sous des surfaces combustibles.
AVERTISSEMENT : Utilisez seulement le régulateur de pression à gaz fourni avec cet appareil.
Ce régulateur est conçu pour une sortie de pression de 11 pouces CE.
Fermez l'alimentation LP au cylindre lorsque l'appareil n'est pas utilisé.
Cet appareil n'est pas conçu pour un usage commercial.
INSTRUCTIONS D'ALLUMAGE - POUR ALLUMER LE BRÛLEUR
Lisez bien toutes les instructions avant de procéder à l'allumage
Assurez-vous que le bouton de commande est en position ARRÊT, puis activez la vanne du
cylindre de propane liquide en la tournant lentement dans le sens contraire des aiguilles
d'une montre.
Enfoncez le bouton de commande et tournez-le lentement dans le sens contraire des
aiguilles d'une montre jusqu'à ce qu'il s'enclenche et que le brûleur s'allume.
Si le brûleur ne s'allume pas, fermez le bouton de commande, attendez 5 minutes puis
recommencez le processus d'allumage.
FR Solo para utilizar en exteriores. Si se guarda en interiores, desconecta el cilindro y mantenlo
en exteriores.
No conserves el cilindro de gas propano líquido de repuesto debajo o cerca del
electrodoméstico.
Nunca llenes el cilindro en más del 80 % de su capacidad total.
Si la información anterior no se sigue de manera exacta, puede ocurrir un incendio y
provocar lesiones graves o la muerte.
La distancia mínima entre las partes laterales y posterior de la unidad y una construcción
inflamable debe ser de 36 pulgadas desde los laterales y 36 pulgadas desde el frente.
No utilices este electrodoméstico bajo superficies inflamables.
PRECAUCIÓN: Utiliza solo el regulador de presión de gas que se suministra con este
electrodoméstico.
Este regulador está configurado para una presión de salida de 11 iwc.
Apaga el suministro de gas propano líquido en el cilindro cuando no utilices el
electrodoméstico.
Este electrodoméstico no está diseñado para uso comercial.
INSTRUCCIONES DE ENCENDIDO: PARA ENCENDER EL QUEMADOR
Lee todas las instrucciones antes de encenderlo
Asegúrate de que la perilla de control esté en la posición de apagado; luego, enciende la
válvula del cilindro de gas propano líquido girándola lentamente hacia la izquierda.
Presiona y gira la perilla de control lentamente hacia la izquierda hasta que escuches un clic
y el quemador se encienda.
Si el quemador no se enciende, apaga la perilla, espera 5 minutos y vuelve a encenderlo.
ES
Product technical information
Model number
Ooni Karu 12
Product Label
WARNING:
Do not spray aerosols in the vicinity of this appliance while it is in operation.
Do not use or store flammable materials in or near this appliance.
Do not place articles on or against this appliance. Do not modify this appliance
Ooni Karu 12 Gas Burner
Gas Type Number of Burners Injector Size Main
Burner
Total Gas Consumption
BTU Gas Pressure KPa
Propane 1 0.85mm 17500 2.8
14

ES
ADVERTENCIA
Para reducir el riesgo de incendio, quemaduras u otras
lesiones, lee este manual de seguridad con atención y de
manera completa antes de utilizar este electrodoméstico.
ADVERTENCIA
Antes de limpiarlo, asegúrate de que la perilla de control
y suministro de gas esté en posición de apagado, y que el
quemador y el horno se hayan enfriado.
PELIGRO
Nunca operes este electrodoméstico sin supervisión. Si ocurre
un incendio, aléjate del electrodoméstico y llama de inmediato
al departamento de bomberos. No intentes extinguir con agua
un incendio por aceite o grasa.
PELIGRO
Si sientes olor a gas:
• Cierra el paso de gas del electrodoméstico
• Extingue las llamas vivas
• Si el olor continúa, aléjate del electrodoméstico y llama
de inmediato a tu proveedor de gas o al departamento de
bomberos.
Si no sigues estas instrucciones, se puede generar un incendio,
explosión o riesgo de quemaduras que pueden causar daños a
la propiedad, lesiones personales o la muerte.
ADVERTENCIA
SOLO PARA UTILIZAR EN EXTERIORES.
ADVERTENCIA
a. Mantén la manguera de suministro de combustible lejos de
cualquier superficie caliente.
b. El consumo de alcohol o de drogas con o sin prescripción
puede alterar la capacidad del consumidor para instalar
el electrodoméstico de manera adecuada u operarlo con
seguridad.
c. Mantén a los niños y mascotas lejos del electrodoméstico
en todo momento.
d. No muevas el electrodoméstico mientras esté en uso.
e. Este electrodoméstico no está diseñado para utilizarse
como calentador, y nunca se debe usar como tal.
ADVERTENCIA
Pueden anidarse arañas e insectos dentro del quemador
del electrodoméstico y alterar el flujo de gas. Examina el
quemador al menos una vez por año.
ADVERTENCIA
Si utilizas un fósforo para encender el quemador, asegúrate de
utilizar el portafósforos incluido.
ADVERTENCIA
No conserves el electrodoméstico en interiores, salvo que el
cilindro de gas esté desconectado.
ADVERTENCIA
No conserves el cilindro de gas en un edificio, garaje u otra
área cerrada y mantenlo fuera del alcance de los niños en todo
momento.
ADVERTENCIA
Este electrodoméstico no está diseñado para instalarse en
barcos o vehículos recreativos.
ADVERTENCIA
Verifica si hay fugas en todas las conexiones de gas antes
de cada uso. No utilices el electrodomésticos hasta haber
examinado todas las conexiones y asegurarte de que no
existen fugas.
ADVERTENCIA
No fumes mientras examinas si hay fugas. No examines si
existen fugas con la llama encendida.
ADVERTENCIA
Cuando lo enciendas, mantén tu rostro y manos lo más lejos
posible del electrodoméstico.
ADVERTENCIA
La distancia mínima entre los laterales de la unidad y la
construcción inflamable es de 610 mm (24 pulgadas).
La distancia mínima entre la parte posterior de la unidad y la
construcción inflamable es de 915 mm (36 pulgadas).
ADVERTENCIA
Este manual de instrucciones contiene información importante
necesaria para la instalación correcta y el uso seguro del
electrodoméstico. Lee y sigue todas las advertencias e
instrucciones antes de instalar y utilizar el electrodoméstico.
Sigue todas las advertencias e instrucciones cuando utilices el
electrodoméstico. Guarda este manual para futuras consultas.
ADVERTENCIA
Este manual establece que un horno, una freidora o un asador
no se debe utilizar en un departamento ni en un balcón o deck
de condominio.
15

Párate a un lado cuando vuelvas a encenderlo; nunca mires directamente hacia
el horno o la llama.
Es posible que el regulador de gas suministrado no sea ideal para utilizar en tu territorio o región; consulta las
regulaciones locales para obtener más información.
ADVERTENCIA
Este electrodoméstico no está diseñado para instalarse en un
barco. Este electrodoméstico no está diseñado para instalarse
en un vehículo recreativo.
ADVERTENCIA
Mantén la manguera de suministro de combustible lejos de
cualquier superficie caliente.
ADVERTENCIA
Este manual incluye instrucciones para limpiar y examinar
la manguera antes de utilizar el electrodoméstico. Si existen
pruebas de abrasión, desgaste, cortes o fugas, se debe
reemplazar la manguera antes de operar el electrodoméstico.
La instalación de la manguera de repuesto se debe realizar
según las especificaciones de fabricante.
ADVERTENCIA
Este electrodoméstico solo se debe utilizar en exteriores, y no
en un edificio, garaje ni en alguna otra área cerrada.
ADVERTENCIA
Este manual incluye una lista de piezas requeridas que son
necesarias para el funcionamiento seguro del electrodoméstico,
instrucciones para la instalación adecuada y el ensamble
de las piezas instaladas y accesorios suministrados con el
electrodoméstico, y procedimientos adecuados para examinar
si existen fugas de gas.
ADVERTENCIA
El electrodoméstico no se debe ubicar ni utilizar debajo de
materiales o superficies inflamables sin protección en la parte
superior. Para una parrilla, freidora o asador, la distancia mínima
debe ser de al menos 10 pies (3 m) de cualquier estructura o
material inflamable.
ADVERTENCIA
Asegúrate de que las patas del Ooni Karu 12 estén totalmente
desplegadas antes de usarlo.
ADVERTENCIA
Para evitar una descarga, no toques el extremo del electrodo
cuando enciendas el quemador.
ADVERTENCIA
Durante su uso, asegúrate de que la ventilación de la chimenea
esté completamente abierta.
ADVERTENCIA
No ajustes la ventilación de la chimenea durante su uso.
ADVERTENCIA
Mantente alejado de los gases de escape calientes que
provienen de la chimenea.
ADVERTENCIA
Asegúrate de que exista una distancia de al menos 3.5" / 90 mm
entre los extremos de cualquiera de las patas del horno y el
extremo de la superficie de la mesa.
ADVERTENCIA PARA EL CILINDRO DE
GAS PROPANO LÍQUIDO
1. No conserves el cilindro de gas propano líquido de repuesto
debajo o cerca de este electrodoméstico.
2. Nunca llenes el cilindro en más del 80 % de su capacidad.
3. El cilindro de gas propano líquido se debe instalar con un
DISPOSITIVO DE PROTECCIÓN CONTRA DESBORDES
(OPD).
4. Si la información anterior no se sigue de manera exacta,
puede ocurrir un incendio y provocar lesiones graves o la
muerte.
5. Este manual establece que la instalación debe realizarse
conforme a los códigos locales o, en caso de que no existan
dichos códigos, al Código Nacional de Gas Combustible,
ANSI Z223.1/NFPA 54, a la Norma de almacenamiento y
manejo del gas licuado de petróleo, ANSI/NFPA 58; o al
Código de Instalación de Gas Natural y Propano, CSA B149.1;
Almacenamiento y Manejo de Gas Propano, CSA B149.2
16

Paso 1
Instala el tubo de la manguera (si es necesario)
Paso 1a
Ajusta con llaves adecuadas
Paso 1b
Ajusta con llaves adecuadas, luego sigue el Paso 1c.
Paso 1c
Ajusta con un destornillador adecuado.
Los reguladores y las conexiones de la manguera pueden variar según tu región.
Si tu horno de gas Ooni para Ooni Karu 12 tiene una manguera con extremo hembra roscado, sigue el Paso 1a.
Si tu horno de gas Ooni para Ooni Karu 12 tiene una manguera regular con extremo roscado con una abraza-
dera, sigue el Paso 1b y luego el 1c.
Si tu horno de gas Ooni para Ooni Karu 12 tiene una manguera regular con una abrazadera, sigue el Paso 1c.
Si tu horno de gas Ooni para Ooni Karu 12 tiene una manguera preinstalada, sigue con el Paso 2.
Ajusta hacia la izquierda en Europa.
17

Paso 2
Retira la puerta y la bandeja de combustible, y asegúrate de que la
ventilación de la chimenea esté abierta
18
Table of contents
Languages:
Other Ooni Indoor Fireplace manuals
Popular Indoor Fireplace manuals by other brands

Enviro
Enviro Q2G owner's manual

Majestic
Majestic MARQ42IN owner's manual

Regency Fireplace Products
Regency Fireplace Products CI1200 Alterra Owners & installation manual

Blaze King
Blaze King 6003T Installation and operating instructions

Sig Marine
Sig Marine DVP9000 Installation and operating manual

baltur
baltur TBG 45 P instruction manual