Optoma DLP User manual

User manual
DLP®Projector

English
2
TABLE OF CONTENTS
SAFETY ............................................................................................... 4
Important Safety Instruction....................................................................................................... 4
Laser Radiation Safety Information ........................................................................................... 5
Copyright ................................................................................................................................... 6
Disclaimer.................................................................................................................................. 6
Trademark Recognition ............................................................................................................. 6
FCC ........................................................................................................................................... 6
Declaration of Conformity for EU countries ............................................................................... 7
WEEE........................................................................................................................................ 7
INTRODUCTION.................................................................................. 8
Package Overview..................................................................................................................... 8
Standard accessories................................................................................................................ 8
Optional accessories ................................................................................................................. 8
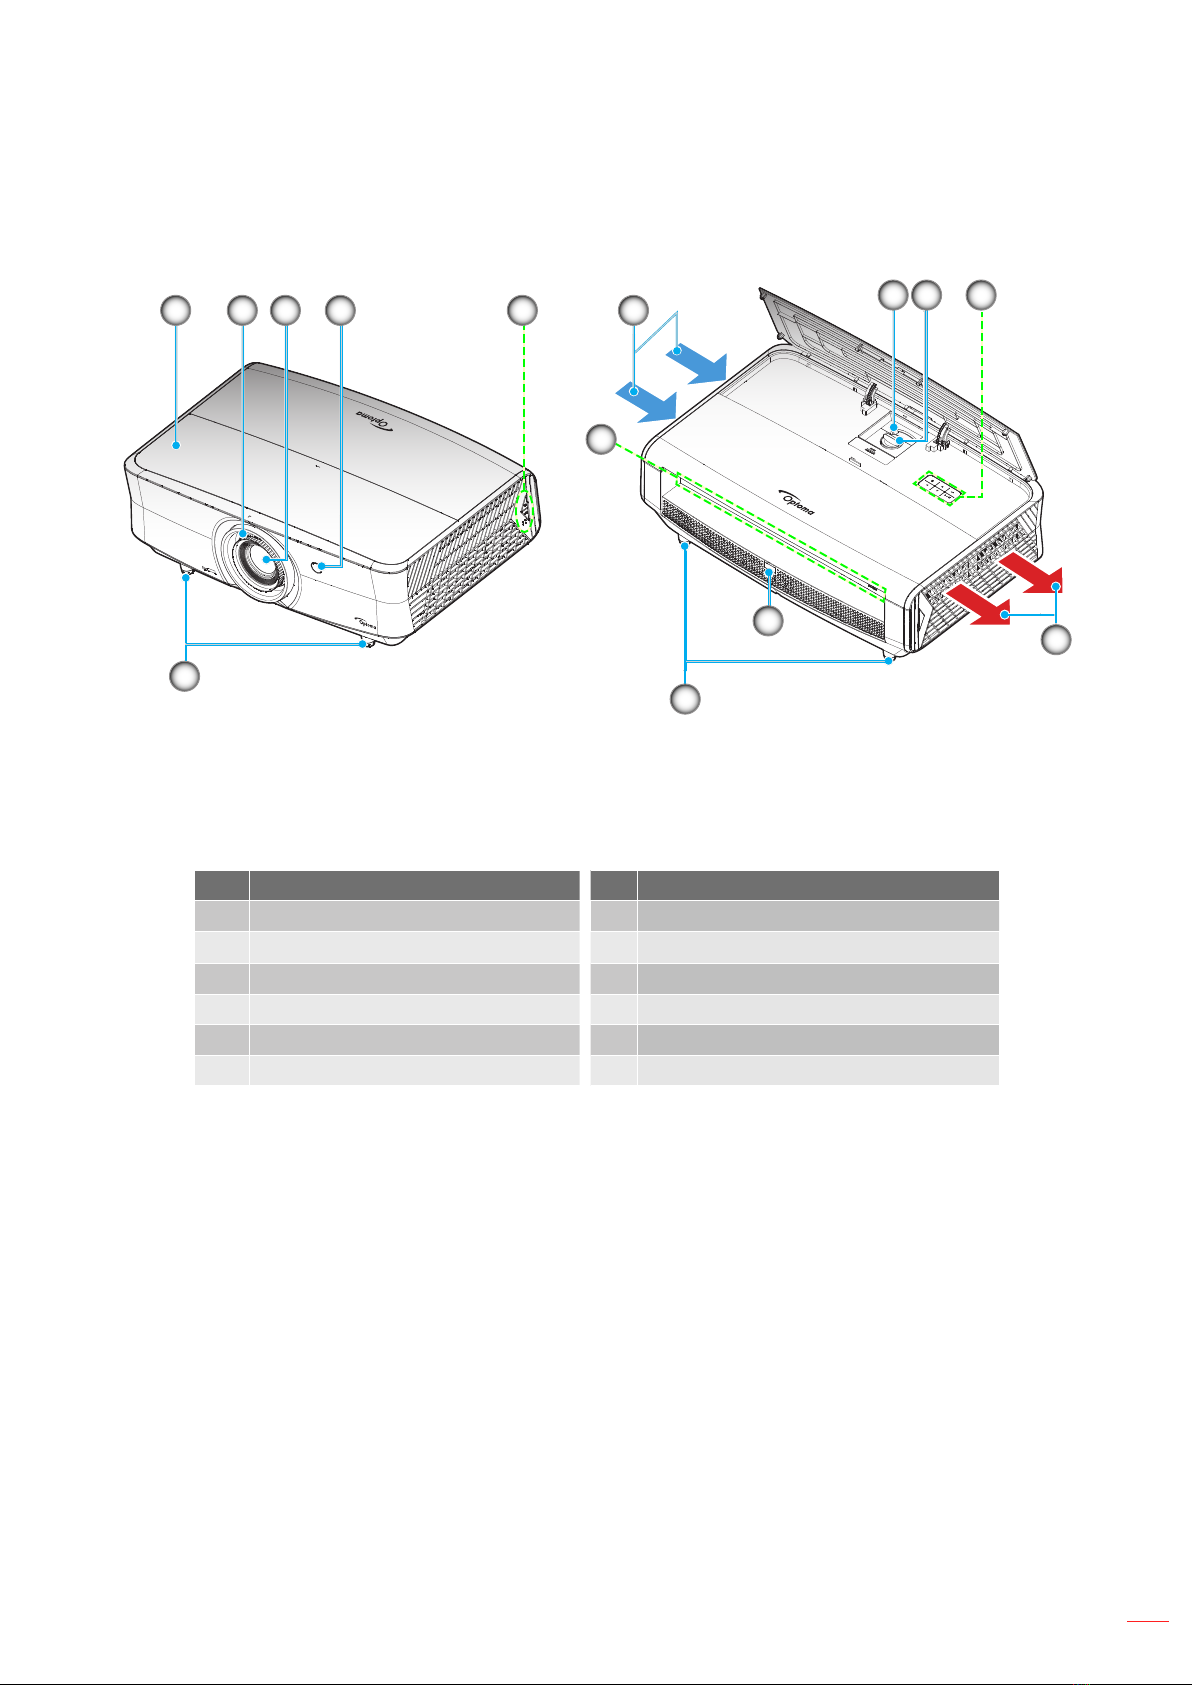
Product Overview ...................................................................................................................... 9
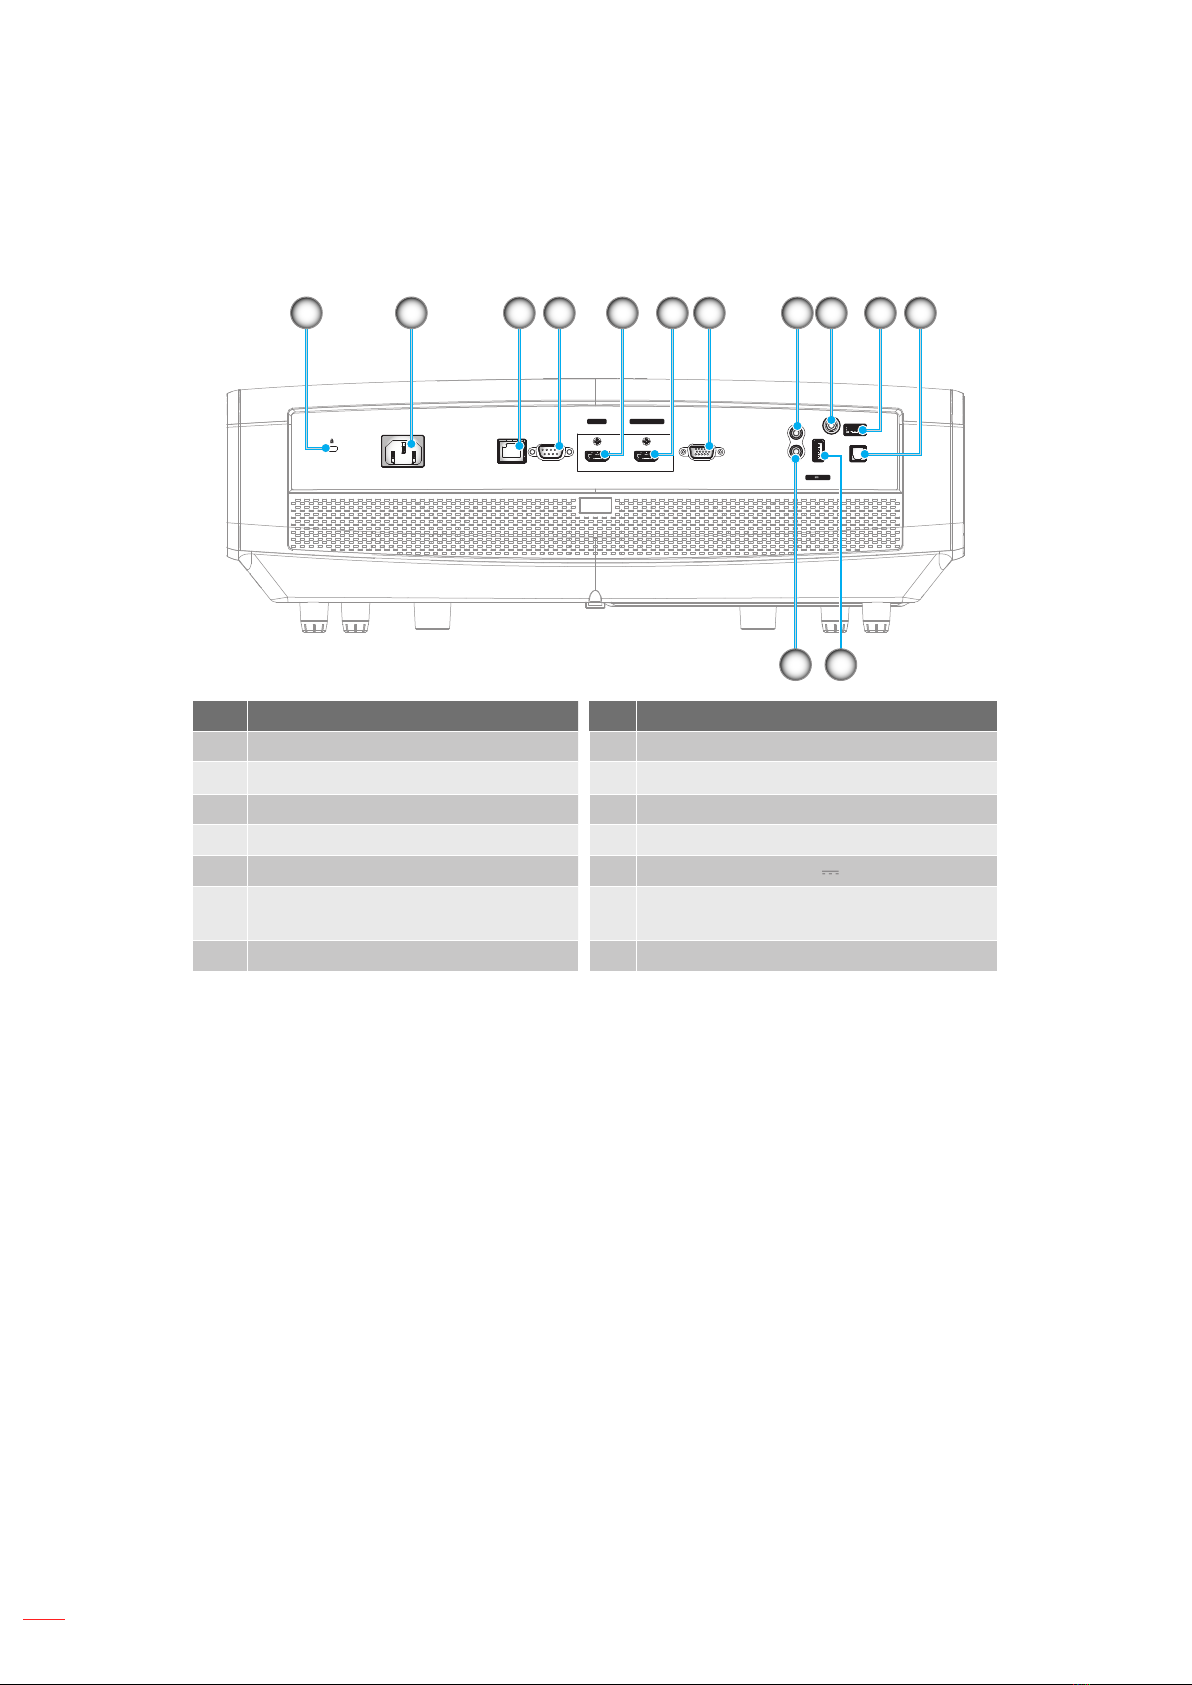
Connections.............................................................................................................................. 10
Keypad ..................................................................................................................................... 11
Remote control ......................................................................................................................... 12
SETUP AND INSTALLATION ............................................................. 14
Installing the projector .............................................................................................................. 14
Connecting sources to the projector......................................................................................... 16
Adjusting the projector image................................................................................................... 17
Remote setup ........................................................................................................................... 19
USING THE PROJECTOR.................................................................. 21
Powering on / off the projector.................................................................................................. 21
Selecting an input source ......................................................................................................... 22
Menu navigation and features .................................................................................................. 23
OSD Menu tree......................................................................................................................... 24
Display image settings menu.................................................................................................... 32
Display 3D menu ...................................................................................................................... 36
Display aspect ratio menu ........................................................................................................ 36
Display edge mask menu ......................................................................................................... 38
Display digital zoom menu........................................................................................................ 38
Display image shift menu ......................................................................................................... 38
Audio internal speaker menu.................................................................................................... 39
Audio mute menu ..................................................................................................................... 39
Audio volume menu.................................................................................................................. 39
Audio audio input menu............................................................................................................ 39
Audio audio out menu............................................................................................................... 39
Setup projection menu.............................................................................................................. 40
Setup lter settings menu......................................................................................................... 40

English 3
Setup power settings menu...................................................................................................... 40
Setup security menu................................................................................................................. 41
Setup test pattern menu ........................................................................................................... 41
Setup remote settings menu..................................................................................................... 41
Setup projector ID menu........................................................................................................... 41
Setup 12V trigger menu............................................................................................................ 42
Setup options menu.................................................................................................................. 42
Setup reset OSD menu ............................................................................................................ 43
Network LAN menu .................................................................................................................. 43
Network control menu............................................................................................................... 44
Setup network control settings menu ....................................................................................... 45
Info menu.................................................................................................................................. 50
MAINTENANCE.................................................................................. 51
Installing and cleaning the dust lter ........................................................................................ 51
ADDITIONAL INFORMATION ............................................................ 52
Compatible resolutions............................................................................................................. 52
Image size and projection distance .......................................................................................... 55
Projector dimensions and ceiling mount installation................................................................. 56
RS232 protocol function list...................................................................................................... 57
IR remote codes ....................................................................................................................... 67
Troubleshooting ........................................................................................................................ 71
Warning indicators.................................................................................................................... 73
Specications ........................................................................................................................... 75
Optoma global ofces............................................................................................................... 76

English
4
SAFETY
The lightning ash with arrow head within an equilateral triangle is
intended to alert the user to the presence of uninsulated "dangerous
voltage" within the product's enclosure that may be of sufcient
magnitude to constitute a risk of electric shock to persons.
The exclamation point within an equilateral triangle is intended to alert
the user to the presence of important operating and maintenance
(servicing) instructions in the literature accompanying the appliance.
Please follow all warnings, precautions and maintenance as recommended in this user’s guide.
Important Safety Instruction
Do not stare into the beam, RG2.
As with any bright source, do not stare into the direct beam, RG2 IEC 62471-5:2015.
Do not block any ventilation openings. To ensure reliable operation of the projector and to protect from
over heating, it is recommended to install the projector in a location that does not block ventilation.
As an example, do not place the projector on a crowded coffee table, sofa, bed, etc. Do not put the
projector in an enclosure such as a book case or a cabinet that restricts air ow.
To reduce the risk of re and/or electric shock, do not expose the projector to rain or moisture. Do not
install near heat sources such as radiators, heaters, stoves or any other apparatus such as ampliers
that emits heat.
Do not let objects or liquids enter the projector. They may touch dangerous voltage points and short
out parts that could result in re or electric shock.
Do not use under the following conditions:
± In extremely hot, cold or humid environments.
(i) Ensure that the ambient room temperature is within 5°C ~ 40°C
(ii) Relative humidity is 10% ~ 85%
± In areas susceptible to excessive dust and dirt.
± Near any appliance generating a strong magnetic eld.
± In direct sunlight.
Do not use the unit if it has been physically damaged or abused. Physical damage/abuse would be
(but not limited to):
± Unit has been dropped.
± Power supply cord or plug has been damaged.
± Liquid has been spilled on to the projector.
± Projector has been exposed to rain or moisture.
± Something has fallen in the projector or something is loose inside.
Do not place the projector on an unstable surface. The projector may fall over resulting in injury or the
projector may become damaged.
Do not block the light coming out of the projector lens when in operation. The light will heat the object
and may melt, cause burns or start a re.
Please do not open or disassemble the projector as this may cause electric shock.
Do not attempt to service the unit yourself. Opening or removing covers may expose you to dangerous
voltages or other hazards. Please call Optoma before you send the unit for repair.
See projector enclosure for safety related markings.

English 5
The unit should only be repaired by authorized service personnel.
Only use attachments/accessories specied by the manufacturer.
Do not look into straight into the projector lens during operation. The bright light may harm your eyes.
This projector will detect the life of the light source itself.
When switching the projector off, please ensure the cooling cycle has been completed before
disconnecting power. Allow 90 seconds for the projector to cool down.
Turn off and unplug the power plug from the AC outlet before cleaning the product.
Use a soft dry cloth with mild detergent to clean the display housing. Do not use abrasive cleaners,
waxes or solvents to clean the unit.
Disconnect the power plug from AC outlet if the product is not being used for a long period of time.
Do not setup the projector in places where it might be subjected to vibration or shock.
Do not touch the lens with bare hands.
Remove battery/batteries from remote control before storage. If the battery/batteries are left in the
remote for long periods, they may leak.
Do not use or store the projector in places where smoke from oil or cigarettes may be present, as it
can adversely affect the quality of the projector performance.
Please follow the correct projector orientation installation as non standard installation may affect the
projector performance.
Use a power strip and or surge protector. As power outages and brown-outs can KILL devices.
Laser Radiation Safety Information
This product is classied as CLASS 1 LASER PRODUCT - RISK GROUP 2 of IEC60825-1 : 2014 and
also complies with 21 CFR 1040.10 and 1040.11 as a Risk Group 2, LIP (Laser Illuminated Projector)
as dened in IEC 62471:2006 except for deviations pursuant to Laser Notice No. 50, dated June 24,
2007.
Failure to comply with the following could result in death or serious injury.
This projector has built-in Class 4 laser module. Disassembly or modication is very dangerous and
should never be attempted.
Any operation or adjustment not specically instructed by the user’s guide creates the risk of
hazardous laser radiation exposure.
Do not open or disassemble the projector as htis may cause damage by the exposure of laser
radiation.
Do not stare into beam when the projector is on. The bright light may result in permanent eye damage.
When turning on the projector, make sure no one within projection range is looking at the lens.
Without following the control, adjustment or operation procedure may cause damage by the exposure
of laser radiation.
Adequate instructions for assembly, operation, and maintenance, including clear warnings concerning
precautions to avoid possible exposure to laser.

English
6
Copyright
This publication, including all photographs, illustrations and software, is protected under international copyright
laws, with all rights reserved. Neither this manual, nor any of the material contained herein, may be reproduced
without written consent of the author.
© Copyright 2019
Disclaimer
The information in this document is subject to change without notice. The manufacturer makes no representations
or warranties with respect to the contents hereof and specically disclaims any implied warranties of
merchantability or tness for any particular purpose. The manufacturer reserves the right to revise this publication
and to make changes from time to time in the content hereof without obligation of the manufacturer to notify any
person of such revision or changes.
Trademark Recognition
Kensington is a U.S. registered trademark of ACCO Brand Corporation with issued registrations and pending
applications in other countries throughout the world.
HDMI, the HDMI Logo, and High-Denition Multimedia Interface are trademarks or registered trademarks of HDMI
Licensing LLC in the United States and other countries.
DLP®, DLP Link and the DLP logo are registered trademarks of Texas Instruments and BrilliantColorTM is a
trademark of Texas Instruments.
MHL, Mobile High-Denition Link and the MHL Logo are trademarks or registered trademarks of MHL Licensing,
LLC.
All other product names used in this manual are the properties of their respective owners and are Acknowledged.
FCC
This device has been tested and found to comply with the limits for a Class B digital device pursuant to Part 15
of the FCC rules. These limits are designed to provide reasonable protection against harmful interference in a
residential installation. This device generates, uses and can radiate radio frequency energy and, if not installed and
used in accordance with the instructions, may cause harmful interference to radio communications.
However, there is no guarantee that interference will not occur in a particular installation. If this device does cause
harmful interference to radio or television reception, which can be determined by turning the device off and on is
encouraged to try to correct the interference by one or more of the following measures:
Reorient or relocate the receiving antenna.
Increase the separation between the device and receiver.
Connect the device into an outlet on a circuit different from that to which the receiver is connected.
Consult the dealer or an experienced radio/television technician for help.
Notice: Shielded cables
All connections to other computing devices must be made using shielded cables to maintain compliance with FCC
regulations.
Caution
Changes or modications not expressly approved by the manufacturer could void the user's authority, which is
granted by the Federal Communications Commission, to operate this projector.

English 7
Operation Conditions
This device complies with Part 15 of the FCC Rules. Operation is subject to the following two conditions:
1. This device may not cause harmful interference and
2. This device must accept any interference received, including interference that may cause undesired operation.
Notice: Canadian users
This Class B digital apparatus complies with Canadian ICES-003.
Remarque à l'intention des utilisateurs canadiens
Cet appareil numerique de la classe B est conforme a la norme NMB-003 du Canada.
Declaration of Conformity for EU countries
EMC Directive 2014/30/EU (including amendments)
Low Voltage Directive 2014/35/EU
RED 2014/53/EU (if product has RF function)
WEEE
Disposal instructions
Do not throw this electronic device into the trash when discarding. To minimize pollution and ensure
utmost protection of the global environment, please recycle it.

English
8
INTRODUCTION
Package Overview
Carefully unpack and verify that you have the items listed below under standard accessories. Some of the items
under optional accessories may not be available depending on the model, specication and your region of
purchase. Please check with your place of purchase. Some accessories may vary from region to region.
The warranty card is only supplied in some specic regions. Please consult your dealer for detailed information.
Standard accessories
Optional accessories
Note:
Optional accessories vary depending on model, specication and region.
Projector Remote control Power lead Documentation
Warranty Card*
Basic User Manual
Paper UM
F3
On
Geometric
Mode
Correction PIP/PBP
Off
F1 F2
AV Mute
ENTER
Source
Volume D Zoom
Info.
VGA
1
S-Video
2
HDMI1
3
HDMI2
HDMI3
Format Freeze Remote
ID All
HDBaseT
4
Video
5
DVI
6
BNC
7
YPbPr
8
DisplayPort
9
3D
0
Re-Sync
Menu
F3
Note:
The remote control is shipped with the battery.
*For European warranty Information, please visit www.optoma.com.
Lens cap CD user manual Carry bag VGA cable

English 9
INTRODUCTION
Product Overview
11
721 53 4
8 9 5
10
4
11
6
Note:
Do not block projector intake and exhaust vents.
When operating the projector in an enclosed space, allow at least 30 cm clearance around the intake
and exhaust vents.
No Item No Item
1. Top Cover 7. Ventilation (inlet)
2. Focus Ring 8. Zoom Lever
3. Lens 9. Lens Shift Dial
4. IR Receiver 10. Ventilation (outlet)
5. Keypad 11. Tilt-Adjustment Foot
6. Input / Output

English
10
INTRODUCTION
Connections
(5V 1.5A)
AC-IN RJ-45 RS232 VGA
SERVICE
S / PDIF
AUDIO
IN 12V
OUT
AUDIO
OUT
USB
POWER OUT
HDMI 1
HDMI v1.4
HDMI 2
HDMI v2.0 4K/MHL
2
13
1 6 743 5 9 10 118
12
No Item No Item
1. KensingtonTM Lock Port 8. AUDIO IN Connector
2. Power Socket 9. 12V OUT Connector
3. RJ-45 Connector 10. Service Connector (*2)
4. RS232 Connector 11. S/PDIF Connector
5. HDMI 1 (v1.4) Connector 12. USB Power Out (5V 1.5A) (*3)
6. HDMI 2 (v2.0) 4K / MHL Connector
(*1;*3)13. AUDIO OUT Connector
7. VGA Connector
Note:
(*1)HDMI 2 connector supports HDCP2.2 and MHL V2.2.
(*2)For rmware upgrade.
(*3)MHL and USB DC5V are alternately powered on. For example, USB DC 5V is off when MHL is on
or DC 5V is on when MHL is off.

English 11
INTRODUCTION
Keypad
7
8
1 2 43
56
No Item No Item
1. Power and On/Standby LED 5. Re-Sync
2. Source 6. Four Directional Select Keys
3. Menu 7. Laser LED
4. Enter 8. Temp LED

English
12
INTRODUCTION
Remote control
For Data Model
F3
On
Geometric
Mode
Correction PIP/PBP
Off
F1 F2
AV Mute
ENTER
Source
Volume D Zoom
Info.
VGA
1
S-Video
2
HDMI1
3
HDMI2
HDMI3
Format Freeze Remote
ID All
HDBaseT
4
Video
5
DVI
6
BNC
7
YPbPr
8
DisplayPort
9
3D
0
Re-Sync
Menu
F3
10
1
2
3
4
5
6
8
7
9
11
34
33
32
31
12
13
15
14
16
19
2017 2118
27
26
29
30
28
25
24
23
22
No Item No Item
1. Power on 18. YPbPr (not supported)
2. Geometric Correction 19. Numeric keypad (0-9)
3. Function button (F1) (Assignable) 20. Display port (not supported)
4. Mode 21. 3D
5. Four directional select keys 22. DVI (not supported)
6. Information 23. HDMI3 (not supported)
7. Function button (F3) (Assignable) 24. HDMI1
8. Source 25. HDMI2
9. Menu 26. Remote ID / Remote all
10. Volume - / + 27. Digital Zoom - / +
11. Freeze 28. Re-sync
12. Format (Aspect Ratio) 29. Laser (not supported)
13. VGA 30. Enter
14. S-Video 31. AV Mute
15. HDBase-T 32. Function button (F2) (Assignable)
16. Video 33. PIP/PBP (not supported)
17. BNC (not supported) 34. Power off

English 13
INTRODUCTION
Note: Some keys may have no function for models that do not support these features.
For Home Model
ON OFF
Menu
VGA1
HDMI1
User2
Contrast
Aspect ratio
DB
Volume
Source
Re-sync
User1
Brightness
Keystone
Mute
User3
Mode
3D
Sleep Timer
Volume
HDMI2
VGA2 Video YPbPr
1
3
2
4
5
6
7
8
11
12
13
14
15
16
17
18
19
20
21
23
22
24
25
27
26
9
10
No Item No Item
1. Power On 15. User 3
2. User 2 16. Contrast
3. User 1 17. Display Mode
4. Brightness 18. Aspect Ratio
5. Keystone (not supported) 19. 3D Menu On / Off (not supported)
6. Mute 20. Sleep Timer
7. DB (Dynamic Black) 21. Volume +
8. Source 22. Re-Sync
9. Enter 23. Four Directional Select Keys
10. Menu 24. Volume -
11. HDMI1 25. HDMI2
12. VGA1 26. YPbPr (not supported)
13. VGA2 (not supported) 27. Video (not supported)
14. Power Off
Note: Some keys may have no function for models that do not support these features.

English
14
SETUP AND INSTALLATION
Installing the projector
Your projector is designed to be installed in one of four possible positions.
Your room layout or personal preference will dictate which installation location you select. Take into consideration
the size and position of your screen, the location of a suitable power outlet, as well as the location and distance
between the projector and the rest of your equipment.
Table mount front Ceiling mount front
Table mount rear Ceiling mount rear
Projector should be placed at on a surface and 90 degrees / perpendicular to the screen.
How to determine projector location for a given screen size, please refer to distance table on page
55.
How to determine screen size for a given distance, please refer to distance table on page 55.
Note: The further away the projector is placed from the screen the projected image size increases and vertical
offset also increases proportionally.
IMPORTANT!
Do not operate the projector in any orientation other than table top or ceiling mount. The projector should
be horizontal and not tilted either forwards/backwards or left/right. Any other orientation will invalidate the
warranty and may shorten the lifetime of the projector light source or the projector itself. For none standard
installation advise please contact Optoma.

English 15
SETUP AND INSTALLATION
Projector installation notice
Allow at least 30 cm clearance around the exhaust vent.
Minimum
100mm
(3.94 inches)
Minimum
300mm
(11.81 inches)
Minimum
300mm
(11.81 inches)
Minimum
100mm
(3.94 inches)
Minimum
100mm
(3.94 inches)
Minimum
100mm
(3.94 inches)
Ensure that the intake vents do not recycle hot air from the exhaust vent.
When operating the projector in an enclosed space, ensure that the surrounding air temperature within
the enclosure does not exceed operation temperature while the projector is running, and the air intake
and exhaust vents are unobstructed.
All enclosures should pass a certied thermal evaluation to ensure that the projector does not recycle
exhaust air, as this may cause the device to shutdown even if the enclosure temperature is with the
acceptable operation temperature range.

English
16
SETUP AND INSTALLATION
Connecting sources to the projector
(5V 1.5A)
AC-IN RJ-45 RS232 VGA
SERVICE
S / PDIF
AUDIO
IN 12V
OUT
AUDIO
OUT
USB
POWER OUT
HDMI 1
HDMI v1.4
HDMI 2
HDMI v2.0 4K/MHL
MOLEX
MOLEX
1
10
2
3
4
5
6
7
8
9
11
12
13
14
No Item No Item
1. HDMI Cable 8. S/PDIF Out Cable
2. HDMI / MHL Cable 9. USB Power Cable
3. RCA Component Cable 10. Audio Out Cable
4. VGA In Cable 11. HDMI Dongle
5. Audio In Cable 12. RS232 Cable
6. 12V DC Jack 13. RJ-45 Cable
7. USB Cable 14. Power Cord

English 17
SETUP AND INSTALLATION
Adjusting the projector image
Image height
The projector is equipped with elevator feet for adjusting the image height.
1. Locate the adjustable foot you wish to adjust on the underside of the projector.
2. Rotate the adjustable foot clockwise or counterclockwise to raise or lower the projector.
Tilt-Adjustment Feet
Tilt-Adjustment Ring
Zoom, lens shift, and focus
To adjust the image size and position, do the following:
a. Push down rmly on the middle of the top cover to unlock the latch. Then open the top cover.
Zoom Lever
Lens Shift
b. To adjust the image size, turn the zoom lever clockwise or counterclockwise to increase or decrease
the projected image size.
c. To adjust the image position, turn the lens shift dial clockwise or counterclockwise to adjust the
position of the projected image vertically.

English
18
SETUP AND INSTALLATION
To adjust the focus, turn the focus ring clockwise or counterclockwise until the image is sharp and
legible.
Focus Ring
Focus adjustment
Note: The projector will focus at a distance of 1.3m to 9.3m.

English 19
SETUP AND INSTALLATION
Remote setup
Installing / replacing the batteries
Two AAA size batteries are supplied for the remote control.
1. Remove the battery cover on the back of the remote control.
2. Insert AAA batteries in the battery compartment as illustrated.
3. Replace back cover on remote control.
Note: Replace only with the same or equivalent type batteries.
CAUTION
Improper use of batteries can result in chemical leakage or explosion. Be sure to follow the instructions below.
Do not mix batteries of different types. Different types of batteries have different characteristics.
Do not mix old and new batteries. Mixing old and new batteries can shorten the life of new batteries or
cause chemical leakage in old batteries.
Remove batteries as soon as the are depleted. Chemicals that leak from batteries that come in contact
with skin can cause a rash. If you nd any chemical leakage, wipe thoroughly with a cloth.
The batteries supplied with this product may have a shorter life expectancy due to storage conditions.
If you will not be using the remote control for an extended period of time, remove the batteries.
When you dispose of the batteries, you must obey the law in the relative area or country.
Effective range
Infra-Red (IR) remote control sensor is located on the front side and rear side of the projector. Ensure to hold the
remote control at an angle within 30 degrees perpendicular to the projector’s IR remote control sensor to function
correctly. The distance between the remote control and the sensor should not be longer than 7 meters (~ 23 feet).
Make sure that there are no obstacles between the remote control and the IR sensor on the projector
that might obstruct the infra-red beam.
Make sure the IR transmitter of the remote control is not being shined by sunlight or uorescent lamps
directly.
Please keep the remote controller away from uorescent lamps for over 2 m or the remote controller
might become malfunction.
If the remote control is close to Inverter-Type uorescent lamps, it might become ineffective from time
to time.
If the remote control and the projector are within a very short distance, the remote control might
become ineffective.
When you aim at the screen, the effective distance is less than 5 m from the remote control to the
screen and reecting the IR beams back to the projector. However, the effective range might change
according to screens.

English
20
SETUP AND INSTALLATION
F3
On
Geometric
Mode
Correction PIP/PBP
Off
F1 F2
AV Mute
ENTER
Source
Volume D Zoom
Info.
VGA
1
S-Video
2
HDMI1
3
HDMI2
HDMI3
Format Freeze Remote
ID All
HDBaseT
4
Video
5
DVI
6
BNC
7
YPbPr
8
DisplayPort
9
3D
0
Re-Sync
Menu
F3
F3
On
Geometric
Mode
Correction PIP/PBP
Off
F1 F2
AV Mute
ENTER
Source
Volume D Zoom
Info.
VGA
1
S-Video
2
HDMI1
3
HDMI2
HDMI3
Format Freeze Remote
ID All
HDBaseT
4
Video
5
DVI
6
BNC
7
YPbPr
8
DisplayPort
9
3D
0
Re-Sync
Menu
F3
Approx. ±15°
Approx. ±15°
Other manuals for DLP
2
Table of contents
Other Optoma Projector manuals

Optoma
Optoma EH615T User manual

Optoma
Optoma DS329 User manual

Optoma
Optoma EW695UT User manual

Optoma
Optoma EW766 User manual

Optoma
Optoma TW610ST User manual

Optoma
Optoma EH1020 User manual

Optoma
Optoma HD81-LV User manual

Optoma
Optoma EH200st User manual

Optoma
Optoma TX612-3D User manual

Optoma
Optoma EP770 Instruction manual

Optoma
Optoma 4K500 User manual

Optoma
Optoma TX542-3D User manual

Optoma
Optoma EcoBright TL50W User manual

Optoma
Optoma EH1020 User manual

Optoma
Optoma HD80 Quick start guide

Optoma
Optoma DS322 User manual

Optoma
Optoma ES520 Technical manual

Optoma
Optoma H27 User manual

Optoma
Optoma UHZ45 User manual

Optoma
Optoma EX542 User manual