Oracom ORC-200M User manual

-1-
DIGITAL AUDIO PLAYER
(ORC-200M)
User Manual

-2-
# CONTENTS #
@ PREPARATION
■
Feature
■
Checking parts
■
Names and functions of ORC-200M
■
LCD display panel
@ INSTALLATION AND USE
■
Turning on/off the power
■
Setting the modes
■
Playing back digital music/voice files
■
Adjusting the volume
■
Searching music/voice file
■
Setting the section repeating function
■
Recording voice
■
Button table
@ APPLICATION
■
Setting the menu
■
Setting the repeat function
■
Setting the equalizer function
■
Managing files
■
Setting the logo
■
Setting display function
■
Display the file information
■
Setting the language
■
Menu table
@ COMPUTER CONNCETION
■
Installing USB Device Driver for Windows98/SE
■
Connecting ORC-200M to PC
■
Managing files
■
Formatting
■
Separating ORC-200M from PC
@ LOGO EDITOR
■
Installing logo editor
■
Editing logo
■
Installing logo
@ CUSTOMER SERVICE
■
Product Specification

-3-
@ PREPARATION
■
FEATURE
°
Compact and slim design
°
Plug-and-Play USB flash drive (USB driver is needed only for Windows 98/SE)
°
MP3,WMA music file playback
°
Voice recording function
°
F/W upgradable
°
10 band Equalizer
°
Controlling diverse menu
°
User logo support
°
High-speed USB communication
°
Indigo blue backlight
°
Diverse OS support for Windows, Mac and Linux
■
CHECKING PARTS
°
Digital Audio Player (ORC-200M)
°
Stereo Earphone
°
USB cable
°
Installation CD
°
One AAA size battery
°
User manual
■
Names and functions of ORC-200M
■
LCD display panel
MicrophoneEarphone jack LCD display pannel
Volume control button
+ -
Mode button
▷□
buttonBattery case
◀◀
/
▶▶
button
1/030
Mahavishnu Orche
03:36:52
Repeat icon Playing time
Text scroll area
EQ icon
File No/Total file No. Battery iconModeMode icon

-4-
@ INSTALLATION AND USE
■
TURNING ON/OFF THE POWER
°
Press the
▷□
button on the ORC-200M to turn on the power.
LOGO
◀
125 MB free
▶
Mahavishnu Orche
03:36:52
1/030
°
Press the
▷□
button on the ORC-200M for longer than 1 seconds to turn off the power.
If the unit is in the Stop mode for longer than 1 minute, it will power off automatically.
Power Off
■
CONVERTING MODES
°
Stop to playback and press the mode button.
It converts like Music mode
→
Voice mode
→
Voice recording mode
Mahavishnu Orche
03:36:52
1/030 VI002.VRF
01:25:43
1/015 Standby
00:06:21
(Music mode) (Voice mode) (Voice recording mode)
■
PLAYING BACK DIGITAL MUSIC/VOICE FILES
°
To playback - Press
▷□
button on ORC-200M in stop mode, and digital music/voice
will be played back.
°
To stop - Press
▷□
button on ORC-200M in playback mode, and digital music/voice
will be stopped.
■
CONTROLLING VOLUME
°
Control volume with volume control button( + - )on ORC-200M player.
Volume can be controlled in the range from 0 to 30.
Press the button briefly to control the volume by one level.
Press and hold button to control continuously
03:36:52
1/030 15
■
SEARCHING MUSIC/VOICE FILE
°
To move desired music/voice file
- Press the
◀◀
button to move one track backward in the playback or stop mode.
- Press the
▶▶
button to move one track forward in the playback or stop mode.
Note) If the
◀◀
button is pressed within 5 seconds after a song started,
the previous song will be repeated.
If the button is pressed 5 seconds after the song started,
the current song will be repeated.
(For VBR files, the previous song won't be played even if the button is pressed within
5 seconds.)
For VBR files, the actually playtime may not match the playback time displayed on

-5-
ORC-200M.
* VBR(Variable Bit Rate) file: MP3 file which has multi compression rates applied
°
To move the desired spot of the song during playback
Press the
◀◀
/
▶▶
button for longer than 1 second and release the
◀◀
/
▶▶
button
at the desired spot of the song.
■
SETTING SECTION REPEATING FUNCTION
°
To set a start point of section repeating
Press the mode button briefly at the start point of the desired section repeating during digital
music/voice playback. Then, the icon brinks on the display panel.
°
To set an end point of section repeating
Press the mode button again briefly at the end point of the desired section repeating.
Then, it shows Icon on the display panel and the section from A to B will be
automatically repeated.
°
To cancel a section repeating
Press the mode button in the section repeating status.
Then, the section repeating is cancelled, and it is played back automatically.
Mahavishnu Orche
03:36:52
1/030 Mahavishnu Orche
03:36:52
1/030 Mahavishnu Orche
03:36:52
1/030
■
RECORDING VOICE
°
To record voice
Move the voice recording mode
Press
▷□
button and recording starts.
°
To finish voice recording
Press the
▷□
button. Then, recording stops and voice file will be created.
Note) When memory is fully used, recording stops automatically and voice file will be created.
Possible recording time shows in the low of the 'standby' text in accordance with memory
capacity.
VI003.VRF
00:06:21
Standby
07:23:46

-6-
■
BUTTON TABLE
Button Former status Push time Operation
▷□
Power off Briefly Playback after power on
Music/Voice playback Briefly Stop
Music/Voice playback
Recording
Stop Longer Power off
Stop (Music/Voice mode) Briefly Playback
Stop (Recording mode) Briefly Start Voice Recording
Recording Briefly Finish Voice Recording
Menu status Briefly To exit menu
▶▶
|
Playback Briefly Playback the next file
Playback Longer Fast backward search in playback file
Stop Briefly To move the next file
|
◀◀
Playback Briefly
Less than 5 sec. after beginning playback :
Former file playback
Longer than 5 sec. after beginning playback :
File playback from the start
Playback Longer Fast forward search in playback file
Stop Briefly To move the former file
+
Playback / Stop Briefly/longer Volume(
↑
)
Menu status Briefly To move in the menu
-
Playback / Stop Briefly/longer Volume(
↓
)
Menu status Briefly To move in the menu
MODE
Stop Briefly To change the mode ( Music
→
Voice
→
Record )
Playback Briefly To appoint the starting spot of the section
repeating
During setting section
repeating Briefly To appoint the ending spot of the section repeating
Status of setting section
repeating Briefly To cancel the section repeating
Playback / Stop Longer To move the menu mode
Menu status Briefly To select the menu item

-7-
@ APPLICATION
■
SETTING THE MENU
°
Press the mode button for longer than 1 sec., and it is converted to the menu mode.
When selecting, use the mode button and when moving the different order,
use + /
-
button.
°
Pressing
▷□
button is to
cancel
the menu mode.
- Repeat: when selecting the repeating playback
- EQ: when using the equalizer function
- File: when deleting or formatting the music/voice file
- Logo: when selecting the logo
- Display: when controlling the display panel
- File info: when display the file information
- Language: when selecting the language
- Exit menu: when exiting the menu
Note) If there is no any input in the menu mode for 10 sec., it will be cancelled automatically.
Return is not the function in the menu mode. Select Return to exit the present mode.
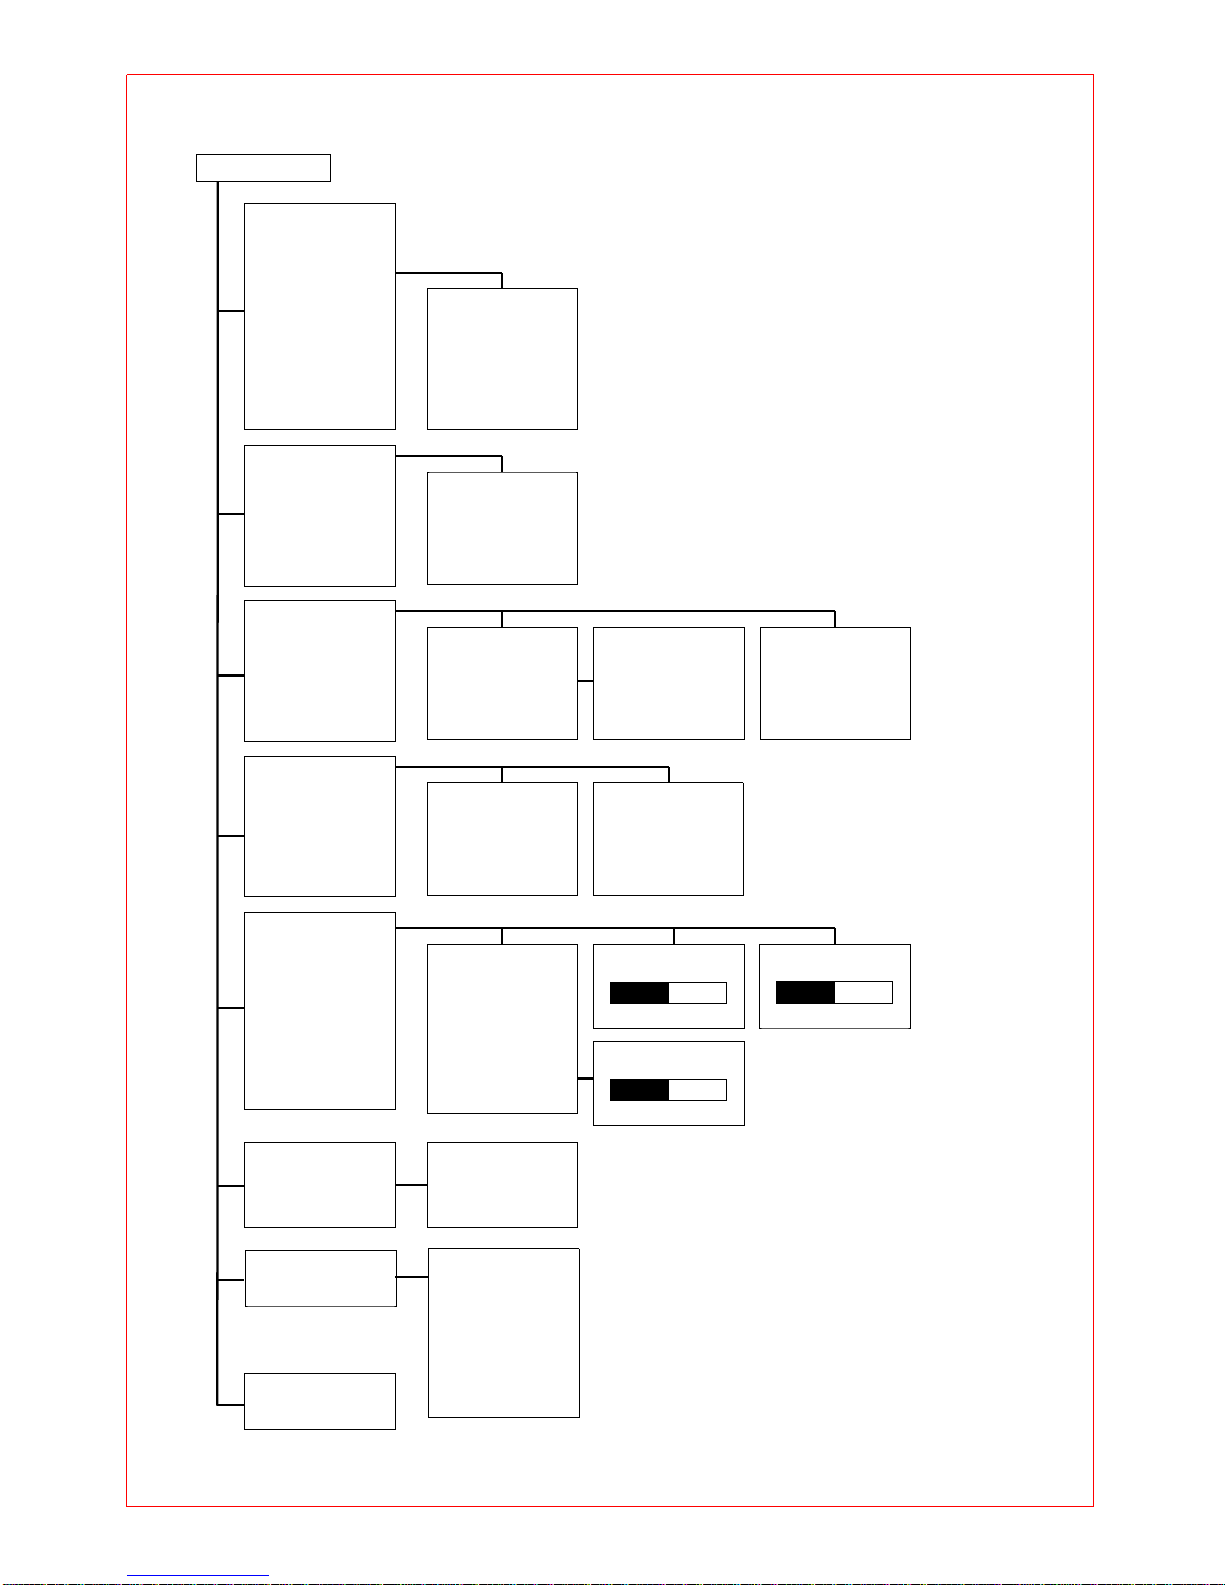
MENU
①
Repeat
②
EQ
▶
▶
■
SETTING THE REPEAT FUNCTION
°
Select Repeat in the menu mode.
Move the desired repeat mode with + /
-
button, and then select the mode button.
- Normal: when playing back 1 time each of collection in order
- Repeat one: when listening one file repeatedly
- Repeat all: when listening all files repeatedly
- Repeat list: when listening the file after making the list
- Shuffle: when listening the appointed file randomly
- Intro: when listening the first 10 sec. of all appointed files
REPEAT
①
Normal
②
Repeat one
°
To make the repeat list
When the repeat list menu is selected, it shows the list control panel.
When selecting the desired music/voice file and making the list, it playbacks and repeats the
appointed song only
REPEAT LIST
001: ~
002: ~
■
SETTING THE EQUALIZER FUNCTION
°
Select EQ in the menu mode
Select the mode button after moving the desired the EQ mode with + /
-
button.
EQ
①
Normal
②
User
▶

-8-
- Normal: Setting the 0dB base equalizer
- User: User can set the equalizer with user's taste
10 band : Setting the range from -8 to +8
USER
①
Bass
②
Treble
▶
▶
BASS TREBLE
00 00
■
MANAGING FILES
°
Select the file in the menu mode.
Select with the mode button after moving the desired file mode with + /
-
button.
°
To delete
To select the place of the deleting file after selecting "delete".
Delete to select the mode button after moving the file that you want to delete.
FILE
①
Delete
②
Format
▶
▶
MUSIC
001: ~
002: ~ Deleting...
DELETE
①
Music
②
Voice
▶
▶
°
Format
All files of the memory are deleted if the format is selected.
FILE
①
Delete
②
Format
▶
▶
FORMAT
①
OK
②
Cancel Formatting...
Caution) All files are deleted when executing the format.
■
SETTING THE LOGO
°
Logo can be selected in the display panel.
- Default: Oracom Logo
- User: User's Logo by using the logo editor
°
Display logo
It can be selected if the logo is displayed always
On: Always
Off: When power on
LOGO
①
Default
②
User
▶
■
SETTING DISPLAY FUNCTION
°
Select display in the menu mode.
Select with the mode button after moving the desired display mode with + /
-
button
DISPLAY
①
Backlight
②
Contrast
▶
▶
°
Backlight
The backlight in the display panel can be controlled

-9-
1. On: Turned on always
2. Off: Turned on accordance with the time.
3. Lighting Time: The lasting time of backlight
Set the time to press + /
-
button.
BACKLIGHT
①
On
②
Off
Note) If Off is selected, battery is saved.
°
Contrast
Contrast can be controlled in the display panel.
Control the contrast to press + /
-
button.
CONTRAST
10
°
Scroll speed
The text passing speed can be controlled in the display panel.
Control the contrast to press + /
-
button.
SCROLL SPEED
5
■
DISPLAY THE FILE INFORMATION
- Bitrate - Sampling Frequency
- File Size - Playing Time
FILE INFO
128Kbps
9.3Mbyte 44.1KHz
12:32
■
SETTING THE LANGUAGE
- 1. Korean
2. Western
3. W.Europe
4. Japanese
5. S.Chinese (Simplified Chinese)
6. T.Chinese (Traditional Chinese)

-10-
■
MENU TABLE
Repeat
1.Normal
2.Repeat one
3.Repeat all
4.Repeat list
▶
5.Shuffle
6.Intro
Return
EQ
1.Normal
2.User
▶
Return
File
1.Delete
▶
2.Format
▶
Return
Logo
1.Default
2.User
▶
3.Display logo
▶
Return
Repeat list
1.file1
2.file2
3.file3 ...
Return
User
10 Band
MENU
Delete
1.Music
▶
2.Voice
▶
Return
Music/Voice
1.M/V file1
2.M/V file1 ...
Return
Format
1.OK
2.Cancel
User
1.Logo1
2.Logo2 ...
Return
Display logo
1.On
2.Off
Exit menu
1.Korean
2.Western
3.W.Europe
4.Japanese
5.S.Chinese
6.T.Chinese
File Info
▶
File Info
Bitrate Spl.freq
Size Time
Display
1.Backlight
▶
2.Contrast
▶
3.Scroll speed
▶
Return
ContrastBacklight
1.On
2.Off
3.Lighting time
▶
Return Lighting time
Scroll speed
Language

-11-
@ COMPUTER CONNCETION
■
INSTALLING USB DEVICE DRIVER FOR WINDOWS98/SE
Note) Do not need to install the driver again after installation for use of windows98/SE
°
Insert the installation CD supported to "CD-ROM driver" in PC and
plug ORC-200M into PC's
USB port.
Click on the next button when the pop-up diagram shows as below.
°
Check "Search for the best driver for your device " and click
on the next button
when the pop-up diagram shows as below.

-12-
°
Check "CD-ROM drive" and click
on the next button when the pop-up diagram shows as below.
°
Click on the next button when the pop-up diagram shows as below..

-13-
°
Click on the button to finish the installation
Now the driver has been installed into your system.
■
CONNECTING ORC-200M TO PC
°
Turn on the PC power
Connect PC connection cable to USB port on the PC
"Removable Disk" folder is made in the My Computer of the Window Explore.
°
The usage is the same as floppy disk or hard disk.
When ORC-200M is removed from PC, the Removable Disk is disappeared in the My
Computer folder.

-14-
The message, Waiting shows in the display panel of ORC-200M while connecting to PC.
Standby
PC<->Player
■
MANAGING FILES
°
There are MUSIC, VOICE, and LOGO folder in the Removable disk and they are still
existed even if formatted.
°
To download the music file.
Save the music file in the MUSIC folder.
The display panel in ORC-200M shows as below while downloading the file.
PC<->Player
▶
Caution) Do not remove ORC-200M from PC even if PC monitor says finished
when PC<->Player (
▶
) is moving in the display panel of ORC-200M.
Caution) If any other folders are used except MUSIC or any folders are made in the MUSIC
folder for the music input, the music can not be played back.
Note) ORC-200M can be used as the computer memory device.
It is used as the floppy disk or hard disk.
°
To make voice file
If the voice is recorded, the voice file is saved in the VOICE folder.
Caution) If any other folders are used except VOICE or any folders are made in the
VOICE folder for the voice input, the voice can not be played back.
°
To upload
It is used as the floppy disk or hard disk
°
To download the logo
Save the logo made by the logo editor in the LOGO folder.

-15-
Caution) If any other folders are used except LOGO or any folders are made in the LOGO
folder for the input of the logo file, the logo can not be displayed in the display panel.
■
FORMATTING
°
Click on the right side of the mouse after selecting removable disk.
Select format in the menu and click on the "start".
°
Use ORC-200M when formatting is completed because ORC-200M is formatted again after
formatting in the PC.
Note) It is possible to format with the function, Menu->File->Format in ORC-200M.
■
SEPARATING ORC-200 FROM PC
°
Make sure if the data transfer is completed in the display panel of ORC-200M when
separating ORC-200M from PC.
The data is damaged while the data is being transferring when separating ORC-200M from PC.
Caution) Do not separate ORC-200M from PC during PC<->Player (
▶
) is moving in the display
panel of ORC-200M.
Note) In Windows 2000, ME, and XP, the safe procedure will be to double click on the icon( )
located at the bottom right corner of your screen and follow instructions before removing.

-16-
@ LOGO EDITOR
■
INSTALLING LOGO EDITOR
°
Install the logo editor program supported from CD.
■
EDITING LOGO
°
To use the frame function
- What is the frame function?
It is the logo editor function to make several pictures into one logo and to show the
logo in the display panel continuously.
- The number of pages displayed in the panel can be controlled accordance with the
number of page in the frame control
°
The example of the first page for frame

-17-
°
The example of the second page for frame
°
The example of the third page for frame

-18-
°
The example of the fourth page for frame
°
To import the picture file
Select the Convert image icon ( ) in the menu icon.
Select the desired picture file to click on the Open button as below.
Transfer the logo to the Logo Editor if the desired logo is made
The desired logo is made in the display panel of the Logo Editor as the sample above.

-19-
Save the logo file.
■
INSTALLING LOGO
°
Save the logo file made by the logo editor in the LOGO folder.
Caution) If any other folders are used except LOGO or any folders are made in the LOGO
folder for the input of the logo file, the logo can not be displayed in the display panel.
°
Select Display->Logo->User in the menu mode and the display panel of ORC-200M shows
your own logo

-20-
@ CUSTOMER SERVICE
■
PRODUCT SPECIFICATION
°
Memory Capacity: 64/128/256/512MB built in memory
°
Communication Method: Supporting USB 1.1(Plug & Play)
°
Earphone Output Power: 5.0mW / 16
Ω
°
S/N, THD: 80dB / 0.1% (with 'A' filter)
°
Output Frequency Range: 20Hz ~ 20KHz
°
Operating temperature: 0 ~ 40C
°
Battery: 1 x AAA size
°
Supporting OS: Windows98/SE,ME,2000,XP, Mac 8.6 or higher and Linux kernel 2.4.0 or higher.
°
Case: plastic
°
Dimension: 39 x 86 x 13.2mm
°
Weight: 32g (Without battery)
Table of contents
Popular Media Player manuals by other brands

Escient
Escient Vision VC-1 Quick setup guide

KOBE
KOBE FrameXX HOME/2 user manual

Audio international
Audio international DVD-9101-201-x Installation and operation manual

Philips
Philips GoGear SA2ARA04 quick start guide

VIA Technologies
VIA Technologies ALTA DS 4K user manual

PlayNetwork
PlayNetwork C400 quick start guide