ORANGE 4078 DECT User manual

4077/4078 DECT sets
User manual

2
how

3
User manual
how
Thank you for choosing theMobile 4077 DECT or 4078 DECT: this is a reliable telephone
designed to make life easier.
To find out the essential functions of the Mobile 4077 DECT or 4078 DECT, we suggest that
you read carefully the first chapters of this guide.
The availability of certain functions described in this guide may depend on the version or
configuration of your system.
If in doubt, consult the person responsible for your system.

4
Contents
Toc
Precautions for use . . . . . . . . . . . . . . . . . . . . . . p. 8
Your telephone . . . . . . . . . . . . . . . . . . . . . . . . . p. 10
1. Display and corresponding icons . . . . . . . . . . . p. 12
1.1 Status icons . . . . . . . . . . . . . . . . . . . . . . . . . . . . . . . . . . . p. 12
1.2 MENU icons . . . . . . . . . . . . . . . . . . . . . . . . . . . . . . . . . . p. 13
1.3 Call icons . . . . . . . . . . . . . . . . . . . . . . . . . . . . . . . . . . . . p. 14
1.4 How to read this guide. . . . . . . . . . . . . . . . . . . . . . . . . . p. 15
2. Getting started. . . . . . . . . . . . . . . . . . . . . . . . . . p. 16
2.1 Installing the battery in the telephone . . . . . . . . . . . . . . p. 16
2.2 Charging your telephone battery . . . . . . . . . . . . . . . . . . p. 17
2.3 Switching on your telephone . . . . . . . . . . . . . . . . . . . . . p. 18
2.4 Accessing the MENU and navigating . . . . . . . . . . . . . . . p. 18
3. Using your telephone . . . . . . . . . . . . . . . . . . . . p. 19
3.1 Making a call . . . . . . . . . . . . . . . . . . . . . . . . . . . . . . . . . . p. 19
3.2 Calling from your personal directory . . . . . . . . . . . . . . p. 19
3.3 Calling your correspondent by name
(company directory). . . . . . . . . . . . . . . . . . . . . . . . . . . . p. 20
3.4 Receiving a call . . . . . . . . . . . . . . . . . . . . . . . . . . . . . . . . p. 20
3.5 Redialling. . . . . . . . . . . . . . . . . . . . . . . . . . . . . . . . . . . . . p. 21
3.6 Requesting automatic callback if internal number is busy p. 21
3.8During a call . . . . .... . . . . . ..... . . . . ..... . . . . ...p. 22
4. During a conversation . . . . . . . . . . . . . . . . . . . . p. 23
4.1 Make a second call . . . . . . . . . . . . . . . . . . . . . . . . . . . . . p. 23
4.2 Receiving a second call . . . . . . . . . . . . . . . . . . . . . . . . . . p. 23
4.3 Switching between two calls (Broker call). . . . . . . . . . . p. 24
4.4 Transferring a call . . . . . . . . . . . . . . . . . . . . . . . . . . . . . . p. 24
4.5 Transfer a call to the voice mailbox of an absent party p. 25
4.6 Three-way conference with internal and/or external
correspondents (conference). . . . . . . . . . . . . . . . . . . . . p. 25
4.7 Placing an outside call on hold (parking) . . . . . . . . . . . . p. 26
4.8 Store a number. . . . . . . . . . . . . . . . . . . . . . . . . . . . . . . . p. 27
3.7 Activate/Deactivate voice frequency . . . ..... . . . . ...p. 21

5
Contents
5. Sharing . . . . . . . . . . . . . . . . . . . . . . . . . . . . . . . . p. 28
5.1 Answering the general bell . . . . . . . . . . . . . . . . . . . . . . . p. 28
5.2 Call pick-up . . . . . . . . . . . . . . . . . . . . . . . . . . . . . . . . . . . p. 28
5.3 Hunting groups . . . . . . . . . . . . . . . . . . . . . . . . . . . . . . . . p. 29
5.4 Diverting hunting group calls . . . . . . . . . . . . . . . . . . . . . p. 29
5.5 Sending a written message to an internal
correspondent . . . . . . . . . . . . . . . . . . . . . . . . . . . . . . . . p. 30
5.6 Send a voice message copy. . . . . . . . . . . . . . . . . . . . . . . p. 31
5.7 Sending a recorded message to a number / a
distribution list . . . . . . . . . . . . . . . . . . . . . . . . . . . . . . . . p. 32
5.8 Modify the automated attendant welcome message
remotely . . . . . . . . . . . . . . . . . . . . . . . . . . . . . . . . . . . . . p. 33
6. Keep in touch . . . . . . . . . . . . . . . . . . . . . . . . . . . p. 34
6.1 Selecting calls to be diverted . . . . . . . . . . . . . . . . . . . . . p. 34
6.2 Diverting calls to your voice mailbox . . . . . . . . . . . . . . p. 34
6.3 Consulting your voice mailbox. . . . . . . . . . . . . . . . . . . . p. 34
6.4 Activating/deactivating the personal assistant . . . . . . . . p. 35
6.5 Personal assistant: reaching you with one number only p. 36
6.6 Diverting calls to another number
(immediate diversion). . . . . . . . . . . . . . . . . . . . . . . . . . . p. 37
6.7 Different types of diversions . . . . . . . . . . . . . . . . . . . . . p. 37
6.8 Cancelling all diversions . . . . . . . . . . . . . . . . . . . . . . . . . p. 38
6.9 Consulting messages left while you were away. . . . . . . p. 38

6
Contents
7. Programming your telephone . . . . . . . . . . . . . p. 39
7.1 Initializing your voice mailbox . . . . . . . . . . . . . . . . . . . . p. 39
7.2 Customising your voice greeting . . . . . . . . . . . . . . . . . . p. 39
7.3 Modifying your personal code . . . . . . . . . . . . . . . . . . . . p. 40
7.4 Adjusting the audio functions. . . . . . . . . . . . . . . . . . . . . p. 41
7.5 Activating headset mode . . . . . . . . . . . . . . . . . . . . . . . . p. 43
7.6 Adjusting your telephone functions . . . . . . . . . . . . . . . . p. 43
7.7 Adjusting screen brightness . . . . . . . . . . . . . . . . . . . . . . p. 44
7.8 Selecting language . . . . . . . . . . . . . . . . . . . . . . . . . . . . . . p. 44
7.9 Programming your personal directory. . . . . . . . . . . . . . p. 45
7.10 Modifying a card in the personal directory . . . . . . . . . . p. 45
7.11 Programming an appointment reminder . . . . . . . . . . . . p. 46
7.12 Identify the terminal you are on. . . . . . . . . . . . . . . . . . . p. 47
7.13 Locking your telephone . . . . . . . . . . . . . . . . . . . . . . . . . p. 47
8. Using the telephone in GAP mode . . . . . . . . . p. 47
8.1 Making a call . . . . . . . . . . . . . . . . . . . . . . . . . . . . . . . . . . p. 48
8.2 Receiving a call . . . . . . . . . . . . . . . . . . . . . . . . . . . . . . . . p. 48
8.3 Calling from your personal directory . . . . . . . . . . . . . . p. 48
8.4 Redialling the last number dialled (redial) . . . . . . . . . . . p. 48
8.5 Sending DTMF signals. . . . . . . . . . . . . . . . . . . . . . . . . . . p. 49
8.6 Sending a calibrated cut-off . . . . . . . . . . . . . . . . . . . . . . p. 49
8.7 Programming your personal directory. . . . . . . . . . . . . . p. 49
8.8 Modifying a name or number . . . . . . . . . . . . . . . . . . . . . p. 50
8.9 Deleting a card . . . . . . . . . . . . . . . . . . . . . . . . . . . . . . . . p. 50
8.10 Customizing and adjusting your telephone . . . . . . . . . . p. 51
8.11 Adjusting your telephone functions . . . . . . . . . . . . . . . . p. 52
9. Registering the telephone . . . . . . . . . . . . . . . . . p. 53
9.1 Registering the telephone on a system for the first
time . . . . . . . . . . . . . . . . . . . . . . . . . . . . . . . . . . . . . . . . . p. 53
9.2 Registering the telephone on other systems . . . . . . . . . p. 55

7
Contents
10. Accessories . . . . . . . . . . . . . . . . . . . . . . . . . . . . . p. 58
10.1 Chargers . . . . . . . . . . . . . . . . . . . . . . . . . . . . . . . . . . . . . p. 58
10.2 Characteristics of the mains power adapter . . . . . . . . . p. 59
10.3 Battery . . . . . . . . . . . . . . . . . . . . . . . . . . . . . . . . . . . . . . p. 59
10.4 Headphone / external microphone . . . . . . . . . . . . . . . . p. 60
10.5 Cleaning your telephone . . . . . . . . . . . . . . . . . . . . . . . . p. 60
10.6 Transporting and protecting your telephone . . . . . . . . p. 60
11. Glossary . . . . . . . . . . . . . . . . . . . . . . . . . . . . . . . p. 61
Declaration of compliance . . . . . . . . . . . . . . . . p. 62

Precautions for use
8
howtoc
Coverage area
The DECT functions provided by your e-diatonis system allow user mobility management via DECT
cordless telephones.
Radio coverage of the e-diatonis system is ensured by a network of radio terminals. The coverage
area of a radio terminal is called a cell.
• Mobility:
A user can make or receive calls in any cell.
• Radio transfer:
This function enables the user to move during a conversation and go from one cell to another. The
transfer takes place automatically and has no effect on the conversation. In some cases, slight
crackling may be audible at the moment of transition.
Use of approved DECT equipment
This DECT telephone is designed to be used with a private automatic branch exchange (PABX)
without an e-diatonis wire.
The CE symbol means that this product is compliant with current Community directives, more
especially the following directives:
Pursuant to directive 1999/5/CE (R&TTE) published in the Official Journal of the European
Community of April 7, 1999, these items of equipment use the DECT harmonized frequency
spectrum and can be used in all the countries of the European Community, in Switzerland and
Norway.
89/336/CEE Electromagnetic Compatibility
73/23/CEE (low voltage)
1999/5/CE (R&TTE)
No guarantee is given concerning possible interference affecting
DECT equipment, due to other authorised utilisation of the radio
frequencies concerned.

9
Pre
Operating conditions
The following conditions must be respected, notably concerning the use of
radioelectric frequencies:
•DECT equipment can only be used to establish links between fixed points if
these links are temporary and the equivalent isotropically radiated power at the
antenna is less than 250 mW.
•This telephone is specially designed for use with an e-diatonis system such as is
described in the manual.
•As this telephone complies with the GAP standard, it can be used in simplified
mode on another DECT/GAP system (other PABX or private residential base
station). Utilization in GAP mode involvesaparticularmodeof operation that
can lead to functional limitations for which no claims will be considered under
the terms of the guarantee.
•Do not expose your telephone to severe conditions (rain, sea air, dust, etc.).
•Correct operation of your telephone is not guaranteed at temperatures outside
the range -10°C to +45°C.Between -5ºCand -10ºC the display may not be
readable. This is a temporary phenomenon and does not affect the performance
of your telephone in any way.
•You must not switch on or use your telephone near gas or inflammable liquids.
Recommendations on the management of password (or personal
code) of your phone:
When connected to an external public network your e-diatonis IPBX can be subject
to malicious attacks.
A simple way of protecting against attack is to change your passwords regularly as
you do for your PCs.
Here are a few tips on choosing your password, called "personal code" (4 digits on
your phone) :
Do not use a too easy password (ex. 1234, 2010 ...)
Take a different password for each application
Your password is personal and should remain confidential, not disclose
it to anyone else
Never write down your password. The first thing an attacker will do is
rummage through your belongings – check your diary, look under your
monitor and keyboard, sift through your garbage, etc.
Your phone is now correctly secure and the fraud risks are minimized
Your telephone
10
Call icons
Making a call
Receiving a call
In conversation
Call on hold*
Accessing the directories
Transferring a call
Switching to DTMF signals
Setting up a conference
Diverting your calls to your voice
message service
Putting on common hold
Parking an external communication
Microphone
123
MARTIN Paul
Wed 24 May 16:30
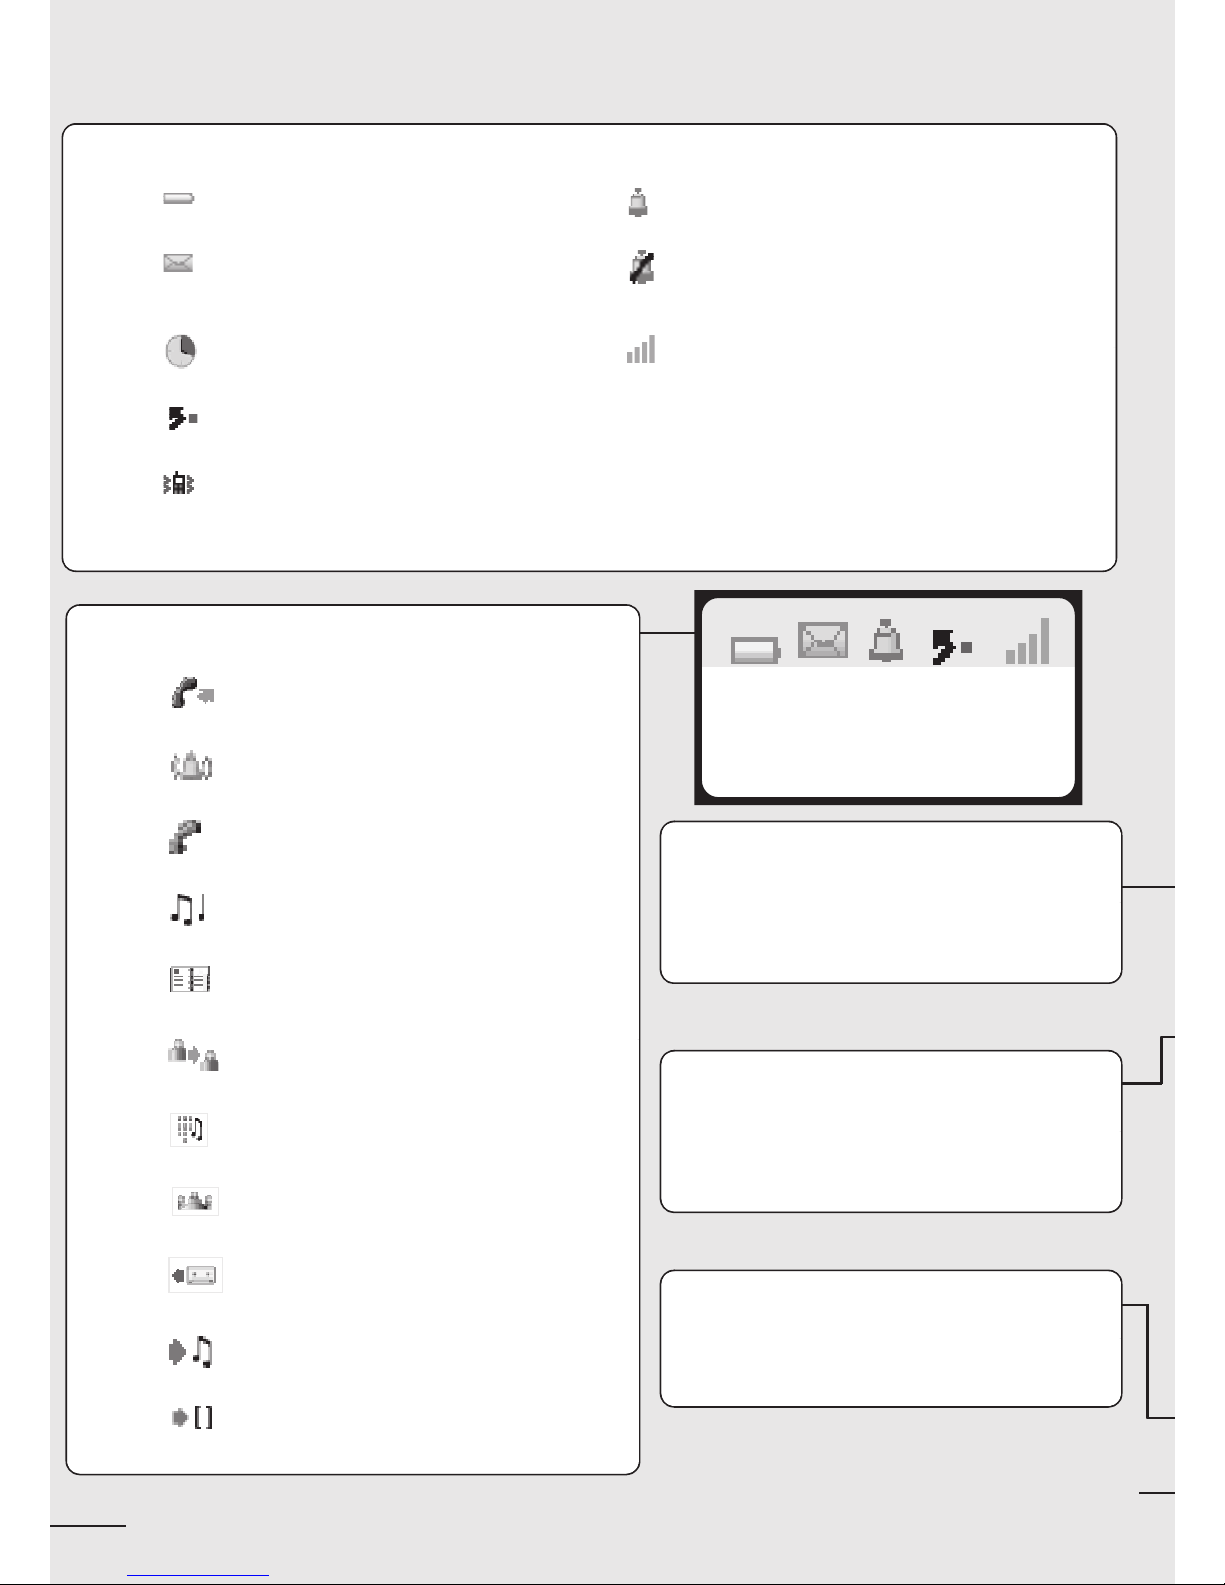
Status icons
Battery charge level Ringer active
Initializing the voice mailbox /
Consulting information
Ringer disabled
Programmed call-back time Radio reception quality
Call diversion activated
Vibrator active
Hang up
Return to first screen
Switch off ringer
Lock/unlock keypad (long press)
Company directory
Customizing yourtelephone/Info
(long press)
Switch the screen on again
Erase a character
Return to previous menu
Delete an entire field (long press)

11
Light
•Greensteady:handset charging
•Green fast flashing: outside the radiofield
•Red slow flashing: message present
Adjust audio volume
Access MENU
Apply
Navigate (up, down, left, right)
Lift the receiver
Redial (long press): call back the last
number dialled.
Broker call (single-line terminal)
Activate/deactivate loudspeaker
(4078 DECT)
Activate/Deactivate the vibrating
ringer (long press)
Headset socket
(4078 DECT)
Back-lit screen (in colour for the 4078 DECT)
The screen switches off automatically after a few seconds of inactivity.
To turn it back on, press the key .
C
Switch on/off (long press)
Rapid access to ringer adjustment

Display and corresponding icons
12
1
Other
Features 1 lineof status icons and 3 lines of16 alphanumeric characters. The Mobile 4078
DECT also has a back-lit display and keypad.
1.1 Status icons
The status icons are displayed on the welcome screen and indicate the status of the telephone.
You can obtain details on the status icons from the tooltips that appear on the welcome screen
when you use the navigator:
Battery charge level
Initializing the voice mailbox / Consulting
information
Programmed call-back time
Call diversion activated
Vibrator active
Ringer active
Ringer disabled
Radio reception quality
123
Battery
full power

Di
s
pla
y
and corre
s
pondin
g
icon
s
1
13
1.2 MENU icons
The MENU is accessible from the welcome screen by pressing the OK key. (OK:)
It provides access to all the functions available on your system.
Directories:
manage your personal directory and access the company
directory.
Redial:
call back the last number dialled.
Divert:
divert your calls to another number.
Mailbox:
consult and send voice and text messages.
Call pick-up:
answer a call intended for another telephone.
Appointment:
program a call-back time.
System lock:
prohibit outgoing calls and modification of the programming.
Customizing the telephone:
program your voice mailbox, select the ringer tune, language,
etc.
Adjustment:
adjust contrast, activate or deactivate the beeps, lighting, etc.
System selection
Installation

Display and corresponding icons
14
1.3 Call icons
* In the event of a multiple call, the icons are given indices to represent the different correspondents
Making a call
Answering a call*
In conversation*
Call on hold*
Accessing the directories
Transferring a call
Switching to DTMF signals
Setting up a conference
Putting on common hold
Parking an external communication

Di
s
pla
y
and corre
s
pondin
g
icon
s
1
15
1.4 How to read this guide
These symbols can be supplemented by small icons or texts.
The features described in this manual and indicated with an asterisk (*) can only be accessed with
some software versions.
Press briefly on the navigation key to access the MENU
and to confirm.
Move the navigation key up or down.
Move the navigation key to the left or right.
Use the keypad to enter digits and letters.
Description of an action or context.
Important information

Getting started
16
2
Other
2.1 Installing the battery in the telephone
•Installing the battery in the telephone
•To remove it
Position the battery
'connectors' side as
shown in the drawing
(A). Terminate the
installation of the
battery in its
compartment by
pressing as shown in
the drawing (B).
Replace the cover.
Lift up the cover. Remove the battery
from its compartment
as shown in the
drawing.

Gettin
g
s
tarted
2
17
2.2 Charging your telephone battery
Recharge your telephone battery regularly. The telephone can be on or off when recharging the
battery. If the telephone is to remain unused or out of its charger for several weeks, remove the
battery and store it separately.
Connect the charger and
place the telephone in the
charging holder. The
telephone LED is green
when charging.
*The battery charge time is3.5 h.
Switch off the telephone before changing the battery.
1
OK

Getting started
18
2.3 Switching on your telephone
If the display fails to light up or the battery icon is flashing, recharge the battery.
If the radio reception icon doesn’t appear on the telephone display :
•Check that you’re in an area covered (if you’re not, move close to a radio terminal).
•Check that the telephone is properly installed in the system (consult the PABX manager).
Switching off your telephone:
Press the switch on/off key (long press).
(switch on/off:)
2.4 Accessing the MENU and navigating
The MENU is accessible from the welcome screen by pressing the OK key. (OK :)
Accessing the functions:
switch on (long
press)
wait a few seconds (about
3s).
your telephone is
switched on
If the display indicates: 'System 1 — Auto install ?', see paragraph
'Registering the telephone' or contact your installation technician.
123
MARTIN Paul
Wed 24 May 16:30
apply
select the 'diversion' function you can move horizontally along the
various icons within the function
123
MARTIN Paul
Wed 24 May 16:30
123
123
123 123
FwdImmVMU
OK?

19
Using your telephone
3
Other
3.1 Making a call
3.2 Calling from your personal directory (Individual number)
dial send the call speak
To make an external call, dial the outside line access code before
dialling your correspondent's number.
123
Paul
inconversation
SendMFCode?
select the 'directories' function confirm access to
'pers sp dial'
select the name of the person
you wish to call
send the call
The call can be sent directly from the list of names by dialling the
number of the card.
123 123
PersSpDial
Directory
123
1-JOHN
2-PAUL
3-
Quick access : .
long press -
more information on the caller:
successive presses for name and
number
Long press = Info (i)
Depending on how the system is configured, the name or
number of the caller is displayed on the screen. Pressing the 'i'
key displays the name or number of the caller on the screen. If
the number is displayed by default, pressing the 'i' key displays the name.
If the name is displayed by default, pressing the 'i' key displays the
number.

Using your telephone
20
3.3 Calling your correspondent by name (company directory)
* If several names come up, you can refine the search by entering the successive letters (second,
third, etc.) of the name you are looking for.
Press 1when you do not know one of the letters of the name.
3.4 Receiving a call
Disabling the ringer:
Press the hang up key when your telephone rings: it is still possible to answer by pressing the
unhook key.
(hang up : , lift the receiver :)
select the 'directories' function
select 'directory' apply enter the first letter of your
correspondent's surname*
select the desired
name
send the call
For fast access to this function from the home screen page, press the
directory key (directory:).
123
123
PersSpDial
Directory
123
Typesurname:
you are receiving a
call
lift the
receiver
speak
The ringer does not ring if:
- the vibrator is active, the vibrator active icon is displayed on the
screen saver.
- the ringer is disabled, the ringer disabled icon is displayed on the
screen saver.
123
Sophie
iscalling
123
Paul
inconversation
SendMFCode?
long press -
more information on the caller:
successive presses for name and
number
This manual suits for next models
1
Table of contents
Other ORANGE IP Phone manuals


