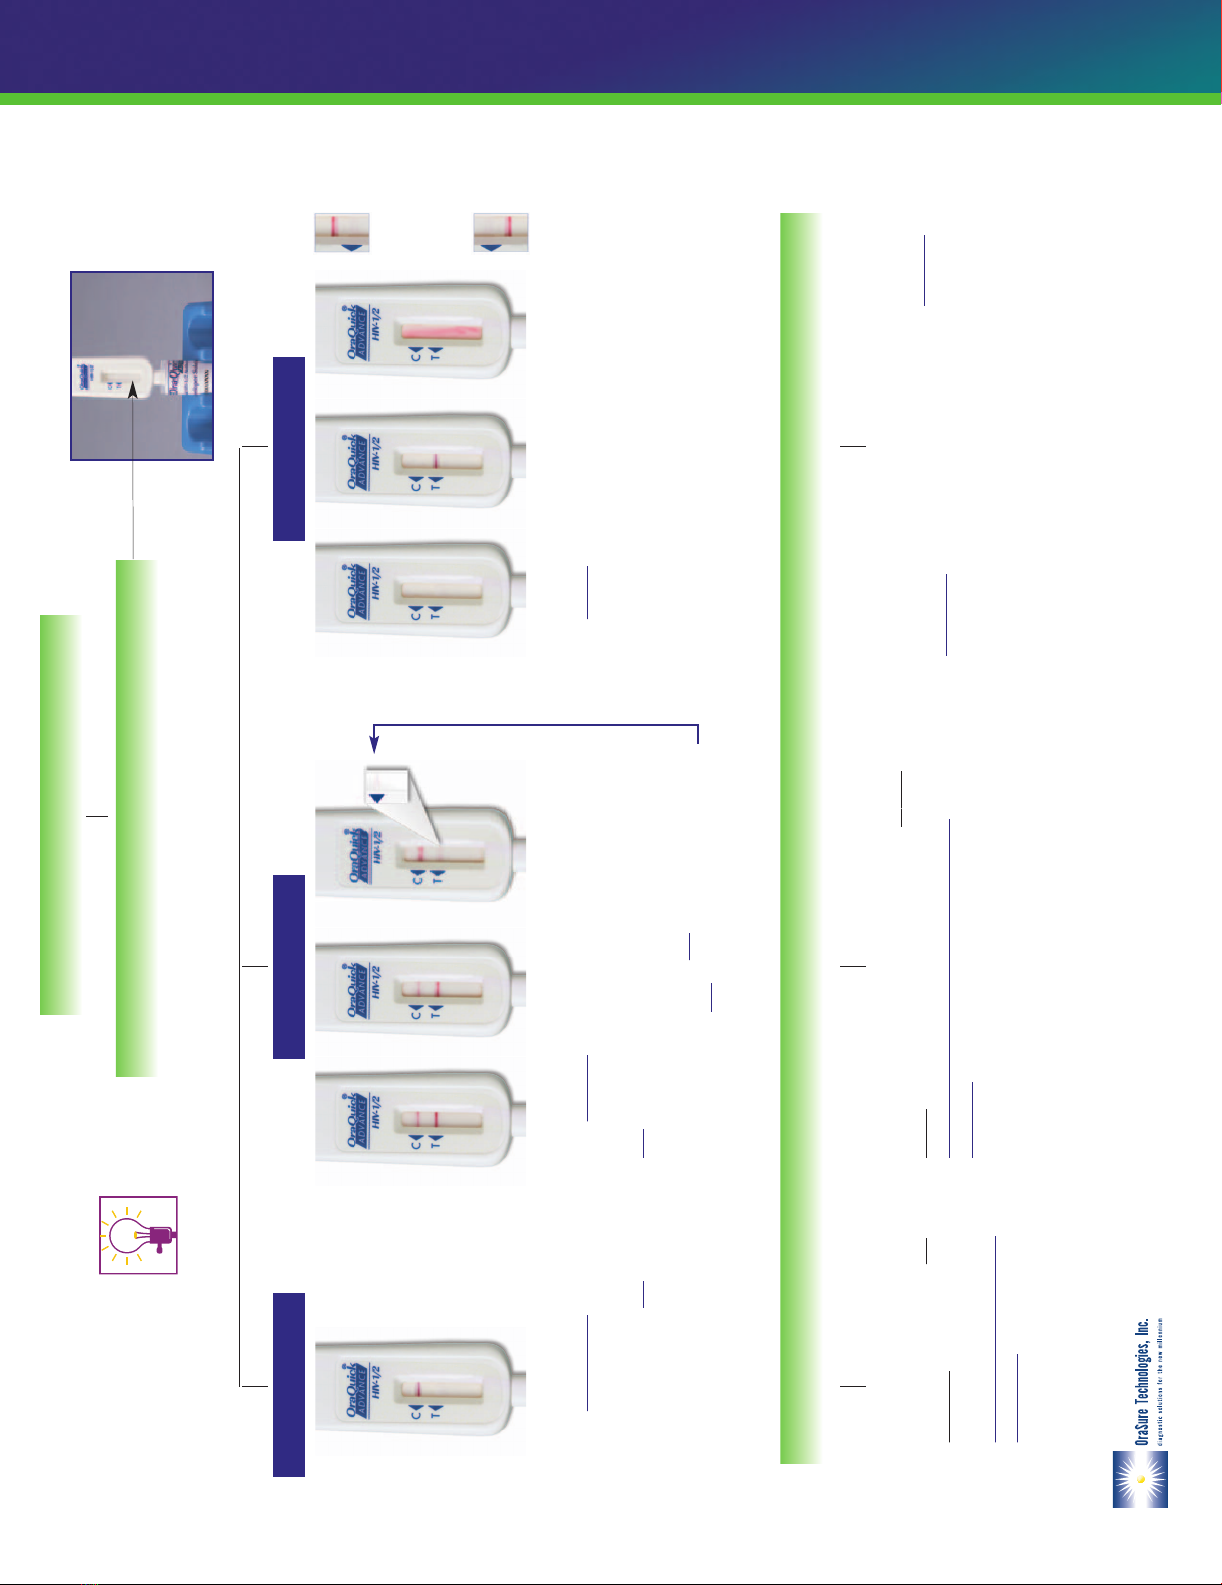
OraQuick ADVANCE HIV-1/2 User manual

ADVANCE
Rapid HIV-1/2 Antibody Test
™
STEP-BY-STEP INSTRUCTIONS
FOR ORAQUICK®ADVANCE™
RAPID HIV-1/2 ANTIBODY TEST
•These instructions are only a Reference Guide. For complete
information, refer to the OraQuick®ADVANCE ™Rapid HIV-1/2
Antibody Test Package Insert.
•Read these instructions completely before using the product. Follow
the instructions carefully when performing testing. Not doing so may
result in inaccurate test results.
•Before performing testing, all operators MUST read and become
familiar with Universal Precautions for Prevention of Transmission of
Human Immunodeficiency Virus, Hepatitis B Virus, and other
Blood-borne pathogens in Health-Care Settings.1
Complexity: WAIVED for Oral Fluid, Fingerstick
Whole Blood, and Venipuncture Whole Blood
Complexity: MODERATE for Plasma
OQA Eng_SPA_StepbyStep-10-05 10/31/05 4:16 PM Page 2

THE FOLLOWING ITEMS ARE NEEDED TO DO THE TEST:
THE ORAQUICK®ADVANCE™RAPID HIV-1/2 ANTIBODYTEST CONSISTS OF ADIVIDED POUCH CONTAINING THE FOLLOWING:
•Test Device (including an absorbent packet) •Developer Solution Vial (containing 1 mL)
NOTE: The pouch is divided into two chambers. One chamber holds the Test Device while the other
chamber holds the Developer Solution Vial.
MATERIALS PROVIDED IN THE MASTER SHIPPING CARTON:
•Reusable Test Stand •Specimen Collection Loop ( 5 microliter)
•Subject Information Pamphlet •Package Insert
•Customer Letter
MATERIALS REQUIRED BUT NOT PROVIDED:
•Timer or Watch capable of timing 20 to 40 minutes •Biohazard Waste Container
•Clean, Disposable, Absorbent Workspace Cover
Additional items required for fingerstick and venipuncture whole blood collection, and plasma specimens:
•Antiseptic Wipe •Latex, Vinyl or Nitrile Disposable Gloves (Optional for Oral Fluid Testing)
•Sterile Lancet to Obtain a Fingerstick Whole Blood •Sterile Gauze Pads
Specimen, or Materials Required to Obtain a •Centrifuge to process a plasma specimen
Venipuncture Whole Blood Specimen
INTENDED USE:
The OraQuick® ADVANCE™Rapid HIV-1/2 Antibody Test is a single-use,
qualitative, immunoassay to detect antibodies to Human
Immunodeficiency Virus Type 1 (HIV-1) and Type 2 (HIV-2)
in oral fluid, fingerstick whole blood, venipuncture whole blood,
and plasma specimens.
FOR IN VITRO DIAGNOSTIC USE
THIS IS A RESTRICTED DEVICE.
SALES, DISTRIBUTION AND USE RESTRICTIONS APPLY.
SEE CUSTOMER LETTER AND PACKAGE INSERT.
For answers to questions regarding the OraQuick® ADVANCE™Rapid HIV-1/2 Antibody Test
or for more information on other OraSure Technologies’ products, call:
1-800-ORASURE (800-672-7873) or visit our web site:www.orasure.com
NOTE: Handle all blood specimens and materials contacting specimens as if capable of transmitting infectious agents. Dispose of all test specimens and materials
used in the test procedure in a biohazard waste container.1Oral fluid is not considered potentially infectious unless it contains blood.2
1See “Universal Precautions,”CDC, MMWR, 1988; 37(24):377-388. 2CDC, MMWR, 2001: 50(RR-11):1-42.
Developer
Solution
Vial
Reusable
Test Stand
Flat
Pad
Test
Device
Specimen
Collection
Loop
Absorbent
Packet
Result
Window
Developer
Solution
Vial
Reusable
Test Stand
Flat
Pad
Test
Device
Specimen
Collection
Loop
Absorbent
Packet
Result
Window
OQA Eng_SPA_StepbyStep-10-05 10/31/05 4:16 PM Page 3

c
NOTE: DO NOT cover the
two holes in the back of the
Device with labels or other
materials. Doing so may cause
an Invalid result.
Set Up Your Work Space
b
General Test Preparation
Two Chambers
a
•Gather the materials you will need.
•Allow the test kit to come to operating temperature (15˚– 37˚C; 59˚– 99˚F) before use.
•Refer to the External Quality Control section above to determine when the Kit Controls should be run.
•Cover your workspace with a clean, disposable, absorbent workspace cover.
•Set an OraQuick® ADVANCE™Reusable Test Stand (“Stand”) up on your workspace cover. Use only the Stand provided.
•Put on your disposable gloves if you are planning to perform the test using a blood specimen. Use of gloves is optional for oral fluid testing.
External Quality Control
OraQuick® ADVANCE™Rapid HIV-1/2 Antibody Test Kit Controls are available separately for use only with the OraQuick® ADVANCE™
Rapid HIV-1/2 Antibody Test. The Kit Controls are specifically formulated and manufactured to ensure performance of the Test, and are
used to verify your ability to properly perform the test and interpret the results. Refer to the Kit Control Package Insert for complete
instructions.
Run the Kit Controls under the following circumstances:
•Each new operator prior to performing testing on patient specimens,
•When opening a new test kit lot,
•Whenever a new shipment of test kits is received,
•If the temperature of the test kit storage area falls outside of 2˚– 27˚C (35˚– 80˚F),
•If the temperature of the testing area falls outside of 15˚– 37˚C (59˚– 99˚F),
•At periodic intervals as dictated by the user facility.
Prior to testing, provide the “Subject Information” pamphlet
to the person being tested.
•Open the two chambers of the OraQuick® ADVANCE™Divided Pouch
(“Pouch”) by tearing at the notches on the top of each side of the Pouch
(see picture a and b ).
•To prevent contamination, leave the Test Device (“Device”) in the Pouch until
you are ready to use it.
•Remove the Developer Solution Vial (“Vial”) from the Pouch.
•Hold the Vial firmly in your hand.
•Carefully remove the cap from the Vial by gently rocking the cap back and
forth while pulling it off.
•Set the cap on your workspace cover.
•Slide the Vial into the top of one of the slots in the Stand (see picture c ).
•DO NOTforce the Vial into the stand from the front of the slot as splashing
may occur.
•Make sure the Vial is pushed all the way to the bottom of the slot in the stand
(see picture c ).
OQA Eng_SPA_StepbyStep-10-05 10/31/05 4:16 PM Page 4

STEP 1 – COLLECT
•Have the person being tested remove the Device from its Pouch.
•DO NOT allow the person to touch the Flat Pad (see picture A1 ).
•Check to make sure that an Absorbent Packet is included with the Device
(see picture A2 ). If no Absorbent Packet is present, discard the Device and
obtain a new Pouch for testing.
•Direct the person to place the Flat Pad above the teeth against the outer gum.
Direct the person to gently swab completely around the outer gums, both
upper and lower, one time around, using the Flat Pad (see picture A3
and A4 ). DO NOT allow the person to swab the roof of the mouth, the inside
of the cheek or the tongue. NOTE: Both sides of the Flat Pad may be used
during this procedure.
STEP 2 – TEST
•Instruct the person being tested to insert the Flat Pad of the Device all the
way into the Vial (see picture A5 ). Make sure that the Flat Pad touches the
bottom of the Vial. The Result Window on the Device should be facing
towards you (see picture A6 ).
•Start timing the test (see picture A7 ). DO NOT remove the Device from the
Vial while the test is running. Pink fluid will appear and travel up the Result
Window. The pink fluid will gradually disappear as the test develops
(see picture A8 ).
•Read the results after 20 minutes but not more than 40 minutes in a fully
lighted area.
•Refer to the Reading Test Result and Interpretation of Test Result sections on
the back of these instructions.
ORAL FLUID – Specimen Collection and Testing Procedure
A2A1 Flat
Pad Absorbent
Packet
A3 A4
A5 A6
A7 A8
OQA Eng_SPA_StepbyStep-10-05 10/31/05 4:16 PM Page 5

STEP 1 – COLLECT
•
Using an antiseptic wipe, clean the finger of the person being tested. Allow the finger
to dry thoroughly or wipe dry with a sterile gauze pad.
•
Using a sterile lancet, puncture the skin just off the center of the finger pad.
•
Hold the finger downward. Apply gentle pressure beside the point of the puncture.
Avoid squeezing the finger to make it bleed (see picture B1 ).
•
Wipe away this first drop of blood with a sterile gauze pad. Allow a new drop of blood
to form.
•
Pick up an unused Specimen Collection Loop (“Loop”) by the thick “handle” end
(see picture B2 ).
•
Put the “rounded” end of the Loop on the drop of blood (see picture B3 ).
Make sure that the Loop is completely filled with blood (see picture B4 ).
STEP 2 – MIX
•
Immediately insert the blood-filled end of the Loop all the way into the Vial
(see picture B5 ).
•
Use the Loop to stir the blood sample in the Developer Solution (“Solution”)
(see picture B6 ).
•
Remove the used Loop from the Solution. Throw the used Loop away in a biohazard
waste container.
•
Check the Solution to make sure that it appears pink. This means that the blood was
correctly mixed into the Solution (see picture B7 ). If the Solution is not pink, discard
all the test materials in a biohazard waste container. Start the test over.
Use a new Pouch and a new blood sample.
STEP 3 – TEST
•
Remove the Device from the Pouch. DO NOT touch the Flat Pad (see picture B8 ).
•
Check to make sure that an Absorbent Packet is included with the Device
(see picture B9 ). If no Absorbent Packet is present, discard the Device and obtain
a new Pouch for testing.
•
Insert the Flat Pad of the Device all the way into the Vial containing the blood sample
(see picture B10 ). Make sure that the Flat Pad touches the bottom of the Vial. The Result
Window on the Device should be facing towards you (see picture B11 ).
•
Start timing the test (see picture B12 ). DO NOTremove the Device from the Vial
while the test is running. Pink fluid will appear and travel up the Result Window. The
pink fluid will gradually disappear as the test develops (see picture B13 ).
•
Read the results after 20 minutes but not more than 40 minutes in a fully
lighted area.
•
Refer to the
Reading Test Result and Interpretation of Test Result
sections on the
back of these instructions.
FINGERSTICK - WHOLE BLOOD – Specimen Collection and Testing Procedure
B2
B3 B4
Handle
B1
NOTE: If the Loop is dropped or comes in contact with any
other surface, discard it in a biohazard waste container. Get a
new Loop for the collection of the blood sample.
B5
B6 B7
B9B8
B11B10
B13B12
Flat
Pad Absorbent
Packet
OQA Eng_SPA_StepbyStep-10-05 10/31/05 4:16 PM Page 6

STEP 1 – COLLECT
•
Using standard venous phlebotomy procedures, collect a whole blood sample using
a tube containing any of the following anticoagulants: EDTA (lavender top), sodium
heparin (green top), or sodium citrate(light blue top). Other anticoagulants have
not been tested and may give an incorrect result. If the specimens are not
tested at the time of collection, the whole blood may be stored at 2
˚
–30
˚
C
(35
˚
–86
˚
F) for up to 5 days.
•
Prior to testing, mix the blood tube gently by inversion several times to ensure a
homogeneous sample.
•
Pick up an unused Specimen Collection Loop ("Loop") by the thick "handle"
end (see picture C1 ).
•
Put the "rounded" end of the Loop into the tube of blood (see picture C2 ).
Make sure the Loop is completely filled with blood (see picture C3 ).
STEP 2 – MIX
•
Immediately insert the blood-filled end of the Loop all the way into the Vial
(see picture C4 ).
•
Use the Loop to stir the blood sample in the Developer Solution (“Solution”)
(see picture C5 ).
•
Remove the used Loop from the Solution. Throw the used Loop away in a biohazard
waste container.
•
Check the Solution to make sure that it appears pink. This means that the blood was
correctly mixed into the Solution (see picture C6 ). If the Solution is not pink, discard all
the test materials in a biohazard waste container. Start the test over. Use a new Pouch
and a new blood sample.
STEP 3 – TEST
•
Remove the Device from the Pouch. DO NOT touch the Flat Pad (see picture C7 ).
•
Check to make sure that an Absorbent Packet is included with the Device
(see picture C8 ). If no Absorbent Packet is present, discard the Device and obtain a new
Pouch for testing.
•
Insert the Flat Pad of the Device all the way into the Vial containing the blood sample
(see picture C9 ). Make sure that the Flat Pad touches the bottom of the Vial. The Result
Window on the Device should be facing towards you (see picture C10 ).
•
Start timing the test (see picture C11 ). DO NOT remove the Device from the Vial
while the test is running. Pink fluid will appear and travel up the Result Window. The
pink fluid will gradually disappear as the test develops (see picture C12 ).
•
Read the results after 20 minutes but not more than 40 minutes in a fully lighted area.
•
Refer to the
Reading Test Result and Interpretation of Test Result
sections on the
back of these instructions.
VENIPUNCTURE - WHOLE BLOOD – Specimen Collection and Testing Procedure
C2
C3
C1
NOTE: If the Loop is dropped or comes in contact with any
other surface, discard it in a biohazard waste container. Get a
new Loop for the collection of the blood sample.
Handle
C4
C5 C6
C8C7
C10C9
Flat
Pad Absorbent
Packet
C12C11
OQA Eng_SPA_StepbyStep-10-05 10/31/05 4:16 PM Page 7

STEP 1 – COLLECT
•
Using standard venous phlebotomy procedures, collect a whole blood sample
using a tube containing EDTA (lavender top) anticoagulant. Other
anticoagulants have not been tested and may give an incorrect result. If
the specimens are not tested at the time of collection, the specimen may be
stored as whole blood for up to 5 days at 2
˚
–30
˚
C (35
˚
–86
˚
F) or as plasma
for up to 7 days at 2
˚
–8
˚
C (35
˚
–46
˚
F).
•
Centrifuge the tube of blood (1000-1300 x g, for approximately 5 minutes, no
refrigeration required) to separate the cells from the plasma.
•
Carefully uncap the tube by gently rocking the stopper towards you so that it vents
away from you.
•
Pick up an unused Specimen Collection Loop (“Loop”) by the thick “handle” end
(see picture D1 ).
•
Put the “rounded end” of the Loop into the tube of plasma (see picture D2 ).
•
Make sure that the Loop is completely filled with plasma (see picture D3 ).
STEP 2 – MIX
•
Immediately insert the plasma-filled end of the Loop all the way into the Vial
(see picture D4 ).
•
Use the Loop to stir the plasma sample in the Developer Solution (“Solution”)
(see picture D5 ).
•
Remove the used Loop from the Solution. Throw the used Loop away in a biohazard
waste container.
STEP 3 – TEST
•
Remove the Device from the Pouch. DO NOT touch the Flat Pad (see picture D6 ).
•
Check to make sure that an Absorbent Packet is included with the Device
(see picture D7 ). If no Absorbent Packet is present, discard the Device and obtain
a new Pouch for testing.
•
Insert the Flat Pad of the Device all the way into the Vial containing the blood sample
(see picture D8 ). Make sure that the Flat Pad touches the bottom of the Vial. The
Result Window on the Device should be facing towards you (see picture D9 ).
•
Start timing the test (see picture D10 ). DO NOT remove the Device from the Vial
while the test is running. Pink fluid will appear and travel up the Result Window. The
pink fluid will gradually disappear as the test develops (see picture D11 ).
•
Read the results after 20 minutes but not more than 40 minutes in a fully lighted area.
•
Refer to the
Reading Test Result and Interpretation of Test Result
sections on the
back of these instructions.
D4 D5
D7D6
D9D8
D11D10
Flat
Pad Absorbent
Packet
PLASMA – Specimen Collection and Testing Procedure
D2
D3
D1 Handle
NOTE: If the Loop is dropped or comes in contact with any
other surface, discard it in a biohazard waste container. Get a
new Loop for the collection of the plasma sample.
General Test Clean Up
•
Dispose of the used test materials in a biohazard waste container.
•
When using gloves, change your gloves between each test to prevent contamination. Throw away the used gloves in a biohazard waste container.
•
Use a freshly prepared 10% solution of bleach to clean up any spills.
NOTE: Testing of plasma samples may only be performed by
laboratories certified to perform moderate complexity tests.
OQA Eng_SPA_StepbyStep-10-05 10/31/05 4:16 PM Page 8

Reading Test Result
Test is INVALID if:
•NO reddish-purple line appears next to the triangle labeled “C”
(see Diagram a and b ), or
•A red background in the Results Window makes it difficult to read the
result after 20 minutes (Diagram c ), or
•If any of the lines areNOTinside the “C” or “T” triangle areas
(see Diagram d1 and d2 ).
•
An Invalid test result means that there was a problem running the test, either
related to the specimen or to the Device. An Invalid result cannot be
interpreted.Repeat the test with a new Pouch and a new oral fluid,
fingerstick or venipuncture whole blood, or plasma sample. Contact
OraSure Technologies’ Customer Service if you are unable to get a valid test
result upon repeat testing.
Test is REACTIVE if:
•A reddish-purple line appears next to the triangle labeled “C”
and a reddish-purple line appears next to the triangle labeled
“T”. One of these lines may be darker than the other.
NOTE: The test is Reactiveif any reddish-purple line appears
next to the “T” triangleand next to the “C” triangle, no matter
how faint these lines are.
•
A Reactivetest result means that HIV-1 or HIV-2 antibodies have been
detected in the specimen. The test result is interpreted as
PRELIMINARY POSITIVE for HIV-1 and/or HIV-2
antibodies. Follow CDC Guidelines to inform the test subject of
the test result and its interpretation.
Test is NON-REACTIVE if:
•
A reddish-purple line appears next to
the triangle labeled “C” and NO
line appears next to the triangle
labeled “T”.
•
ANon-Reactivetest result means
that HIV-1 and HIV-2 antibodies were
not detected in the specimen. The
test result is interpreted as
NEGATIVE for HIV-1 and HIV-
2 antibodies. Follow CDC
Guidelines to inform the test subject
of the test result and its
interpretation.
ADEQUATE
LIGHTING
REQUIRED
abc
d1
OR
d2
Bethlehem, PA 18015 USA • Ph. 800-ORASURE (800-672-7873) • Fax 610.882.3572 • www.orasure.com L3001-1216 (rev. 10/05)
©2001, 2005 OraSure Technologies, Inc.
U.S. Patent # 6,303,081 and various international and U.S. patents pending
OraQuick® is a registered trademark of OraSure Technologies, Inc.
Non-ReactiveReactiveInvalid
Interpretation of Test Result
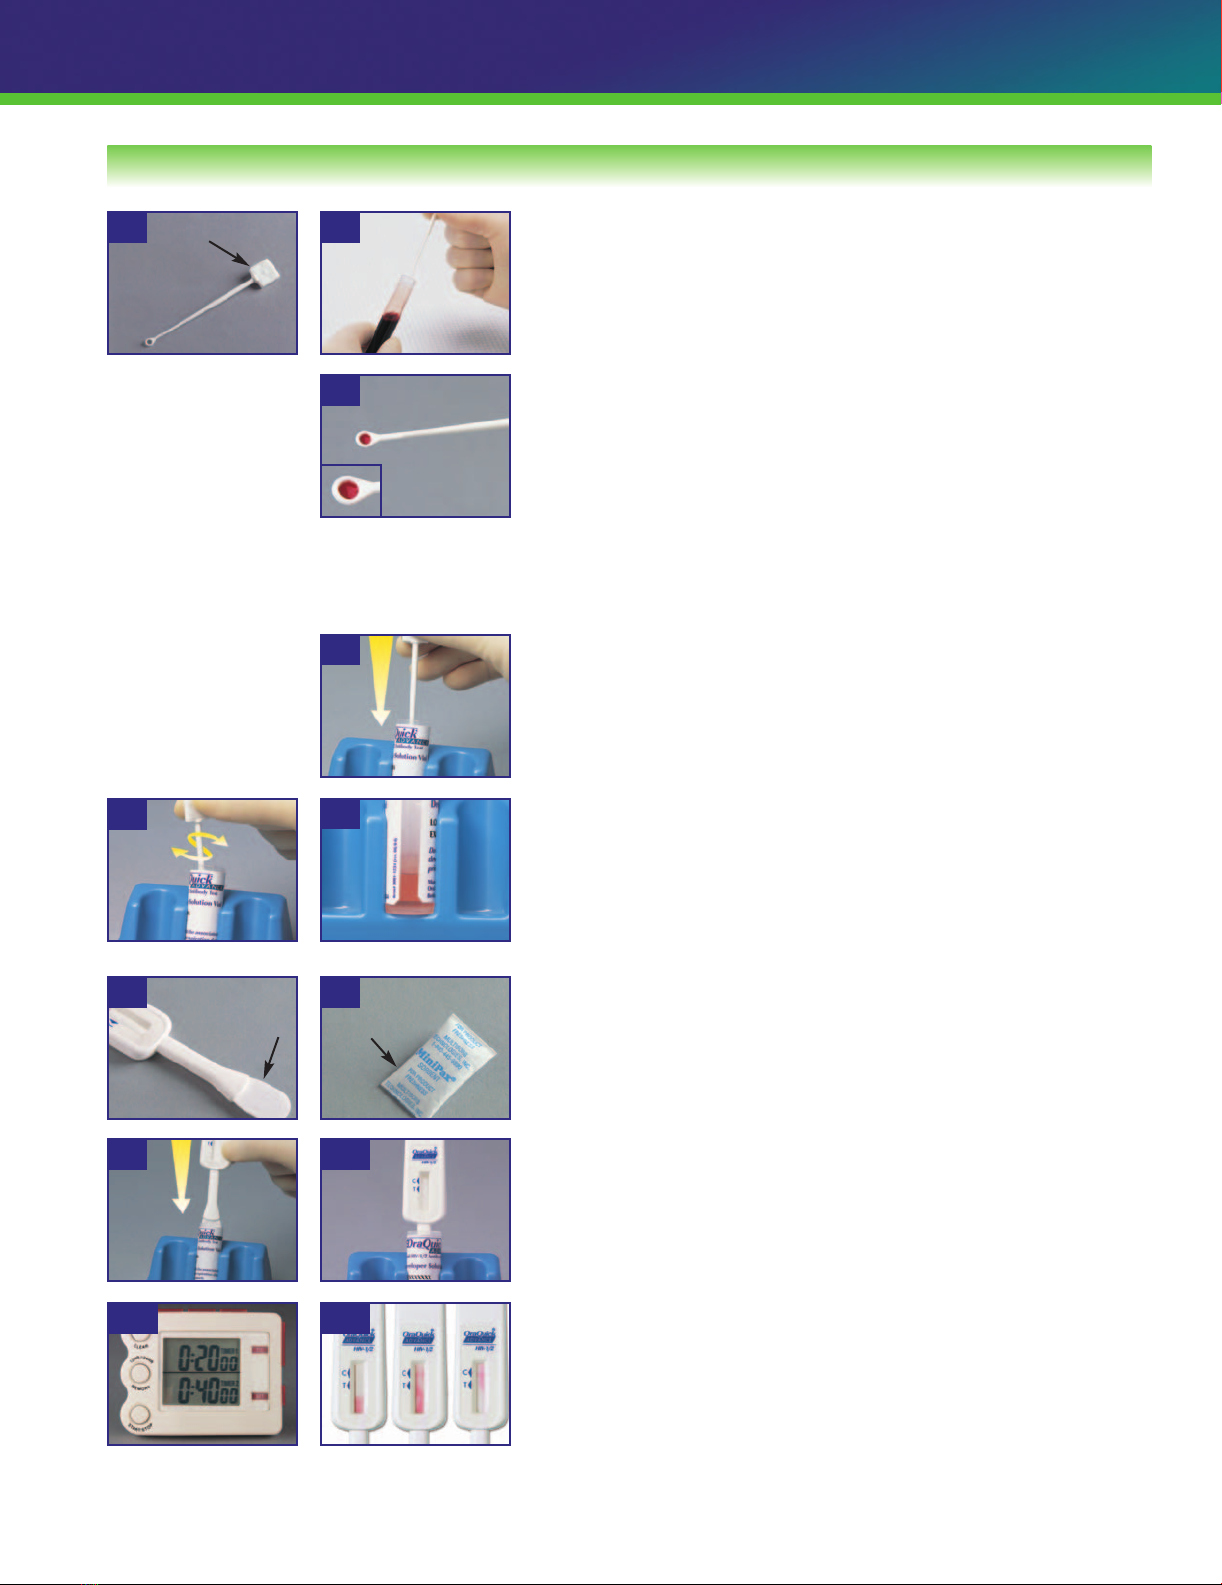
Read results after 20 minutes but not more than 40 minutes.
Look at the Result Window of the Test Device
OQA Eng_SPA_StepbyStep-10-05 10/31/05 4:16 PM Page 1
Other OraQuick Test Equipment manuals
Popular Test Equipment manuals by other brands

SMC Networks
SMC Networks PTE-50-CE Pro user manual

Extech Instruments
Extech Instruments ET40 user manual

IKONIX
IKONIX ASSOCIATED RESEARCH HypotMAX 7710 Operation and service manual

Tektronix
Tektronix 1A2 instruction manual

CharlesWater
CharlesWater 99036 Operation and maintenance

Extech Instruments
Extech Instruments 380385 manual