Professional Outdoor Cooling
3/8" Misting System
U.S. Patent No. 5,441.202
IMPORTANT: Read all instructions and check kit contents
before beginning assembly.
**Check the contents in the parts bag. If items are missing, please return
unopened to the place of purchase, or call Orbit Customer Service at
(800) 488-6156.
Professional Outdoor Cooling 3/8” Misting System Contents List
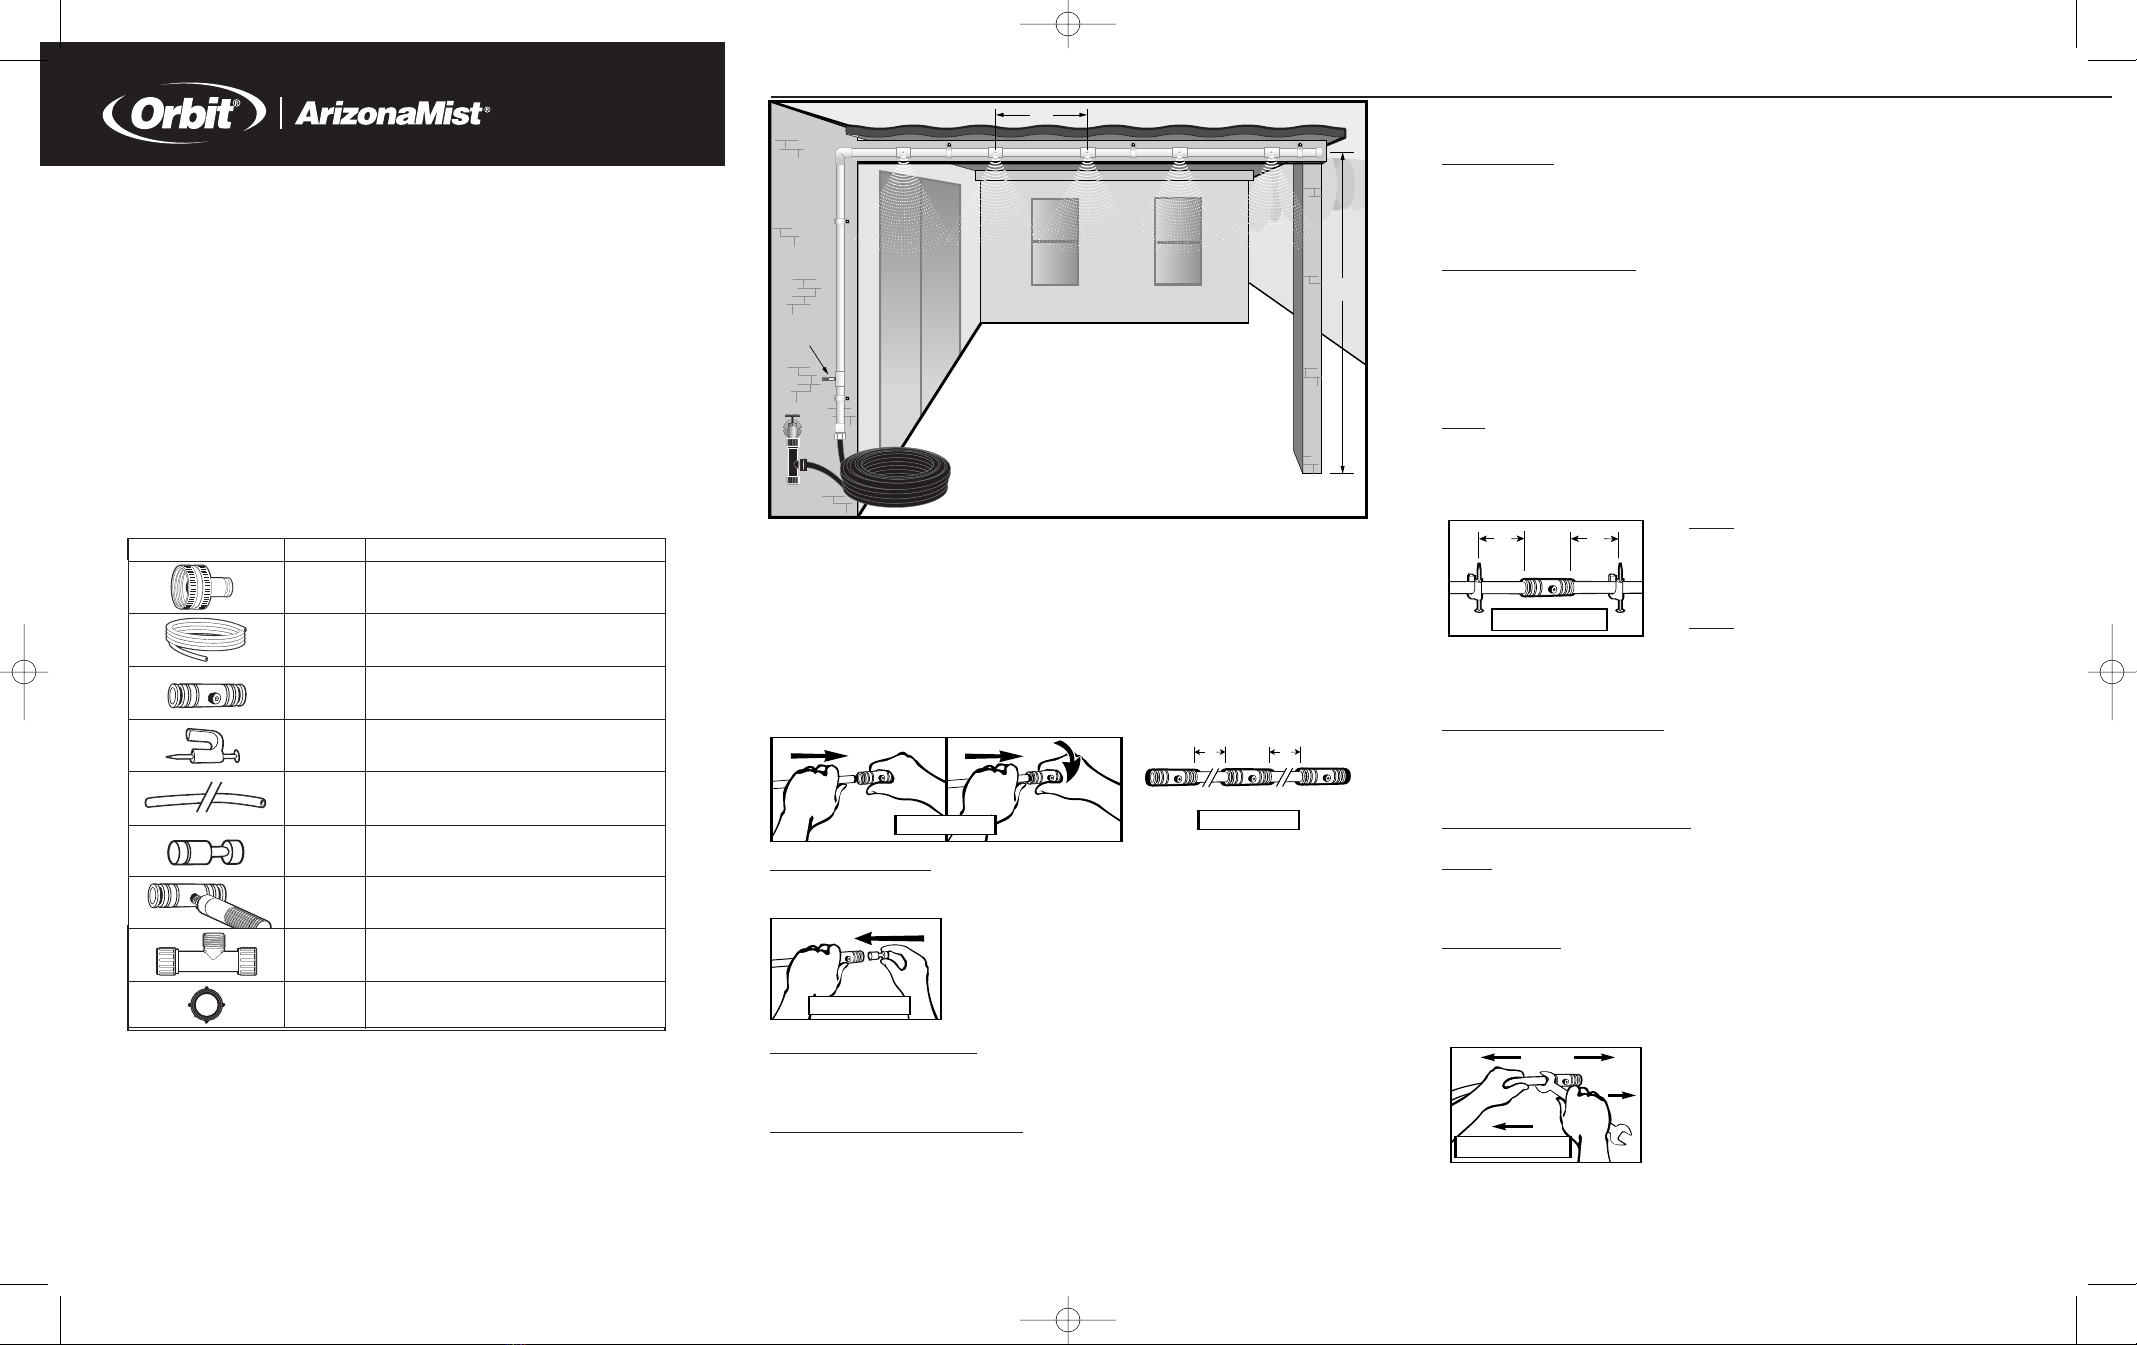
USEFUL TIPS FOR MIST SYSTEM LAYOUT
For the most effective cooling:
1. Mist line is placed around the perimeter of the area to be cooled. This forms a “mist
curtain,” a cooling barrier between the protected area and the outside heat.
2. Place mist nozzles 24" apart for mist lines mounted 8' to 10' above the ground. Nozzle
spacing should be adjusted if mist line is mounted higher.
Mist System Assembly and Installation
REMEMBER: Read all instructions before assembly.
Mist Line Assembly
Insert one of the supplied 24" pre-cut sections of tubing into the end of a Slip-Lok T Fitting
with a firm “push and twist” motion (see illus. 2A). The tubing must be inserted past the
O-ring inside the fitting to form a leakproof seal (approximately 3/4"). Continue this
procedure until desired length of mist line is completed. Your line should now begin and
end with a Slip-Lok T Fitting (see illus. 2B).
After‚ push and twist‚ of tubing in fitting, give a gentle pull on the tubing to assure proper
insertion and engagement.
Inserting the End Plug
Insert end plug into the last Slip-Lok T Fitting with the tabbed end out (see illus. 2C).
This will be the end of our mist line.
Assembling Water Feed line
Insert one end of the supplied 10' section of tubing into the 3/8" end of the hose adapter.
Insert opposite end of tubing into the Slip-Lok T fitting at the beginning of the mist line.
*Note: Auto Drain Valve Assembly.The auto drain valve should be installed in the feed
line for most installations. Cut the feed line approximately one foot from the Hose Adapter.
Thread the auto drain valve into Slip-Lok T Fitting. Install the fitting where you cut the tubing
as illustrated above. This will automatically drain off excess water from the line when water
is turned off, reducing calcium build up in the nozzles.
If there are multiple elevation changes,
more than one drain valve may be needed. Additional drain valves should be installed at the
lowest points in your system.
1
QtyPart
1
5
10
5
1
24" Pre-Cut Sections 3/8" Tubing (Mist line)
Brass End Plug
Slip-Lok T Brass Fittings w/ Brass and
Stainless Steel Nozzles
3/8" Hanging Clamps w/ Nails
10' Section of 3/8" UV-Treated Tubing
for Feed line
3/8" X 3/4" Brass Hose Adapter
Description
1
Slip Lock Auto Drain Valve Assembly
1
T Filter
1
Hose Washer
8'-10'
24"
AUTO DRAIN
VALVE
2FOOT SPACING BETWEEN NOZZLES
2' 2'
Illustration 2B
INSERT PUSH TWIST
Illustration 2A
Before Mounting Your Mist System
Flush Mist Line
Remove nozzles from fittings (unscrew by hand and set aside in a safe place) and connect
Hose Adapter to garden hose or tap. Turn on the water for a few minutes to flush out any dirt
or debris from within the mist line. Turn off the water and replace nozzles in fittings. (hand
tighten only).
Pressure Test Mist System
With mist line still attached to water source, turn water on to test line pressure and fittings
for proper installation. Water will shoot from the drain valve when the water is turned on.
Do not be alarmed. The valve will shut off when the line is pressurized. Inspect each fitting.
Should any fitting leak, see the section on Troubleshooting for instructions.
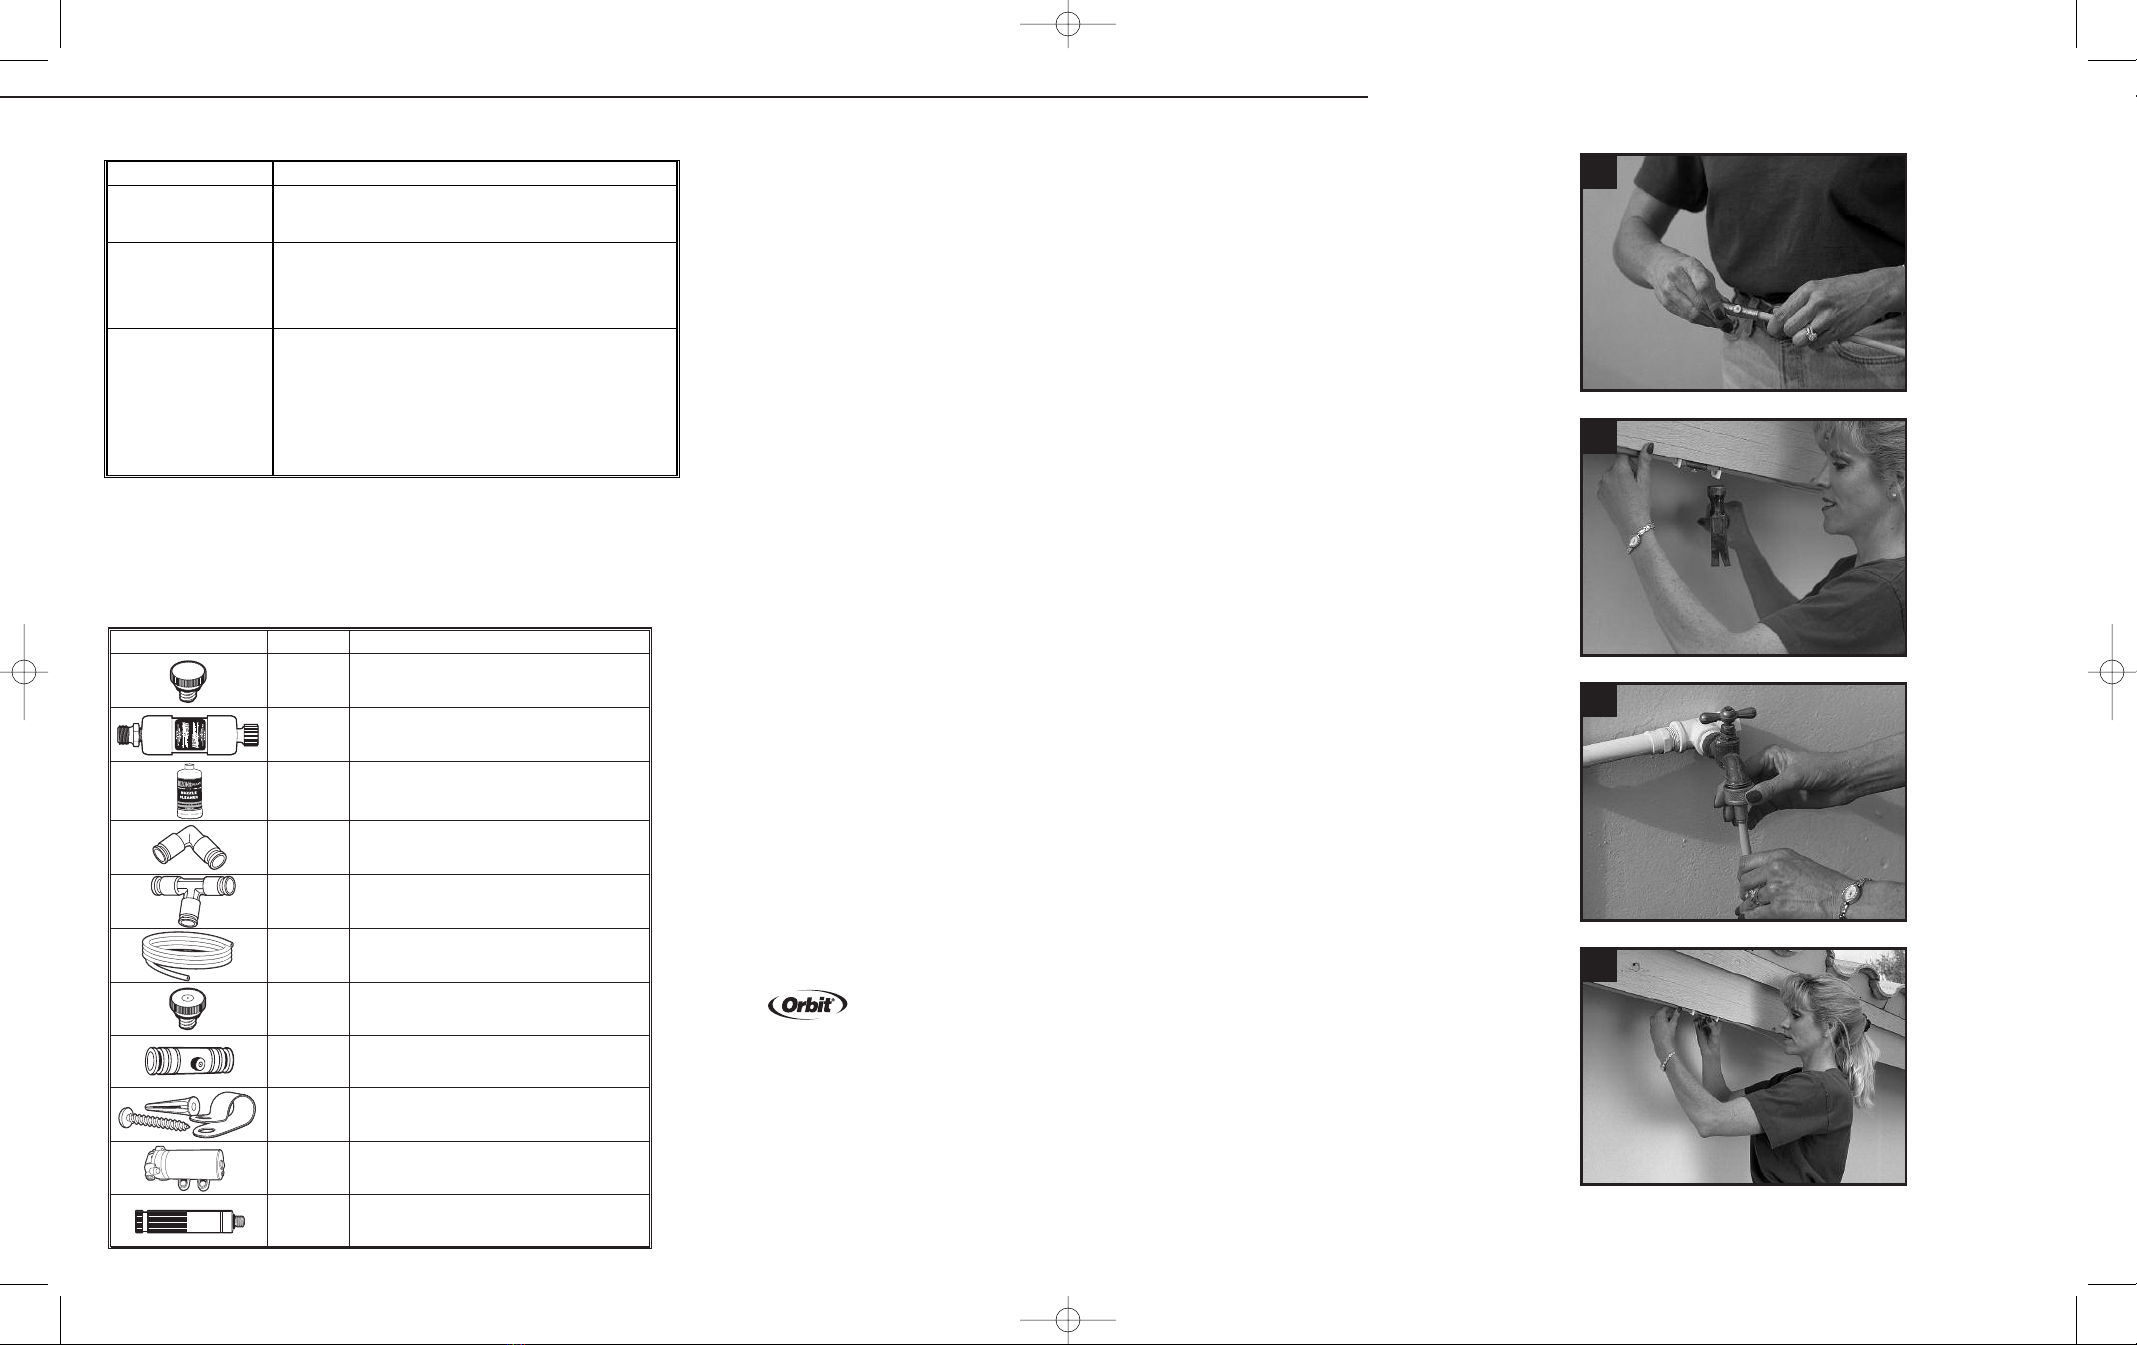
Mounting Your Mist System
Make sure your Mist System has been flushed and pressure tested prior to mounting mist line.
Step 1 It is recommended that the system be mounted on the bottom of the supporting structure.
Begin by placing one of the 3/8” hanging clamps over the mist line 3 inches from the first
Slip Lok T Fitting. The first fitting in your Mist System should begin 2 feet from the house on
apatio cover.Hammer the clamp into the BOTTOM of the support beam or fascia board.
Step 2 Continue placing a hanging clamp 3” on each
side of each Slip Lok T Fitting and hammering in place
(see illus. 3A). Pull tubing slightly while applying each
clamp to avoid sagging in mist line.
Step 3 Connect feed line to water source and turn on
the water to operate mist system.
Maintenance
The following recommendations will assist you in maintaining your mist nozzles and
preventing unnecessary clogging.
Draining Water from Mist Line -Whenever the mist system is not in use the residual
water should be drained to minimize nozzle clogging. If your system has had an Auto Drain
Valve installed correctly at the lowest points in the system no additional steps are required
after turning off the system. If an Auto Drain Valve has not been installed, detach system at
the water source and allow the water to drain completely.
Orbit/Arizona Mist Nozzle Cleaner -Periodically clean the nozzles in system. See bottle
for instructions.
Filters -The T Filter,supplied in the system, will filter out solid sediments from your line.
If needed, Orbit /Arizona Mist also offers a Calcium Inhibitor Filter that will filter solid
sediments from the line and contains poly-phosphates which help prevent mineral build-up
within the line. (see accessories list)
Flushing System -Always remove nozzles at the end of the summer season. Before
re-installing your nozzles, flush the system for 5 minutes. Tokeep the mist line free from
debris in the off-season, install Orbit /Arizona Mist Nozzle Plugs in place of nozzle.
You should also flush the system if it has been idle for longer than a month.
Troubleshooting
The 3/8” Professional System can be easily disassem-
bled to correct problems, replace parts, or extend the
system. To disassemble the 3/8” Professional System
tubing from any Slip Lok fitting, place a 3/8" or 1/2"
open end wrench over the tubing next to the fitting.
Pull the tubing away from the fitting while pushing
the wrench against the fitting. This will depress the
locking ferrule, releasing the tubing from the fitting
(see illus. 3B).
AZM001905 10060-24 rD.qxd 9/8/06 1:41 PM Page 1