Oreck CC1605 User manual

OWNER’S
MANUAL
PORTABLE CANISTER
U414300 #961A00007 ID111867
Important: Read carefully before assembly and use.

THANK YOU
for purchasing an Oreck product
please register your product:
online at oreck.com or call 1.800.989.3535
to register by phone

If you need assistance: visit our website at oreck.com or email us at info@oreck.com
PLEASE DO NOT RETURN THIS PRODUCT TO THE STORE.
TABLE of CONTENTS IMPORTANT SAFETY INSTRUCTIONS ................................................................................. 4
FEATURES ................................................................................................................................... 6
OPERATION ................................................................................................................................. 8
Attach the Tool Caddy ................................................................................................................... 8
Attach the Adjustable Shoulder Strap ........................................................................................ 10
Using the Vacuum ....................................................................................................................... 11
MAINTENANCE ........................................................................................................................ 12
Replacing Inner Bag .................................................................................................................... 12
Replacing the Micro Filter ........................................................................................................... 14
Replacing the HEPA Filter .....................................................................................................................................16
TROUBLESHOOTING GUIDE ................................................................................................. 17
WARRANTY .............................................................................................................................. 18
1
2
3
4
5
6

IMPORTANT SAFETY INSTRUCTIONS
SAVE THESE INSTRUCTIONS
When using an electrical appliance, basic precautions should always be followed, including the following:
READ ALL INSTRUCTIONS BEFORE USING THIS APPLIANCE.
WARNING: TO REDUCE THE RISK OF FIRE, ELECTRIC SHOCK OR INJURY:
This canister vacuum is intended for household use only. If used commercially, warranty is VOID.
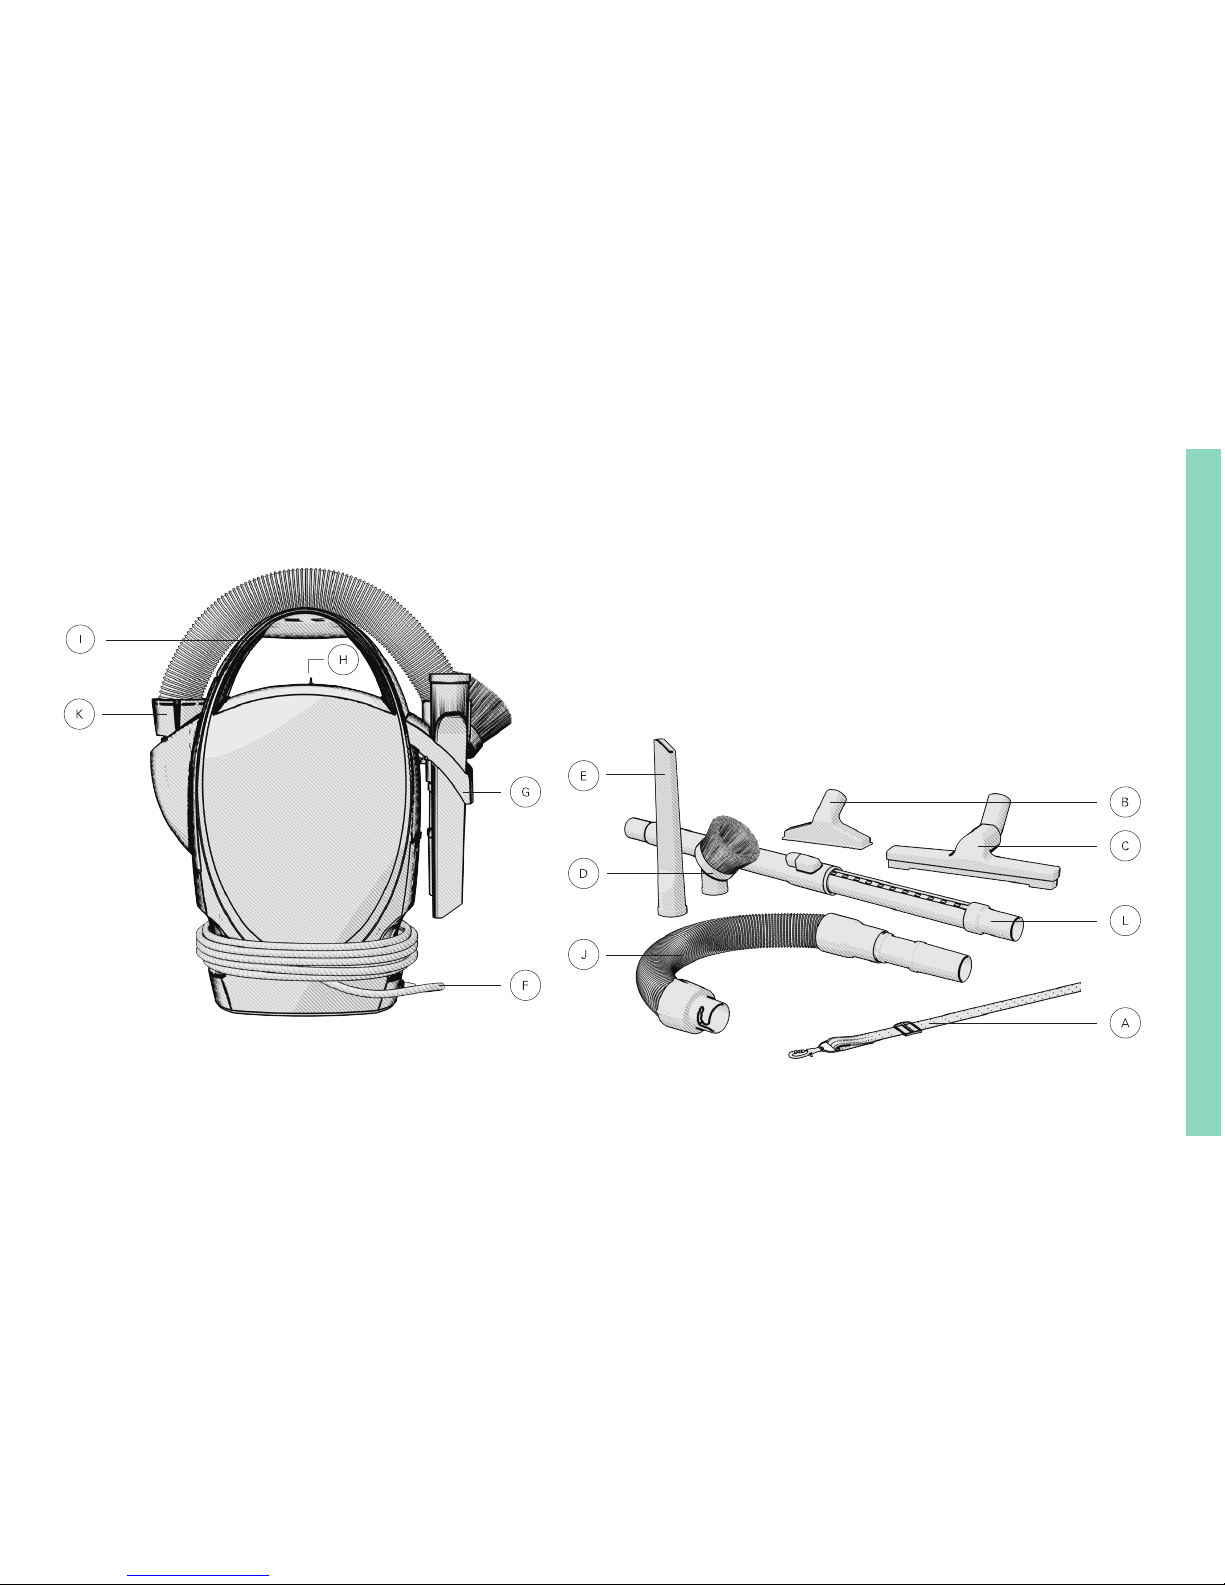
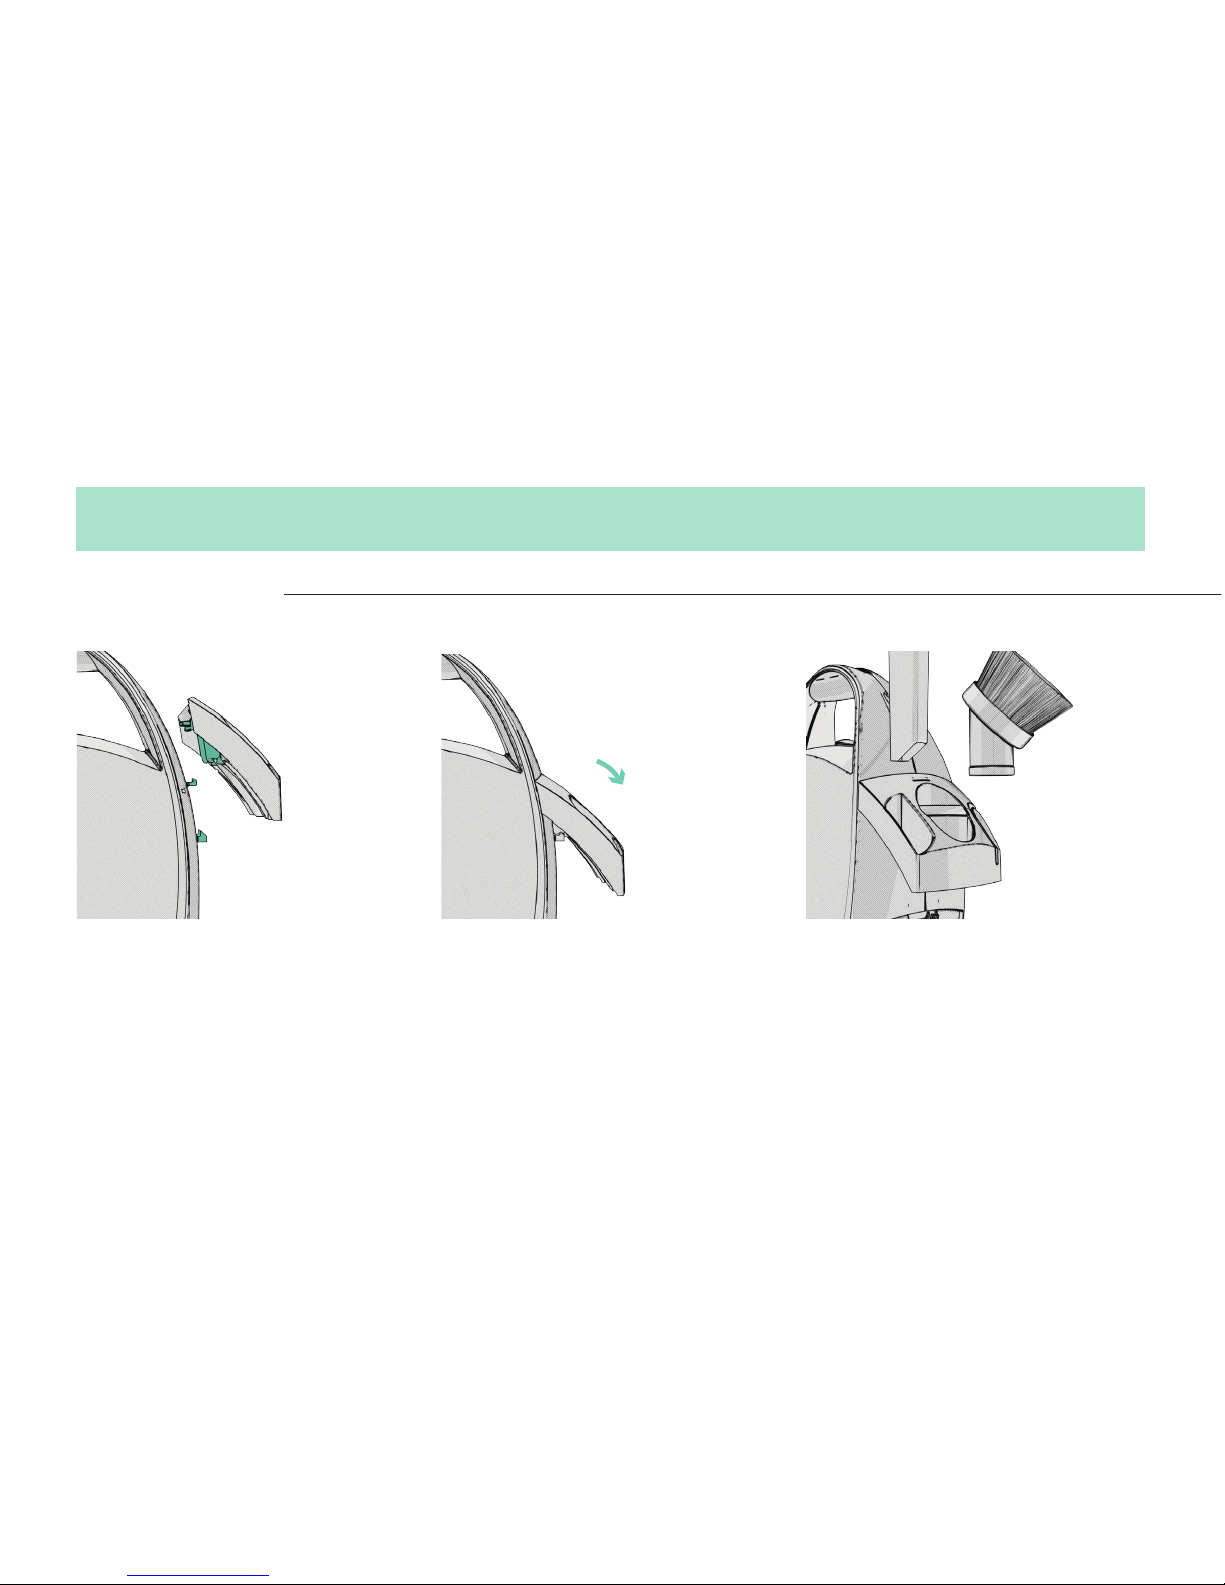
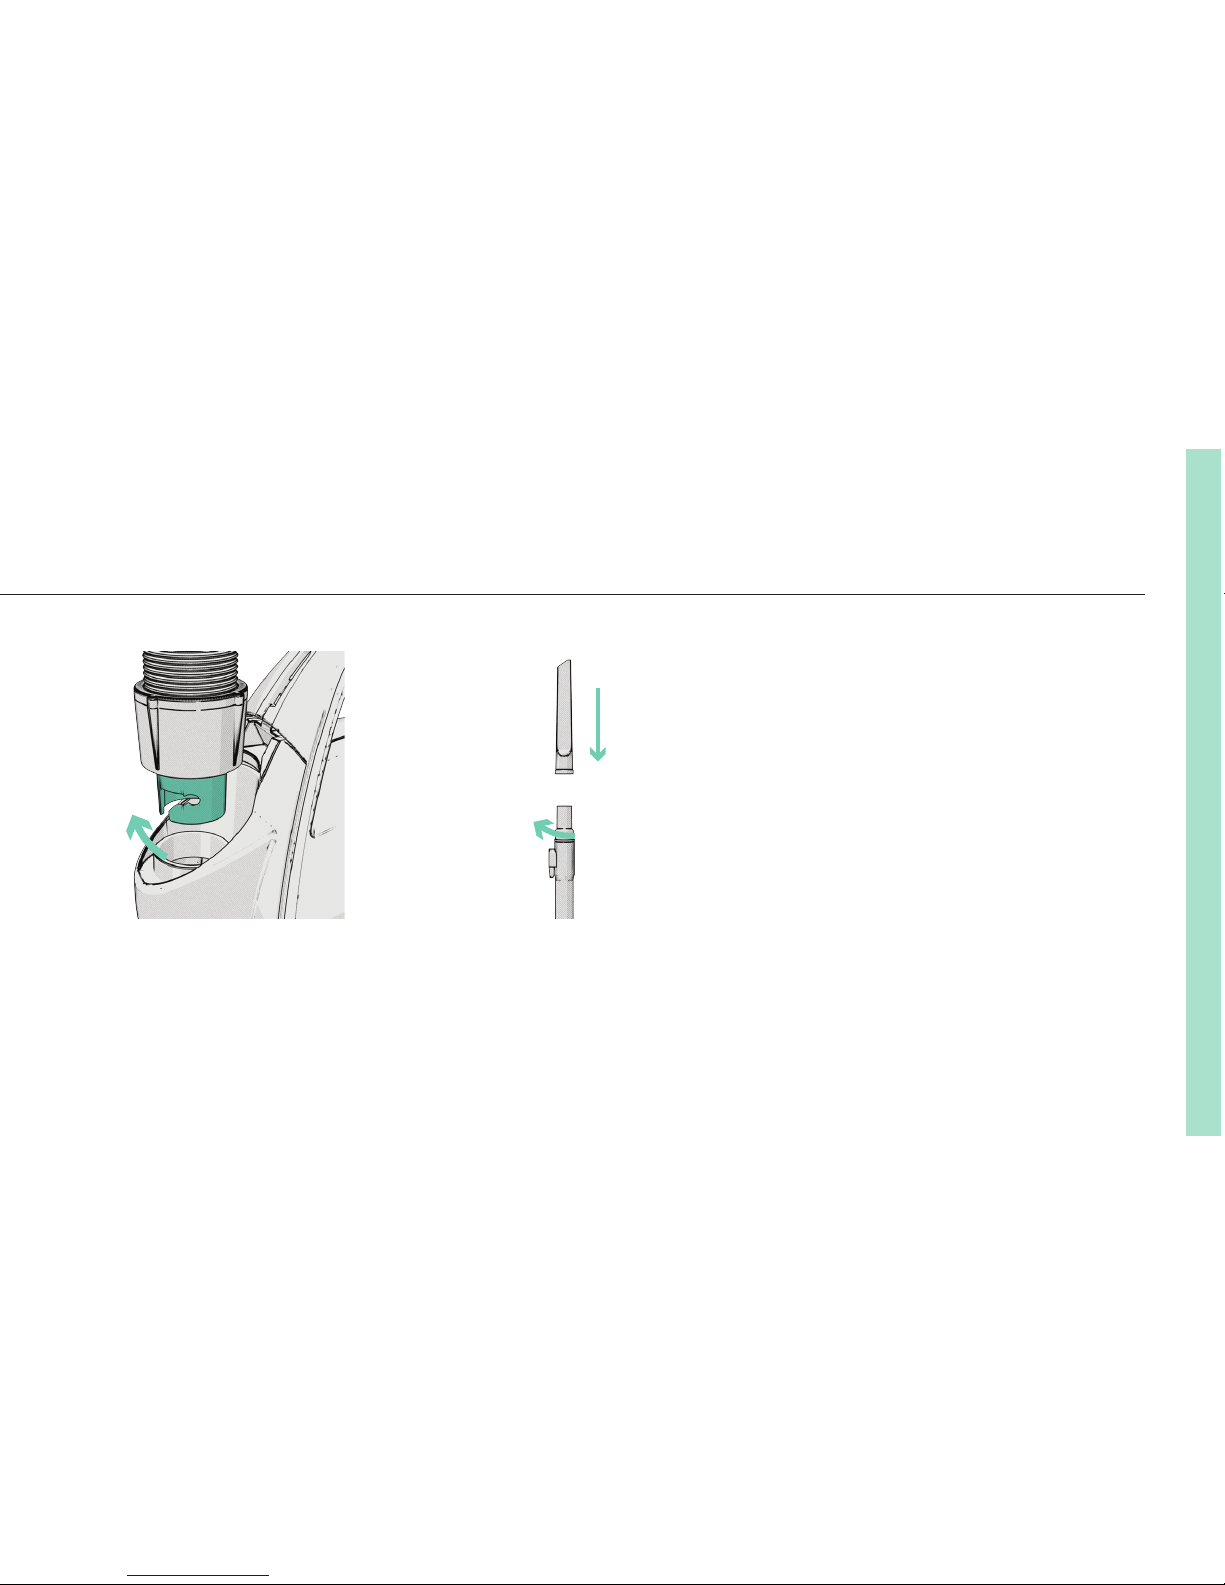
• Fully assemble before operating.
• Operate cleaner only at voltage specified on data plate on the bottom of the cleaner.
• Do not leave appliance unattended when plugged in. Unplug from outlet when not in use and before servicing.
• Do not use outdoors or on wet surfaces.
• Do not allow to be used as a toy. Close attention is necessary when used by or near children.
• Use only as described in this manual. Use only manufacturer’s recommended attachments.
• Do not use with damaged cord or plug. If appliance is not working as it should, has been dropped, damaged, left outdoors, or dropped into
water, return it to a service center or call customer service at 0845 603 0153
• Do not pull or carry by cord, use cord as a handle, close door on cord, or pull cord around sharp edges or corners. Do not place product on
cord. Do not run appliance over cord. Keep cord away from heated surfaces.
• Do not unplug by pulling on cord. To unplug, grasp the plug, not the cord.
• This appliance can be used by children aged from 8 years and above and persons with reduced physical sensory or mental capabilities or lack of
experience and knowledge if they have been given supervision or instruction concering use of the appliance in a safe way and understand the hazards
involved. Children shall not play with the appliance. Cleaning and user maintenance shall not be made by children without supervision.

• Do not handle plug or appliance with wet hands.
• Do not put any object into openings. Do not use with any opening blocked; keep free of dust, lint, hair and anything that may reduce air flow.
• Do not use to pick up flammable or combustible liquids, such as gasoline or lighter fluid, or use in areas where they may be present.
• Keep hair, loose clothing, fingers and all parts of body away from openings and moving parts.
• Do not use to pick up anything that is burning or smoking, such as cigarettes, matches, or hot ashes.
• Do not use without dust bag and filter in place.
• Turn off all controls before unplugging.
• Use extra care when cleaning on stairs.
• Do not use sharp objects to clean out hose as they can cause damage.
PLEASE KEEP INSTRUCTIONS FOR FURTHER USE.
THIS PRODUCT CONTAINS CHEMICALS KNOWN TO
THE STATE OF CALIFORNIA TO CAUSE CANCER AND
BIRTH DEFECTS OR OTHER REPRODUCTIVE HARM.
WASH HANDS AFTER HANDLING.
TO REDUCE THE RISK OF DAMAGE:
AVOID PICKING UP HARD, SHARP
OBJECTS WITH THIS PRODUCT, AS
THEY MAY CAUSE DAMAGE.
TO REDUCE THE RISK OF DAMAGE:
STORE APPROPRIATELY INDOORS IN A
DRY PLACE. DO NOT EXPOSE MACHINE
TO FREEZING TEMPERATURES.
5
CAUTION!
!
!
CAUTION!
!
!
WARNING!
!
!
The wires in this mains lead are coloured
in accordance with the following code:
Blue: Neutral Brown: Live
Plug:
As the colours of the wires in the mains lead of this appliance may not correspond with the coloured markings identifying
the terminals in your plug, proceed as follows;
The wire which is coloured Blue must be connected to the terminal which is marked with the letter N or coloured Black.
The wire which is coloured Brown must be connected to the terminal which is marked with the letter L or coloured Red.
Neither wire is to be connected to the earth pin of the 3 pin plug.
Replace fuse with same size fuse.

Adjustable shoulder strap
Upholstery tool
Large floor tool
Dusting brush
Crevice tool
Power cord
The Ultimate Handheld Canister weighs about 2.3 kg/5 lbs.
CARTON CONTENTS
A
B
C
D
E
F
G
H
Tool caddy
On/Off Switch
Carry handle with strap hooks
Slinky hose
Hose inlet
Extension wand
I
J
K
L
2. FEATURES

7

3. OPERATION
Align the middle slot and two pronged
tabs with the vacuum tab and slots.
Snap the tool caddy down into place. Load the tools onto the tool caddy.
ATTACH THE TOOL CADDY

Align the J-shaped slot at the end of
the hose with the tab inside the hose
inlet. Turn clockwise to lock into place.
Attach the tool you would like to use.
Twist and push to lock in. Twist and
pull to remove.
9

3. OPERATION
ATTACH THE ADJUSTABLE SHOULDER STRAP
Loosen the straps, and slide the clip
up or down to adjust.
To carry in a vertical position: clip each
end of the shoulder strap into the two
carry handle side slots.
To carry in a horizontal position: clip
one end of the shoulder strap into carry
handle slot. Clip the opposite end into
the bottom of the vacuum slot.
The shoulder strap can be attached in a horizontal or vertical position.

USING THE VACUUM
Unwrap the cord and plug into an
electrical outlet.
Attach the tool you need to the end of
the extension wand.
Note: Press the button on the extension
wand for more length if needed.
Slide the power switch to the ON position.
11

4. MAINTENANCE
REPLACING INNER BAG
Push down on the inner bag door
release button located above the
hose inlet.
Rotate the inner bag door down. Pull the inner bag out.
TO REDUCE THE RISK OF PERSONAL INJURY–
UNPLUG BEFORE CLEANING OR SERVICING.
IF APPLIANCE IS NOT WORKING AS IT SHOULD, HAS BEEN DROPPED,
DAMAGED, LEFT OUTDOORS, OR DROPPED INTO WATER, TAKE IT TO A
SERVICE CENTER PRIOR TO CONTINUING USE.
ANY OTHER SERVICING SHOULD BE
DONE BY AN AUTHORIZED SERVICE
REPRESENTATIVE.
WARNING!
!
!

Insert a new inner bag by fitting the
cardboard rim between the tabs
inside the bag holder.
Close the inner bag door.
13

REPLACING THE MICRO FILTER
4. MAINTENANCE
Lift up on the finger tab and pull out. Remove the Micro Filter from the frame. Replace by pressing a new Micro
Filter onto the tab located on the
underside of the frame.
Important: Never remove the white gasket surrounding the inner bag opening. The vacuum will leak air and not run properly.
TO REDUCE THE RISK OF PERSONAL INJURY–
UNPLUG BEFORE CLEANING OR SERVICING.
IF APPLIANCE IS NOT WORKING AS IT SHOULD, HAS BEEN DROPPED,
DAMAGED, LEFT OUTDOORS, OR DROPPED INTO WATER, TAKE IT TO A
SERVICE CENTER PRIOR TO CONTINUING USE.
ANY OTHER SERVICING SHOULD BE
DONE BY AN AUTHORIZED SERVICE
REPRESENTATIVE.
WARNING!
!
!

Insert the frame back in. Then insert the
inner bag back into place, and close the door.
15

4. MAINTENANCE
REPLACING THE HEPA FILTER
Push down the HEPA filter door
tab to pull out
Slide the HEPA filter up and out.
Insert a new filter by aligning the
slots on the side of the filter with
the tabs on the filter door.
Place the HEPA filter door back in
until it snaps into place.
LUBRICATION
The motor is
equipped with
bearings which
contain sufficient
lubrication for
their lifetime. The
addition of lubricant
could cause damage.
Do not add lubricant
to motor.
TO REDUCE THE RISK OF PERSONAL INJURY–
UNPLUG BEFORE CLEANING OR SERVICING.
IF APPLIANCE IS NOT WORKING AS IT SHOULD, HAS BEEN DROPPED,
DAMAGED, LEFT OUTDOORS, OR DROPPED INTO WATER, TAKE IT TO A
SERVICE CENTER PRIOR TO CONTINUING USE.
ANY OTHER SERVICING SHOULD BE
DONE BY AN AUTHORIZED SERVICE
REPRESENTATIVE.
WARNING!
!
!

5. TROUBLESHOOTING
Service problems can often be solved easily. This guide can help you troubleshoot.
Problem
Cleaner will
not run
Check What to do
Cleaner does
not pick up or
has low suction
Extension
wand and
tools will not
stay together
• Replace fiinner bag. See “Replacing the Inner Bag”
• Clear obstruction
• Replace the white bag gasket
• Return to Service Center for repair
• Push and twist the tools together to
properly attach
• Inner Bag is full
• Hose/wand tool is clogged
• Air leak due to missing or
damaged gasket
• Proper friction fiffififiit is not
being obtained
• Not plugged in properly
• No electricity in wall outlet
• Blown fuse or tripped breaker
• Motor Protector tripped
• Be sure cleaner is ffififiirmly plugged
into wall outlet
• Check electrical source – fuse
or circuit breaker in home
• Replace Fuse or reset breaker
in home
• See thermal protection box.
17
THERMAL PROTECTION
A thermal protector has been
designed into your cleaner to protect
it from over heating. When the
thermal protector activates the
cleaner will stop running. If this
happens proceed as follows: 1. Turn
cleaner OFF and unplug it from the
electrical outlet. 2. Check fullness
of bag, change if needed. 3. Inspect
the hose or accessory for any
obstructions. Clear obstructions
if present. 4. When cleaner is
unplugged and motor cools for 30
minutes, the thermal protector will
deactivate and cleaning may continue.
If the thermal protector continues to
activate after following the above
steps, your cleaner needs servicing.
TO REDUCE THE RISK OF PERSONAL INJURY–
UNPLUG BEFORE CLEANING OR SERVICING.
IF APPLIANCE IS NOT WORKING AS IT SHOULD, HAS BEEN DROPPED,
DAMAGED, LEFT OUTDOORS, OR DROPPED INTO WATER, TAKE IT TO A
SERVICE CENTER PRIOR TO CONTINUING USE.
ANY OTHER SERVICING SHOULD BE
DONE BY AN AUTHORIZED SERVICE
REPRESENTATIVE.
WARNING!
!
!

5. WARRANTY
Techtronic Floor Care Technology gives you the following limited warranty for this product only if it was originally purchased for residential use, not for resale, from
Oreck or an Oreck Authorized Retailer.
Oreck will repair or replace, free of charge, to the original purchaser, any part that is found to be defective in material or workmanship within three (3) years following
the date of purchase for all residential models. NOTE: If the unit is used commercially, warranty is void. This limited warranty does not cover the replacement of
expendable or consumable parts such as filters, cartridges, and other parts subject to normal wear unless they are defective in material or workmanship.
This limited warranty does not apply to any part subjected to accident, abuse, commercial use, alteration, misuse, damage caused by an act of God, the use of voltages
other than on the data plate of this product or service of this product by other than Oreck or a participating Factory Authorized Service Center.
Oreck does not authorize any person or representative to assume or grant any other warranty obligation with the sale of this product.
Oreck’s limited warranty is valid only if you retain proof of purchase from Oreck or an Oreck Authorized Retail Dealer for this product. If you purchase this product
from any other source, your purchase is “AS IS,” which means Oreck grants you no warranty, and that you, not Oreck, assume the entire risk of the quality and
performance of this product, including the entire cost of any necessary servicing or repairs of any defects.
Oreck’s liability for damages to you for any costs whatsoever arising out of this statement of limited warranty shall be limited to the amount paid for this product at the
time of original purchase, and Oreck shall not be liable for any direct, indirect, consequential or incidental damages arising out of the use or inability to use this product.
Some states do not allow the exclusion or limitation of incidental or consequential damages, so the above limitation or exclusion may not apply to you.
ALL EXPRESS AND IMPLIED WARRANTIES OTHER THAN THE LIMITED WARRANTY SET FORTH ABOVE, FOR THIS PRODUCT, INCLUDING IMPLIED WARRANTIES OF
MERCHANTABILITY AND FITNESS FOR A PARTICULAR PURPOSE ARE EXPRESSLY DENIED.
This warranty gives you specific legal rights, and you may also have other rights which vary from state to state.


Techtronic Floor Care Technology Limited
Distributed by Royal Appliance Mfg. Co. Glenwillow, Oh 44139
U414300
Table of contents
Other Oreck Vacuum Cleaner manuals

Oreck
Oreck XL UPRO14T User manual

Oreck
Oreck XL2800HAY User manual

Oreck
Oreck U3770 User manual

Oreck
Oreck ELEVATE CONTROL UK30100 User manual

Oreck
Oreck UK30200 User manual

Oreck
Oreck Simply Amazing XLPRO6A User manual

Oreck
Oreck XL U2640RH User manual

Oreck
Oreck XL3600RH User manual

Oreck
Oreck POWER BROOM DP-460 Guide

Oreck
Oreck U3775 User manual

Oreck
Oreck U4090H2 User manual

Oreck
Oreck BB1005 User manual

Oreck
Oreck XL2000RH User manual

Oreck
Oreck XL2205RH User manual

Oreck
Oreck SurfaceScrub FK40100 Series User manual

Oreck
Oreck XL U3120HH User manual

Oreck
Oreck U4151 User manual

Oreck
Oreck XL BB870-ED User manual

Oreck
Oreck XL2090RHM User manual

Oreck
Oreck XL U2630HH User manual