Oric MICRODISC User manual


THE ORIC
MICRODISC
MANUAL

© Copyright Oric Products International Limited 1984
The information contained in this document must not be reproduced in
any form whatsoever without prior written permission from Oric
Products International Limited.
The product described in this document is subject to continuous
development and it is acknowledged that there may be errors or
omissions.
Oric can accept no responsibility for such omissions and/or errors, nor
for damage or loss resulting from work carried out on the product by
persons other than those authorised to do so, by Oric Products
International Limited.
Oric would be most grateful for any comments and/or suggestions from
users regarding this document or the product it describes. All such
correspondence should be sent to:
Customer Services
Oric Products International Limited, Coworth Park, London Road,
Ascot, Berks SL5 7SE.

SAFETY
All dangerous voltages are contained within the power supply unit
which plugs directly into the mains electricity supply. If you suspect this
unit of being faulty DO NOT attempt to remove the outer case and plug
the unit into the mains with the inside exposed. Take the unit to your
nearest ORIC authorised dealer.
iii

CONTENTS
CHAPTER 1
CHAPTER 2
CHAPTER 3
CHAPTER 4
CHAPTER 5
ABOUT THIS USER GUIDE
ABOUT DATA STORAGE
Why do we need data storage?
Magnetic disc storage
The disc itself
Disc files and directories
Formatting the disc
The disc drive unit
THE ORIC MICRODISC SYSTEM
Introduction
The disc operating system
The disc drive
GETTING STARTED
Checking the supplied items
Connecting up and switching on
Making a Backup Copy of the system disc
USING THE MICRODISC FUNCTIONS
General Instructions
HELP Pages
BACKUP a complete disc
COPY file(s)
DELETE a file or set of files
DIRECTORY listing
DRIVE default setting
FORMAT a disc
LOAD a file from disc
PROTECT a file
RENAME a file
SAVE a file to disc
SYSTEM disc drive re-configuration
OPEN a file
CLOSE a file
PUT data in a file
GET a data from a file
STORE a BASIC array
RECALL a BASIC array
Page
1
9
9
9
10
13
13
13
16
19
19
24
26
28
33
34
36
37
38
39
40
41
43
44
45
45
46
47
48

FIGURE 1
FIGURE 2
FIGURE 3
FIGURE 4
APPENDIX
ILLUSTRATIONS
Magnetic disc surface (40 tracks 10 sectors)
A 3 inch microdisc and a 5.25 inch flexibledisc
A system with four disc drive units
ORIC microdisc drive unit (showing disc insertion)
Error numbers and messages
5
7
11
15
49
vi

CHAPTER 1
About this User Guide
This user guide is intended to help you in the correct use of the
ORIC
microdisc system, and is aimed at existing and future users of ORIC-1
and ATMOS microcomputer users.
For those of you who have not previously owned a microcomputer,
Chapter 2 explains what data storage is and why we need to have such a
system. It also compares disc storage with tape storage and gives some
useful information on exactly how data is organized on a magnetic disc
surface. Chapter 3 deals specifically with the ORIC microdisc system,
telling you exactly what you get, what the system is capable of and
briefly how it works.
Chapters 4 and 5 are concerned with the practical side -- connecting up,
switching on, making sure the system is working correctly and finally,
using the system.
IMPORTANT
We recommend that you read this User Guide thoroughly before using
the system. When you do start to use it, observe the General
Instructions given in the Introduction in Chapter 5, they will help you to
use the system efficiently and avoid making too many mistakes.

CHAPTER 2
About Data Storage
WHY DO WE NEED DATA STORAGE?
If you have not previously used or owned a computer, you are probably
wondering why it is necessary to have a data storage system at all!
Let's begin by talking about the computer's built-in memory which
stores the information you type in on the keyboard. This memory is
called Random Access Memory and is commonly referred to as RAM.
One of the features of RAM is that it is not a permanent form of
storage, in other words, when you switch off the computer the contents
of RAM are lost forever. If these contents are important items of data
or programs then it is desirable to be able to store them in some form
which does not depend on whether the computer is switched
on
or
off.
For this reason your computer is designed so that it can be connected to
a storage device which enables you to permanently store anything that is
in computer RAM and (even more useful), put it back in RAM
whenever you want.
Another reason for data storage is that although your computer has a
large area of RAM (the ORIC-1 has space to store about 37,000
characters) it is obviously not endless. There will be times therefore,
when it is necessary to store data in order to make RAM free to store
new data.
The most commonly used way of storing data is on magnetic tape and
when you buy a microcomputer you can also buy a cassette tape
recorder (if you have not already got one) which plugs into the
computer. The ORIC-1 BASIC PROGRAMMING MANUAL --
Chapter 2 tells you about tape recorders.
An increasingly popular method of storage, however, is on magnetic
discs, and this is described in the following pages.

MAGNETIC DISC STORAGE
The disc itself
A magnetic storage disc is a dark coloured disc similar to a record and
comes in a number of different sizes (diameters).
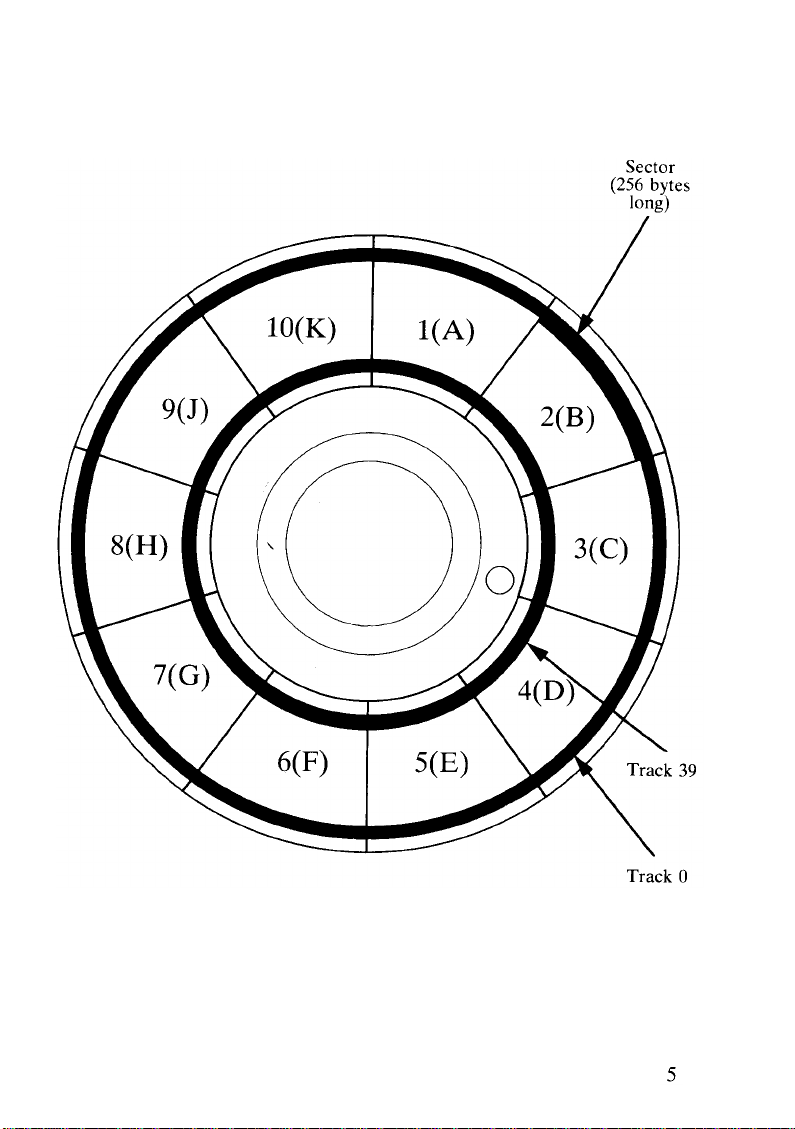
For the purpose of storing data, a magnetic disc is divided into
concentric circles called
tracks
of which there are 40 or 80 on each side
of a disc (depending on the disc system in use). Each track is divided
into a number of
sectors,
and each sector is used to store a number of
characters.
For example, an 80 track disc with 10 sectors per track and
256 characters per sector, can store 80 x 10 x 256 = 204,800 characters
per side. Fig 1 shows the layout of a 40 track, 10 sector disc surface.
Tracks are generally given numbers and sectors are given letters. Each
sector therefore is identified with a track number and then a leter e.g.
29F, 49A.
Each character on the keyboard (alphanumeric or symbolic) is stored on
a disc track in the form of an 8 bit coded electronic signal known as a
byte.
All storage devices as quoted as having so many
bytes
storage
capacity, for example a disc having a capacity of 256k bytes can store
256,000 characters. \
The two disc types which can be used on the ORIC system are very
different to look at. The 5.25 inch flexible disc is almost identical to a
'single' LP record although it is permanently stored in a paper jacket
(like the cover of a record), this prevents damage to the surface. There
is a slot in the jacket to allow the read/write heads to access the disc
surface. The 3 inch microdisc, apart from being smaller is permanently
enclosed in a rigid plastic case which makes it more robust than the
flexible disc.
All magnetic discs have provision for protection against the writing or
erasing of data. In the case of the 3 inch microdiscs you will notice in one
corner there is a small hole or slot which can be covered or left exposed
by the operating of a small mechanical switch in the case edge. You can
operate this switch with a small screwdriver and with the hole covered
up the disc is unprotected which means it can be written to or data can
be deleted from it. In the other position with the hole or slot exposed,
data can be read from the disc but not deleted or written onto it i.e. it is
protected.

Sector
(256 bytes
long)
10(K)
9(J) 2(B)
8(H) 3(c)
7(G)
6(F) Track 39
Track 0
Figure 1 -- Magnetic disc surface (40 tracks, 10 sectors)
1(A)
4(D)
5(E)

In the case of the 5.25 inch flexible disc, the write protection device is a
slot cut in the edge of the protective jacket which can be covered by
small stickers provided with each pack of discs.
Disc files and directories
Everything you store on a disc (information, programs etc.) must be
given a name which we commonly refer to as a 'filename', hence the
term 'Disc files'. Each time you store some data in a new file, the
filename, together with the location of the first sector of data, is written
onto a specially reserved sector called a directory. The system allocates
a directory sector for every fifteen filenames you create, for example, if
you stored data in a total of 60 different files, four directories would be
created. The directory makes it easy for the read/write heads to quickly
locate a piece of information, and most systems have a facility which
enables you to display the contents of directories to find out exactly
which files are on a disc.
In addition to a list of filenames, each directory, when it holds the
maximum of fifteen filenames, also holds the sector location of the next
directory.
Figure 2 shows both types of disc with the write protect devices.
Formatting the Disc
Before a disc can be used for storing data it must be put through a
process called
formatting.
As we explained previously, a disc is divided
into a number of tracks and a number of sectors per track. When a disc
is
formatted
the beginning of each and every sector is marked so that the
system can recognise it.
In addition to sector marking, formatting has two more important uses:
It enables you to give the disc a name and it reserves a 'system' sector on
track 0 for the storing of certain essential information about the disc
itself. For the more technically minded user, here is a list of items stored
in the ORIC microdisc system sector:
--The name of the disc (this is the name you gave it during
formatting)
-- The version number of the disc operating system under which the
disc was created (formatted)
--The number of sectors currently full of stored data (excluding
directories)

Label
Mechanical
drive hole
Magnetic disc
Figure 2 -- A 3 inch microdisc and a 5.25 inch flexible disc
Rigid plastic
casing
Indicates
'A' side Arrow
insertion
direction
Write protect
hole for 'A'
side
Write protect
switch for 'A' side
Access slot
for read/write
heads
Write protect
switch for
'B' side
Write protect
hole for
'B' side
Mechanical"
drive
hole
A 3 inch microdisc
Access slot
for read/write
heads
Write protect
sticker
Write protect
slot
Permanent
protective paper
jacket
A 5.25 inch flexible disc

-- The number of sectors currently free for storing data on (excluding
directories)
-- The location of the first directory sector and the first data sector
free.
The Disc Drive Unit
Probably the most obvious difference between disc and tape storage is
the speed of operation with a disc system, it is possible to write data to a
disc and read data from a disc many times faster than from a tape
system. Disc systems are also generally more reliable and there is less
likelihood of the data being spoiled as it is being transferred to and from
the disc.
The disc drive unit which holds the disc has no external controls (unlike
a tape recorder which has a number of controls -- Record, Playback
etc). This means that control of storage and retrieval of data from disc is
entirely with the computer and therefore more sophisticated data
handling features can be built into the disc than is possible for a tape
cassette storage system which usually requires manual operation of the
'press button' controls.
Because of the way in which a disc drive unit is engineered, it takes only
seconds for an item of data to be found and loaded into the computer.
With a tape sytem, the speed at which the tape moves means that it can
take minutes rather than seconds.
The devices which actually record and read data on the disc surface are
called the read/write heads and they move radially under control of the
computer. The disc itself is spinning at high speed, so the read/write
head can very quickly get to any sector of any track. Disc drive units
come in single or double-sided versions, the double one having two sets
of read/write heads (one for each side of the disc). With a double sided
drive you don't have to turn the disc over in the drive in order to write to
both sides (as you have to with a single sided drive).

CHAPTER 3
The ORIC Microdisc System
INTRODUCTION
When you purchase an ORIC microdisc system you get (in addition to
this User Guide) a disc drive unit for 3 inch microdiscs, a power unit and
a 3 inch microdisc. You will need to purchase some additional
microdiscs for storing data, your dealer should be able to supply these.
THE DISC OPERATING SYSTEM
The microdisc which is supplied is called the 'system disc' and on each
side is written a set of computer programs which are known collectively
as the Disc Operating System (DOS) and without which the microdisc
system will not work. When you connect up and switch on (see Chapter
4) the DOS is loaded into the computer RAM automatically. Once this
has happened you can give instructions to the computer telling it how to
use the microdisc drive(s). In addition to the DOS, there is also a lot of
information on the system disc, in the form of 'help' pages and we shall
tell you how to use these in Chapter 5.
Let's talk a little more about the DOS and what it does. The DOS is in
fact seventeen completely separate programs (all of which perform
different microdisc functions) and there are seventeen different
instructions which you can give to the computer (one for each DOS
program). We will not discuss the microdisc instructions in detail at the
moment, this comes later in Chapter 5.
When you type in an instruction, the computer selects the appropriate
DOS program from its RAM and then 'runs' the program, which results
in the instruction being carried out. When the instruction is completed,
control of the system is returned to the keyboard so you can type in
another instruction.

Each instruction is made up of a short command word (which tells the
computer which DOS program to select) followed by some qualifying
data which the program must have before it can run. For example, one
instruction enables the contents of a disc in one disc drive unit to be
copied to a disc in another drive. The command word is COPY, which is
followed by some qualifying data to tell the computer exactly which
drive unit is to be read from and which drive unit data is to be sent to.
Finally, to put the instruction into the computer having checked that it is
correct on the screen, you simply press the RETURN key.
The addition of a disc system to your microcomputer does not reduce
the amount of free RAM available to you for storing programs or data,
the ATMOS (48K) and ORIC-1 (48K) microcomputers still give you a
minimum of 37K bytes free.
THE DISC DRIVE
It is important to appreciate from the beginning that there are two types
of microdisc drive unit called
master
and
slave.
The
master
contains
electronic interface circuitry which enables it to be connected directly to
and controlled directly from, the microcomputer. It also has a red 'reset'
button on the rear, the purpose of which is explained in Chapter 4.
The
slave
contains no interface circuitry and no 'reset' button, in other
words it cannot be connected directly to the computer and it is
controlled by the computer via the
master
drive interface. This is why,
when you have more than one disc drive, the drive units are all
connected together in 'chain' fashion with only the
master
(at the end of
the chain) being connected to the computer. The ORIC system can be
fitted with up to four disc drives (one
master
and three
slaves)
as shown
by Figure 3.
Each disc drive unit has internal switching which allows it to be
numbered 0, 1, 2 or 3, this is how the computer recognises a disc drive.
The microdisc drive which you purchase as part of the microdisc system
will always be a
master
and its internal switching will always be set up for
number 0. If you purchase an additional drive, this must be a
slave
and
will always be numbered 1. You may also wish to purchase up to two
additional drives which must also be
slaves
and will also be numbered 1.
10

mains
SLAVE DISC
DRIVE UNIT 3
3" OR 5.25"
DISCS
POWER
UNIT
mains
MONITOR
OR
TELEVISION MICROCOMPUTER
SLAVE DISC
DRIVE UNIT 2
3" OR 5.25"
DISCS
SLAVE DISC
DRIVE UNIT 1
3" OR 5.25"
DISCS
mains
MASTER
DISC
DRIVE 0
3" DISCS
Figure 3 -- A system with four disc drive units.
11
POWER
UNIT

Every
slave
drive is accompanied by a leaflet explaining how to change
the internal number and if you are purchasing second and/or third
slaves
then you will have to re-number them (from 1 to 2 or 3). You will note
also (from figure 3) that with one or two extra drive units you will need
an extra power supply unit. A 5.25 inch 'floppy' disc drive can also be
used as a
slave,
however these are not sold by ORIC and you should
refer to their manuals provided, for user instructions. A 5.25 inch
'floppy' disc drive connects with the microcomputer in the same way as
the ORIC microdisc drive, however the power supply arrangement may
be different.
Currently, all disc drives supplied by ORIC are single sided and all discs
are double sided.
12

CHAPTER 4
Getting Started
CHECKING THE SUPPLIED ITEMS
First, make sure you have all the items listed in the separate checklist
supplied. Make sure also that the dealer from whom you purchased the
system has stamped the guarantee card for the disc drive unit.
If you have purchased a microcomputer and a microdisc system you will
find separate instructions for setting up the ORIC-1 or ATMOS, in the
packing with the microcomputer. You will also need some spare 3 inch
microdiscs and your dealer will almost certainly be able to supply these.
CONNECTING UP AND SWITCHING ON
The power unit supplied with the ORIC-1 and ATMOS is not needed,
since the power unit included with the microdisc system will supply the
microcomputer and up to two disc drive units. If you already have an
ORIC-1 or an ATMOS, disconnect and remove the power unit, and
store it away. If you have just purchased a microcomputer, there is no
need to unpack the power unit. Now refer to Page 11 of the ORIC-1
User Guide or Page 2 of the ATMOS Manual, you will see that one of
the plugs on the rear of the computer is labelled 'Expansion Port' and
this is used for the disc drive unit.
Next, take the
Master
disc drive (the one with a red pushbutton on the
rear) and connect the 34 way socket on the end of its flat
ribbon
type
cable to the EXPANSION port on the microcomputer. There is a slot in
the plug and a locating piece on the socket so you cannot get it the
wrong way round. If the socket does not go in fairly easily, DO NOT try
to force it as there may be a bent pin or an obstruction. Be very careful if
you attempt to straighten a bent pin, in fact it is probably better to let
your dealer do it for you. If you have more than one disc drive, connect
the remaining
slave
drives in 'chain fashion' to the
Master
drive as shown
in Figure 4 (each drive has a 34 way plug just like the microcomputer).
13

Once the disc drives are all connected up, the next job is to connect up
the power supply. You will notice that the power unit has four cables
extending from it. One with a 3 pin plug for the mains electricity, one
with a small 'jack' type plug for the microcomputer, and the remaining
two each having a 4 way DIN socket for a 3 inch microdisc drive.
Connect the jack plug into the power socket on the computer, and a
DIN socket into the 4 way DIN plug on the back of each microdisc
drive.
Remember we mentioned previously that each microdisc has a device
for preventing its data from being overwritten or removed accidentally.
It is very important that the system disc supplied has its' data (the DOS)
protected so make sure both write protect holes (one in each corner) are
exposed.
Next, plug the power unit and the television into the mains and switch
on the electricity supply and the television (there is no on/off switch on
the disc drive unit). There may or may not be a sensible message on the
screen, however this does not matter because the next thing to do is
press the red RESET button on the rear of the master disc drive. Two
things will now happen: The message 'insert system disc' will appear on
the screen and a light will show on the front of the disc drive unit.
Note: On some units the light is green or red depending on which side of
the disc is upper most. On other units the lights is always red.
Insert the system microdisc in the drive unit. It does not matter which
side (A or B) is uppermost (since the DOS is on both sides), but make
sure you insert the correct edge into the slot (see Figure 4). Push the disc
fully home until the 'bar' type switch under the disc springs outwards,
the disc is now locked in position.
The next thing to happen is that the DOS will be read from disc and
loaded into the computer. When loading is finished, the green or red
light will go out and you will see the following message on the screen:
14

Disc slot
Disc 'lock/release'
bar switch
Front view of drive with disc being inserted
Reset
button
'DIN'
power
socket
34 way socket
Rear view of drive
Figure 4 -- ORIC Microdisc drive unit
15
'Ribbon'
cable
34pinplug
Table of contents
Popular DC Drive manuals by other brands

Danfoss
Danfoss VFD500 Series manual

SEW-Eurodrive
SEW-Eurodrive MOVIMOT MM C Series Addendum to the operating instructions

Siemens
Siemens SINAMICS S120 manual

SEW-Eurodrive
SEW-Eurodrive MOVITRAC 31C operating instructions

Emerson
Emerson PACMotion VFD Series user guide

Cole Parmer
Cole Parmer MasterFlex L/S Series operating manual