Do not point the unit at walls, home applicance, furniture
surface as excess moisture could cause damage to them.
Do not repair, modify or disassemble this unit. Call customer
service for assistance and guarantee information.
Do not fill water tank when the steamer is being used.
Reminder: This appliance is not intended for use by persons
(including children) with reduced physical, sensory or mental
capabilities,.or lack of experience and knowledge, unless
they have been given supervision or instruction concerning
use of the appliance by a person responsible or their safety.
Children should be supervised to ensure that they do not play
with the appliance.
3.DIRECTIONS FOR USE
16)
17)
18)
19)
1)
2)
3)
Handy Garment Steamer
Thank you for your purchase of our product. To use this product
properly and safety, please read the following instruction carefully.
1. MODEL & SPECIFICATION
Model
Power supply
Power
Water Tank Capacity
Measuring Cup Capacity
Run Time
Accessary
2. ATTENTIONS
Read all instructions and warnings carefully before use.
This product is for indoor use only.
This product is not a toy. Do not allow children to play it.
This product is designed for household use only.
Only water should be use - other cleaning agents(detergent,
aromatherapy oil or chemicals) could damage the unit.
Distilled or demineralized water is highly recommended, in
order to entend the life lenght.
Clean the unit by rinsing the water tank and wiping it dry
with a clean cloth.
Do not use detergents or abrasive agents to clean the
steamer unit.
Shut off and unplug the power before cleaning.
Steam emitted by this unit is very HOT. To avoid burns and
injuries, never point the steam nozzle at other person or pet.
To ensure the stable operation of the steamer, please drain
the water tank after using it.
Never use corrosive solvent to clean product.
Always disconnect the unit from electrical outlet when filling
or disposing water as well as the water tank is empty or the
unit not being used.
Steam nozzle and accessory become HOT when you using.
To avoid being injuries, do not touch nozzle while using this
unit. Do not attempt to remove accessory while unit is
emitting steam.
To avoid being scalded by the HOT water emitting from
steam nozzle, keep the unit away from body when using it.
When the water tank is lack of water, the pump continues to
operate, which is normal. Please turn off the unit
immediately, and wait for the unit to cool down completely
before refill water and reuse it.
1)
2)
3)
4)
5)
6)
7)
8)
白底黑字, 中英各一面, 風琴摺, A4 SIZE,
90g紙或以上
9)
10)
11)
12)
13)
14)
15)
This product is guaranteed for 1 year (commercial use for 3
months)from the date of receipt against manufacturing defect.
The warranty does not cover the cover, brush, measuring cup and
other accessories, damage or defect caused by negligence or use
not according to this instruction manual.
Remark: For any repair service, please contact and bring with
the invoice or receipt to the Service Centre.
***Extra 3 months warranty: just complete Online Warranty
Registration within 10 days from the date of receipt, free warranty
will be extended to 15 months (not applicable to commercial use).
Please enter our website: www.origo.hk
5. WARRANTY
Service Centre
ORIGIN MARKETING LIMITED
Unit H,21/F, Reason Group Tower
(nearby 12 Wah Sing Street), 403 Castle Peak Road,
Kwai Chung, N.T., Hong Kong.
Tel: 2156 8238
Office Hours
10.30am - 12:30pm (Mon ~ Fri)
02:30pm - 05:30pm (Mon ~ Fri)
10:30am - 12:30pm (Sat)
(Closed on Sunday and Holiday)
: GS6707
: 220-240V 50/60Hz
: 900W
: 110ml
: 150ml
: Continuous steam emits about 9 min
: Brush and Meauring Cup
Origin Map
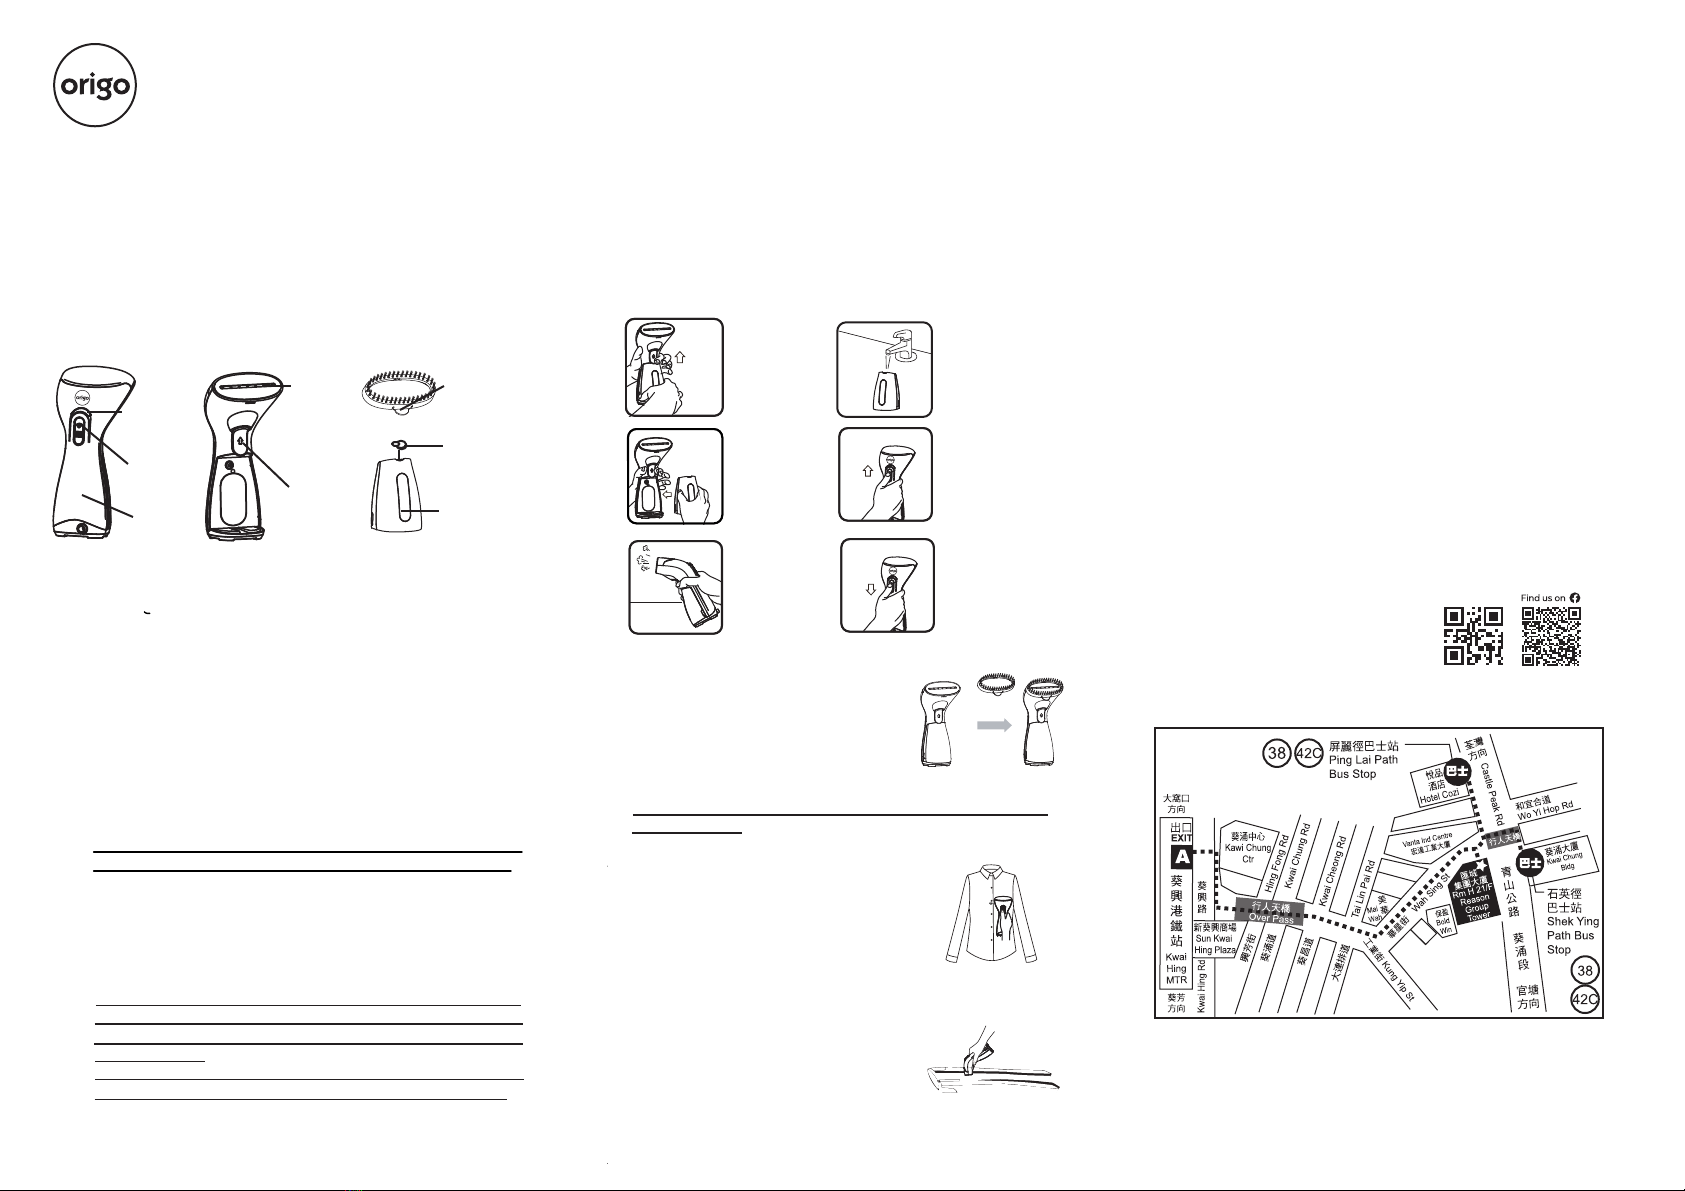
Water
Tank
Water
Tank
Rubber
Plug
Brush
Power
Indicator
Light
Handle
On/Off
Switch
Steam
Nozzle
Water
Tank
Release
Knob
Brush
BRUSH INSTALLATION
Make sure the unit is turned off and no
steam emitted from the steam nozzle.
Line up the Brush into upper and lower
slots of the steam nozzle plate.
Check whether the Brush is properly
installed before start the steaming.
Caution: Do not install the Brush on the Nozzle Plate while
steam emitting.
VERTICAL STEAMING
Hang the clothes on a hanger properly.
Direct the steam nozzle towards the garment
from the top to bottom part.
Repeat the vertical steaming motion until
smoothing out the wrinkles.
Note: Pull the bottom of the clothes slightly tight
with your free hand to make the steaming effectively.
STEAMING IRONING
Place the clothes or pants on a flat and heat
resistant surface.
Direct the steam nozzle plate closely on
the garment and move back and forth motion.
Repeat this motion until the wrinkles is smoothed out.
Note: Slightly press and pull the garment against the
direction of the steam ironing motion to make the steaming
effectively.
1)
2)
3)
1)
2)
3)
4.MAINTENANCE & CARE
Make sure the plug is removed from the power supply socket.
After the unit is completely cooled down, clean it with the
mild cleaner or gel-like cleaner by using soft cloth.
Do not immerse the main body in water to clean.
Open the water tank rubber plug to pour out the water.
Put the unit on the cool place right after the cleaning.
1)
2)
3)
4)
5)
www.origo.hk
The picture is for reference only, everything in kind shall prevail.
1.Remove the
water tank
by pulling
release knob.
2.Pull the rubber
plug out and fill
with water within
110ml then close
the rubber plug.
3.Install and
pull the water
tank to the
Steamer still
hearing"click"
sound.
4.Plug the power
plug, push the
On/Off Switch to
"ON"position, the
Steamer start.
5.Wait for 30
seconds,
the steam
emits.
6.Push the On/Off
Switch to "OFF"
position and
unplug the power
after finishing.
Release
knob


