manuals.online logo
Brands
  1. Home
  2. •
  3. Brands
  4. •
  5. ORION TELESCOPES & BINOCULARS
  6. •
  7. Camera Accessories
  8. •
  9. ORION TELESCOPES & BINOCULARS Starshoot 5862 User manual

ORION TELESCOPES & BINOCULARS Starshoot 5862 User manual

Orion®Starshoot™AllSky
Camera Roof Mount
#5862
INSTRUCTION MANUAL
Providing Exceptional Consumer Optical Products Since 1975
OrionTelescopes.com
Customer Support (800)676-1343
E-mail: suppor[email protected]
Corporate Offices (831) 763-7000
89 Hangar Way, Watsonville, CA 95076
© 2011 Orion Telescopes & Binoculars
IN 428 Rev. A 10/11
Parts List
• Roof mount bracket
• Adapter plate
• 4x short Hexagonal head
screws
• Hexagonal Allen Key
• 3x Philips head screws
• 3x Wall plugs
• 3x Nuts
• 3x Bolts
Required tools (Not supplied)
• Tamper proof Allen key
(supplied with Starshoot AllSky
Camera)
• Small Philips head screwdriver
• Dowel or small screwdriver (for
making holes)
• Tube of outdoor waterproof
silicon sealant
2 3
1. Installation of the adapter
plate to AllSky Camera
In order to install the roof mount to
the Orion Starshoot AllSky Camera
(SASC) the adapter plate will need to
be attached to the base of the SASC.
To attach the adapter plate the dome
lid will first need to be removed. Use
the tamper proof Allen key that came
with your SASC to unscrew each of
the 4 tamper proof screws located on
the top lid of the SASC.
Be careful not to hit the acrylic dome
with the Allen key, screws or other
hard objects.
Also be careful not to lose the non
standard tamper proof Allen key
that came supplied with your SASC.
(Replacement Allen keys sold sepa-
rately by Orion)
Carefully lift the top lid directly
upwards to remove it from the bottom base.
Be careful not to touch the lens to avoid having to clean it. Place the lid in a safe
location. (Cleaning supplies sold separately by Orion)
Remove the rubber feet attached to the bottom of the SASC using a Philips
head screwdriver. These screws are fastened internally with nuts and silicon
sealant. A pair of small pliers may be necessary to hold the nut while the screw
is being unscrewed.
Next 4 holes need to be made through the black EVA material on the bottom of
the SASC. The pre made holes in the aluminum housing can be seen from the
inside of the dome.
Use a dowel or small screwdriver to carefully poke a hole through the black EVA
material until a hole large enough to fit the screw is made. The safest way to do
this without damaging the electronic components inside is to drive the hole from
the inside of the dome to the outside. Remove any access material from the hole
to allow a clean thread.
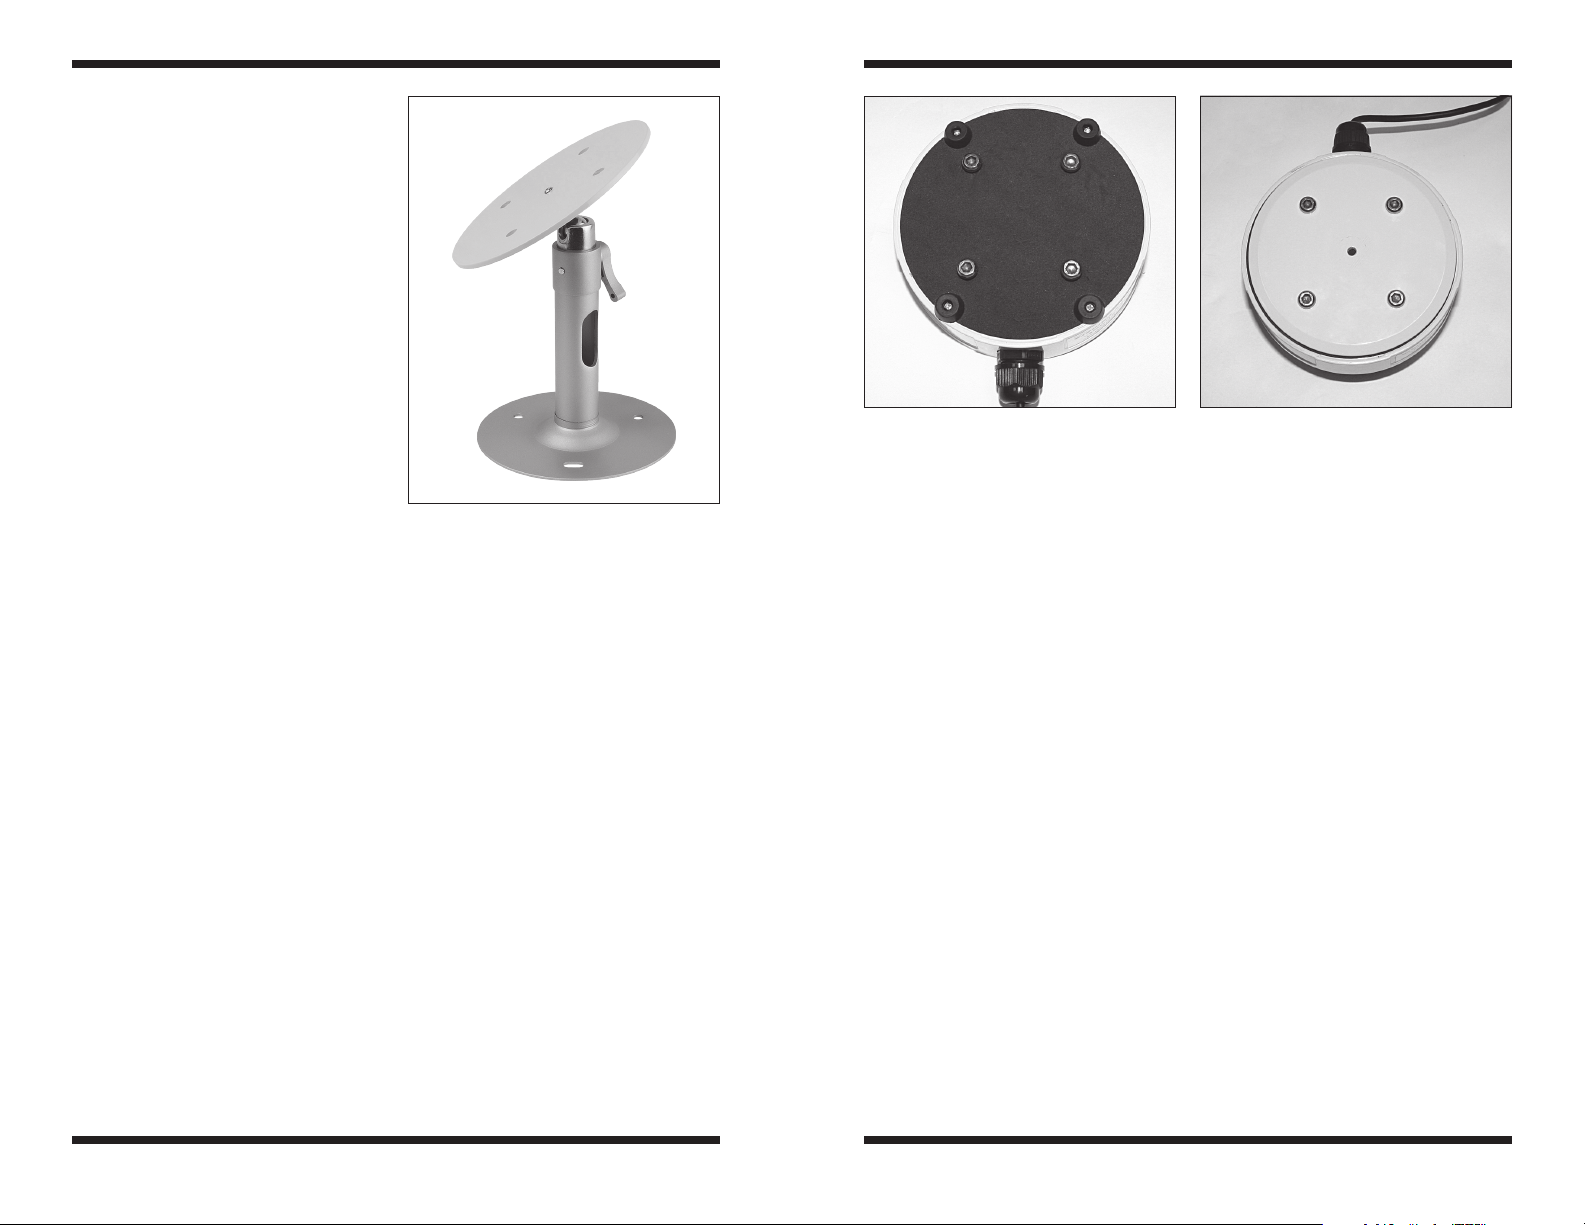
Once 4 holes are made, partially screw in the 4 Hexagonal head screws to test
the fit (Figure 2).
Remove the screws, align the adapter plate to holes on the bottom of the SASC
and tightly screw in the 4 screws back onto the bottom of the SASC using the
supplied Hexagonal Allen key (Figure 3).
In order to ensure a weather proof seal, the holes made in the previous step and
the holes from the rubber feet will need to be sealed from the inside of the dome
by applying a small amount of silicone over the screws and holes from the inside
of the SASC. Follow the instructions on the silicone to allow for drying time
before using the SASC outdoors. This is an important step in order to keep
the internal components safe from the elements and allow the heater and
fan within the SASC to work efficiently.
The dome lid can now be re-attached to the base. To re-attach the dome lid
carefully line up the groove on the inside of the top lid with the notch on the
inside of the bottom base and gently allow the top lid to drop into place. The top
lid should now be seated evenly and all 4 screws lined up ready for installation.
Using the tamper proof Allen key, gently tighten each screw until a small amount
of resistance is felt, then move onto the next screw. Repeat for all screws. Next
tighten each screw more firmly and evenly across all 4 screws to help ensure a
weatherproof seal.
2. Installation of Bracket to Adapter Plate
Screw in the bracket into the center of the adapter plate then rotate the plastic
wheel to ensure a tight fit. Use the clamp on the side of the mount select desired
angle and tightly fasten the clamp (Figure 4).
3. Installation of Bracket to Wall/Roof
The included screws & wall plugs (or optionally nuts and bolts) can be used to
secure the bracket base to a wall or roof.
Your Orion Starshoot AllSky Camera is now ready for use. Please follow instruc-
tions found within the AllSky manual for operating instructions.
Figure 1. The roof mount bracket and
adapter plate.
Figure 2. Placement of Hexagonal head
screws.
Figure 3. Adapter plate attached to
bottom of SASC.
4
Specifications
• 160mm x 110mm diameter
• Al-Alloy Material
• Weight 276g
• Max Load 3Kg
• CE Certified, RoHS Certified
Figure 4. Adapter plate attached to Roof
mount bracket.
Figure 5. The adapter plate can also be
attached to a standard tripod.
One-Year Limited Warranty
This Orion StarShoot AllSky Camera Roof Mount is warranted against defects in materials
or workmanship for a period of one year from the date of purchase. This warranty is for the
benefit of the original retail purchaser only. During this warranty period Orion Telescopes &
Binoculars will repair or replace, at Orion’s option, any warranted instrument that proves to
be defective, provided it is returned postage paid to: Orion Warranty Repair, 89 Hangar Way,
Watsonville, CA 95076. If the product is not registered, proof of purchase (such as a copy of
the original invoice) is required.
This warranty does not apply if, in Orion’s judgment, the instrument has been abused,
mishandled, or modified, nor does it apply to normal wear and tear. This warranty gives
you specific legal rights, and you may also have other rights, which vary from state to state.
For further warranty service information, contact: Customer Service Department, Orion
Telescopes & Binoculars, 89 Hangar Way, Watsonville, CA 95076; (800) 676-1343.

Other ORION TELESCOPES & BINOCULARS Camera Accessories manuals

ORION TELESCOPES & BINOCULARS Solar StarSeeker 10382 User manual

ORION TELESCOPES & BINOCULARS

ORION TELESCOPES & BINOCULARS Solar StarSeeker 10382 User manual

ORION TELESCOPES & BINOCULARS AutoTracker 8976 User manual

ORION TELESCOPES & BINOCULARS

ORION TELESCOPES & BINOCULARS AutoTracker 8976 User manual

ORION TELESCOPES & BINOCULARS SteadyPix Deluxe User manual

ORION TELESCOPES & BINOCULARS

ORION TELESCOPES & BINOCULARS SteadyPix Deluxe User manual

ORION TELESCOPES & BINOCULARS Tritech II Installation and operating instructions

ORION TELESCOPES & BINOCULARS

ORION TELESCOPES & BINOCULARS Tritech II Installation and operating instructions

ORION TELESCOPES & BINOCULARS Paragon HD-F2 User manual

ORION TELESCOPES & BINOCULARS

ORION TELESCOPES & BINOCULARS Paragon HD-F2 User manual

ORION TELESCOPES & BINOCULARS Tritech II-M User manual

ORION TELESCOPES & BINOCULARS

ORION TELESCOPES & BINOCULARS Tritech II-M User manual

ORION TELESCOPES & BINOCULARS VersaGo III Micro‑MotionAltazimuth Mount User manual

ORION TELESCOPES & BINOCULARS

ORION TELESCOPES & BINOCULARS VersaGo III Micro‑MotionAltazimuth Mount User manual

ORION TELESCOPES & BINOCULARS Tritech II-M Pro User manual

ORION TELESCOPES & BINOCULARS

ORION TELESCOPES & BINOCULARS Tritech II-M Pro User manual

ORION TELESCOPES & BINOCULARS AZ-4 User manual

ORION TELESCOPES & BINOCULARS

ORION TELESCOPES & BINOCULARS AZ-4 User manual

ORION TELESCOPES & BINOCULARS StarBlast II User manual

ORION TELESCOPES & BINOCULARS

ORION TELESCOPES & BINOCULARS StarBlast II User manual

ORION TELESCOPES & BINOCULARS Atlas II EQ-G Equatorial GoTo Mount User manual

ORION TELESCOPES & BINOCULARS

ORION TELESCOPES & BINOCULARS Atlas II EQ-G Equatorial GoTo Mount User manual

ORION TELESCOPES & BINOCULARS Tritech LT-1 User manual

ORION TELESCOPES & BINOCULARS

ORION TELESCOPES & BINOCULARS Tritech LT-1 User manual

ORION TELESCOPES & BINOCULARS Tritech II-M User manual

ORION TELESCOPES & BINOCULARS

ORION TELESCOPES & BINOCULARS Tritech II-M User manual

ORION TELESCOPES & BINOCULARS Tritech II User manual

ORION TELESCOPES & BINOCULARS

ORION TELESCOPES & BINOCULARS Tritech II User manual

Popular Camera Accessories manuals by other brands

Sony HDVF-200 Operation manual

Sony

Sony HDVF-200 Operation manual

Nikon SB-500 user manual

Nikon

Nikon SB-500 user manual

GoPro Wi-Fi Remote User manual and warranty

GoPro

GoPro Wi-Fi Remote User manual and warranty

Wetekom TR9 instruction manual

Wetekom

Wetekom TR9 instruction manual

A&D FXi-09 instruction manual

A&D

A&D FXi-09 instruction manual

Gitzo GT5541LS parts list

Gitzo

Gitzo GT5541LS parts list

PowerPlus Energy Eco P Series Installation and operation manual

PowerPlus Energy

PowerPlus Energy Eco P Series Installation and operation manual

XS Power D375 user manual

XS Power

XS Power D375 user manual

Würth 0981 103 1 Translation of the original operating instructions

Würth

Würth 0981 103 1 Translation of the original operating instructions

IKE 4 Setup guide

IKE

IKE 4 Setup guide

Canon VI-L manual

Canon

Canon VI-L manual

Zircon StudSensor L70 OneStep manual

Zircon

Zircon StudSensor L70 OneStep manual

Ikelite 5509.15 Installation

Ikelite

Ikelite 5509.15 Installation

DISCOVER LITHIUM PRO PROFESSIONAL Series Installation and operation manual

DISCOVER

DISCOVER LITHIUM PRO PROFESSIONAL Series Installation and operation manual

GRASS VALLEY Triax camera system v1 user guide

GRASS VALLEY

GRASS VALLEY Triax camera system v1 user guide

KStrong AFT710007HD User instruction manual

KStrong

KStrong AFT710007HD User instruction manual

Vello Extenda LW-100 user manual

Vello

Vello Extenda LW-100 user manual

Mophie charge force user manual

Mophie

Mophie charge force user manual

manuals.online logo
manuals.online logoBrands
  • About & Mission
  • Contact us
  • Privacy Policy
  • Terms and Conditions

Copyright 2025 Manuals.Online. All Rights Reserved.