manuals.online logo
Brands
  1. Home
  2. •
  3. Brands
  4. •
  5. ORION TELESCOPES & BINOCULARS
  6. •
  7. Camera Accessories
  8. •
  9. ORION TELESCOPES & BINOCULARS Paragon HD-F2 User manual

ORION TELESCOPES & BINOCULARS Paragon HD-F2 User manual

#5377
#5378
IN 396 Rev. B 03/19
Orion®Paragon™
Field Tripod & Fluid Pan Head
#5378 Paragon HD-F2,
#5377 Paragon-Plus XHD
INSTRUCTION MANUAL
Corporate Offices: 89 Hangar Way, Watsonville CA 95076 - USA
Toll Free USA & Canada: (800) 447-1001
International: +1(831) 763-7000
Customer Support: [email protected]
Copyright © 2020 Orion Telescopes & Binoculars.All Rights Reserved. No part of this product instruction or any of its contents
may be reproduced, copied, modied or adapted, without the prior written consent of Orion Telescopes & Binoculars.
AN EMPLOYEE-OWNED COMPANY
Español
Francais
Deutsche
➊Pour obtenir le manuel d'utilisation
complet, veuillez vous rendre sur le site Web
OrionTelescopes.eu/fret saisir la référence du
produit dans la barre de recherche.
➋Cliquez ensuite sur le lien du manuel
d’utilisation du produit sur la page de descrip-
tion du produit.
➊Wenn Sie das vollständige Handbuch
einsehen möchten, wechseln Sie zu
OrionTelescopes.de, und geben Sie in der
Suchleiste die Artikelnummer der
Orion-Kamera ein.
➋Klicken Sie anschließend auf der Seite mit
den Produktdetails auf den Link des entspre-
chenden Produkthandbuches.
➊Para ver el manual completo, visite
OrionTelescopes.eu y escriba el número de
artículo del producto en la barra de búsqueda.
➋A continuación, haga clic en el enlace al
manual del producto de la página de detalle
del producto.
IN 396 Rev. A 08/10
Congratulations on your purchase of a quality Orion product.
These sturdy aluminum tripods provide solid support for bin-
oculars, small telescopes, still cameras, or video cameras.
Designed for use either indoors or outdoors, the Paragons fea-
ture a smooth, two-way pan head and quick-release shoe for
convenient operation.
To get the most from your new tripod, please take a few min-
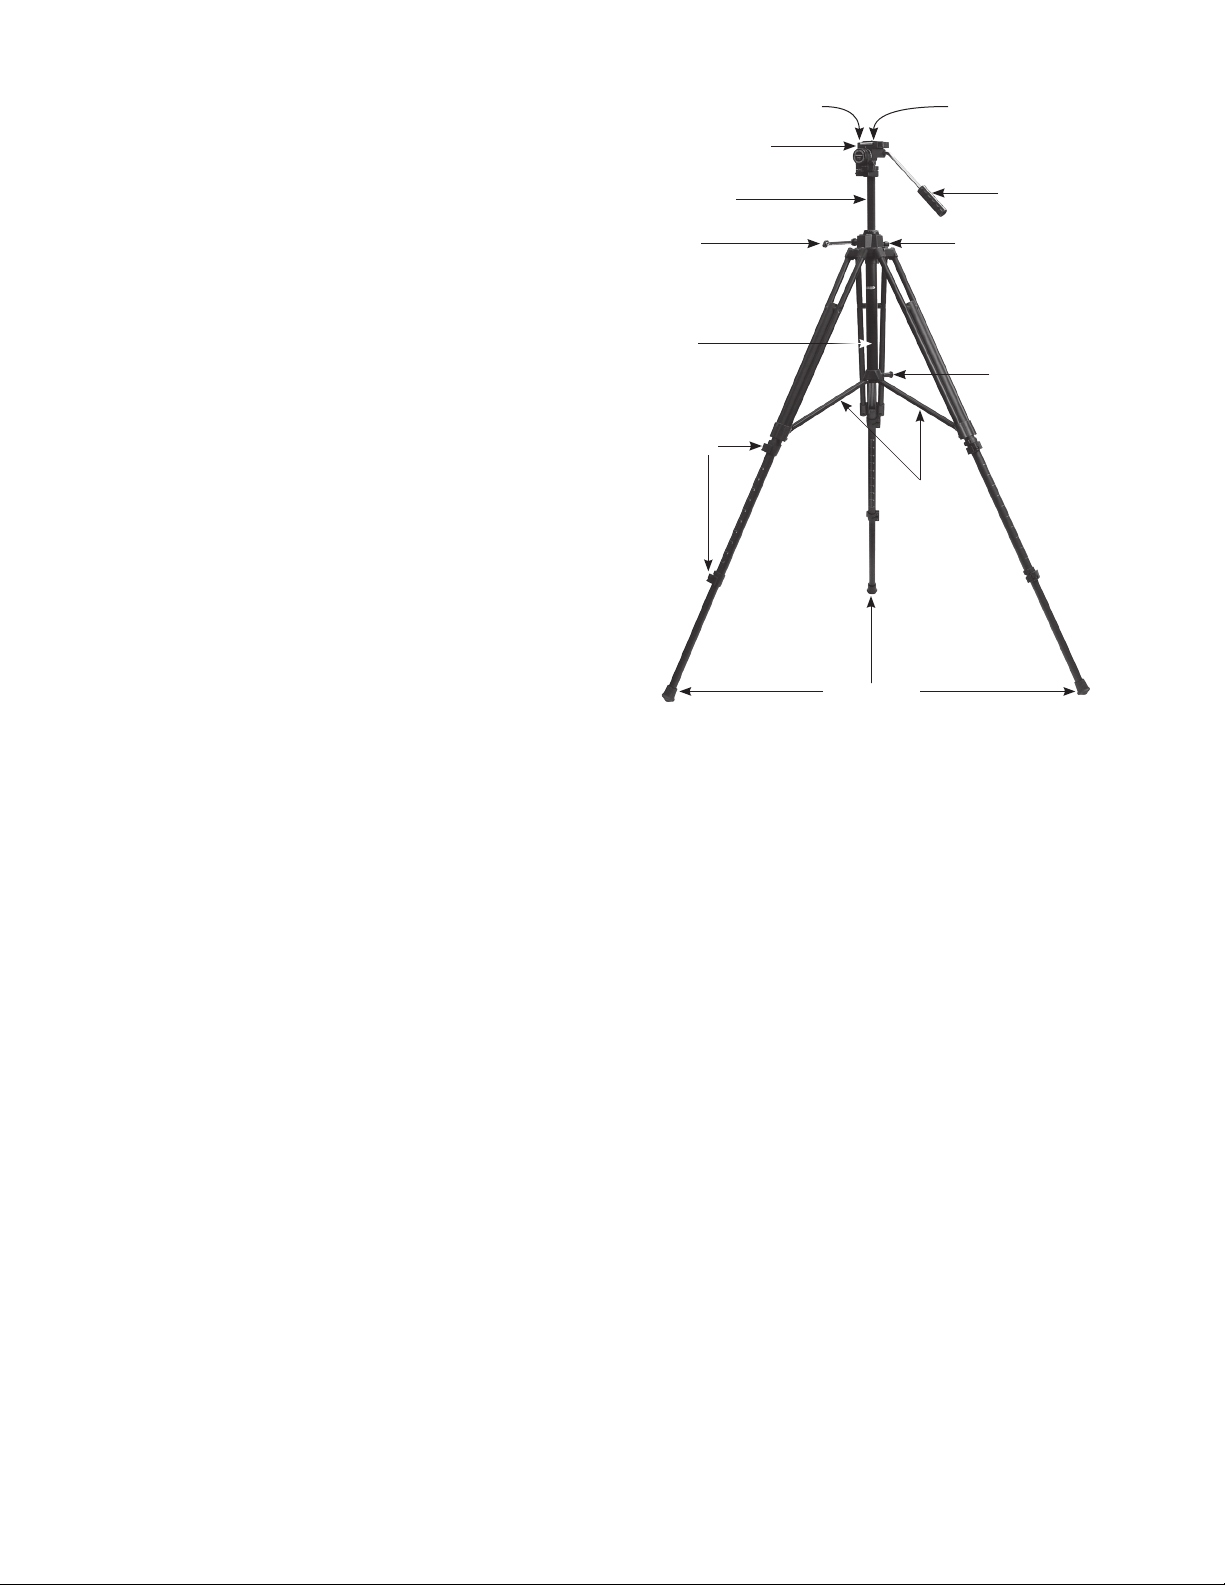
utes to read these instructions and operating tips. Refer to the
labeled gure for the names of specic parts of the tripod.
Adjusting the Legs
Your Paragon tripod comes fully assembled. Note that each
leg has two telescoping sections. To extend a leg, loosen
the lever lock knob, then extend the leg. When it has been
extended to the desired length, tighten the lever knob back
down. There is a handy scale printed on the middle segment
of each leg, which can be used to judge the relative height of
the legs. Before mounting an instrument on the tripod it is a
good idea to press down gently on the pan head to make sure
the legs are locked securely and will not give way under the
instrument’s weight.
Dual Rubber/Spike Feet
The Paragons are equipped with dual-purpose feet that con-
sist of a retractable rubber foot and a metal spike. The rubber
feet are intended for use of the tripod indoors or on a smooth
paved surface. The metal spikes are desirable for achieving a
rm grip on soft surfaces.
To use the rubber feet, thread the foot counterclockwise until
it stops. In this position, the metal spike will be well recessed
within the rubber. Be sure all three rubber feet are at on the
oor, not tipped sideways.
To expose the spike feet, thread the rubber foot clockwise until
the spike protrudes from the rubber. In some instances you
may wish to remove the rubber feet altogether so more of the
metal spike is exposed. This can be done by just pulling the
rubber feet off their anchors. They can be pressed on again at
any time.
Adjusting the Tripod’s Stance
The Paragons have a very wide stance for enhanced stabil-
ity. The widest stance is achieved when the tri-brace is as far
down as it will go on the elevator shaft housing. The brace lock
knob should be tightened to secure the stance.
If you are using the tripod in a conned space, the stance can
be narrowed by loosening the tri-brace lock knob, and push-
ing the legs closer together. The tri-brace will move up on the
elevator shaft housing. Retighten the lock knob to secure the
legs in the new position. Be aware that the tripod will become
more “tippy” as its stance is narrowed. Be very careful when
mounting an instrument with an unwieldy center of gravity on
the tripod, especially if it is somewhat heavy.
Approximate leveling of the tripod should suffice for use with
binoculars or spotting scopes. For photographic use, the built-
in bubble level aids in achieving more precise leveling.
Using the Fluid Pan Head
The Paragons feature a precision uid-type pan head, which
has a range of motion of 180° on the vertical axis and 360°
on the horizontal axis. Both axes are equipped with a large
tension-adjustment knob and a lock knob. The tension-adjust-
ment knobs allow you to set the desired ease of motion for
each axis.
Panning is easy using the pan head handle. Its angle relative
to the mount head is adjustable. Loosen the handle lock knob,
then remove the handle from its sleeve completely. Reinsert
the handle into the sleeve at the desired position and thread
the lock knob back in until tight.
The removable mounting shoe allows quick attachment and
removal of your instrument. The shoe has a 1/4" -20 threaded
post and a ribbed mat, and is retained by a spring-loaded,
quick-release lock lever. When mounting an optical instrument,
you must rst remove the shoe from the head by releasing the
lock lever. Attach the shoe to the instrument, then replace the
shoe on the head. Make certain the shoe is locked securely
in place before releasing the instrument from your grip. It is
recommended that the instrument be removed from the tripod
for transportation.
It is possible to point an instrument at the zenith (straight up).
This is especially useful when using the tripod for astronomical
observation. Instead of pushing the handle down to tilt the pan
head up, tilt the pan head so that the handle points upward.
This way the handle will not contact the tripod itself and hin-
der the tilt. You will have to rotate the instrument 180° on the
pan head from its normal position to point it upward in this
“reversed” way.
Elevator
hand crank
Lever
lockknobs
Elevator shaft
housing
Rubber feet
Two-way pan head
Quick release shoe
Handle lock knob (hidden)
Brace lock knob
Pan head
handle
Elevator shaft
Tri-brace
Elevator lock knob
Raising and Lowering the Pan Head
To raise or lower the pan head, rst loosen the elevator lock
knob. Then use the hinged hand crank to move the aluminum
rack-and-pinion elevator shaft up or down. Retighten the eleva-
tor lock knob to secure the instrument at the new height.
The elevator friction will need to be adjusted depending
on the weight of the instrument on the tripod. To adjust the
elevator friction, rotate the elevator shaft housing with your
hands. Rotating it clockwise will increase friction, and makes
the elevator hand crank harder to turn. Rotating the elevator
shaft housing counterclockwise reduces friction. The elevator
friction should be adjusted so that the pan head maintains its
position and the hand crank is easy to turn.
General Care and Cleaning
When using the tripod in direct sunlight, be aware that its black
anodized surface can become hot. If the tripod is used in wet
conditions, dry it completely with a soft cloth after use. Clean
the tripod with mild detergent and a soft cloth.
Specifications
Paragon HD-F2 Paragon XHD
Height fully extended: 69-1/2" 66"
Height folded: 31-1/2" 34-3/4"
Elevator travel: 13-1/2" 10-3/4"
Rotation axes: two two
Weight: 7.5 lbs. 9 lbs.
Suggested Accessories
#7033 Orion Precision Slow-Motion Adapter
Attach this adapter to the tripod pan head to add micro-motion
altitude and azimuth control. Very useful for ne terrestrial pan-
ning or for manually tracking celestial objects with binoculars
or spotting scopes. Built-in 1/4" -20 threaded socket for attach-
ment to tripod; has 1/4" -20 threaded post for attachment of
instrument.
#15167 Soft Case for Paragon HD-F2 Tripod
Highly recommended for protection, storage, and convenient
transport of the Paragon Tripod. Made of heavy polyester stock
and fully padded, this case has strap handles and an adjust-
able-length shoulder strap. Full zipper access. Navy with black
trim. Does not t Paragon-Plus XHD.
Corporate Offices: 89 Hangar Way, Watsonville CA 95076 - USA
Toll Free USA & Canada: (800) 447-1001
International: +1(831) 763-7000
Customer Support: [email protected]
Copyright © 2020 Orion Telescopes & Binoculars.All Rights Reserved. No part of this product instruction or
any of its contents may be reproduced, copied, modied or adapted,without the prior written consent of Orion
Telescopes & Binoculars.
AN EMPLOYEE-OWNED COMPANY
One-Year Limited Warranty
This Orion product is warranted against defects in materials or workmanship for
a period of one year from the date of purchase. This warranty is for the benet of
the original retail purchaser only. During this warranty period Orion Telescopes &
Binoculars will repair or replace, at Orion’s option, any warranted instrument that
proves to be defective, provided it is returned postage paid. Proof of purchase
(such as a copy of the original receipt) is required. This warranty is only valid in the
country of purchase.
This warranty does not apply if, in Orion’s judgment, the instrument has been
abused, mishandled, or modied, nor does it apply to normal wear and tear. This
warranty gives you specic legal rights. It is not intended to remove or restrict your
other legal rights under applicable local consumer law; your state or national statu-
tory consumer rights governing the sale of consumer goods remain fully appli-
cable.
For further warranty information, please visit www.OrionTelescopes.com/warranty.

This manual suits for next models

3

Other ORION TELESCOPES & BINOCULARS Camera Accessories manuals

ORION TELESCOPES & BINOCULARS Starshoot 5862 User manual

ORION TELESCOPES & BINOCULARS

ORION TELESCOPES & BINOCULARS Starshoot 5862 User manual

ORION TELESCOPES & BINOCULARS Tritech II-M Pro User manual

ORION TELESCOPES & BINOCULARS

ORION TELESCOPES & BINOCULARS Tritech II-M Pro User manual

ORION TELESCOPES & BINOCULARS Atlas II EQ-G Equatorial GoTo Mount User manual

ORION TELESCOPES & BINOCULARS

ORION TELESCOPES & BINOCULARS Atlas II EQ-G Equatorial GoTo Mount User manual

ORION TELESCOPES & BINOCULARS AZ-4 User manual

ORION TELESCOPES & BINOCULARS

ORION TELESCOPES & BINOCULARS AZ-4 User manual

ORION TELESCOPES & BINOCULARS Tritech II-M User manual

ORION TELESCOPES & BINOCULARS

ORION TELESCOPES & BINOCULARS Tritech II-M User manual

ORION TELESCOPES & BINOCULARS Tritech LT-1 User manual

ORION TELESCOPES & BINOCULARS

ORION TELESCOPES & BINOCULARS Tritech LT-1 User manual

ORION TELESCOPES & BINOCULARS SteadyPix Deluxe User manual

ORION TELESCOPES & BINOCULARS

ORION TELESCOPES & BINOCULARS SteadyPix Deluxe User manual

ORION TELESCOPES & BINOCULARS Tritech II User manual

ORION TELESCOPES & BINOCULARS

ORION TELESCOPES & BINOCULARS Tritech II User manual

ORION TELESCOPES & BINOCULARS VersaGo III Micro‑MotionAltazimuth Mount User manual

ORION TELESCOPES & BINOCULARS

ORION TELESCOPES & BINOCULARS VersaGo III Micro‑MotionAltazimuth Mount User manual

ORION TELESCOPES & BINOCULARS AutoTracker 8976 User manual

ORION TELESCOPES & BINOCULARS

ORION TELESCOPES & BINOCULARS AutoTracker 8976 User manual

ORION TELESCOPES & BINOCULARS Tritech II-M User manual

ORION TELESCOPES & BINOCULARS

ORION TELESCOPES & BINOCULARS Tritech II-M User manual

ORION TELESCOPES & BINOCULARS Tritech II Installation and operating instructions

ORION TELESCOPES & BINOCULARS

ORION TELESCOPES & BINOCULARS Tritech II Installation and operating instructions

ORION TELESCOPES & BINOCULARS Solar StarSeeker 10382 User manual

ORION TELESCOPES & BINOCULARS

ORION TELESCOPES & BINOCULARS Solar StarSeeker 10382 User manual

ORION TELESCOPES & BINOCULARS StarBlast II User manual

ORION TELESCOPES & BINOCULARS

ORION TELESCOPES & BINOCULARS StarBlast II User manual

Popular Camera Accessories manuals by other brands

Sony HDVF-200 Operation manual

Sony

Sony HDVF-200 Operation manual

Nikon SB-500 user manual

Nikon

Nikon SB-500 user manual

GoPro Wi-Fi Remote User manual and warranty

GoPro

GoPro Wi-Fi Remote User manual and warranty

Wetekom TR9 instruction manual

Wetekom

Wetekom TR9 instruction manual

A&D FXi-09 instruction manual

A&D

A&D FXi-09 instruction manual

Gitzo GT5541LS parts list

Gitzo

Gitzo GT5541LS parts list

PowerPlus Energy Eco P Series Installation and operation manual

PowerPlus Energy

PowerPlus Energy Eco P Series Installation and operation manual

XS Power D375 user manual

XS Power

XS Power D375 user manual

Würth 0981 103 1 Translation of the original operating instructions

Würth

Würth 0981 103 1 Translation of the original operating instructions

IKE 4 Setup guide

IKE

IKE 4 Setup guide

Canon VI-L manual

Canon

Canon VI-L manual

Zircon StudSensor L70 OneStep manual

Zircon

Zircon StudSensor L70 OneStep manual

Ikelite 5509.15 Installation

Ikelite

Ikelite 5509.15 Installation

DISCOVER LITHIUM PRO PROFESSIONAL Series Installation and operation manual

DISCOVER

DISCOVER LITHIUM PRO PROFESSIONAL Series Installation and operation manual

GRASS VALLEY Triax camera system v1 user guide

GRASS VALLEY

GRASS VALLEY Triax camera system v1 user guide

KStrong AFT710007HD User instruction manual

KStrong

KStrong AFT710007HD User instruction manual

Vello Extenda LW-100 user manual

Vello

Vello Extenda LW-100 user manual

Mophie charge force user manual

Mophie

Mophie charge force user manual

manuals.online logo
manuals.online logoBrands
  • About & Mission
  • Contact us
  • Privacy Policy
  • Terms and Conditions

Copyright 2025 Manuals.Online. All Rights Reserved.