Oster TSSTTVDFL1-049 User manual

Instruction Manual
TOASTER OVEN WITH TURBO CONVECTION TECHNOLOGY
READ ALL INSTRUCTIONS BEFORE USING THIS APPLIANCE
TSSTTVDFL1-049
MODEL
TSSTTVDFL1-049_14EM1.indd 1 23/07/14 9:46 AM

IMPORTANT SAFEGUARDS
When using electrical appliances, basic safety precautions should always be followed,
including the following:
READ ALL INSTRUCTIONS, PRODUCT LABELS AND WARNINGS BEFORE USING THE
TOASTER OVEN.
1. DO NOT touch hot surfaces . Always use oven mitts when handling hot materials
and allow metal parts to cool before cleaning. Always use the oven handles when
moving the unit.
2. When the unit is not in use and before cleaning, press the “Start/Cancel” button and
remove the countertop oven from the power outlet. Allow the unit to cool thoroughly
before putting in or taking off parts.
3. To protect against risk of electrical shock, do not immerse the cord, plug, or appliance
in water or any other liquids.
4. Close supervision is always necessary when this or any appliance is used near
children. This appliance is not for use by children.
5. DO NOT operate this or any appliance with a frayed or damaged cord or plug or after
the appliance malfunctions or is dropped or has been damaged in any manner. Take
the toaster oven to the nearest Authorized Oster Service Center for examination,
repair or electrical or mechanical adjustment.
6. DO NOT use attachments not recommended by the manufacturer; they may cause
re, electric shock or personal injury.
7. DO NOT use outdoors or for commercial purposes.
8. DO NOT use this appliance for other than its intended use.
9. DO NOT let the cord dangle over the edge of a tabletop or countertop or touch hot
surfaces.
10. DO NOT place the appliance near a hot gas or electric burner or in a heated oven.
11. Extreme caution should be used when using containers constructed of material other
than metal or glass.
12. A re may occur if the countertop oven is covered or touching ammable materials,
including curtains, draperies, walls, etc., when in operation. Do not store any items on
top of the appliance when in operation.
13. When using countertop oven, pull the unit out a minimum of 6 inches away from the
wall or other cords.
14. DO NOT store any materials, other than manufacturer’s recommended accessories, in
this unit when not in use.
2
TSSTTVDFL1-049_14EM1.indd 2 23/07/14 9:46 AM

15. DO NOT place any ammable materials in oven, such as paper, cardboard, plastic or
any materials that may catch re or melt.
16. DO NOT cover the oven tray or rack with metal foil. This will cause overheating of the
appliance.
17. Oversized foods or metal utensils must not be inserted in the appliance as they may
create a re or risk of electrical shock.
18. DO NOT clean with metal scouring pads. Pieces can break off the pad and touch
electrical parts involving a risk of electrical shock.
19. Use extreme caution when removing pan or disposing of hot grease or other hot
liquids.
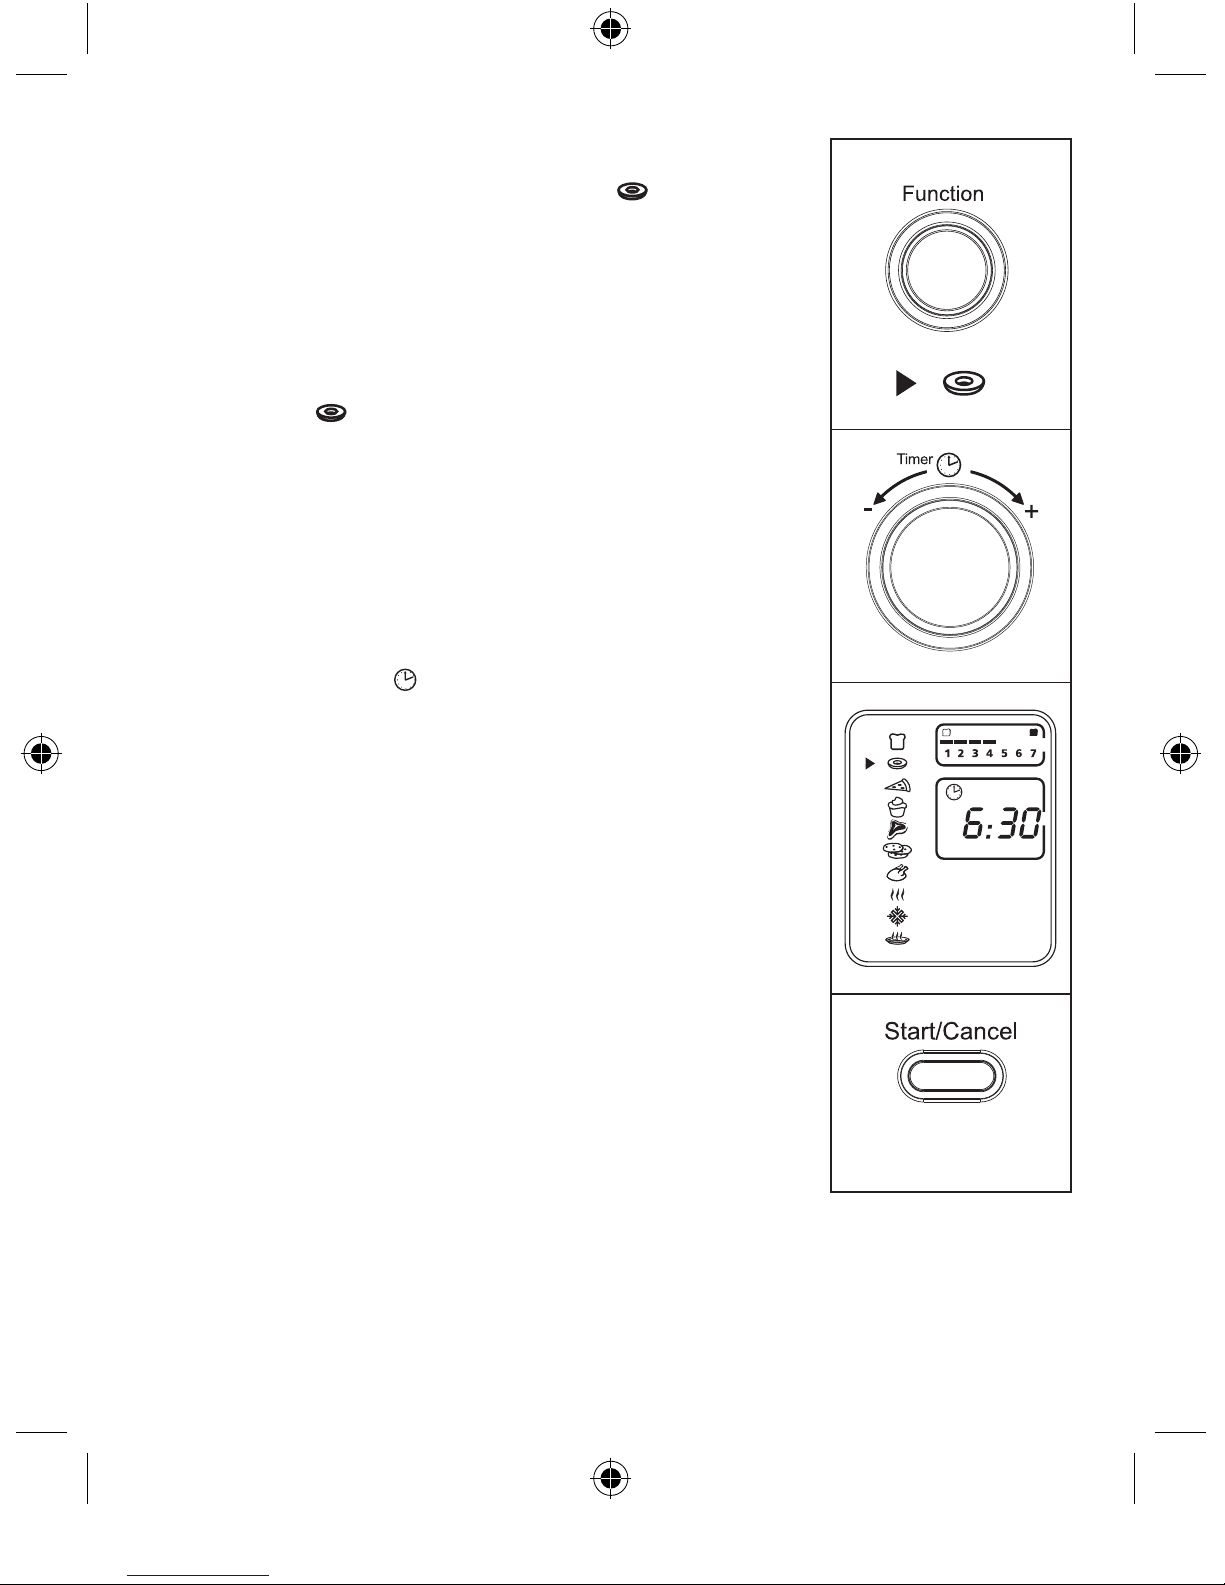
20. To turn this appliance off, press the “Start/Cancel” button and remove cord from outlet.
The LCD will turn off after 30 seconds of inactivity.
21. This appliance is not intended for use by persons (including children) with reduced
physical, sensory or mental capabilities, or lack of experience and knowledge, unless
they have been given supervision or instruction concerning use of the appliance by a
person responsible for their safety. Children should be supervised to ensure that they
do not play with the appliance.
22. Close supervision is necessary when any appliance is used by or near children, or
incapacitated individuals.
23. The instructions shall state that appliances are not intended to be operated by means
of an external timer or separate remote-control system.
24. This appliance is intended to be used in household and similar applications such as:
staff kitchen areas in shops, ofces and other working environments, farm houses, by
clients in hotels, motels and other residential type environments, bed and breakfast
type environments.
THIS UNIT IS FOR HOUSEHOLD USE ONLY.
SAVE THESE INSTRUCTIONS
SHORT POWER SUPPLY CORD INSTRUCTIONS
A short power-supply cord is provided to reduce the risk resulting from becoming entangled in or
tripping over a longer cord. An extension cord may be used if care is exercised in its use. If an
extension cord is used, the electrical rating of the cord must be at least as great as the electrical
rating of the appliance. The extension cord should be arranged so that it will not drape over the
countertop or tabletop where it can be pulled on by children or tripped over unintentionally.
3
TSSTTVDFL1-049_14EM1.indd 3 23/07/14 9:46 AM

1. LCD Display
2. Function Selector Knob – Select cooking function by turning knob
to desired setting.
3. Start/Cancel Button – Press this button to turn the appliance off.
4. Turbo Convection Heat Button – Use to activate or cancel
turbo convection heat.
5. Time Control Knob – Adjust the dial to the desired time
6. Temperature Control Knob – Adjust the dial thermostat to desired temperature.
7. Removable Wire Rack – See “Positioning Rack” section.
8. Tempered Glass Door – For front viewing of food.
9. Two Rack Positions
10. Removable Crumb Tray – For crumb or fallen food particles collection.
Pulls out for easy cleaning.
11. Baking Pan/Cookie Sheet in One and Broil Rack – Use for all your baking needs,
broiling and grilling needs.
12. Easy Clean Interior Walls – Allows fast clean up.
DESCRIPTION OF THE APPLIANCE
4
1
9
11
5
6
2
4
10
78
12
3
TSSTTVDFL1-049_14EM1.indd 4 23/07/14 9:46 AM

LCD Display
a. Functions Indicator – Toast “ ”, Bagel “ ”, Pizza “ ”, Bake “ ”, Broil “ ”,
Cookies “ ”, Roast “ ”, Warm “ ”, Defrost “ ” and Reheat “ ”
b. Function Indicator Arrow
c. 1-7 color shade setting indicator
d. Time Indicator
e. Turbo Convection Heat Icon
f. Temperature Indicator
If you are using your toaster oven for the first time, please:
• Remove any stickers from the surface of the oven.
• Open oven door and remove all printed documents and paper from inside the toaster
oven.
• Clean the rack and pan with hot water, a small amount of dishwashing liquid and a
nonabrasive sponge or cleaning pad.
DO NOT IMMERSE THE CORD, PLUG OR BODY OF THE UNIT IN WATER.
• Dry the unit thoroughly before using.
• Select a location for the toaster oven. The location should be in an open area on a flat
counter where the plug will reach an outlet.
• Plug the toaster oven into an electrical outlet.
a c
f
bd
e
PREPARING TO USE YOUR TOASTER
OVEN FOR THE FIRST TIME
5
TSSTTVDFL1-049_14EM1.indd 5 23/07/14 9:46 AM

Plug the unit in. The unit will emit two long “beeps” and the LCD
screen will illuminate. The function option will appear with an
indicator on the preset TOAST “ ” function. The LCD and
the “Start/Cancel” button light will be illuminated for 30 seconds
and then go out if no other buttons or knobs are pressed or
moved.
NOTE: Once the blue LCD display goes out – you can press
or move any button or knob to “wake up” the display
and operate as normal.
Step 1. Select Function
Turn the “Function” Knob to choose one of the
following 10 options from the menu: Toast “ ”, Bagel
“ ”, Pizza “ ”, Bake “ ”, Broil “ ”, Cookies
“ ”, Roast “ ”, Warm “ ”, Defrost “ ” and
Reheat “ ”.The indicator arrow will move from
function to function as the knob is turned.
NOTE: If the cooking process is not started or no further
button is pressed or knob is turned within 30 seconds
the blue backlight and the “Start/Cancel” Button Light
will turn off.
Step 2. Time:
Turn the time “ ” knob to increase or decrease
the cooking time. The maximum time setting is 60
minutes.
Step 3. Temperature:
Turn the temperature “ ” knob to increase or
decrease the temperature setting.
Figure 1
USING YOUR TOASTER OVEN
6
TSSTTVDFL1-049_14EM1.indd 6 23/07/14 9:46 AM

USING THE TOAST FUNCTION (SEE FIG. 2)
Step 1. Turn the “Function” Knob to the Toast function. When
you select the Toast “ ” function, the 1-7 color shade
setting indicator will become visible on the LCD. Both
upper and lower heating elements will heat.
Default Color Shade Setting is 4. This will be the
default every time the Toaster Oven is unplugged
and plugged back in. If the Toaster Oven remains
plugged in since the last time you have selected a
different shade for the Toast function (even if not
activated), the unit will remember the last shade
setting you selected.
NOTE: The top rack position is recommended for toasting.
The temperature is not adjustable for the Toast
function. The time adjusts automatically with
shade adjustment. The temperature or time is not
adjustable during the Toast function.
Step 2. To adjust the shade color:
Turn the Time “ ” Knob to adjust the shade color.
The color shade-setting indicator will show your
selection as you turn the knob.
Step 3. To Start:
Press the “Start/Cancel” Button to start the
toasting process. The red “Start/Cancel” Button
light will illuminate. The LCD Display will show the
Toast Function, the shade color selection and the
countdown time. The unit will begin to operate and
the timer will start counting down.
When the Toasting is complete, the unit will emit 3
beeps. The LCD and the “Start/Cancel” Button Light
will turn off after 30 seconds.
NOTE: You can cancel the toasting cycle at any time by
pressing the Start/Cancel Button once. The red
“Start/Cancel” Button light will turn off whenever a
function has been completed or a function is manually
cancelled.
7
Figure 2
TSSTTVDFL1-049_14EM1.indd 7 23/07/14 9:46 AM

USING THE BAGEL FUNCTION (SEE FIG. 3)
Step 1. Turn the “Function” Knob to the Bagel “ ” function.
When you select the Bagel function, the 1-7 color shade
setting indicator will become visible on the LCD. The
upper and lower heating elements will heat. Default
Color Shade Setting is 4. This will be the default every
time the Toaster Oven is unplugged and plugged back
on. If the Toaster Oven remains plugged-in since the
last time you have selected a different shade for the
Bagel “ ” function (even if not activated), the unit will
remember the last shade setting you selected.
NOTE: The top rack position is recommended for bagel toasting.
For best results toast bagel with cut side up.
The temperature is not adjustable for the Bagel
function. The time adjusts automatically with shade
adjustment. The temperature or time is not adjustable
during the Bagel function.
Step 2. To adjust the shade color:
Turn the Time “ ” Knob to adjust the shade color. The
color shade-setting indicator will show your selection as
you turn the knob.
Step 3. To Start:
Press the “Start/Cancel” Button to start the bagel
toasting process. The red Start/Cancel Button light
will illuminate. The LCD Display will show the Bagel
Function, the shade color selection and the countdown
time. The unit will begin to work and the timer will start
counting down.
When the Bagel toasting is complete, the unit will emit
3 beeps. The LCD and the “Start/Cancel” Button Light
will turn off after 30 seconds.
NOTE: You can cancel the bagel toasting cycle at any time by
pressing the “Start/Cancel” Button once. The red Start/
Cancel Button light will turn off whenever a function has
been completed or a function is manually cancelled.
8
Figure 3
TSSTTVDFL1-049_14EM1.indd 8 23/07/14 9:46 AM

USING THE PIZZA/ TURBO CONVECTION
HEAT FUNCTION (SEE FIG. 4)
Step 1. Turn the “Function” Knob to the Pizza “ ”
function. When you select the Pizza function, the
Turbo Convection Heat will automatically activate.
Step 2. If you wish to switch to the regular Pizza function,
press the Turbo “ ” button once to turn off the
Turbo Convection Heat default selection. The blue
light of the Turbo Convection Heat button will turn off.
The Turbo Convection Heat Function turns on
a built-in fan that circulates hot air in the oven
chamber, cooking your food faster and more evenly.
Default Temperature: 200ºC.
Default Time: 16 minutes.
Step 3. To set the temperature:
Turn the Temperature “ ” Knob if you wish to
increase or decrease the temperature setting. For
the Pizza Function, the temperature can be set from
170°C to 230°C in 15-degree increments.
Step 4. To set the time:
Turn the Time “ ” Knob if you wish to increase
or decrease the cooking time. The maximum time
setting for Pizza is 60 minutes (1 hour). Once you
have selected the desired cooking time, press the
Start button to initiate the cooking process.
Step 5. To Start:
Press the “Start/Cancel” Button to start the cooking
process. The red Start/Cancel Button light will
illuminate. The LCD Display will show the Pizza
Function, the countdown time and the selected
temperature. The unit will begin to work and the
timer will start counting down.
When the Pizza function cycle is complete, the unit
will emit 3 beeps. The LCD and the Start/Cancel
Button Light will turn off after 30 seconds.
9
Figure 4
TSSTTVDFL1-049_14EM1.indd 9 23/07/14 9:46 AM

NOTE: You can cancel the cooking cycle at any time by
pressing the Start/Cancel Button once. The red
Start/Cancel Button light will turn off whenever
a function has been completed or a function is
manually cancelled.
USING THE BAKE/ TURBO CONVECTION
HEAT FUNCTION (SEE FIG. 5)
Step 1. Turn the “Function” Knob to the Bake “ ” function.
When you select the Bake “ ” function, the Turbo
Convection Heat will automatically activate.
Step 2. If you wish to switch to the regular Bake function,
press the Turbo “ ” button once to turn off the
Turbo Convection Heat. The blue light of the Turbo
Convection Heat button will turn off.
The Turbo Convection Heat Function turns on
a built-in fan that circulates hot air in the oven
chamber, cooking your food faster and more evenly.
Default Temperature: 165°C.
Default Time: 30 minutes.
Step 3. To set the temperature:
Turn the Temperature “ ” Knob if you wish to
increase or decrease the temperature setting. For
the Bake Function, the temperature can be set from
65°C to 230°C in 1-degree increments.
Step 4. To set the time:
Turn the Time “ ” Knob if you wish to increase
or decrease the cooking time. The maximum time
setting for Bake is 60 minutes (1 hour). Once you
have selected the desired cooking time, press the
Start button to initiate the cooking process.
Step 5. To Start:
Press the “Start/Cancel” Button to start the cooking
process. The red “Start/Cancel” Button light will
illuminate. The LCD Display will show the Bake
Function, the countdown time and the selected
temperature. The unit will begin to work and the
timer will start counting down.
10
Figure 5
TSSTTVDFL1-049_14EM1.indd 10 23/07/14 9:46 AM

When the Baking cycle is complete, the unit will emit
3 beeps. The LCD and the Start/Cancel Button Light
will turn off after 30 seconds.
NOTE: You can cancel the cooking cycle at any time by
pressing the “Start/Cancel” Button once. The red
“Start/Cancel” Button light will turn off whenever
a function has been completed or a function is
manually cancelled.
USING THE BROIL FUNCTION (SEE FIG. 6)
Step 1. Turn the “Function” Knob to the Broil “ ” function.
When you select the Broil function, the upper heating
elements will heat.
Default Temperature: 230°C.
Default Time: 10 minutes.
Step 2. To set the temperature:
Turn the Temperature “ ” Knob if you wish to
increase or decrease the temperature setting. For
the Broil Function, the temperature can be set from
200°C to 230°C in 15-degree increments.
Step 3. To set the time:
Turn the Time “ ” Knob if you wish to increase
or decrease the cooking time. The maximum time
setting for Broil is 60 minutes (1 hour). Once you
have selected the desired cooking time, press the
Start button to initiate the cooking process.
Step 4. To Start:
Press the “Start/Cancel” Button to start the broiling
process. The red Start/Cancel Button light will
illuminate. The LCD Display will show the Broil
Function, the countdown time and the selected
temperature. The unit will begin to work and the
timer will start counting down.
When the Broiling cycle is complete, the unit will
emit 3 beeps. The LCD and the Start/Cancel Button
Light will turn off after 30 seconds.
NOTE: You can cancel the broiling cycle at any time by
pressing the “Start/Cancel” Button once. The red
Start/Cancel Button light will turn off whenever
a function has been completed or a function is
manually cancelled.
11
Figure 6
TSSTTVDFL1-049_14EM1.indd 11 23/07/14 9:46 AM

USING THE COOKIES/TURBO CONVECTION
HEAT FUNCTION (SEE FIG. 7)
Step 1. Turn the “Function” Knob to the Cookies “ ”
function. When you select the Cookies function, the
Turbo Convection Heat will automatically activate.
Step 2. If you wish to use the regular Cookies function,
press Turbo “ ” button once to turn off the
Turbo Convection Heat. The blue light of the Turbo
Convection Heat button will turn off.
The Turbo Convection Heat Function turns on
a built-in fan that circulates hot air in the oven
chamber, cooking your food faster and more evenly.
Default Temperature: 170°C.
Default Time: 11 minutes.
Step 3. To set the temperature:
Turn the Temperature “ ” Knob if you wish to
increase or decrease the temperature setting. For
the Cookies Function, the temperature can be set
from 65°C to 230°C in 1-degree increments.
Step 4. To set the time:
Turn the Time “ ” Knob if you wish to increase
or decrease the cooking time. The maximum time
setting for Cookies is 60 minutes (1 hour). Once you
have selected the desired cooking time, press the
Start button to initiate the cooking process.
Step 5. To Start:
Press the “Start/Cancel” Button to start the cooking
process. The red Start/Cancel Button light will
illuminate. The LCD Display will show the Cookies
Function, the countdown time and the selected
temperature. The unit will begin to work and the
timer will start counting down.
When the Cookies function cycle is complete, the
unit will emit 3 beeps. The LCD and the Start/Cancel
Button Light will turn off after 30 seconds.
12
Figure 7
TSSTTVDFL1-049_14EM1.indd 12 23/07/14 9:46 AM

NOTE: You can cancel the cooking cycle at any time by
pressing the “Start/Cancel” Button once. The red
Start/Cancel Button light will turn off whenever
a function has been completed or a function is
manually cancelled.
USING THE ROAST/TURBO CONVECTION
FUNCTION (SEE FIG. 8)
Step 1. Turn the “Function” Knob to the Roast “ ”
function. When you select the Roast function, the
Turbo Convection Heat is will automatically activate.
Step 2. If you wish to use the regular Roast function,
press the Turbo button once to turn off the Turbo
Convection Heat. The blue light of the Turbo
Convection Heat button will turn off.
The Turbo Convection Heat Function turns on
a built-in fan that circulates hot air in the oven
chamber, cooking your food faster and more evenly.
Default Temperature: 170°C.
Default Time: 60 minutes.
Step 3. To set the temperature:
Turn the Temperature “ ” Knob if you wish to
increase or decrease the temperature setting. For
the Roast Function, the temperature can be set from
65° to 230°C in 1-degree increments.
Step 4. To set the time:
Turn the Time “ ” Knob if you wish to increase
or decrease the cooking time. The maximum time
setting for Roast is 60 minutes (1 hour). Once you
have selected the desired cooking time, press the
Start button to initiate the cooking process.
Step 5. To Start:
Press the “Start/Cancel” Button to start the cooking
process. The red Start/Cancel Button light will
illuminate. The LCD Display will show the Roast
Function, the countdown time and the selected
temperature. The unit will begin to work and the
timer will start counting down.
13
Figure 8
TSSTTVDFL1-049_14EM1.indd 13 23/07/14 9:46 AM

When the Roasting cycle is complete, the unit will
emit 3 beeps. The LCD and the Start/Cancel Button
Light will turn off after 30 seconds.
NOTE: You can cancel the cooking cycle at any time by
pressing the “Start/Cancel” Button once. The red
Start/Cancel Button light will turn off whenever
a function has been completed or a function is
manually cancelled.
USING THE WARM FUNCTION (SEE FIG. 9)
Step 1. Turn the “Function” Knob to the Warm “ ”
function. When you select the Warm function, the
lower heating element will heat.
Default Temperature: 65°C.
Default Time: 60 minutes.
You may manually activate the Turbo Convection
Heat by pressing the Turbo “ ” button once to turn
it on. The blue light of the Turbo button will turn on.
Step 2. To set the temperature:
Turn the Temperature “ ” Knob if you wish to
increase or decrease the temperature setting. For
the Warm Function, the temperature can be set from
65°C to 95°C in 15-degree increments.
Step 3. To set the time:
Turn the Time “ ” Knob if you wish to increase
or decrease the warming time. The maximum time
setting for Warm is 60 minutes (1 hour). Once you
have selected the desired warming time, press the
Start button to initiate the warming process.
Step 4. To Start:
Press the “Start/Cancel” Button to start the warming
process. The red Start/Cancel Button light will
illuminate. The LCD Display will show the Warm
Function, the countdown time and the selected
temperature. The unit will begin to work and the
timer will start counting down.
14
Figure 9
TSSTTVDFL1-049_14EM1.indd 14 23/07/14 9:46 AM

When the Warming cycle is complete, the unit will
emit 3 beeps. The LCD and the Start/Cancel Button
Light will turn off after 30 seconds.
NOTE: You can cancel the warming cycle at any time by
pressing the Start/Cancel Button once. The red
Start/Cancel Button light will turn off whenever
a function has been completed or a function is
manually cancelled.
USING THE DEFROST FUNCTION (SEE FIG. 10)
Step 1. Turn the “Function” Knob to the Defrost “ ”
function.
Default Temperature: 230°C.
Default Time: 16 minutes.
You may manually activate the Turbo Convection
Heat by pressing the Turbo “ ” button once to turn
it on. The blue light of the Turbo button will turn on.
Step 2. To set the temperature:
Turn the Temperature “ ” Knob if you wish to
increase or decrease the temperature setting. For
the Defrost function, the temperature can be set
from 65°C to 230°C in 1-degree increments.
Step 3. To set the time:
Turn the Time “ ” Knob if you wish to increase or
decrease the defrosting time. The maximum time
setting for Defrost is 60 minutes (1 hour). Once you
have selected the desired defrosting time, press the
Start button to initiate the cooking process.
Step 4. To Start:
Press the “Start/Cancel” Button to start the
defrosting process. The red Start/Cancel Button
light will illuminate. The LCD Display will show the
Defrosting function, the countdown time and the
selected temperature. The unit will begin to work
and the timer will start counting down.
When the Defrosting cycle is complete, the unit will
emit 3 beeps. The LCD and the Start/Cancel Button
Light will turn off after 30 seconds.
15
Figure 10
TSSTTVDFL1-049_14EM1.indd 15 23/07/14 9:46 AM

NOTE: You can cancel the defrosting cycle at any time
by pressing the “Start/Cancel” Button once. The
red Start/Cancel Button light will turn off whenever
a function has been completed or a function is
manually cancelled.
USING THE REHEAT FUNCTION (SEE FIG. 11)
Step 1. Turn the “Function” Knob to the Reheat “ ”
function.
Default Temperature: 165°C.
Default Time: 15 minutes.
You may manually activate the Turbo Convection
Heat by pressing the Turbo button once to turn it on.
The blue light of the Turbo button will turn on.
Step 2. To set the temperature:
Turn the Temperature “ ” Knob if you wish to
increase or decrease the temperature setting. For
the Reheat function, the temperature can be set
from 65°C to 230°C in 1-degree increments.
Step 3. To set the time:
Turn the Time “ ” Knob if you wish to increase or
decrease the reheating time. The maximum time
setting for Reheat is 60 minutes (1 hour). Once you
have selected the desired reheating time, press the
Start button to initiate the reheating process.
Step 4. To Start:
Press the “Start/Cancel” Button to start the
reheating process. The red Start/Cancel Button
light will illuminate. The LCD Display will show
the Reheat Function, the countdown time and the
selected temperature. The unit will begin to work
and the timer will start counting down.
When the Reheating cycle is complete, the unit will
emit 3 beeps. The LCD and the Start/Cancel Button
Light will turn off after 30 seconds.
NOTE: You can cancel the reheating cycle at any time by
pressing the “Start/Cancel Button once. The red
Start/Cancel Button light will turn off whenever
a function has been completed or a function is
manually cancelled.
16
Figure 11
TSSTTVDFL1-049_14EM1.indd 16 23/07/14 9:46 AM

• To accommodate a wide variety of foods the oven has two rack positions. The rack can
be inserted in the oven in the upper or lower rack guides. The rack will fit into either of the
rack guides inside of the Countertop Oven. (See Figure Below)
• Before removing the rack allow the unit to cool.
• To remove the rack, open the oven door and pull the rack towards the front of the oven.
The rack will slide on the rack guides on the inside of the oven.
PLEASE NOTE: the oven rack may tilt downward causing food to shift when the rack is
pulled out, proceed with caution.
• Positioning of the oven rack will depend on the size of the food and desired browning.
Move the rack to the lower rack position to prevent top browning and move the rack to the
upper rack position to prevent bottom burning.
• For best toasting results, position the rack in the upper rack guide.
RACk GUIdE
OpTIONS
POSITIONING PAN
17
TSSTTVDFL1-049_14EM1.indd 17 23/07/14 9:46 AM

DO NOT IMMERSE IN LIQUIDS.
Step 1. Press the Start/Cancel Button OFF and remove plug from electrical
outlet. Allow to cool.
Step 2. Wipe unit down with damp cloth. DO NOT IMMERSE IN WATER. Make sure to
only use mild, soapy water. Abrasive cleaners, scrubbing brushes and chemical
cleaners will damage the coating on this unit.
Step 3. Remove crumb tray by pulling out of Countertop Oven.
Step 4. Shake off crumbs from crumb tray. Cleaning the crumb tray often will avoid any
accumulations.
Step 5. Remove wire rack and clean with damp cloth or place in top rack of dishwasher.
Allow the appliance to cool completely before storing. If storing the Countertop Oven for long
periods of time make certain that the Countertop Oven is clean and free of food particles.
Store the Countertop Oven in a dry location such as on a table or countertop or cupboard
shelf. Other than the recommended cleaning, no further user maintenance should be
necessary.
CLEANING YOUR TOASTER OVEN
STORING YOUR TOASTER OVEN
18
TSSTTVDFL1-049_14EM1.indd 18 23/07/14 9:46 AM

WARRANTY
Jarden Consumer Solutions of India Private Limited (hereinafter referred to as
“JCS”) warrants that, for a period of two (2) years from the date of purchase of
this product as evidenced in the cash memo (“Warranty Period”), this product
will be free from defects in material and workmanship (the “Warranty”). Please
preserve the warranty card and the cash memo of the product duly stamped
and signed by the dealer, as this will be required for any claims under this
Warranty.
• The rights and benets under this Warranty are additional to your statutory
rights, which are not affected by this Warranty.
• During the Warranty Period, JCS, at its sole choice, will either repair or
replace this product or any component of the product found to be defective
free of cost through (the dealer from whom the product was purchased or
through the service center listed in the card – business people to conrm),
provided that:
- JCS is promptly informed of the defect;
- The product has not been altered in any way or subjected to misuse
or repair by the person other than a person authorized by JCS;
- This Warranty, duly lled, stamped and signed by the dealer is made
available.
• The Warranty provided herein is towards the original purchaser and is not
transferrable to any third party.
• Any repaired or replaced product will be warranted on these terms for the
remaining portion of the Warranty in the country where the product was
purchased.
• Liability for consequential loss or damage is neither accepted nor is it
implied.
• This Warranty is in lieu of all others expressed or implied and does not
cover the following:
a.If product was use in any manner other than the intended use.
b.If the product has not been used according to the instruction manual/
user’s manual, included with the product.
TSSTTVDFL1-049_14EM1.indd 19 23/07/14 9:46 AM

c.If the defects are caused by improper use or reckless use.
d.If the product was altered or repaired by anyone other than those
authorized by JCS.
e.If installation of the product is not done as per the printed instructions
provided along with the product.
f. If the defects are caused by re, ood, and other act of god.
g.If the defects are caused by use of incorrect current or voltage or faulty
electric power supply.
h.Normal wear and tear of parts and accessories resulting from regular
use.
i. Damage resulting from transportation, accidents, mishandling or
negligence on the part of the consumer.
j. The following part/components:
- Broken glass or ceramic parts
- Light bulb
- Accessories
k.If the product is put to industrial or commercial use.
• JCS will not be responsible for any delay in servicing due to non-
availability of any components or due to reasons beyond the control of
JCS.
• Any failure of the product to perform any purpose other than the
intended purpose shall not be considered as a default under this
warranty.
• In any event, if JCS becomes liable for damages incurred in
connection with these presents, then the liability of JCS will be limited
to the amount equal to the sale invoice amount paid by you.
Waste electrical products should not be disposed off with household waste.
Please recycle where facilities exist.
WARRANTY
TSSTTVDFL1-049_14EM1.indd 20 23/07/14 9:46 AM
Table of contents
Other Oster Oven manuals

Oster
Oster TSSTTV-ELXLDAF3 User manual

Oster
Oster TSSTTVDGXL User manual

Oster
Oster TSSTTVCF01 User manual

Oster
Oster 6056 User manual

Oster
Oster K45548 Dimensions

Oster
Oster TSSTTVRB04 User manual

Oster
Oster 6235 User manual

Oster
Oster TSSTTVFDMAF User manual

Oster
Oster TSSTTVLC60L User manual

Oster
Oster TSSTTVF8GA User manual

Oster
Oster 6059 User manual

Oster
Oster 6073 User manual

Oster
Oster TSSTTVVG01 User manual

Oster
Oster TSSTTVMATT User manual

Oster
Oster TSSTTVLS25NS User manual

Oster
Oster 814100097 User manual

Oster
Oster 4-Slice Toaster Oven User manual

Oster
Oster TSSTTVXXLL-049 User manual

Oster
Oster TSSTTVVGS1-049 User manual

Oster
Oster TSSTTVSM9L User manual