OTC Welbee P400 II User manual

DAIHEN Corporation
June, 2021
Manual No. : P30344-1
Welbee P400 II
OWNER'S MANUAL
DAIHEN Corporation

00
Preliminaries
Forward
Thank you for your purchase of OTC's welding power source.
This Owner's Manual (hereafter referred to as "this manual") explains the following points for safe use of the product.
• Caution regarding the product
• Welding operation/setting method
• Daily maintenance (cleaning, inspection)
• Troubleshooting
Store this manual in a safe place so that it can be referred whenever necessary.
Service and Support
See the back cover for contact numbers and mailing addresses. When contacting your dealer for service,
you are required to provide the following information:
• Name, address, telephone number
• Product model, manufacture year, serial number, and software version number
(Refer to the diagram below for product information. Attachment location and content of nameplate may
vary depending on the purchased product.)
<Example> Attachment location of the nameplate
No. Serial No.
1• (Same number as the nameplate in the rear)
#X#####X ###########
2
•Productmodel
• Manufacture
year
• Serial number
XX-X###X
#### year
#X#####X ###########
3• Software version number
X##### Ver ###.###.###.###
12
3
FRONT REAR

1
Important Information
Use of the Product
This product is a power supply unit designed and manufactured for use in arc welding.
Do not use the product for any other purposes.
Safe Use of the Product
For safe use of the product (hereafter referred to as welding power source), ensure to follow the
instructions below:
• This manual is intended for workers who are familiar with the listed terminologies. If this product is going
to be operated or serviced by workers who are not familiar with the terminology, the responsibility falls
on the customer to provide thorough training on operation and safety.
• This equipment and this manual are for use only by persons trained and experienced in the safety
operation of welding equipment. Untrained persons must complete the "Special workshop for arc
welding".
• For protection from possible injury or damage in the equipment, be sure to read and follow the safety
information in this manual. Do not use it for purposes not indicated in the manual.
• Make sure that installation/operation/maintenance of the welding power source and welding machine is
performed by qualified personnel with sufficient knowledge and skills.
• If this manual is lost or damaged, immediately contact your dealer.
Copyright
This manual is copyrighted and all rights are reserved by OTC. Any part of the manual shall not be
copied, photocopied, or reproduced without the prior consent of OTC.
When Exporting the Product
The following conditions are to be observed and met when exporting the product outside of the country.
• The product is designed and manufactured according to the Japanese laws/specification and industrial
standards. The product may not conform to laws/specification and standards in other countries.
• When shipping or reselling the product outside of the country, make sure to contact our distributor or
customer service in advance.
Disposal of the Product
For disposal of welding equipment including the welding power source and welding material, confirm
the regulation of the country/region in which the equipment is located and follow the rules. When
disposing, arrange consignment contract for waste disposal with an authorized waste collectors and
manage the disposal processes.

TABLE OF CONTENTS
2
TABLE OF CONTENTS
Forward
Service and Support
Important Information. . . . . . . . . . . . . . . . . . . . . . . . . . . 1
Use of the Product . . . . . . . . . . . . . . . . . . . . . . . . . . . . . . . . . . . 1
Safe Use of the Product . . . . . . . . . . . . . . . . . . . . . . . . . . . . . . . 1
Copyright . . . . . . . . . . . . . . . . . . . . . . . . . . . . . . . . . . . . . . . . . . 1
When Exporting the Product. . . . . . . . . . . . . . . . . . . . . . . . . . . . 1
Disposal of the Product . . . . . . . . . . . . . . . . . . . . . . . . . . . . . . . 1
CHAPTER 1 SAFETY INFORMATION
1.1 Warning Symbols . . . . . . . . . . . . . . . . . . . . . .4
1.2 Safety Precaution . . . . . . . . . . . . . . . . . . . . . .5
1.2.1 Operating precautions . . . . . . . . . . . . . . . . . . . . . . . . . . 5
1.2.2 Precautions for power supply and electric shock. . . . . . 6
1.2.3 Precautions for handling of plastic parts . . . . . . . . . . . . 6
1.2.4 Precautions for disassembling and modifying the
welding power source . . . . . . . . . . . . . . . . . . . . . . . . . . 7
1.2.5 Precautions for air discharge and use of respiratory
protective equipment . . . . . . . . . . . . . . . . . . . . . . . . . . . 7
1.2.6 Precaution for protective equipment . . . . . . . . . . . . . . . 8
1.2.7 Precautions for flammable materials . . . . . . . . . . . . . . . 9
1.2.8 Precautions for gas cylinder and gas regulator . . . . . . 10
1.2.9 Precautions for rotating part . . . . . . . . . . . . . . . . . . . . 10
1.3 Principal Safety Standards . . . . . . . . . . . . .11
CHAPTER 2 PRODUCT SPECIFICATION
AND CONFIGURATION
2.1 Specification . . . . . . . . . . . . . . . . . . . . . . . . .12
2.1.1 Specifications. . . . . . . . . . . . . . . . . . . . . . . . . . . . . . . . 12
2.1.2 Applicable welding method . . . . . . . . . . . . . . . . . . . . . 13
2.1.3 External dimensions . . . . . . . . . . . . . . . . . . . . . . . . . . 14
2.1.4 Rated duty cycle . . . . . . . . . . . . . . . . . . . . . . . . . . . . . 14
2.2 Product Configuration . . . . . . . . . . . . . . . . .16
2.2.1 Standard composition . . . . . . . . . . . . . . . . . . . . . . . . . 16
2.2.2 Accessory (supplied) . . . . . . . . . . . . . . . . . . . . . . . . . . 18
2.2.3 Accessory (not supplied) . . . . . . . . . . . . . . . . . . . . . . . 19
2.2.4 Optional accessories . . . . . . . . . . . . . . . . . . . . . . . . . . 19
2.3 Part Names . . . . . . . . . . . . . . . . . . . . . . . . . .21
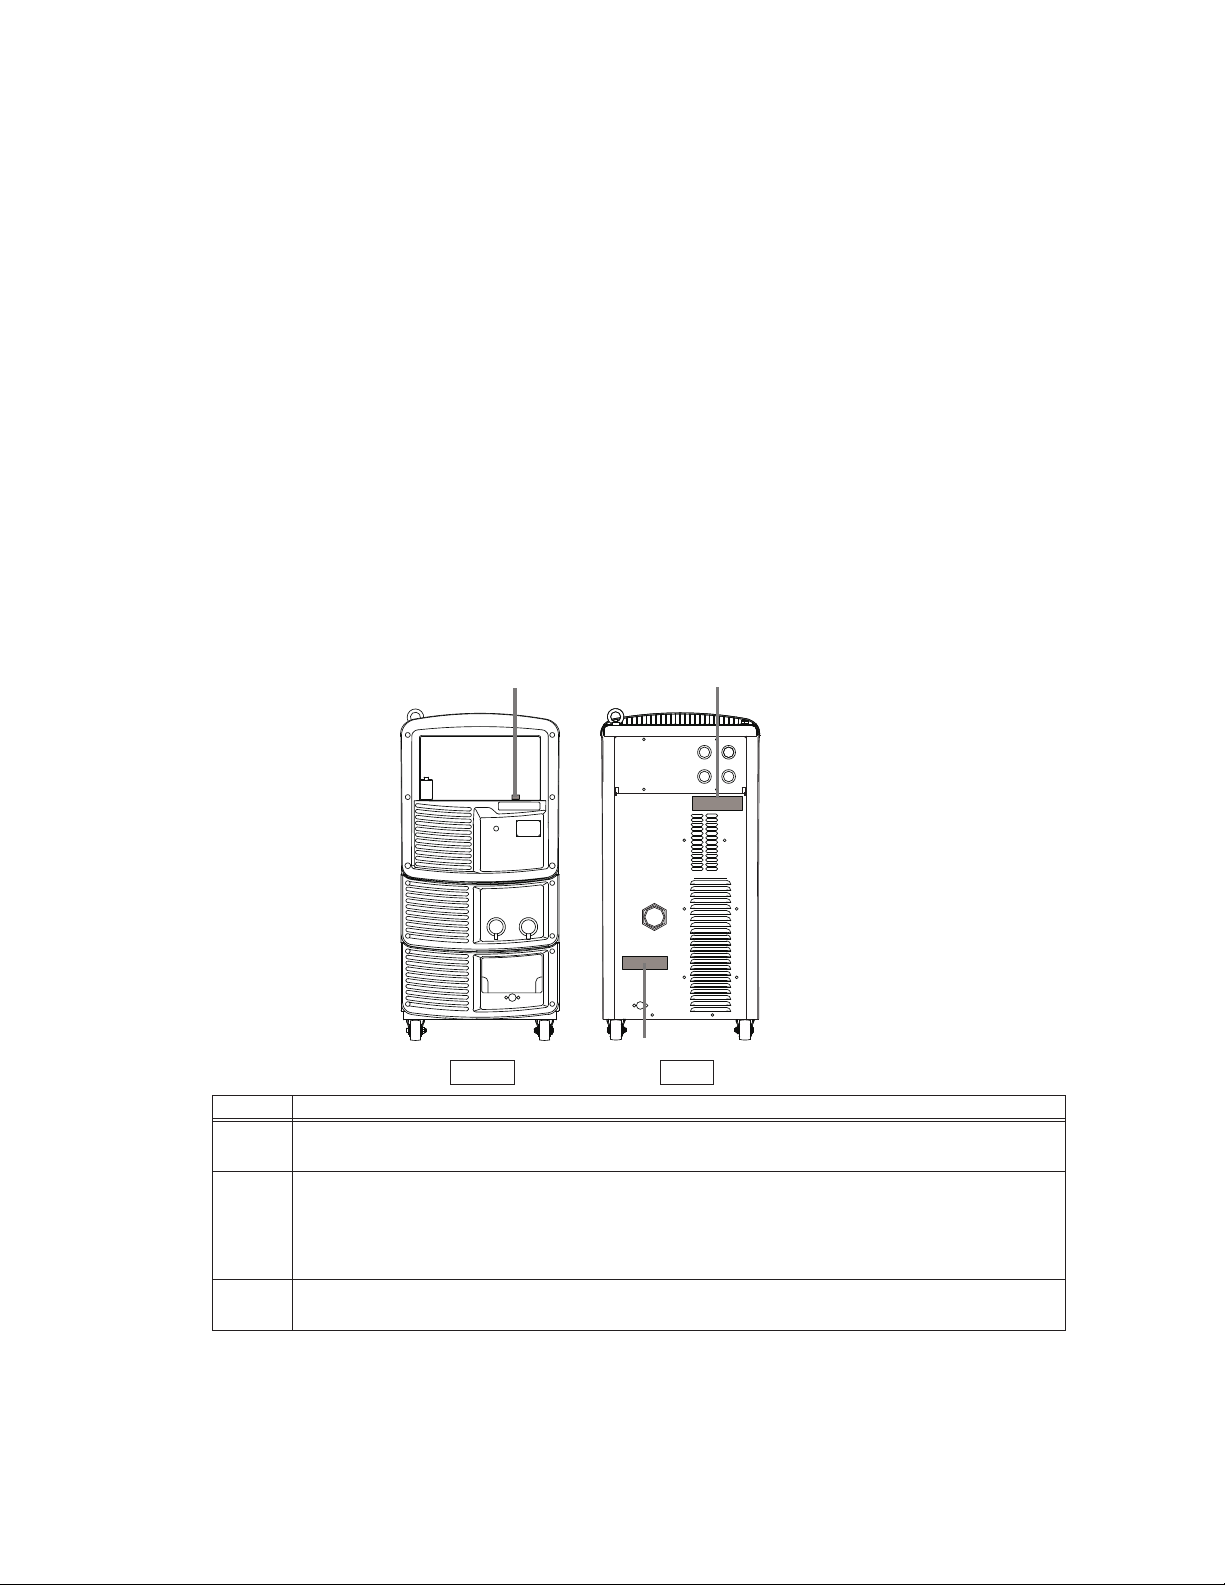
2.3.1 Front panel. . . . . . . . . . . . . . . . . . . . . . . . . . . . . . . . . . 21
2.3.2 Rear panel . . . . . . . . . . . . . . . . . . . . . . . . . . . . . . . . . . 21
CHAPTER 3 TRANSPORTATION AND
INSTALLATION
3.1 Required Equipment. . . . . . . . . . . . . . . . . . .22
3.1.1 Welding power source equipment . . . . . . . . . . . . . . . . 22
3.1.2 Ventilation equipment/partial exhaust facility. . . . . . . . 23
3.2 Installation Environment . . . . . . . . . . . . . . .24
3.2.1 Installation environment. . . . . . . . . . . . . . . . . . . . . . . . 24
3.2.2 Electromagnetic interference . . . . . . . . . . . . . . . . . . . . 24
3.3 Transportation Procedure . . . . . . . . . . . . . .25
3.3.1 Transportation with lifting lug . . . . . . . . . . . . . . . . . . . . 26
3.3.2 Manual transportation with carts . . . . . . . . . . . . . . . . . 27
CHAPTER 4 CONNECTION
4.1 Precautions for Connection Procedure
and Grounding . . . . . . . . . . . . . . . . . . . . . . .28
4.2 Connecting the Welding Power Source . . .28
4.2.1 Connection of cable at output side . . . . . . . . . . . . . . . 29
4.2.2 Connection of wire feeder . . . . . . . . . . . . . . . . . . . . . . 30
4.2.3 Connection of welding torch . . . . . . . . . . . . . . . . . . . . . 31
4.2.4 Connection at TIG welding . . . . . . . . . . . . . . . . . . . . . . 31
4.2.5 Connection at DC STICK welding . . . . . . . . . . . . . . . . 33
4.2.6 Connection of shield gas . . . . . . . . . . . . . . . . . . . . . . . 33
4.3 Grounding and Connection of Input
Power Supply . . . . . . . . . . . . . . . . . . . . . . . .35
4.4 Confirmation of Connection . . . . . . . . . . . .36
4.5 Connection of External Equipment. . . . . . .36
4.5.1 Connection of robot . . . . . . . . . . . . . . . . . . . . . . . . . . . 36
4.5.2 Connection of automatic machine . . . . . . . . . . . . . . . . 37
4.6 Wiring of Voltage Detection Cable at
Base Metal Side . . . . . . . . . . . . . . . . . . . . . .40
4.6.1 Wiring to wire feeder . . . . . . . . . . . . . . . . . . . . . . . . . . 40
4.6.2 Wiring to welding power source . . . . . . . . . . . . . . . . . . 41
4.6.3 Wiring example of voltage detection cable. . . . . . . . . . 41
CHAPTER 5 WELDING OPERATION
5.1 Precaution at Welding Operation . . . . . . . .42
5.1.1 Precautions for air discharge and use of respiratory
protective equipment . . . . . . . . . . . . . . . . . . . . . . . . . . 42
5.1.2 Precaution for protective equipment. . . . . . . . . . . . . . . 43
5.1.3 Precautions on welding place. . . . . . . . . . . . . . . . . . . . 43
5.2 Check before Welding . . . . . . . . . . . . . . . . .43
5.3 Power ON and Gas Supply . . . . . . . . . . . . .45
5.4 Wire Inching . . . . . . . . . . . . . . . . . . . . . . . . .46
5.5 Check and Setting of Welding Condition . .47
5.5.1 Reading welding condition . . . . . . . . . . . . . . . . . . . . . . 47
5.5.2 Preventing erroneous operation on operation panel . . 47
5.6 Performing Welding Operation . . . . . . . . . .48
5.6.1 Operation of welding start . . . . . . . . . . . . . . . . . . . . . . 48
5.6.2 Operation during welding . . . . . . . . . . . . . . . . . . . . . . . 49
5.6.3 Operation at welding end . . . . . . . . . . . . . . . . . . . . . . . 51
CHAPTER 6 WELDING CONDITION
6.1 List of Welding Conditions . . . . . . . . . . . . .52
6.1.1 Parameter (Welding parameter). . . . . . . . . . . . . . . . . . 52
6.1.2 Function . . . . . . . . . . . . . . . . . . . . . . . . . . . . . . . . . . . . 52
6.1.3 Internal function . . . . . . . . . . . . . . . . . . . . . . . . . . . . . . 53
6.2 Function on Operation Panel. . . . . . . . . . . .57
6.2.1 Operation panel . . . . . . . . . . . . . . . . . . . . . . . . . . . . . . 57
6.2.2 Setting screen . . . . . . . . . . . . . . . . . . . . . . . . . . . . . . . 58
6.3 Welding Conditions . . . . . . . . . . . . . . . . . . . 61
6.3.1 Basic welding conditions . . . . . . . . . . . . . . . . . . . . . . . 61
6.3.2 Useful functions . . . . . . . . . . . . . . . . . . . . . . . . . . . . . . 61
6.4 Preparing Welding Conditions . . . . . . . . . .62
6.5 Memory Function of Welding Conditions. .62
6.5.1 Memory registration of welding conditions . . . . . . . . . . 63
6.5.2 Read out of welding conditions . . . . . . . . . . . . . . . . . . 64
6.5.3 Deletion of memory registration . . . . . . . . . . . . . . . . . . 65
6.6 Setting Welding Conditions. . . . . . . . . . . . . 66
6.6.1 Welding mode setting. . . . . . . . . . . . . . . . . . . . . . . . . . 66
6.6.2 Setting welding conditions . . . . . . . . . . . . . . . . . . . . . . 68
6.6.3 Setting welding parameter . . . . . . . . . . . . . . . . . . . . . . 69
6.6.4 Crater setting . . . . . . . . . . . . . . . . . . . . . . . . . . . . . . . . 70
6.6.5 Arc spot time . . . . . . . . . . . . . . . . . . . . . . . . . . . . . . . . 74
6.6.6 Welding voltage adjustment . . . . . . . . . . . . . . . . . . . . . 74
6.6.7 Arc characteristics adjustment . . . . . . . . . . . . . . . . . . . 75
6.6.8 Penetration control adjustment. . . . . . . . . . . . . . . . . . . 75
6.6.9 Adjustment of wave frequency . . . . . . . . . . . . . . . . . . . 76

TABLE OF CONTENTS
3
6.6.10 Welding guide . . . . . . . . . . . . . . . . . . . . . . . . . . . . . . . 77
6.7 Setting Internal Functions. . . . . . . . . . . . . . 79
6.7.1 Setting procedure . . . . . . . . . . . . . . . . . . . . . . . . . . . . 79
6.7.2 Detailed information on internal functions . . . . . . . . . . 80
6.8 Operation of Analog Remote Control
(Optional) . . . . . . . . . . . . . . . . . . . . . . . . . . 103
CHAPTER 7 ADMINISTRATOR
FUNCTIONS
7.1 Protection of Welding Conditions . . . . . . 105
7.1.1 Setting/Changing password . . . . . . . . . . . . . . . . . . . 105
7.1.2 Disabling erroneous operation prevention. . . . . . . . . 107
7.2 Welding Result Control Function . . . . . . . 109
7.2.1 Setting welding result control function. . . . . . . . . . . . 109
7.2.2 Details of welding control items. . . . . . . . . . . . . . . . . 110
7.3 Data Backup (Utilization of data) . . . . . . . 114
7.3.1 Setting of welding conditions/internal functions. . . . . 115
7.3.2 Simplified data log function . . . . . . . . . . . . . . . . . . . . 116
7.3.3 Failure log function . . . . . . . . . . . . . . . . . . . . . . . . . . 117
7.3.4 Welding Result Control Function. . . . . . . . . . . . . . . . 118
7.3.5 Backup operation . . . . . . . . . . . . . . . . . . . . . . . . . . . 118
7.3.6 Importing backup data. . . . . . . . . . . . . . . . . . . . . . . . 120
7.4 Initializing Welding Conditions and
Internal Functions . . . . . . . . . . . . . . . . . . . 121
7.5 Checking the Software Version and
Serial Number. . . . . . . . . . . . . . . . . . . . . . . 122
7.6 Calibration Mode . . . . . . . . . . . . . . . . . . . . 123
7.6.1 Adjustment of output current . . . . . . . . . . . . . . . . . . . 123
7.6.2 Adjustment of output voltage. . . . . . . . . . . . . . . . . . . 124
7.7 System Setting . . . . . . . . . . . . . . . . . . . . . . 126
CHAPTER 8 MAINTENANCE AND
INSPECTION
8.1 Precautions for Maintenance and
Inspection . . . . . . . . . . . . . . . . . . . . . . . . . . 127
8.2 Daily Inspection . . . . . . . . . . . . . . . . . . . . 128
8.3 Periodical Inspection. . . . . . . . . . . . . . . . . 129
8.4 Periodical Replacement Parts . . . . . . . . . 131
8.5 Insulation Resistance Measurement and
Withstand Voltage Test . . . . . . . . . . . . . . . 132
CHAPTER 9 TROUBLESHOOTING
9.1 Action in Case of Error . . . . . . . . . . . . . . . 133
9.2 Troubleshooting. . . . . . . . . . . . . . . . . . . . . 137
CHAPTER 10REFERENCE MATERIALS
10.1 Parts List. . . . . . . . . . . . . . . . . . . . . . . . . . . 139
10.2 Reference Drawing . . . . . . . . . . . . . . . . . . 140
10.2.1 Schematic diagram . . . . . . . . . . . . . . . . . . . . . . . . . . 141
10.2.2 Parts layout drawing . . . . . . . . . . . . . . . . . . . . . . . . . 143
10.3 Materials for Setting Welding Conditions 144
10.3.1 Guide for changing welding conditions . . . . . . . . . . . 144
10.3.2 Samples of welding condition settings . . . . . . . . . . . 144

4
Chapter 1 Safety Information
This chapter explains the precautions on the welding power source and welding operation.
1.1 Warning Symbols
The following safety warning symbols and signs are used throughout the manual to ensure proper operation of the
product and to prevent from various hazards that cause serious injury and damages. Indication and explanation for the
symbols are as follows:
Make sure to fully understand the content before beginning operation.
The below symbols are categorized by the degree of possible hazard and damage.
The below symbols are categorized according to the content to be followed.
Symbols Explanation
Gives information regarding possible personal injury or loss of life if the product is used
improperly.
Refers to minor personal injury or possible equipment damage if the product is used improperly.
Symbols Explanation
Instruction: indicates "Instruction" matters to be followed.
Prohibited: indicates "Prohibited" matters.
CAUTION

5
Chapter 1
Safety Information
SAFETY PRECAUTION
SAFETY INFORMATION CHAPTER 1
1.2 Safety Precaution
This section explains the safety precautions regarding operation of the welding power source.
1.2.1 Operating precautions
To prevent serious injury or accidents, ensure to follow the instructions below:
• Be sure to read and understand the information in the manual before operating the
product. Have only trained and experienced personnel perform operation of welding
power source or welding power source.
• Perform construction work on primary power source in the facility, selection of
installation space, operation/storage/piping of high pressure gas, storage of welded
products, and disposal of waste in accordance with local law and/or regulation at the
customer's facility.
• Be sure to take appropriate measures during welding so that no person is allowed
unauthorized access near the welding power source or work areas.
• Only authorized personnel or person with full understanding and experience of the
welding power source must perform installation, maintenance and repair of welding
power source.
• Make sure to attach a safety belt when working at high locations.
• For those with pacemaker, avoid being close to the machine during operation or work
area until obtaining physician's approval. Machine at operation will generate magnetic
field nearby that may cause influence upon the working of pacemaker.
• Do not use the welding power source for purpose other than welding such as thawing a
frozen pipe.
• Do not use the welding power source when the case and the cover are removed.
• Removing the cases for maintenance, inspection and repair should be performed by
qualified persons or persons familiar with the welding power source. Also put up a
barrier around the welding power source or take other necessary measure to prevent
other people from getting in the nearby area.

SAFETY PRECAUTION
SAFETY INFORMATION
CHAPTER 1
6
1.2.2 Precautions for power supply and electric shock
To prevent electric shock or burn injury, ensure to follow the instructions below:
1.2.3 Precautions for handling of plastic parts
Front and rear panel and fan of the welding power source is made from polycarbonate resin. To prevent from electric
shock or fire caused by the damage on polycarbonate resin, ensure to follow the instructions below.
• Do not touch the input and output terminals and the internal live electrical parts of the
welding power source.
• Have a qualified electrical engineer ground the case of the welding power source and
base metal or jig electrically connected in accordance with local regulation.
• Before starting maintenance and inspection, make sure to cut the input power with the
disconnect switch in the box connected with the welding power source and wait three
minutes or more.
The capacitors may be still charged even after the input power is cut. Make sure that
there is no charged voltage before starting the work.
• Wear dry insulating gloves for protection. Do not use damaged or wet gloves.
• Tighten all cable connections and insulate them.
• Do not wrap cables around the body.
• Perform periodical maintenance and repair damaged parts if any before use.
• Turn off POWER switch of all the related equipment when not in use.
• Periodically blow the parts of welding power source with dry compressed air to remove
dust.
Powder dust accumulating inside may cause insulation deterioration, resulting in
electric shock or fire.
• Do not use a cable with insufficient capacity, serious damage or cable without
grounding.
CAUTION
• When the power switch is tripped, never turn it on again and contact your dealer.
• Do not apply external force or shock to the front panel, rear panel and fan.
Otherwise, damage and malfunction may occur.
• If there is dirt on plastic parts, soak a soft cloth in water, alcohol or neutral detergent,
wring it well and wipe off the dirt.
Do not use organic detergent or chemical agent. Doing so may cause crack (breaking)
and degrade the strength.
• If there is any abnormality in the plastic parts such as front panel, rear panel and fan,
immediately stop the use and contact your dealer.
• Do not use the welding power source at location in which organic solvent, chemicals,
cutting oil and composition oil adhere or atmosphere containing the above.
Doing so may cause crack (breaking) and deterioration in the plastic part.

7
Chapter 1
Safety Information
SAFETY PRECAUTION
SAFETY INFORMATION CHAPTER 1
1.2.4 Precautions for disassembling and modifying the welding power source
To prevent electrical shock, fire, injury from malfunction and error in the welding power source, ensure to follow the
instructions below:
1.2.5 Precautions for air discharge and use of respiratory protective equipment
To prevent suffocation or gas poisoning in the welding operation, ensure to follow the instructions below:
To prevent any health damage due to poisonous gas or particle substances (fume) emitted in the welding operation, ensure
to follow the instructions below:
• Do not disassemble/modify the welding power source.
Disassembling/modifying by customer is out of the warranty scope.
• When welding is required in tank, boiler, reaction tower, or hold of a ship, closed space,
or any other places of poor ventilation, ensure to provide ventilation equipment.
• Gas of larger gravity than that of oxygen, such as carbon dioxide gas or argon gas,
retains at the bottom part.
To prevent anoxia due to the retention gas, provide ventilation equipment.
• When it is difficult to provide ventilation equipment or the ventilation equipment does
not give sufficient performance, ensure to use respiratory protective equipment.
For preventive measure from falling due to anoxia, apply lifelines such as a safety belt.
• For the welding operation in a narrow space, perform the operation with the trained
supervisor.
• Periodically inspect the ventilation equipment to ensure correct and proper
performance of ventilation.
• To reduce the dust concentration, install a partial exhaust facility such as fume suction
device, or install the collective ventilation equipment.
• When it is difficult to provide a partial exhaust facility or the ventilation or exhaust
facility does not give sufficient performance, ensure to use the respiratory protective
equipment.
• In performing welding or cutting the coating steel plate or galvanized steel sheet,
provide a partial exhaust facility or let the welding operator as well as the surrounding
operators use respiratory protective equipment. (Welding or cutting the coating steel
plate or galvanized steel sheet will cause toxic gas or fume.)
• Do not perform welding operation in the vicinity of degreasing, cleansing, or spraying
operation. Performing the welding operation in such places may generate poisonous
gas.

SAFETY PRECAUTION
SAFETY INFORMATION
CHAPTER 1
8
1.2.6 Precaution for protective equipment
For protection from arc ray generated from welding, spattering dross and hearing disorder from noise, observe the
following:
• When welding or watching a welder work, wear face shield with a proper shade of filter
(See ANSI Z 49.1 listed in PRINCIPAL SAFETY STANDARDS) to protect the face and
eyes.
• Wear safety goggles in the work area and the surrounding.
Ignoring the above may cause injury in the eye or burn from spatter and spattering
dross.
• Wear protective equipment such as protective leather gloves, long-sleeve clothes, leg
covers, and leather apron.
Ignoring the above may cause electrical shock and burn.
• Install protective screens or barriers to protect the eyes of others in the work area from
arc ray.
• Wear an ear protector when noise level is high.
Ignoring the above may cause hearing disorder.

9
Chapter 1
Safety Information
SAFETY PRECAUTION
SAFETY INFORMATION CHAPTER 1
1.2.7 Precautions for flammable materials
To prevent fire, explosion and rupture, ensure to follow the instructions below:
• Remove all flammables within 33 ft (10 m) of the welding arc so that sparks and
spatter do not strike flammable materials. If this is not possible, tightly cover them with
noncombustible covers.
• When welding on a ceiling, floor, bulkhead or partition, remove all flammable materials
in hidden places.
• Tighten all cable connections and insulate them.
Loose connection in the cable and current path of the base metal such as steel frame
may cause electric shocks and fire hazards from energization.
• Connect power cable for base metal as close to the welding area as possible.
• Do not weld on gas pipe and closed containers such as tanks or drums.
• Performing arc welding on flammable object such as fuel tank may cause explosion.
Furthermore, welding on closed container such as tanks and pipes may cause burst.
• Watch for fire and keep a fire extinguisher near the welding area.
• Periodically blow the parts of welding power source with dry compressed air to remove
dust.
Powder dust accumulating inside may cause insulation deterioration, resulting in
electric shock or fire.
• Do not place hot base metal after welding near flammable materials.
Spatter and hot base metal after welding can cause fire.
• Do not place the welding power source near combustible materials or flammable gas.
• Do not place the welding torch near the wire feeder or the frame of wire reel stand.
• When there is an electrical connection between a workpiece and the frame of wire
feeder or the wire reel stand, arc may be generated and cause damage by a fire if the
wire contacts the frame or the workpiece.

SAFETY PRECAUTION
SAFETY INFORMATION
CHAPTER 1
10
1.2.8 Precautions for gas cylinder and gas regulator
To prevent falling of gas cylinder, gas regulator explosion and accident caused by gas, ensure to follow the instructions
below:
1.2.9 Precautions for rotating part
To prevent being caught/pinched by the rotating parts, ensure to follow the instructions below:
• Use only correct shield gas cylinders according to the related laws, regulations and
customer's standard.
Gas cylinder contains compressed gas. Wrong operation may cause gas explosion,
resulting in serious physical injury.
• Read and follow instructions on compressed gas cylinders, associated equipment, and
the CGA publication P-1 listed in PRINCIPAL SAFETY STANDARDS.
• Keep the cylinder upright and securely chained to a stationary support or a rack.
Falling or tipping of cylinder may cause serious injury.
In opening the valve of gas cylinder, keep your face away from the gas discharge port.
• Keep protective cap in place over valve except when gas cylinder is in use or connected
for use.
• Do not place the gas cylinder under high temperature.
• Protect compressed gas cylinders from excessive heat, mechanical shock, and arcs.
• Do not set welding torch to the cylinder or touch the cylinder with welding electrode.
• For the gas regulator, make sure to use a device for compressed gas cylinder that
conforms to the specific application of the shield gas.
Using an inappropriate gas regulator may cause explosion.
• Keep your hands, fingers, hairs and clothes away from the rotating cooling fan, open
parts around the cooling fan and feed roll of the wire feeder.

11
Chapter 1
Safety Information
PRINCIPAL SAFETY STANDARDS
SAFETY INFORMATION CHAPTER 1
1.3 Principal Safety Standards
Arc welding equipment – Installation and use, Technical Specification
IEC 62081, from International Electro technical Commission
Arc welding equipment Part 1: Welding power sources IEC 60974-1, from International Electro technical Commission
Safety in Welding and Cutting, ANSI Standard Z49.1, from American Welding Society.
Safety and Health Standards, OSHA 29 CFR 1910, from Superintendent of Documents, U.S. Government Printing Office.
Recommended Practices for Plasma Arc Cutting, American Welding Society Standard AWS C5.2, from American Welding
Society.
Recommended Safe Practices for the Preparation for Welding and Cutting of Containers That Have Held Hazardous
Substances, American Welding Society Standard AWS F4.1, from American Welding Society.
National Electrical Code, NFPA Standard 70, from National Fire Protection Association. Safe Handling of Compressed
Gases in Cylinders, CGA Pamphlet P-1, from Compressed Gas Association.
Code for Safety in Welding and Cutting, CSA Standard W117.2, from Canadian Standards Association, Standards Sales.
Safe Practices For Occupation And Educational Eye And Face Protection, ANSI Standard Z87.1, from American National
Standards Institute.
Cutting And Welding Processes, NFPA Standard 51B, from National Fire Protection Association.
NOTE
• The codes listed above may be improved or eliminated. Always refer to the updated codes.

12
Chapter 2 Product Specification and
Configuration
This chapter explains the specification, name of each part and configuration of the welding power source.
2.1 Specification
This section explains the specification and external dimension of the welding power source.
2.1.1 Specifications
This section explains the specification of the welding power source.
Specification/
Number of phase/
Welding method
Welbee P400 II
Three phase Single phase
DC DC PULSE DC TIG DC STICK DC DC PULSE DC TIG DC STICK
Model WB-P402
Number of phase Three phase Single phase
Rated frequency 50/60 Hz
Rated input voltage 208/230 V 208/230 V
460 V 460 V
Input voltage range 208/230 V ± 10% 208/230 V ± 10%
460 V ± 10% 460 V ± 10%
Rated input 19.7 kVA, 18.1 kW (*1) 11.2 kVA 9.4 kW (*1)
20.8 kVA, 18.3 kW (*2) 13.8 kVA, 9.3 kW (*2)
Rated input current 54.0/49.5 A (*1) 53.6/48.8 A (*1)
26.1 A (*2) 30.0 A (*2)
Rated output current 400 A 300 A 250 A 200 A 250 A
Rated load voltage 34 V 26 V 32 V 26.5 V 24 V 20 V 30 V
Maximum no-load voltage (*3) 83/91 V (*1) 83/91 V (*1)
80 V (*2) 80 V (*2)
Rated duty cycle 60% 50% 60% 80% 60% 40% 60%
Number of welding condition 100
Temperature rise +320 °F (+160 °C)
Operating temperature range +14 to +104 °F (-10 to 40 °C)
Operating humidity range up to 50% at 104°F (40 °C), up to 90% at 68°F (20 °C)
Storage temperature range -4 to 131 °F (-20 to 55 °C)
Storage humidity range up to 50% at 104°F (40 °C), up to 90% at 68°F (20 °C)
External dimensions (W×D×H) 15.6" × 28.0" × 31.9" (395 mm × 710 mm × 810 mm) (w/o eyebolt)
Mass 176.4 lbs (80 kg)
Static characteristic Constant voltage
characteristic
Constant Current
characteristic
Constant voltage
characteristic
Constant Current
characteristic
IP Rating IP23
*1: Rated input voltage is 208/230 V.
*2: Rated input voltage is 460 V.
*3: In some countries, Maximum no-load voltage is also known as U0or OCV (see CAN/CSA-W117.2).

13
Chapter 2
Product Specification
and Configuration
SPECIFICATION
PRODUCT SPECIFICATION AND CONFIGURATION CHAPTER 2
2.1.2 Applicable welding method
This section explains the applicable welding method (shield gas/wire type/welding type) and wire diameter.
Standard specification
WELDING
METHOD GAS (*1) WIRE MATERIALS WIRE DIA. [in. (mm)] TRAVEL SPEED Penetration
adjustment
DC
CO2MILD STEEL .030/.035/.040/.045
(0.8/0.9/1.0/1.2) STANDARD (*2)/HIGH Enable
MAG (20 % CO2)
(*1-1)
MILD STEEL .030/.035/.040/.045
(0.8/0.9/1.0/1.2) STANDARD (*2)/HIGH Enable
MILD STEEL CORED .045(1.2) STANDARD (*2) Enable
METAL CORED .045(1.2) STANDARD (*2) Enable
STAINLESS CORED .045(1.2) STANDARD (*2) Enable
MIG (2 % O2)
(*1-2)
STAINLESS STEEL .030/.035/.040/.045
(0.8/0.9/1.0/1.2) STANDARD (*2)/HIGH Enable
STAINLESS FERRITE .030/.035/.040/.045
(0.8/0.9/1.0/1.2) STANDARD (*2)/HIGH Enable
MIG (100 % Ar)
(*1-3)
SOFT ALUMINUM .0451/16(1.2/1.6) STANDARD (*2)/HIGH -
HARD ALUMINUM .0451/16(1.2/1.6) STANDARD (*2)/HIGH -
Brazing CuSi .030/.035/.045
(0.8/0.9/1.2) STANDARD (*2)/HIGH -
Brazing CuAl .030/.035/.045
(0.8/0.9/1.2) STANDARD (*2)/HIGH -
DC
PULSE
MAG (20 % CO2)
(*1-1)
MILD STEEL .030/.035/.040/.045/.052
(0.8/0.9/1.0/1.2/1.4) STANDARD/HIGH Enable
METAL CORED .045(1.2) STANDARD Enable
MIG (2 % O2)
(*1-2)
STAINLESS STEEL (*3) .030/.035/.045
(0.8/0.9/1.2) STANDARD/HIGH Enable
STAINLESS FERRITE (*3) .030/.035/.045
(0.8/0.9/1.2) STANDARD/HIGH Enable
MIG (100 % Ar)
(*1-3)
SOFT ALUMINUM .0451/16(1.2/1.6) STANDARD/HIGH -
HARD ALUMINUM .0451/16(1.2/1.6) STANDARD/HIGH -
Brazing CuSi .030/.035/.045
(0.8/0.9/1.2) STANDARD/HIGH -
Brazing CuAl .030/.035/.045
(0.8/0.9/1.2) STANDARD/HIGH -
INCONEL .035/.045
(0.9/1.2) STANDARD/HIGH -
DC WAVE
PULSE
MAG (20 % CO2)
(*1-1) MILD STEEL .030/.035/.040/.045/.052
(0.8/0.9/1.0/1.2/1.4) STANDARD/HIGH -
MIG (2 % O2)
(*1-2)
STAINLESS STEEL (*3) .030/.035/.045
(0.8/0.9/1.2) STANDARD/HIGH -
STAINLESS FERRITE (*3) .030/.035/.045
(0.8/0.9/1.2) STANDARD/HIGH -
MIG (100 % Ar)
(*1-3)
SOFT ALUMINUM .0451/16(1.2/1.6) STANDARD/HIGH -
HARD ALUMINUM .0451/16(1.2/1.6) STANDARD/HIGH -
MS-MIG MIG (100% Ar)
(*1-3) HARD ALUMINUM 1/16 (1.6) STANDARD/HIGH -
DC TIG - - - - -
DC STICK - - - - -
*1: Note that the "collective" voltage adjustment may not meet the appropriate condition if a mixing gas other than those with the following
mixing ratios is used.
*1-1: MAG gas: Argon (Ar) 80 % + Carbon dioxide (CO2) 20 %
*1-2: MIG gas: Argon (Ar) 98 % + Oxygen (O2) 2 %
*1-3: MIG gas: Argon (Ar) 100 %
*2: For "STANDARD" mode, the standard mode or extended cable mode (extended mode of power cable) is available.
( 6.7.2.1 F1: Standard/Extended cable mode)
*3: Two types of welding performances can be selected. ( 6.7.2.18 F22: SUS EX pulse switching)
*4: This mode is suitable for welding hard aluminum medium-thickness plates.

SPECIFICATION
PRODUCT SPECIFICATION AND CONFIGURATION
CHAPTER 2
14
2.1.3 External dimensions
This section explains the external dimensions of the welding power source.
2.1.4 Rated duty cycle
This section explains the rated duty cycle of the welding power source.
CAUTION
• Use this welding power source at or under the rated duty cycle.
Exceeding the rated duty cycle may result in deterioration and damage to the welding
power source.
• Periodically blow moisture-free compressed air to clean dust and dirt accumulated on
the transistor and radiation fin of the diode.
If dust and dirt accumulate on the radiation fin, it may not only reduce the duty cycle
but also result in degradation or burnout of the welding power source.
• The rated duty cycle of the welding power source is the following:<Operation cycle at duty cycle of 60 %>
400 A 60% (for DC, DC TIG, three phase)
400 A 50% (for DC PULSE, three phase)
300 A 80% (for DC STICK, three phase)
250 A 60% (for DC, DC TIG, DC STICK, single phase)
200 A 40% (for DC PULSE, single phase)
(Rated duty cycle of 60% means the power source must be rested
for 4 minutes after 6 minutes of continuous welding at the rated
current.)
• Use the welding power source within its usable range by observing
the duty cycle for the welding current.
• Use the welding power source within the lowest rated duty cycle of
combined accessories such as welding torches.
18.1" (460 mm) 3.9" (100 mm)
28.0" (710 mm)
31.9" (810 mm)
15.6" (395 mm)
12.6" (320 mm)
Energized Stop
6 minutes 4 minutes
10 minutes

15
Chapter 2
Product Specification
and Configuration
SPECIFICATION
PRODUCT SPECIFICATION AND CONFIGURATION CHAPTER 2
<Relationship between welding current and duty cycle>
100
80
50
0
100
200
300
250
࠙DC STICK, three phaseࠚ
Usable range
Duty cycle (%)
Welding current (A)
100
50
40
0
100
100
126
200
Usable range
Welding current (A)
)%
(e
l
c
ycytuD
࠙DC PULSE, single phaseࠚ
60
100
50
0
100
194
250
Usable range
Welding current (A)
)%(e
l
cy
c
y
t
uD
࠙DC/DC TIG/DC STICK, single phaseࠚ
100
50
0
100
200
283
400
Usable range
Welding current (A)
)%(
elcyc
ytu
D
࠙DC PULSE, three phaseࠚ
60
100
50
0
100
200
310
400
Usable range
Welding current (A)
)%(elcy
cytuD
࠙DC/DC TIG, three phaseࠚ

PRODUCT CONFIGURATION
PRODUCT SPECIFICATION AND CONFIGURATION
CHAPTER 2
16
2.2 Product Configuration
This section explains the standard or optional composition of the welding power source and parts to be prepared by
customers.
2.2.1 Standard composition
This section explains the standard composition of the welding power source.
For equipment used in combination with the welding power source connected to robot, refer to the instruction manual of
the robot controller.
• When air-cooled welding torch is used
CAUTION
• Use this welding power source in combination with the specified wire feeder.
Connecting to any equipment other than specified may cause failure of the welding
power source.
No. Name Required
component
Optional
accessories Remarks
1 Gas regulator To be prepared by the customer.
(2.2.3
-Accessory (not supplied))
2 Wire feeder 㾎
3Weldingtorch 㾎
4 Gas hose [10 ft (3 m)] 㾎(*1) Included in feeder
5 Control cable for wire feeder [5 ft (1.5 m)] 㾎(*1) Included in feeder
6 Power cable for torch side 㾎(*1)
7 Power cable for base metal side 㾎(*1)
8Shieldgas To be prepared by the customer.
(2.2.3
-Accessory (not supplied))
9 Digital remote control (optional) 㾎E-2454 ( 2.2.4-Optional accessories)
10 Analog remote control [10 ft (3 m)] (optional) 㾎K5804S00 (*1)
*1: Optional extension cable and hose [16 ft/33 ft/50 ft/66 ft (5 m/10 m/15 m/20 m)] are also available.
(2.2.4
-Optional accessories)
6
7
10
5
2
4
1
8
3
9
Base metal
Welding power source
Ground a base metal if
required by local law.

17
Chapter 2
Product Specification
and Configuration
PRODUCT CONFIGURATION
PRODUCT SPECIFICATION AND CONFIGURATION CHAPTER 2
•AtTIGwelding:
TIPS
• The TIG valve kit, which is an optional accessory item, enables you to lay piping in the
welding power source. When using this kit, turn ON F81. ( 6.7.2.55 F81: TIG Mode torch
switch setting)
• For the procedure for installing the TIG valve kit (optional accessory) to the welding power
source, refer to the instruction manual of the TIG valve kit. Connect the kit to the torch as
shown in the following figure.
No. Name Required
component
Optional
accessories Remarks
1 Gas regulator To be prepared by the customer.
(2.2.3
-Accessory (not supplied))
2Weldingtorch
3 Gas hose [10 ft (3 m)] 㾎(*1) Included in feeder (*2)
4 Power cable for base metal side 㾎(*1) Included in feeder
5Shieldgas To be prepared by the customer.
(2.2.3
-Accessory (not supplied))
6 Digital remote control (optional) 㾎E-2454 (*1)
7 Analog remote control [10 ft (3 m)] (optional) 㾎K5804S00 (*1)
8TIG valve kit (optional) 㾎K8197A00
9Analog foot control (optional) 㾎KM3022
*1: Optional extension cable and hose [16 ft/33 ft/50 ft/66 ft (5 m/10 m/15 m/20 m)] are also available.
( 2.2.4-Optional accessories)
*2: The TIG valve kit, which is an optional accessory item, enables you to lay piping in the welding power source.
( 2.2.4-Optional accessories)
4
7
3
1
2
6
Base metal
5
8 9
Welding power source
TIG valve kit

PRODUCT CONFIGURATION
PRODUCT SPECIFICATION AND CONFIGURATION
CHAPTER 2
18
• At DC STICK welding:
2.2.1.1 Wire feeder and welding torch
Wire feeder and welding torch are provided as standard component of the welding power source. Refer to the instruction
manuals for details.
2.2.2 Accessory (supplied)
The section explains the accessories for the welding power source. Check for the warranty, instruction manual (this
publication), and the quantity of parts when opening the package.
No. Name Required
component
Optional
accessories Remarks
1 Welding electrode holder To be prepared by the customer.
(2.2.3
-Accessory (not supplied))
2Power cable for welding electrode holder [AWG2
(38mm2-) or more] 㾎
3 Power cable for base metal side 㾎(*1)
4 Digital remote control (optional) 㾎E-2454 (*1)
5 Analog remote control [10 ft (3 m)] (optional) 㾎K5804S00 (*1)
*1: Optional extension cable and hose [16 ft/33 ft/50 ft/66 ft (5 m/10 m/15 m/20 m)] are also available.
(2.2.4
-Optional accessories)
4
5
2
3
1
Base metal
Welding power source
Table of contents
Other OTC Welding System manuals

OTC
OTC Welbee M350L II User manual

OTC
OTC CPTX 450-2w Synergy User manual

OTC
OTC DP-400 User manual

OTC
OTC HR 22 User manual

OTC
OTC Synergy CPTX 400 User manual

OTC
OTC MTX-3531 User manual

OTC
OTC Welbee P400L II User manual

OTC
OTC CPTX 270 User manual

OTC
OTC DTX-2200 AC/DC User manual

OTC
OTC Welbee M350 II User manual