INS130059 REV031213
Français Lampe de Bureau Articulée de 13w
Español Lámpara de Escritorio Articulada de 13w
100 % ENCHANTÉS... C’EST GARANTI!
Fantastique, vous êtes le nouveau propriétaire d’un produit
OttLite. Sachez qu’il est très important pour nous que vous
soyez 100 % satisfait de nos produits, et ce, dès le premier
jour et pour longtemps! Voilà pourquoi nous vous prions de
l’enregistrer à l’aide du Formulaire d’enregistrement de
produit ci-joint. Vous pouvez aussi le faire en ligne au
warranty.ottlite.com. Ainsi, s’il arrive quoi que ce soit
à votre produit OttLite, nous pourrons vous aider en deux
temps trois mouvements!
AVERTISSEMENT: Pour éviter les chocs électriques,
assurez-vous que la lampe ne soit pas branchée avant
d’avoir effectué toutes les étapes de montage.
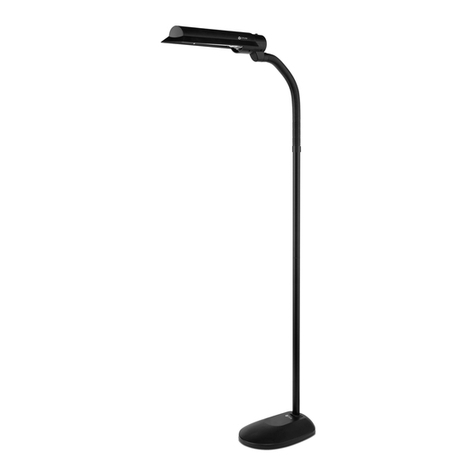
ASSEMBLAGE DE LA LAMPE
1. Déballez la lampe entièrement assemblée et l’ampoule
empaquetée individuellement
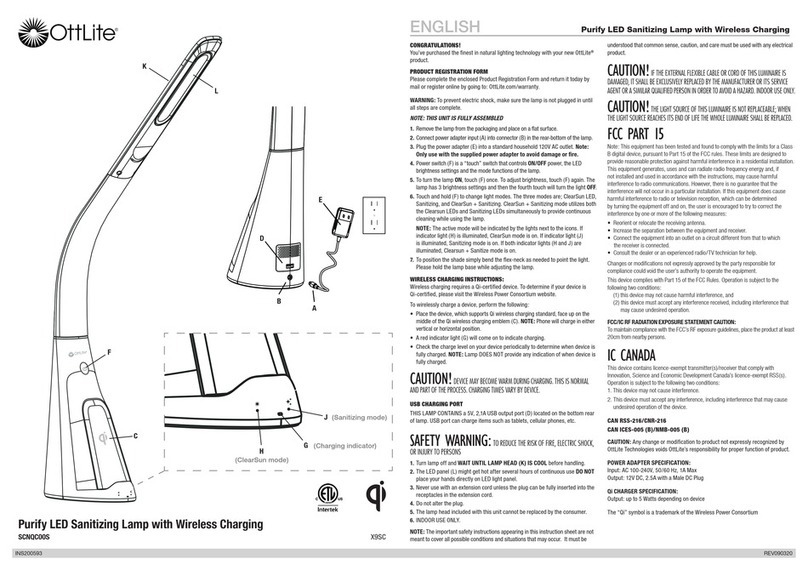
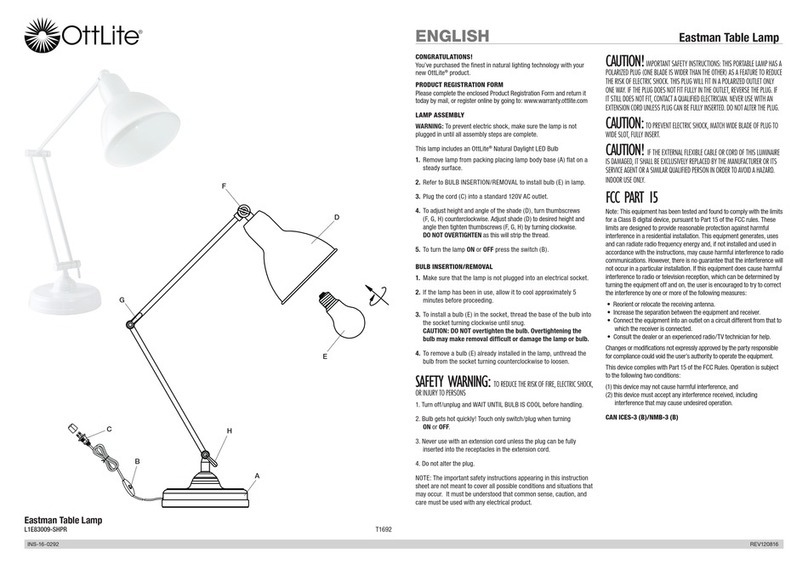
2. Placez la lampe en mettant la base (A) à plat sur une
surface plane.
3. Installez l’ampoule (G). Se référer au DÉMONTAGE/
INSERTION DE L’AMPOULE.
4. Branchez la lampe dans une prise murale standard de
120 V.
5. Pour allumer ou éteindre la lampe, presser simplement le
bouton de I’interrupteur au pied (H).
6. Pour monter ou descendre l’abat-jour (F), desserrez la
vis à oreille (D) en tournant dans le sens antihoraire,
repositionnez l’abat-jour (F), puis resserrez la vis à oreille
(D) en tournant à la main dans le sens horaire jusqu’au
serrage complet. Pour en faciliter le mouvement, tenez
l’abat-jour par le haut (E) et bougez-le doucement.
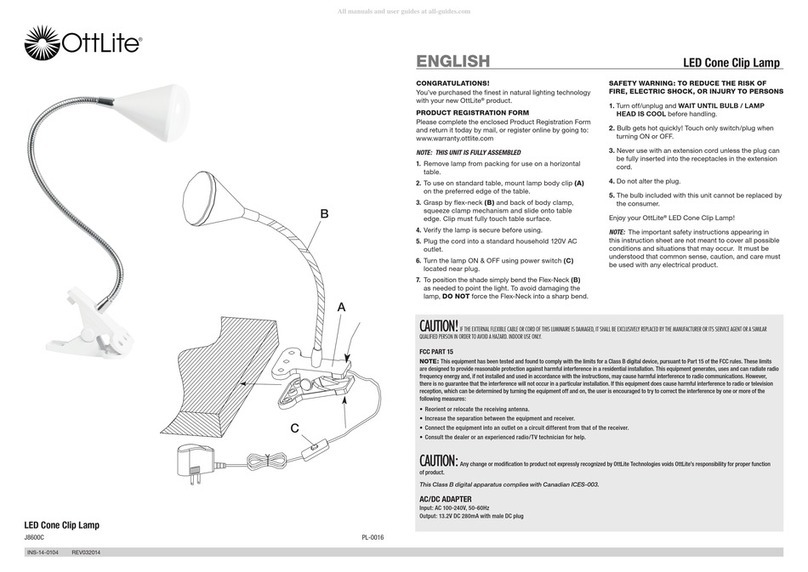
7. Pour modifier la position du corps de la lampe, bougez
le bras du haut (C). Desserrez la vis à oreille (B) en
tournant dans le sens antihoraire, repositionnez le
bras du haut (C), puis resserrez la vis à oreille (B) en
tournant à la main dans le sens horaire jusqu’au serrage
complet. REMARQUE: Le mouvement du bras du haut
(C) est limité tel qu’illustré sur le diagramme, Figure 1.
NE PAS tenter de bouger le bras au-delà de la position
représentée par la Figure 2 sur le diagramme sinon la
lampe pourrait basculer.
8. NE PAS essayer de faire pivoter l’abat-jour de côté, car
cela pourrait endommager la lampe.
DÉMONTAGE/INSERTION DE L’AMPOULE
1. Assurez-vous que la lampe n’est pas branchée dans une
prise de courant électrique.
2. Si la lampe a été utilisée, laissez-la refroidir pendant
environ 5 minutes avant de continuer.
3. Pour installer une ampoule (G) dans la douille,
tenez fermement l’ampoule (G) près de la base, placez-
la pour que les broches de l’ampoule soient alignées avec
les petits trous de la douille et poussez l’ampoule dans la
douille jusqu’à ce qu’elle « s’enclenche » en position.
4. Pour retirer une ampoule (G) installée dans
la lampe, tenez l’ampoule fermement par la base et,
en l’oscillant légèrement, exercez une traction sur
l’ampoule. NE PAS tordre ou tourner la partie en verre
de l’ampoule. PRENEZ GARDE à ce que la l’ampoule ne
frappe pas l’abat-jour.
Veuillez noter qu’une fois en marche, l’intensité des
tubes OttLite®ne peut pas être réglée.
Profitez de votre Lampe de Bureau
Articulée de 13w !
Ce système d’éclairage est conçu uniquement pour être
utilisé avec les ampoules OttLite type
K
(numéro de
style SB13-K). L’utilisation d’autres produits annule la
garantie et pourrait endommager le système d’éclairage.
Pour plus d’information sur l’achat d’ampoules ou de tubes de
remplacement, visiter le www.OttLite.com/replacement13wtube
ATTeNTION! Si le câble ou le cordon souple externe
de ce lampadaire est endommagé, celui-ci doit être remplacé
exclusive-ment par le fabricant, son agent de service ou toute
personne compétente afin d’éviter tout danger. Pour usage à
l’intérieur seulement.
ATTeNTION! Pour éviter les chocs électrique,
insérez le bout large de la fiche dans la grande fente et poussez
jusqu’au bout.
AVerTIssemeNT! ImpOrTANTes
DIreCTIVes De sÉCUrITÉ:
Cette lampe portative est munie d’une fiche polarisée (une lame
plus large que l’autre). Ce dispositif de sécurité diminue le risque
de chocs électriques puisque la fiche ne s’insère dans la prise que
d’un seul côté. Si elle n’entre pas dans la prise, inversez-la. Si elle
n’entre toujours pas, contactez un électricien qualifié. N’utilisez
jamais avec une rallonge sauf si la fiche s’insère entièrement. Ne
modifiez pas ce dispositif de sécurité.
Ce produit est conforme à la partie 18 des règles de la
Commission fédérale des communications (FCC) des États-
Unis, mais il pourrait causer de l’interférence aux radios, aux
télévisions, aux téléphones sans fil et aux télécommandes.
Éviter de placer le produit à proximité de ces appareils. Si des
interférences se produisent, éloigner le produit de l’appareil ou
le brancher dans une autre prise de courant. Ne pas installer le
produit à proximité de matériel de sécurité maritime ou de tout
autre matériel essentiel à la navigation ou à la communication
fonctionnant entre 0,45 et 30 MHz.
TU SATISFACCIÓN AL 100%.
GARANTIZADA.
Acabas de comprar tu nuevo producto OttLite – ¡excelente!
Para nosotros es importante que estés completamente
feliz con nuestros productos desde el primer día. Registra
tu producto con el formulario de registro adjunto o en línea
en: warranty.ottlite.com, y si algo le sucede a su OttLite,
podremos ayudarte inmediatamente.
ADVERTENCIA: Para prevenir un choque eléctrico,
cerciórese de que la lámpara no se conecte hasta que se
complete el ensamblaje y todos los pasos.
ENSAMBLAJE DE LÁMPARA
1. Desempaque la lámpara ya ensamblada y el bombillo.
2. Coloque la lámpara con su base (A) sobre una
superficie firme y estable.
3. Instale el bombillo (G). Consulte las instrucciones para
la INSTALACIÓN/RETIRO del bombillo.
4. Enchufe el cable en un tomacorriente estándar de 120v.
5. Para encender o apagar la lámpara, haga girar el
interruptor (H) en la direción de las manecillas del reloj.
6. Para ajustar la pantalla (F) hacia arriba o abajo, afloje
la tuerca (D) girándola en la dirección contraria a las
manecillas del reloj, mueva la pantalla (F) y apriete la
tuerca (D) en la dirección de las manecillas del reloj.
Para mover la pantalla, sujétela por su parte superior
(E) y muévala delicadamente.
7. Para ajustar la posición de la lámpara, mueva el
brazo superior (C). Afloje la tuerca (B) en la dirección
contraria a las manecillas del reloj, coloque el brazo (C)
en la posición deseada y apriete a mano la tuerca (B)
en la dirección de las manecillas del reloj. ATENCIÓN:
el movimiento del brazo superior (C) se limita a la
posición que muestra la Figura 1. NO intente mover el
brazo más allá de la posición en la Figura 2, debido a
que la lámpara pudiera volcarse.
8. NO intente mover la pantalla hacia los lados, pues
podría dañar la lámpara.
INSTALACIÓN/REEMPLAZO DE BOMBILLO
1. Cerciórese de que la lámpara no esté enchufada en un
tomacorriente.
2. Si la lámpara estuvo recientemente encendida, déjela
enfriarse durante aproximadamente 5 minutos antes de
continuar.
3. Para instalar el bombillo (G) dentro del
portalámpara, sujete el bombillo (G) firmemente cerca
de la base, alinee la base del bombillo y las clavijas con
el portalámpara y los agujeros, empújelo derecho hacia
el portalámpara hasta que “encaje” en su lugar.
4. Para retirar el bombillo (G) ya instalado en la
lámpara, sujételo firmemente por su base y con un leve
movimiento de oscilación hálelo del portalámpara. No
tuerza el bombillo mientras lo retira del portalámpara.
NO permita que el bombillo golpee la pantalla.
Por favor tenga en cuenta que durante la operación, los
tubos OttLite®no son graduables.
¡Disfrute su Lámpara de Escritorio
Articulada de 13w!
Este sistema de iluminación está diseñado para ser
utilizado únicamente con tubos OttLite tipo K(estilo
número SB13-K). El uso de otros productos anula la
garantía y pudiera resultar en daños al sistema de
iluminación.
Pour plus d’information sur l’achat d’ampoules ou de
tubes de remplacement, visiter le www.OttLite.com/
replacement13wtube
¡preCAUCIÓN!
Si el cable o cordón flexible
externo de esta luminaria está dañado, debe ser exclusivamente
reemplazado por el fabricante o su agente de servicio o una
persona calificada similar a fin de evitar un riesgo. Sólo para
uso en interiores.
¡preCAUCIÓN!Para prevenir una descarga
eléctrica, haga coincidir la pata ancha del enchufe con la ranura
ancha, inserte totalmente.
¡preCAUCIÓN! INsTrUCCIONes
De seGUrIDAD ImpOrTANTes:
Esta lámpara portátil tiene un enchufe polarizado (una de sus
patas es más ancha que la otra) como caracteristica para reducir
el riesgo de una descarga eléctrica. Este enchufe encajará en
cualquier tomacorriente polarizado solo de una manera. Si el
enchufe no calza completamente en el tomacorriente déle la
vuelta. Si aún no encaja, póngase en contacto con un electricista
calificado. Nunca utilice una extensión a no ser que el enchufe
pueda ser totalmente insertado. No altere el enchufe.
Este producto cumple con la Parte 18 del Reglamento de la
FCC, pero puede causar interferencias en radios, televisores,
teléfonos inalámbricos y controles remotos. Evite colocar este
producto cerca de estos dispositivos. En caso de interferencia,
mueva el producto lejos del dispositivo o enchúfelo en otro
tomacorriente. No instale este producto cerca de equipos de
seguridad marítima o equipos críticos para la navegación o la
operación de comunicaciones entre 0,45 y 30 MHz.
