manuals.online logo
Brands
  1. Home
  2. •
  3. Brands
  4. •
  5. OVE
  6. •
  7. Indoor Furnishing
  8. •
  9. OVE MIAMI User manual

OVE MIAMI User manual

1-Piece inatable pool oat / Flotteur gonable 1-pièce / Flotador inable 1-pieza
MIAMI
Assembly Instructions
Instructions d’assemblage
Instrucciones de ensamble
MADE IN CHINA / FABRIQUÉ EN CHINE / HECHO EN CHINA2017-01-03
Questions, problèmes ou pièces manquantes?
Avant de retourner le produit à votre détaillant, contactez
notre service à la clientèle au
1-866-839-2888
du lundi au vendredi de 8 h à 17 h HNE
(Canada et États-Unis seulement)
Représentants disponibles en Anglais et Français
Questions, problems, missing parts?
Before returning to your retailer, call our customer service
department at
1-866-839-2888
8 a.m. - 5 p.m., EST, Monday - Friday
(Canada and United States only)
English and French speaking representatives available
Preguntas, problemas, piezas faltantes?
Antes de volver a la tienda, llame a nuestro
departamento de servicio al cliente al
1-866-839-2888
8 am. – 5 pm., HDE, Lunes a Viernes
(Canadá y Estados Unidos solamente)
Representantes disponibles para inglés y francés
HEAD OFFICE / SIÈGE SOCIAL / OFICINA PRINCIPAL
2800 Etienne Lenoir, Laval
Québec H7R 0A3 Canada
This item is intended for outdoor domestic use only. Not for commercial use.
Cet article est destiné à un usage domestique extérieur uniquement. Non pour un usage commercial.
Este artículo es para uso doméstico en exteriores solamente. No es para uso comercial.
E F S
p.1
Item / Pièce / Articulo QTY
QTÉ
CANT
A
Cover / Revêtement / Cobertor
1
B
Body liner / Gaine gonable du bas / Cuerpo del otador
1
C
Armrest liner / Gaine gonable d’accoudoir / Flotador del brazo
2
D
Pump adaptor / Adaptateur pour pompe / Adaptador de la bomba
1
PARTS / PIÈCES / PIEZAS
1
Unscrew the top part to inate.
Dévisser la partie du dessus pour
goner.
Si quiere inarlo, desenrosque la parte
de arriba.
Unscrew the bottom part to deate.
Dévisser la partie du dessous pour
dégoner.
Si quiere desinarlo, desenrosque la
parte de abajo.
DO NOT USE SHARP OBJECTS!
1. Open the package that containing the cover and the
inatable cushions. Unfold the cover. Take special note that
there are two parts to the black valve. The top part is to
inate and the bottom part is to deate.
NE PAS UTILISER D’OBJET TRANCHANTS
1. Ouvrir le paquet contenant le revêtement et les coussins
gonables. Déplier le revêtement. Veuillez noter qu’il y a
deux parties à la valve noire. La partie du dessus sert à
goner et celle du dessous sert à dégoner.
NO UTILICE OBJETOS CORTOPUNZANTES!
1. Abra el paquete que contiene el cobertor y los cojines
inables. Extienda el cobertor. Tengo en cuenta de que hay
dos partes de la válvula negra. La parte de arriba es para
inar y la parte de abajo es para desinar.
ASSEMBLY / ASSEMBLAGE / ENSAMBLE
p.2
ASSEMBLY / ASSEMBLAGE / ENSAMBLE
4
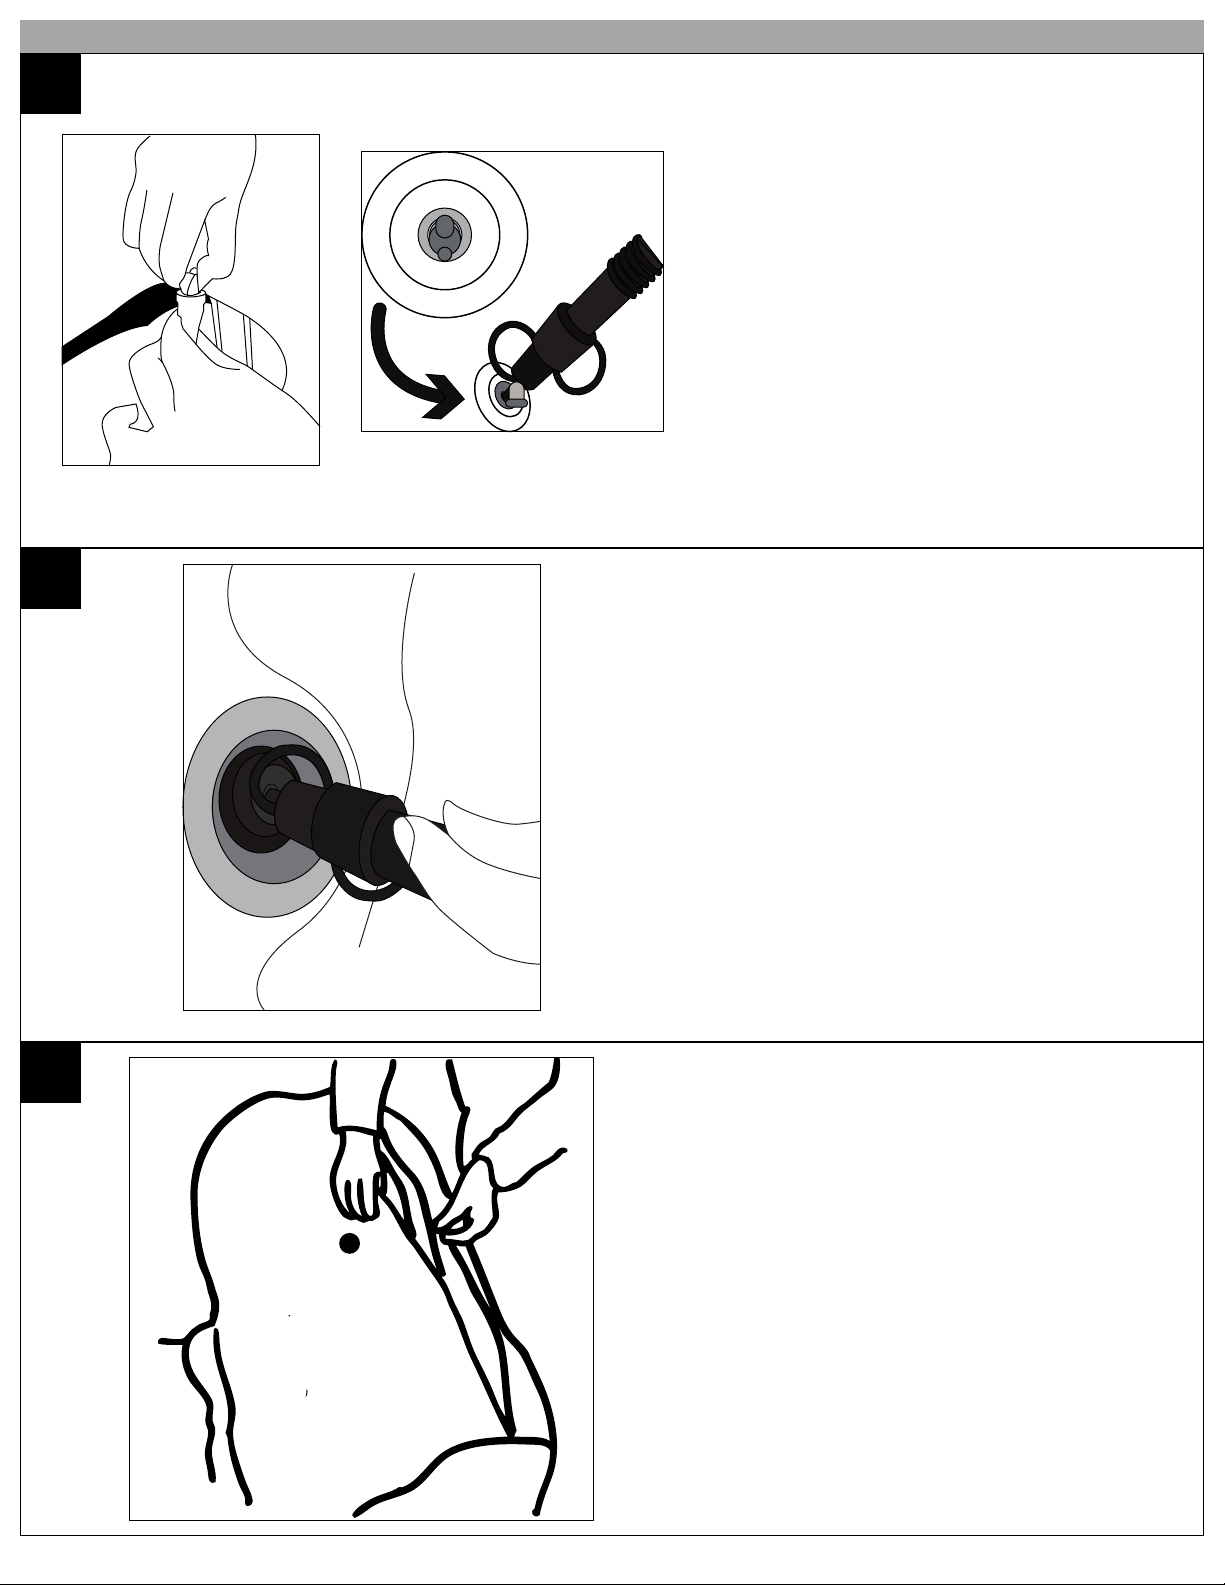
22. Locate the transparent valve of the safety liner.
Choose a suitable adaptor that will t your pump and the valve.
Insert and push the adaptor to transparent valve to inate.
Inate to 80% of capacity. The safety liner ensures that the product
still oats if the main liner is punctured.
2. Situer la valve transparente de la gaine gonable de sécurité.
Veuillez choisir un adaptateur qui est compatible avec la pompe
et la valve. Insérer et pousser l’adaptateur pour goner. Goner
jusqu’à 80% de sa capacité. La gaine de sécurité assures que le
produit ottes si la gaine principale est percée.
2. Localice la válvula transparente del revestimiento de seguridad.
Escoja el adaptador adecuado para la bomba y la válvula.
Introduzca y empuje el adaptador a la válvula transparente para
inarlo.
La capacidad para inar es del 80%. El revestimiento de seguridad
asegura que el producto seguirá otando aunque el revestimiento
de seguridad se encuentre perforado.
33. Align the black valve to the designated hole in the pool oat
cover. Unscrew the top part, insert a suitable adaptor and inate
the oat to 80% of its capacity. Screw back the valve tightly to
ensure no air leakage.
3. Aligner la valve noire avec le trou dans le revêtement du otteur
pour piscine. Dévisser légérement la parite du dessus, insérer un
adaptateur compatible et goner le otteur à 80% de sa capacité.
Revisser la valve fermement pour éviter toutes fuites d’air.
3. Alinee la válvula negra con el agujero que le corresponde en la
cubierta del otador de la piscina. Desenrosque la parte de arriba,
inserte el adaptador adecuado y comience a inar el otador
hasta el 80% de su capacidad. Enrosque nuevamente la válvula
y apriete fuertemente para asegurarse de que no hayan fugas de
aire.
4. If the product feels uneven, simply hold up the cover and give
it a good shake until the liner snuggly ts into the cover. Finally,
close the Velcro tightly.
Repeat steps #2 to #4 for all the liners.
4. Si le produit est inégal, veuillez simplement agiter fermement
jusqu’à ce que la gaine soit bien ajustée dans le revêtement.
Répéter les étapes #2 à #4 pour toutes les gaines gonables.
4. Si el producto se siente irregular, simplemente sostenga la
cubierta y dele una fuerte sacudida hasta que el revestimiento
se ajuste perfectamente al cobertor. Finalmente cierre el Velcro
fuertemente.
Repita el paso #2 y el paso #4 para cada revestimiento.
p.3
ASSEMBLY / ASSEMBLAGE / ENSAMBLE
55. For the armrests: Insert the armrest liners into the armrest
covers. Inate the armrest liners following the previous instructions.
Once inated, push back the inated liners inside the covers and
close the Velcro tightly.
5. Pour les accoudoirs: Insérer les gaines gonables dans les
revêtements d’accoudoirs. Goner les gaines des accoudoirs en
suivant les instructions précédentes. Une fois gonées, pousser
les gaines gonées à l’intérieur des revêtements et refermermer
le velcro fermement.
5. Para el otador del brazo: Inserte los otadores de los brazos
adentro de los cobertores de los brazos. Ine los otadores
de los brazos siguiendo las siguientes instrucciones. Una vez
inados, empuje hacia atrás los otadores inados adentro de los
cobertores y cierre el Velcro fuertemente.
WARNING / ATTENTION / ADVERTENCIA
• Make sure you are centered when sitting on your pool oat. If it feels unstable, let out a small amount of air until it feels comfortable.
• The oat is not a life saving device and is not intended to protect from drowning.
• Do not leave the oat in a swimming pool during any chemical treatments, including super-chlorination.
• In order to prolong the life of oat, do not leave it in direct sunlight / moonlight when not in use. Make sure deate the oat if not to use it for
an extended period of time and store it in a dry place. Prolonged exposure to sunlight and chemicals will eventually accelerate the natural and
irreversible discoloration of the cover.
• Assurez-vous d’être au centre lorsque vous vous assoyez sur votre otteur pour piscine. Si le otteur sembles instable, laisser sortir un peu d’air
jusqu’à ce que vous soyez confortable.
• Le otteur n’est pas un dispositif de sauvetage et n’est pas conçu pour prévenir la noyade.
• Ne pas laisser le otteur dans la piscine lorsque des traitements chimiques (incluant super chloration) sont en cours .
• Pour prolonger la vie du otteur, veuillez ne pas le laisser à la lumière direct du soleil ou de la lune lorsqu’il n’est pas en cours d’utilisation.
Assurez-vous de le dégoner si il n’est pas utiliser pour une période de temps prolongée. Une exposition prolongée au soleil et au produits
chimiques accéléreras la décoloration naturelle et irréversible du revêtement.
• Asegúrese de estar sentado en el centro cuando se encuentre en el otador de la piscina. Si se siente inestable, deje salir un poco de aire hasta
que se sienta conforme.
• El otador no es un producto salvavidas ni tampoco está diseñado para evitar ahogarse.
• No deje el otador adentro de la piscina durante cualquier tratamiento químico, incluyendo la súper-cloración.
• Para prolongar la vida del otador, no lo deje expuesto a la luz solar o a la luz lunar cuando no está en uso. Asegúrese de desinarlo si no lo
va a usar durante un período largo de tiempo y guárdelo en un lugar seco. La exposición a la luz solar y a productos químicos acelerará de
decoloración natural e irreversible del cobertor. p.4
CARE AND MAINTENANCE / ENTRETIEN ET MAINTENANCE / CUIDADO Y MANTENIMIENTO
FOR DOMESTIC USE ONLY
MAINTENANCE - Clean your oat with a
sponge and soapy water. Avoid any harsh
cleaning products such as bleaches or acidic
cleaners.
SÓLO PARA USO DOMÉSTICO
MANTENIMIENTO - Limpie el otador con una
esponja, agua y jabón. Evite cualquier producto
fuerte como blanqueadores o limpiadores.
POUR USAGE DOMESTIQUE SEULEMENT
ENTRETIEN - Nettoyer le otteur avec une
éponge et de l’eau savonneuse. Éviter les
produits nettoyants dur tel que les nettoyants
acide et les javellisants.
MADE IN CHINA / FABRIQUÉ EN CHINE / HECHO EN CHINA p.5
HEAD OFFICE / SIÈGE SOCIAL / OFICINA PRINCIPAL
2800 Etienne Lenoir, Laval
Quebec H7R 0A3 Canada
Customer service / Service à la clientèle / Service al cliente
Tel.: 1-866-839-2888
Fax: 1-866-922-9990
[email protected]
www.ovedecors.com
8:00 am - 5:00 pm E.S.T Monday - Friday
8 h à 17 h HNE, du lundi au vendredi
8 h a 17 h HDE, de lunes a viernes
English and Frenchspeaking representatives available
Représentants disponibles en Anglais et Français
Representantes disponibles para inglés y francés
(Canada and United States only)
(Canada et États-Unis seulement)
(Canadá y Estados Unidos solamente)
IMPORTANT: RETAIN FOR FUTURE REFERENCE, READ
CAREFULLY BEFORE ASSEMBLY.
IMPORTANT : CONSERVER POUR CONSULTATION
FUTURE, LIRE AVEC ATTENTION AVANT L’ASSEMBLAGE.
IMPORTANTE: LO GUARDE PARA FUTURAS CONSULTAS,
LEA DETENIDAMENTE ANTES DEL MONTAJE.
p.6

This manual suits for next models

1

Other OVE Indoor Furnishing manuals

OVE NELLY 36 User manual

OVE

OVE NELLY 36 User manual

OVE CHARLES 24 User manual

OVE

OVE CHARLES 24 User manual

OVE MR 24X31 User manual

OVE

OVE MR 24X31 User manual

OVE MAX 60 User manual

OVE

OVE MAX 60 User manual

OVE WALTER 72 User manual

OVE

OVE WALTER 72 User manual

OVE SANTA FE 40 User manual

OVE

OVE SANTA FE 40 User manual

OVE RACHEL 36 User manual

OVE

OVE RACHEL 36 User manual

OVE 1902418 User manual

OVE

OVE 1902418 User manual

OVE OLLIE 30 User manual

OVE

OVE OLLIE 30 User manual

OVE KEVIN 24 User manual

OVE

OVE KEVIN 24 User manual

OVE TAHOE VI 60 User manual

OVE

OVE TAHOE VI 60 User manual

OVE MALIBU 60 User manual

OVE

OVE MALIBU 60 User manual

OVE LAYLA 24 User manual

OVE

OVE LAYLA 24 User manual

OVE OJV-68 User manual

OVE

OVE OJV-68 User manual

OVE ZAYDEN 40 User manual

OVE

OVE ZAYDEN 40 User manual

OVE MARLEY 47 User manual

OVE

OVE MARLEY 47 User manual

OVE KEVIN 60 User manual

OVE

OVE KEVIN 60 User manual

OVE TRENT 60 User manual

OVE

OVE TRENT 60 User manual

OVE NAVATA 24 User manual

OVE

OVE NAVATA 24 User manual

OVE LORENZON 30MB User manual

OVE

OVE LORENZON 30MB User manual

OVE TAHOE 48 User manual

OVE

OVE TAHOE 48 User manual

OVE DENVER 24 User manual

OVE

OVE DENVER 24 User manual

OVE PAULITA 60 User manual

OVE

OVE PAULITA 60 User manual

OVE MIO VIII OVEL-092 User manual

OVE

OVE MIO VIII OVEL-092 User manual

Popular Indoor Furnishing manuals by other brands

Regency LWMS3015 Assembly instructions

Regency

Regency LWMS3015 Assembly instructions

Furniture of America CM7751C Assembly instructions

Furniture of America

Furniture of America CM7751C Assembly instructions

Safavieh Furniture Estella CNS5731 manual

Safavieh Furniture

Safavieh Furniture Estella CNS5731 manual

PLACES OF STYLE Ovalfuss Assembly instruction

PLACES OF STYLE

PLACES OF STYLE Ovalfuss Assembly instruction

Trasman 1138 Bo1 Assembly manual

Trasman

Trasman 1138 Bo1 Assembly manual

Costway JV10856 manual

Costway

Costway JV10856 manual

moss DESIGN Caisson Credenza Assembly instructions

moss DESIGN

moss DESIGN Caisson Credenza Assembly instructions

Aquaglide FULL DECK 15.0 owner's manual

Aquaglide

Aquaglide FULL DECK 15.0 owner's manual

AREBOS AR-HE-SW30 user manual

AREBOS

AREBOS AR-HE-SW30 user manual

Till-Hilft Fulda 87005.330 Assembly instructions

Till-Hilft

Till-Hilft Fulda 87005.330 Assembly instructions

Twoey Outside 2010 quick start guide

Twoey Outside

Twoey Outside 2010 quick start guide

Hettich Easys 200 operating instructions

Hettich

Hettich Easys 200 operating instructions

The bedboss RELAX 404 Series owner's manual

The bedboss

The bedboss RELAX 404 Series owner's manual

Oeseder Möbelindustrie Bern 991 720 Assembly instructions

Oeseder Möbelindustrie

Oeseder Möbelindustrie Bern 991 720 Assembly instructions

Costway HW68469 user manual

Costway

Costway HW68469 user manual

Next ALIX A27743 Assembly instructions

Next

Next ALIX A27743 Assembly instructions

BROSA Hans Assembly guide

BROSA

BROSA Hans Assembly guide

Prodigg MINIKA PBA015T-FUR installation manual

Prodigg

Prodigg MINIKA PBA015T-FUR installation manual

manuals.online logo
manuals.online logoBrands
  • About & Mission
  • Contact us
  • Privacy Policy
  • Terms and Conditions

Copyright 2025 Manuals.Online. All Rights Reserved.