Overade OxiTurn User manual

130 mm
125 mm
Owner’s manual

130 mm
125 mm
Power
ON/OFF
NO OK
NO
NO
fig.1
fig.2

130 mm
125 mm
GARANTIE
Nous vous proposons d’enregistrer votre produit sur
notre site internet. Ceci vous permettra de recevoir
des promotions et d’activer plus facilement la garantie
si cela s’avérait nécessaire.
Comment faire?
1. Rendez sur www.overade.com/oxi-garantie
2. Renseignez le formulaire et validez
OR
fig.3 fig.4 fig.5
MODE LUMENS RUNTIME
1. Night Steady 9 16h
2. Day Steady 35 7.5h
3. Pulse 90 8h
4. Night Flash 9 21h
5. Day Flash 50 8h
6. Day Mode 0 +24h
fig.6
WARRANTY
We invite you to register your product on our website. This will permit you to receive
our latest deals and activate your product warranty more easily if needed.
How to register your product?
1. Go on www.overade.com/oxi-warranty
2. Fill in the online form
3. You’ll then receive a confirmation email including a welcome offer

130 mm
125 mm
COMMENT FIXER L’ECLAIRAGE?
L’éclairage OxiTurn se fixe sur la majorité des casques urbains grâce à son support magnétique (fourni dans la boîte),
et sur tout autre support (casques sportifs, vélos, trottinettes) grâce au kit de d’attaches supplémentaires disponible
sur notre site web (non-inclus).
Fixation du support magnétique : avant de coller celui-ci en retirant le film protecteur de l’adhésif, veillez à bien
nettoyer la surface d’accroche du casque à l’eau tiède uniquement. N’utilisez aucun solvant.
ATTENTION! Veillez à correctement positionner le support sur le casque car il ne pourra pas être enlevé, de sorte
que l’éclairage soit dans le bon sens (voir figure 1).
L’éclairage OxiTurn pourra ensuite être fixé sur son support (voir figure 2) et retiré à volonté.
PREMIERE UTILISATION.
Avant la première utilisation, chargez entièrement la batterie à l'aide du câble fourni et connecté à un chargeur USB
5V (voir figure 3). Un voyant rouge clignotant indique que l'éclairage est en charge. Le voyant clignotant devient
orange, si l’éclairage est à plus de 50% de capacité. Lorsque le voyant s’éteint, la batterie est entièrement chargée. Des
fixations élastiques sont fournies pour installer la télécommande OxiMote sur un guidon (voir figure 4). Choisissez
celles dont la longueur est la plus adaptée. Vous pouvez utiliser un ou deux élastiques, selon la forme du guidon. La
télécommande fonctionne avec une pile CR2032 déjà en place. Celle-ci peut être changée en enlevant les 3 vis à l'aide
d'un tournevis cruciforme (voir figure 5).
FONCTIONNEMENT.
Pour allumer l'éclairage OxiTurn, appuyez sur le bouton ON/OFF situé au centre de la face avant. Pour l’éteindre,
appuyez sur le bouton 2 secondes. Pour passer d’un mode lumineux à l’autre, une simple pression sur le bouton
ON/OFF suffit. Les puissances et autonomies de chaque mode sont indiquées figure 6. En mode 6 (Day Mode),
l’éclairage s’allume uniquement quand il est activé par l’OxiMote (fonction clignotant) ou par l’OxiBrake (avertisseur
de freinage).
Après avoir allumé ou éteint votre éclairage, le voyant de charge devient vert quelques secondes ou rouge lorsque le
niveau de la batterie est faible.
CLIGNOTANTS DE DIRECTION.
Les clignotants indiquant la direction s’activent grâce à la télécommande OxiMote. Lorsqu’un clignotant est activé, un
rappel sonore vous confirme son fonctionnement ainsi qu’un rappel lumineux sur l’OxiMote. Pour changer de son,
appuyer au moins 6 secondes sur le bouton ON/OFF lorsque l'éclairage OxiTurn est éteint. Un signal sonore indique
alors que le changement a été pris en compte. Pour désactiver le son répétez l'opération une seconde fois.
ATTENTION! L’utilisation de feux clignotants peut être règlementé selon les pays. Se conformer à la loi en vigueur.
PRECAUTIONS D’EMPLOI.
ATTENTION! Ce produit est un éclairage complémentaire, il ne peut se substituer à l'éclairage du véhicule défini par
le code de la route. Ne pas plonger le produit dans l’eau et ne pas démonter l'éclairage sous peine d’annulation de la
garantie. Ne pas jeter la batterie dans le feu (risque d’explosion).
ATTENTION! Ce produit et les batteries qu'il contient ne peuvent être jetés avec les déchets domestiques. Ils font
l'objet d'un tri sélectif et doivent être déposés dans un espace de collecte autorisé afin de les recycler.
FR

130 mm
125 mm
CONNECTION DES PRODUITS OXI ENTRE EUX
Les produits de la gamme Oxi peuvent être connectés ensemble 2 à 2 grâce à la procédure d’appairage
[A] décrite ci-dessous.
ATTENTION! L’OxiTurn et l’OxiMote présents dans l’emballage sont déjà connectés entre eux. Il n’est
donc pas nécessaire d’utiliser la procédure d’appairage. Utilisez cette procédure si vous souhaitez
connecter un produit Oxi supplémentaire ou si vous avez supprimé les appairages d’un produit Oxi.
[A]- APPAIRAGE DE L’ECLAIRAGE OXITURN AVEC L’OXIMOTE
*Si l’OxiTurn et l’OxiMote s’éteignent, recommencer l’opération.
* Si le bouton de l’OxiTurn s’allume alternativement en rouge et vert, ou si l’OxiMote s’allume en orange
et rouge à l’issue de l’appairage au lieu de s’allumer en continu, cela signifie qu’il ne peut plus être
appairé à des produits supplémentaires. Supprimer alors tous les appairages pour pouvoir en appairer un
nouveau (voir [C])
[B]- MULTI-APPAIRAGE
Pour connecter un OxiBrake ou un OxiMote supplémentaire à votre éclairage OxiTurn, répéter la procédure [A].
Pour connecter un éclairage OxiTurn supplémentaire à votre OxiMote, répéter la procédure [A].
Sur l’OxiTurn,
allumer l’éclairage en appuyant
sur le bouton et le relâcher
Appuyer et maintenir le bouton
(au moins 6s) jusqu’à ce que le
bouton clignote orange
Sur l’OxiMote,
appuyer et maintenir les 2
boutons (au moins 4s) jusqu’à
ce qu’ils clignotent orange
1 2 => Si l’appairage est effectué :
- le bouton de l’OxiTurn
s’allume en continu orange
quelques secondes
puis s’éteint
- les boutons de l’OxiMote
s’allument en continu
orange quelques secondes
puis s’éteignent
=> Autres cas*
3
2
1
3
FR

130 mm
125 mm
[C]- SUPPRESSIONDE TOUS LES APPAIRAGES SUR L’OXITURN
[D] - SUPPRESSION DE TOUS LES APPAIRAGES SUR L’OXIMOTE
GARANTIE.
Pour tous nos produits nous appliquons les délais de garantie légaux. Pour plus d'informations sur les conditions,
veuillez contacter votre revendeur local ou consulter notre site internet www.overade.com
Appuyer et maintenir les 2 boutons
(au moins 4s) jusqu’à ce qu’ils
clignotent orange (mode appairage)
Appuyer rapidement 2 fois sur le
bouton gauche et 2 fois sur le
bouton droit (dans les 4s)
Allumer l’OxiTurn en appuyant sur le
bouton
Appuyer et maintenir le bouton (au
moins 6s) jusqu’à ce que le bouton
clignote orange (mode appairage)
Appuyer 3 fois sur le bouton
rapidement (dans les 4s)
12
1 2 3
1
2
3
1
2
FR
=> Si les appairages
sont effacés :
- le bouton clignote
rapidement en vert
=> Si les appairages
sont effacés :
- les boutons
clignotent en
orange et rouge

130 mm
125 mm
HOW TO ATTACH THE DEVICE?
The OxiTurm light can be attached to the majority of urban helmets using the magnetic mount (supplied in the box),
and to any other support (sports helmets, bicycles, scooters) using the kit of additional fasteners available on our
website (not included).
Attaching the magnetic mount: before attaching the magnetic mount by removing the protective film from the
adhesive, make sure to clean the helmet's attachment surface with lukewarm water only. Do not use any solvents.
WARNING! Make sure that the magnetic mount is correctly positioned on the helmet as it cannot be removed, so
that the lighting is in the right (see figure 1).
The OxiTurn light can then be attached to the mount (see figure 2) and removed at will.
FIRST USE.
Before first use, fully charge the battery using the cable provided and connected to a 5V USB charger (see figure 3). A
flashing red light indicates that the light is charging. The flashing light will turn orange, if the light is at more than 50%
capacity. When the light turns off, the battery is fully charged. Elastic straps are provided for mounting the OxiMote
remote control on a handlebar (see figure 4). Choose the most suitable length. You can use one or two elastic bands,
depending on the shape of the handlebars. The remote control works with a CR2032 battery already in place. The
battery can be changed by removing the 3 screws with a screwdriver (see figure 5).
FUNCTIONNING.
To turn on the OxiTurn light, press the ON/OFF button located in the centre of the front panel. To turn it off, press the
button for 2 seconds. To switch from one light mode to another, simply press the ON/OFF button. The power and
operating times for each mode are shown figure 6. In Day Mode 6, the lighting only comes on when it is activated by
the OxiMote (turn signal) or by the OxiBrake (brake warning).
After switching your light on or off, the charge indicator turns green for a few seconds or red when the battery level is
low.
TURN SIGNALS.
The direction indicators are activated by the OxiMote remote control. When a turn signal is activated, an audible
reminder confirms that it is working, as well as an illuminated reminder on the OxiMote. To change the sound, press
the ON/OFF button for at least 6 seconds when the OxiTurn light is off. A sound signal indicates that the change has
been made. To deactivate the sound, repeat the operation a second time.
WARNING! The use of flashing lights may be regulated in some countries. Observe the applicable law.
PRECAUTIONS FOR USE.
WARNING! This product is a supplementary light, it cannot replace the vehicle lighting defined by the Highway Code.
Do not immerse the product in water and do not dismantle the light, as this will invalidate the warranty. Do not
dispose of the battery in fire (risk of explosion).
WARNING! This product and batteries it contains cannot be disposed of with household waste. They are subject to
selective sorting and must be deposited in an authorised collection area for recycling.
EN

130 mm
125 mm
CONNECTING OXI PRODUCTS TO EACH OTHER
The products of the Oxi range can be connected together 2 by 2 using the pairing procedure [A] described below.
WARNING! The OxiTurn and OxiMote in the package are already connected to each other. It is therefore not
necessary to use the pairing procedure. Use this procedure if you want to connect an additional Oxi product or if you
have deleted the pairings of an Oxi product.
[A]- PAIRING OXITURN LIGHT WITH OXIMOTE
*Repeat the pairing process if not successful.
*If the button on the OxiTurn lights up alternately in red and green, or if the OxiMote lights up in orange
and red after pairing instead of continuously, this means that it cannot be paired with additional
products. Delete all pairings to be able to pair a new one (see [C])
[B]- MULTI-PAIRING
To connect an additional OxiBrake or OxiMote to your OxiTurn lighting, repeat the procedure [A].
To connect an additional OxiTurn light to your OxiMote, repeat the procedure [A].
On OxiTurn light,
switch on the light by pressing
and releasing the button
Press and hold the button (at
least 6s) until the button flashes
orange
On OxiMote,
press and hold the 2 buttons (at
least 4s) until they flash orange
1 2 => If the pairing is successful :
- the light button lights up
continuously in orange for
a few seconds and then
turns off
- OxiMote buttons light up
continuously in orange for
a few seconds and then
turns off
=> Other cases*
3
2
1
3
EN

130 mm
125 mm
[C]- DELETING ALL PAIRINGS ON OXITURN LIGHT
[D] - DELETING ALL PAIRINGS ON OXIMOTE
WARRANTY.
We apply the legal warranty periods on all our products. For more information on terms and conditions,
please contact your local dealer or visit our website at www.overade.com
Press and hold the 2 buttons (at
least 4s) until they flash orange
(pairing mode)
Quickly press the left button
twice and the right button twice
(within 4s)
Switch on OxiTurn
by pressing
the button
Press and hold the button (at least
6s) until the button flashes orange
(pairing mode)
Press the button 3 times quickly
(within 4s)
12
1 2 3
1
2
3
1
2
EN
=> If pairings are
correctly deleted:
- the button flashes
rapidly in green
=> If pairings are
correctly deleted:
- buttons are
flashing in orange
and red

130 mm
125 mm
WIE WIRD DIE BELEUCHTUNG BEFESTIGT?
Die OxiTurn-Leuchte kann mithilfe der Magnethalterung (im Lieferumfang enthalten) an den meisten Helmen für den
Straßenverkehr und mithilfe der zusätzlichen Halterungen, die auf unserer Website erhältlich sind (nicht im Lieferumfang
enthalten), an allen anderen Helmen (Sporthelme, Fahrräder, Roller) befestigt werden.
Anbringen des Magnethalters: Bevor Sie den Magnethalter anbringen, indem Sie die Schutzfolie des Klebers abziehen,
sollten Sie die Oberfläche, an der der Helm befestigt wird, nur mit lauwarmem Wasser reinigen. Verwenden Sie keine
Lösungsmittel. ACHTUNG! Achten Sie darauf, dass die Halterung richtig auf dem Helm positioniert ist, da sie nicht entfernt
werden kann, und dass die Beleuchtung in die richtige Richtung zeigt (siehe Abbildung 1).
Die OxiTurn-Leuchte kann dann an ihrer Halterung (siehe Abbildung 2) befestigt und nach Belieben abgenommen werden.
ERSTMALIGER GEBRAUCH.
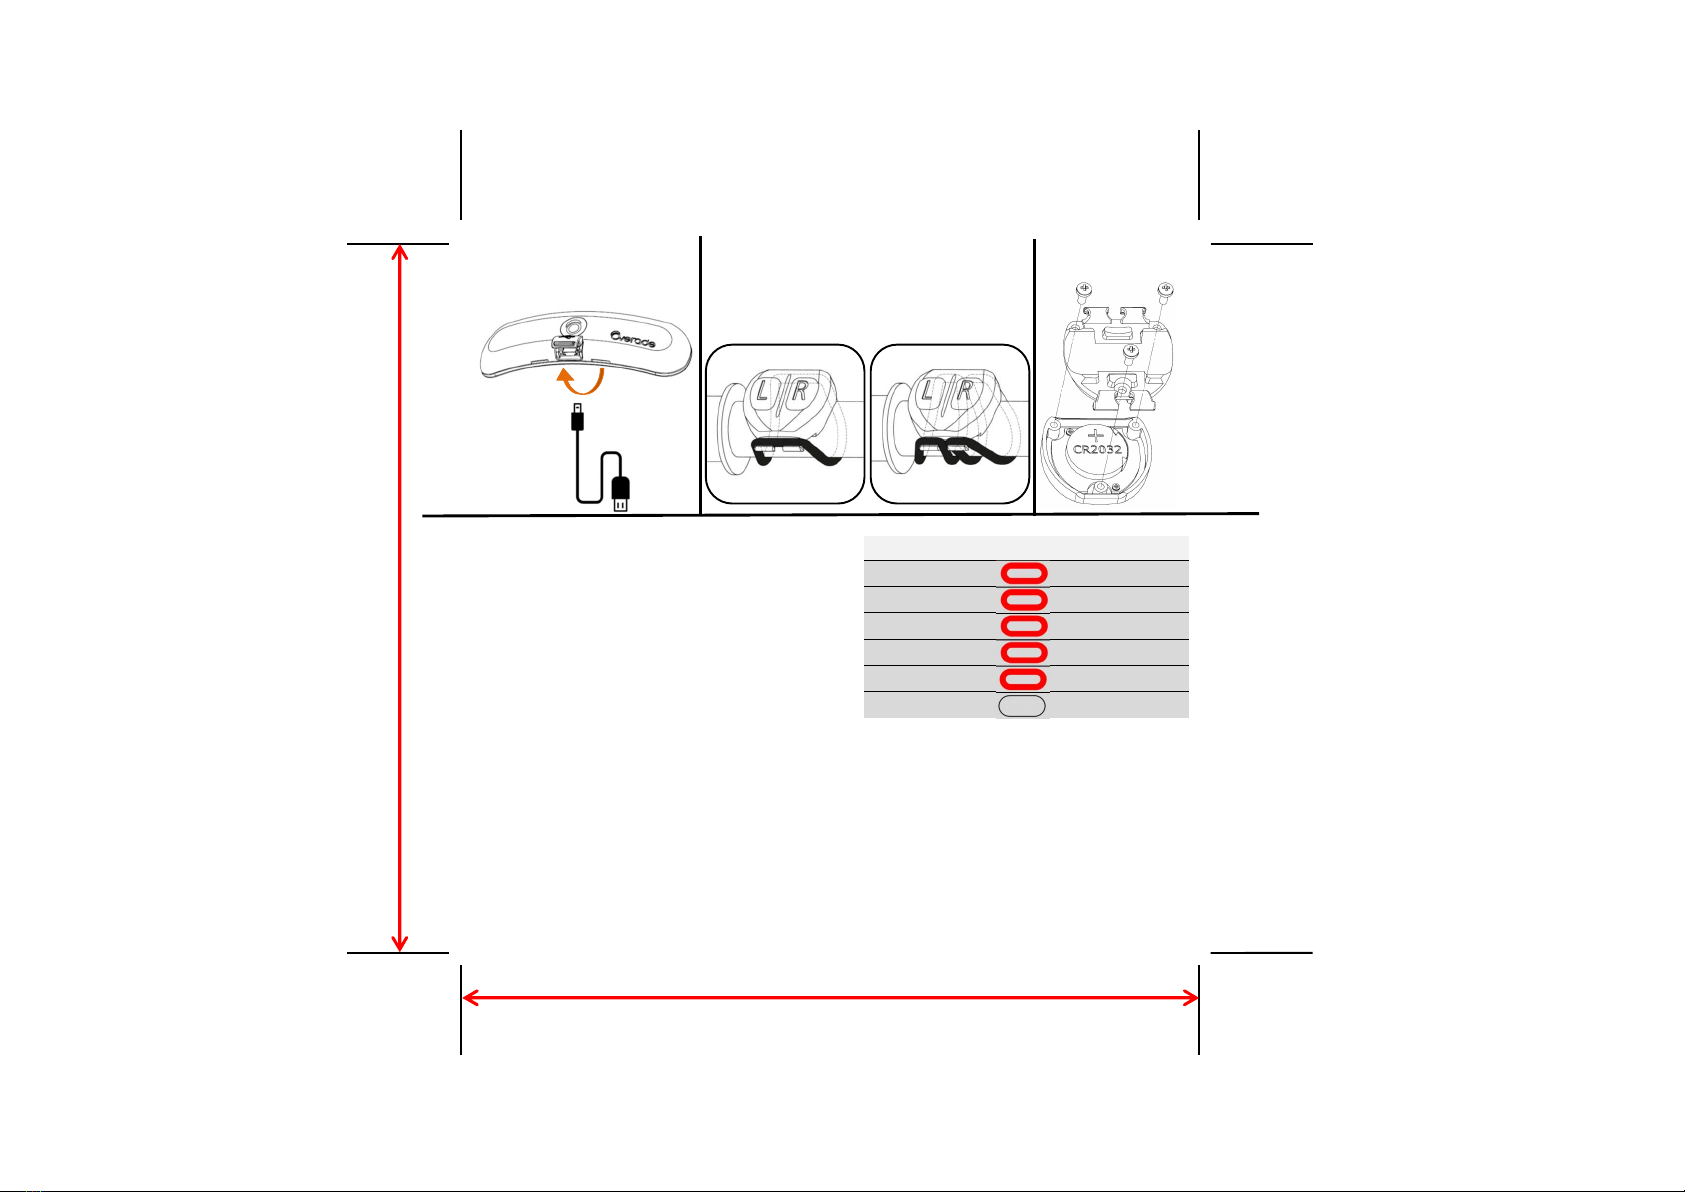
Laden Sie den Akku vor der ersten Verwendung mit dem mitgelieferten Kabel, das an ein 5V-USB-Ladegerät angeschlossen
ist, vollständig auf (siehe Abbildung 3). Ein blinkendes rotes Licht zeigt an, dass die Leuchte aufgeladen wird. Die blinkende
LED wird orange, wenn die Beleuchtung mehr als 50 % Kapazität hat. Wenn die LED erlischt, ist der Akku vollständig
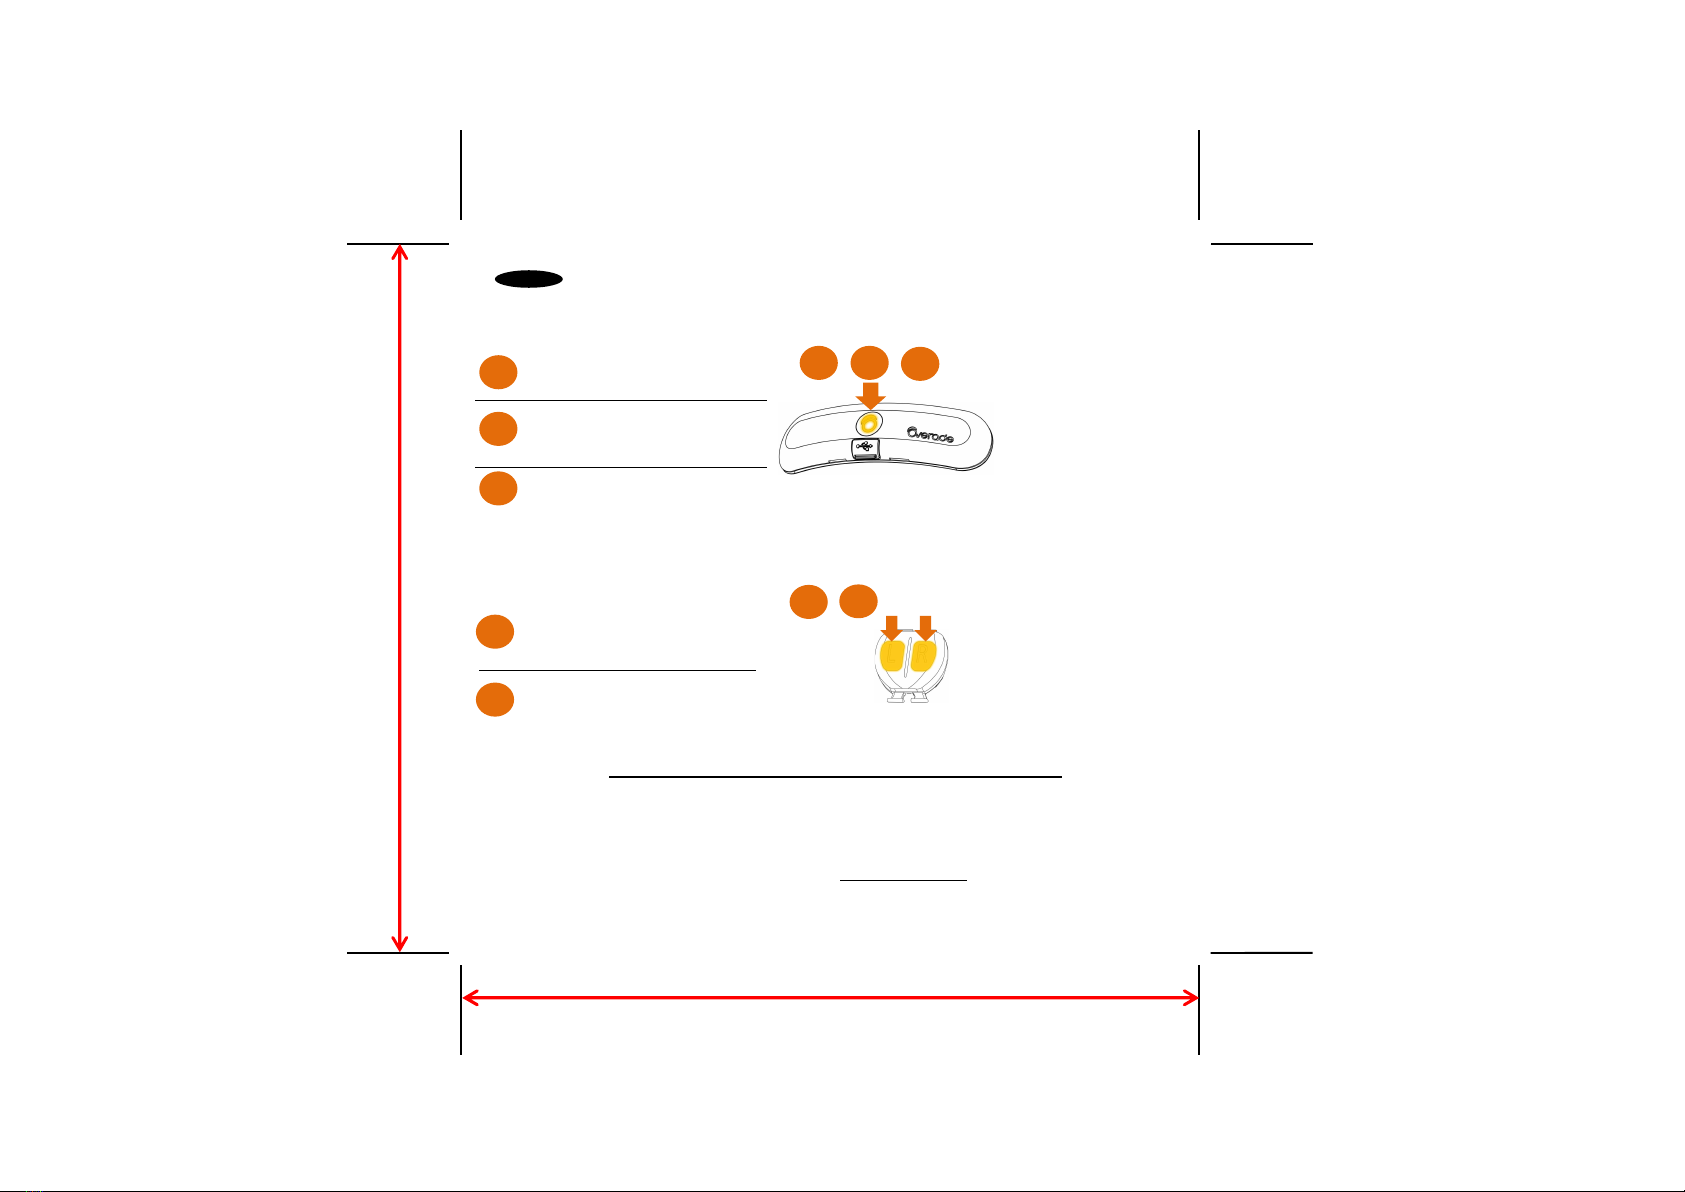
geladen. Für die Befestigung der OxiMote-Fernbedienung an einem Lenker werden elastische Halterungen mitgeliefert
(siehe Abbildung 4). Wählen Sie die Halterungen mit der am besten geeigneten Länge. Je nach Form des Lenkers können Sie
ein oder zwei Gummibänder verwenden. Die Fernbedienung funktioniert mit einer bereits eingesetzten CR2032-Batterie.
Diese kann ausgewechselt werden, indem Sie die drei Schrauben mit einem Kreuzschlitzschraubendreher entfernen (siehe
Abbildung 5).
FUNKTIONSWEISE.
Um die OxiTurn-Beleuchtung einzuschalten, drücken Sie den ON/OFF-Knopf in der Mitte der Vorderseite. Um es
auszuschalten, drücken Sie den Knopf 2 Sekunden lang. Um zwischen den beiden Leuchtmodi zu wechseln, genügt ein
einfacher Druck auf den ON/OFF-Knopf. Die Leistung und die Leuchtdauer der einzelnen Modi sind in Abbildung 6
angegeben. Im Modus 6 (Day Mode) wird die Beleuchtung nur dann eingeschaltet, wenn sie durch OxiMote
(Blinkerfunktion) oder OxiBrake (Bremswarnung) aktiviert wird.
Nachdem Sie Ihre Beleuchtung ein- oder ausgeschaltet haben, leuchtet die Ladeanzeige einige Sekunden lang grün oder rot,
wenn der Batteriestand niedrig ist.
FAHRTRICHTUNGSANZEIGER.
Die Blinker, die die Fahrtrichtung anzeigen, werden mit der OxiMote-Fernbedienung aktiviert. Wenn ein Blinker aktiviert ist,
werden Sie durch einen Signalton und ein Licht auf dem OxiMote daran erinnert, dass er funktioniert. Um den Ton zu
wechseln, drücken Sie den Knopf ON/OFF mindestens 6 Sekunden lang, wenn die OxiTurn-Beleuchtung ausgeschaltet ist. Ein
Signalton zeigt dann an, dass die Änderung übernommen wurde. Um den Ton auszuschalten, wiederholen Sie den Vorgang
ein zweites Mal. ACHTUNG! Die Verwendung von Blinklichtern kann in verschiedenen Ländern gesetzlich geregelt sein.
Beachten Sie die entsprechenden Gesetze.
VORSICHTSMASSNAHMEN FÜR DEN GEBRAUCH.
ACHTUNG! Dieses Produkt ist eine Zusatzbeleuchtung und kein Ersatz für die von der Straßenverkehrsordnung
vorgeschriebene Fahrzeugbeleuchtung. Tauchen Sie die Produkt nicht in Wasser und bauen Sie sie nicht auseinander, da
sonst die Garantie erlischt. Werfen Sie den Akku nicht ins Feuer (Explosionsgefahr). ACHTUNG! Dieses Produkt und die
darin enthaltenen Batterien dürfen nicht mit dem Hausmüll entsorgt werden. Sie werden getrennt gesammelt und
müssen zur Wiederverwertung an einer autorisierten Sammelstelle abgegeben werden.
DE

130 mm
125 mm
VERBINDEN VON OXI-PRODUKTEN UNTEREINANDER
Die Produkte der Oxi-Serie können mithilfe des unten beschriebenen Pairing-Verfahrens [A] paarweise miteinander
verbunden werden.
ACHTUNG! Die in der Verpackung enthaltenen OxiTurn und OxiMote sind bereits miteinander verbunden. Daher ist es nicht
notwendig, das Pairing-Verfahren zu verwenden. Verwenden Sie dieses Verfahren, wenn Sie ein weiteres Oxi-Produkt
anschließen möchten oder wenn Sie die Pairings von einem Oxi-Produkt gelöscht haben..
[A]- PAIRING DER OXITURN-BELEUCHTUNG MIT DEM OXIMOTE
*Wenn sowohl der OxiTurn als auch der OxiMote ausgehen, wiederholen Sie den Vorgang.
* Wenn der Knopf am OxiTurn abwechselnd rot und grün leuchtet oder das OxiMote nach Abschluss des
Pairings orange und rot leuchtet, anstatt durchgehend zu leuchten, kann es nicht mehr mit weiteren
Produkten gepaart werden. Löschen Sie dann alle Pairings, um ein neues Pairing durchführen zu können (siehe
[C]).
[B]- MULTI-APPAIRING
Um eine zusätzliche OxiBrake oder OxiMote an Ihre OxiTurn-Beleuchtung anzuschließen, wiederholen Sie den Vorgang [A].
Um eine zusätzliche OxiTurn-Beleuchtung an Ihr OxiMote anzuschließen, wiederholen Sie den Vorgang [A].
Bei OxiTurn,
die Beleuchtung durch
Drücken und Loslassen des
Knopfes einschalten
Drücken und halten Sie die
Knöpfe (mindestens 6s), bis
der Knopf orange blinkt
Auf dem OxiMote,
drücken und halten Sie beide
Knöpfe (mindestens 4s), bis
sie orange blinken
1 2 => Wenn das Pairing durchgeführt
wurde :
- der Knopf des OxiTurn leuchtet
einige Sekunden lang
kontinuierlich orange auf und
erlischt dann.
- die Knöpfe des OxiMote
leuchten einige Sekunden lang
kontinuierlich orange auf und
schalten sich dann aus
=> Andere Fälle*
3
2
1
3
DE

130 mm
125 mm
[C]- LÖSCHEN ALLER PAIRINGS AUF DEM OXITURN
[D] - LÖSCHEN ALLER PAIRINGS AUF DEM OXIMOTE
GARANTIE. Für alle unsere Produkte gelten die gesetzlichen Gewährleistungsfristen. Weitere Informationen zu den
Bedingungen erhalten Sie bei Ihrem Händler vor Ort oder auf unserer Website www.overade.com
Drücke und halte beide Knöpfe
(mindestens 4 Sekunden), bis sie
orange blinken (Pairing-Modus)
Drücken Sie schnell 2 Mal den linken
Knopf und 2 Mal den rechten Knopf
(innerhalb von 4 Sekunden).
Schalten Sie OxiTurn ein, indem Sie
den Knopf drücken
Drücken und halten Sie die Knöpfe
(mindestens 6s), bis der Knopf
orange blinkt (Pairing-Modus)
Drücken Sie den Knopf dreimal
schnell (innerhalb von 4 Sekunden)
12
1 2 3
1
2
3
1
2
DE
=> Wenn die
Pairings gelöscht
werden :
- der Knopf blinkt
schnell grün
=> Wenn die
Pairings gelöscht
werden:
- die Knöpfe
blinken orange und
rot

130 mm
125 mm
INFORMATIONS GENERALES.
Overade déclare que l'équipement radioélectrique modèle OXTR est conforme à la directive 2014/53/UE. Commande
radio : puissance d'émission 0dBM, fréquence 2.4 GHz. Batterie polymer lithium, capacité 460mAh, tension 3.7V.
Overade déclare que l'équipement radioélectrique modèle OXMT est conforme à la directive 2014/53/UE. Commande
radio : puissance d'émission 0dBM, fréquence 2.4 GHz. Pile CR2032, capacité 220mAh, tension 3V.
Le texte complet de la déclaration UE de conformité est disponible à l'adresse internet suivante: www.overade.com.
GENERAL INFORMATION.
Hereby, Overade declares that the radio equipment type OXTR is in compliance with Directive 2014/53/EU. Radio
control: transmitting power 0dBM, frequency 2.4 GHz. Lithium polymer battery, capacity 460mAh, voltage 3.7V.
Hereby, Overade declares that the radio equipment type OXMT is in compliance with Directive 2014/53/EU. Radio
control: transmitting power 0dBM, frequency 2.4 GHz. CR2032 battery, capacity 220mAh, voltage 3.7V.
The full text of the EU Declaration of Conformity is available at the following web address: www.overade.com
ALLGEMEINE INFORMATIONEN.
Overade erklärt, dass die Funkanlage Modell OXTR der Richtlinie 2014/53/EU entspricht. Funksteuerung: Sendeleistung
0dBM, Frequenz 2.4 GHz. Lithium-Polymer-Batterie, Kapazität 460mAh, Spannung 3.7V.
Overade erklärt, dass die Funkanlage Modell OXMT mit der Richtlinie 2014/53/EU übereinstimmt. Funksteuerung:
Sendeleistung 0dBM, Frequenz 2,4 GHz. Batterie CR2032, Kapazität 220mAh, Spannung 3V.
Der vollständige Text der EU-Konformitätserklärung ist unter folgender Internetadresse abrufbar: www.overade.com.
PRECAUCIONES DE EMPLEO.
¡ADVERTENCIA! Este producto es luz de visibilidad, no puede reemplazar la luz del vehículo definida por el código de
la carretera. No sumerja la luz en agua y no desmonte la luz ya que esto anulará la garantía. No arroje las baterías o la
batería al fuego (riesgo de explosión).
¡ADVERTENCIA! Este producto y las baterías que contiene no se pueden desechar con la basura doméstica. Están
sujetos a clasificación selectiva y deben depositarse en una zona de recogida autorizada para su reciclaje.
INFORMACIÓN GENERAL. Por la presente, Overade declara que el equipo de radio OXTR cumple con la Directiva
2014/53/UE. Control de radio: potencia de transmisión 0dBM, frecuencia 2,4 GHz. Batería de polímero de litio,
capacidad 460mAh, voltaje 3.7V. Por la presente, Overade declara que el equipo de radio OXMT cumple con la
Directiva 2014/53 / UE. Control de radio: potencia de transmisión 0dBM, frecuencia 2,4 GHz. Batería CR2032,
capacidad 220mAh, voltaje 3.7V. El texto completo de la declaración de conformidad de la UE está disponible en la
siguiente dirección de Internet: www.overade.com
Encuentre el prospecto completo en su idioma en www.overade.com/oxi
FR
EN
DE
ES

130 mm
125 mm
PRECAUZIONI D'USO.
ATTENZIONE! Questo prodotto è illuminazione di visibilità, non può sostituire Il fanale del veicolo definita dal codice
della strada. Non immergere Il prodotto in acqua e non smontare Il prodotto poiché ciò invaliderà la garanzia. Non
gettare le batterie o la batteria nel fuoco (rischio di esplosione).
ATTENZIONE! Questo prodotto e le batterie in esso contenute non possono essere smaltiti con i rifiuti domestici.
Sono soggetti a cernita selettiva e devono essere depositati in un'area di raccolta autorizzata per poterli riciclare.
INFORMAZIONI GENERALI. Overade dichiara che l'apparecchiatura radio OXTR è conforme alla Direttiva 2014/53/UE. Radiocomando:
potenza di trasmissione 0dBM, frequenza 2,4 GHz. Batteria ai polimeri di litio, capacità 460mAh, tensione 3,7 V. Overade dichiara che
l'apparecchiatura radio OXMT è conforme alla Direttiva 2014/53 / UE. Radiocomando: potenza di trasmissione 0dBM, frequenza 2,4 GHz.
Batteria CR2032, capacità 220mAh, tensione 3,7 V. Il testo completo della dichiarazione di conformità UE è disponibile al seguente indirizzo
Internet: www.overade.com
Trovate l'opuscolo completo nella vostra lingua su www.overade.com/oxi
PRECAUÇÕES PARA O EMPREGO.
AVISO! Este produto é iluminação de visibilidade, ele não pode substituir a iluminação do veículo definida pelo
código da rodovia. Não mergulhe a iluminação ou na água e não desmonte a iluminação sob penalidade da garantia.
Não jogue as baterias ou a bateria no incêndio (risco de explosão).
AVISO! Este produto e as baterias que ele contém não podem ser jogadas com resíduos domésticos. Eles estão
sujeitos a classificação seletiva e devem ser depositados em um espaço de coleta autorizado para reciclá -los.
INFORMAÇÕES GERAIS. Por isso, declara que o equipamento de rádio OXTR está em conformidade com a diretiva 2014/53/UE. Controle
de rádio: 0dBM Power de emissão, frequência 2.4 GHz. Bateria de polímero de lítio, capacidade 460mAh, tensão 3.7V. Por isso, declara
que o equipamento de rádio OXMT está em conformidade com a diretiva 2014/53/UE. Controle de rádio: 0dBM Power de emissão,
frequência 2.4 GHz. Bateria CR2032, capacidade 220mAh, tensão 3.7V. O texto completo da declaração de conformidade da UE está
disponível no seguinte endereço da Internet: www.overade.com
Encontre o folheto completo na sua língua em www.overade.com/oxi
VOORZORGSMAATREGELEN VOOR GEBRUIK.
OPGELET! Dit product is zichtverlichting, het kan de voertuigverlichting zoals gedefinieerd door de wegcode niet
vervangen. Dompel de verlichting niet onder in water en demonteer de verlichting niet, hierdoor vervalt de garantie.
Gooi de batterijen of de batterij niet in vuur (explosiegevaar).
OPGELET! Dit product en de batterijen erin mogen niet bij het huisvuil worden gegooid. Ze worden selectief
gesorteerd en moeten in een geautoriseerde inzamelplaats worden gedeponeerd om ze te recyclen.
ALGEMENE INFORMATIE. Hierbij verklaart Overade dat de OXTR radioapparatuur in overeenstemming is met Richtlijn 2014/53 / EU.
Radiobesturing: zendvermogen OdBM, frequentie 2,4 GHz. Polymeer lithiumbatterij, capaciteit 460mAh, spanning 3,7 V. Hierbij verklaart
Overade dat de OXMT radioapparatuur in overeenstemming is met Richtlijn 2014/53 / EU. Radiobesturing: zendvermogen OdBM,
frequentie 2,4 GHz. CR2032 batterij, capaciteit 220mAh, spanning 3,7 V. De volledige tekst van de EU-conformiteitsverklaring is
beschikbaar op het volgende internetadres: www.overade.com
Vind de volledige handleiding in uw taal op www.overade.com/oxi
IT
PT
NL

130 mm
125 mm
FORHOLDSREGLER FOR ANSÆTTELSE.
ADVARSEL! Dette produkt er synlighedsbelysning, det kan ikke erstatte køretøjets belysning, der er defineret af
motorvejskoden. Slam ikke belysningen i vandet og demonter ikke belysningen under straf for garantien. Kast ikke
batterierne eller batteriet i ilden (risiko for eksplosion).
ADVARSEL! Dette produkt og de batterier, det indeholder, kan ikke kastes med husholdningsaffald. De er underlagt
selektiv sortering og skal deponeres i et autoriseret indsamlingsrum for at genbruge dem.
GENERELLE INFORMATIONER. Ved dette erklærer overade, at OXTR -belysningsradioudstyret overholder 2014/53/EU -direktivet.
Radiokontrol: 0dBM Emissionseffekt, frekvens 2,4 GHz. Lithiumpolymerbatteri, kapacitet 460mAh, spænding 3,7V. Ved dette erklærer
overade, at OXMT -belysningsradioudstyret overholder 2014/53/EU -direktivet. Radiokontrol: 0dBM Emissionseffekt, frekvens 2,4 GHz.
CR2032 batteri, kapacitet 220mAh, spænding 3,7V. Den fulde tekst til EU -overensstemmelseserklæringen er tilgængelig på følgende
internetadresse: www.overade.com
Find den komplette manual på dit sprog på www.overade.com/oxi
FÖRSIKTIGHETSÅTGÄRDER FÖR ANSTÄLLNING.
VARNING! Denna produkt är synlighetsbelysning, den kan inte ersätta fordonsbelysningen som definieras av
motorvägskoden. Plunge inte belysningen i vattnet och demontera inte belysningen under straff för garantin. Kasta
inte batterierna eller batteriet i elden (risk för explosion).
VARNING! Denna produkt och batterierna som den innehåller kan inte kastas med inhemskt avfall. De är föremål
för selektiv sortering och måste deponeras i ett auktoriserat insamlingsutrymme för att återvinna dem.
ALLMÄN INFORMATION. Genom detta förklarar övertag att OXTR -belysningsradioutrustningen överensstämmer med direktivet om
2014/53/EU. Radiokontroll: 0dBM Emission Power, frekvens 2,4 GHz. Litiumpolymerbatteri, kapacitet 460mAh, spänning 3.7V. Genom
detta förklarar övertag att OXMT -belysningsradioutrustningen överensstämmer med direktivet om 2014/53/EU. Radiokontroll: 0dBM
Emission Power, frekvens 2,4 GHz. CR2032 batteri, kapacitet 220mAh, spänning 3.7V. Den fullständiga texten i EU: s
överensstämmelsedeklaration är tillgänglig på följande internetadress: www.overade.com
Hitta den fullständiga handboken på ditt språk på www.overade.com/oxi
FORHOLDSREGLER FOR SYSSELSETTING.
ADVARSEL! Dette produktet er synlighetsbelysning, det kan ikke erstatte kjøretøybelysningen som er definert av
motorvei -koden. Ikke kast belysningen i vannet, og ikke demonter belysningen under straff for garantien. Ikke kast
batteriene eller batteriet i brannen (risiko for eksplosjon).
ADVARSEL! Dette produktet og batteriene det inneholder kan ikke kastes med husholdningsavfall. De er underlagt
selektiv sortering og må avsettes i et autorisert innsamlingsrom for å resirkulere dem.
GENERELL INFORMASJON. Ved denne overade erklærer at OXTR Radio Equipment er i samsvar med direktivet 2014/53/EU. Radiokontroll:
0dBM Emission Power, frekvens 2,4 GHz. Litiumpolymerbatteri, kapasitet 460mAh, spenning 3,7V. Ved denne overade erklærer at OXMT
Radio Equipment er i samsvar med direktivet 2014/53/EU. Radiokontroll: 0dBM Emission Power, frekvens 2,4 GHz. CR2032 batteri,
kapasitet 220mAh, spenning 3,7V. Den fullstendige teksten til EUs konformitetsdeklarasjon er tilgjengelig på følgende internettadresse:
www.overade.com
Finn hele håndboken på ditt språk på www.overade.com/oxi
DK
SE
NO

130 mm
125 mm
VAROTOIMENPITEET TYÖHÖN.
VAROITUS! Tämä tuote on näkyvyysvalaistus, se ei voi korvata moottoritiellä määritettyä ajoneuvovalaistusta. Älä
syö valaistusta vettä ja älä purkaa valaistusta takuun rangaistuksen nojalla. Älä heitä paristoja tai akkua tulipaloon
(räjähdyksen riski).
VAROITUS! Tätä tuotetta ja sen sisältämiä paristoja ei voida heittää kotimaisella jätteellä. Ne ovat valikoivia
lajitteluja, ja ne on talletettava valtuutettuun keräystilaan niiden kierrättämiseksi.
YLEISET TIEDOT. Tällä ylittämisellä ilmoittaa, että OXLM valaistusradiolaitteet noudattavat 2014/53/EU -direktiiviä.
EU: Radio Control: 0dBM päästöteho, taajuus 2,4 GHz. Litiumpolymeeriakku, kapasiteetti 460mAh, jännite 3,7 V. Tällä
ylittämisellä ilmoittaa, että OXMT valaistusradiolaitteet noudattavat 2014/53/EU -direktiiviä. EU: Radio Control: 0dBM
päästöteho, taajuus 2,4 GHz. CR2032 riakku, kapasiteetti 220mAh, jännite 3,7 V. vaatimustenmukaisuusilmoituksen
koko teksti on saatavana seuraavassa Internet -osoitteessa: www.overade.com
Löydät täydellisen käyttöoppaan omalla kielelläsi osoitteesta www.overade.com/oxi
雇用の注意事項。
警告!本製品は補助灯であり、道路交通法で定められた車両用照明に代わるものではありません。ライトを水につ
けたり、分解したりしないでください。そうしないと保証が無効になります。電池を火の中に投げ込まないでください
(爆発の危険があります)。
警告!この製品とそれに含まれるバッテリーは、家庭用廃棄物で投げることはできません。それらは選択的な選別
の対象となり、それらをリサイクルするために認可された収集スペースに預けなければなりません。
www.overade.com/oxi で、あなたの言語の完全なマニュアルを検索してください。
고용 예방 조치.
경고!본 제품은 부가조명으로 고속도로 법규에 규정된 차량의 조명을 대체할 수 없습니다.조명을 물에
담그거나 조명을 분해하지 마십시오.보증이 무효화됩니다.배터리를 불 속에 던지지 마십시오(폭발 위험).
경고!이 제품과 포함 된 배터리는 가정용 폐기물로 던질 수 없습니다.그것들은 선택적 분류의 대상이되며,이를
재활용하기 위해 공인 수집 공간에 퇴적되어야합니다.
www.overade.com/oxi에서 귀하의 언어로 된 전체 설명서를 찾으십시오.
就业预防措施。
警告!本产品是一种辅助照明,它不能取代《公路法》规定的车辆照明。不要把灯浸在水里,也不要拆开灯,
否则保修期就会失效。不要把电池扔进火中(有爆炸的危险)。
警告!该产品及其包含的电池不能用家用废物扔掉。它们受到选择性排序的约束,必须存放在授权的收集空间中
才能回收它们。
在www.overade.com/oxi 上找到您的语言版本的完整手册。
FI
CN
JP
KR

130 mm
125 mm
Visor
Cover
Secure bag
Discover all our products
on www.overade.com
Foldable helmet

130 mm
125 mm
To switch your light to a Brake Light
Red and White Light

130 mm
125 mm
Additional fasteners
- Sold separately -
Check them out on our website

130 mm
125 mm
OVERADE S.A.S - 13 rue Georges Auric - 75019 PARIS - FRANCE
Model: OXMT
www.overade.com
FCC STATEMENT:
This device complies with Part 15 of the FCC Rules. Operation is subject to the following two conditions: (1) this device may not cause harmful
interference, and (2) this device must accept any interference received, including interference that may cause undesired operation.
NOTE: This equipment has been tested and found to comply with the limits for a Class B digital device, pursuant to Part 15 of the FCC Rules.
These limits are designed to provide reasonable protection against harmful interference in a residential installation. This equipment generates
uses and can radiate radio frequency energy and, if not installed and used in accordance with the instructions, may cause harmful interference
to radio communications. However, there is no guarantee that interference will not occur in a particular installation. If this equipment does
cause harmful interference to radio or television reception, which can be determined by turning the equipment off and on, the user is
encouraged to try to correct the interference by one or more of the following measures:
- Reorient or relocate the receiving antenna.
- Increase the separation between the equipment and receiver.
- Connect the equipment into an outlet on a circuit different from that to which the receiver is connected.
- Consult the dealer or an experienced radio/TV technician for help.
Changes or modifications not expressly approved by the party responsible for compliance could void the user's authority to operate the
equipment.
The device has been evaluated to meet general RF exposure requirement. The device can be used in
portable exposure condition without restriction.
This manual suits for next models
1
Table of contents
Languages:
Other Overade Motorcycle Accessories manuals
Popular Motorcycle Accessories manuals by other brands

Dennis Kirk
Dennis Kirk KIMPEX 402130 instructions

motogadget
motogadget Chronoclassic 2 instruction manual

hepco & becker
hepco & becker 630719 00 02 Mounting instructions

N-Com
N-Com SPCOM00000091 quick start guide

SUOMY
SUOMY J 12 K1 owner's manual

Evotech
Evotech Yamaha MT-09 Tail Tidy installation instructions