manuals.online logo
Brands
  1. Home
  2. •
  3. Brands
  4. •
  5. Overland Tandberg
  6. •
  7. Disk Array System
  8. •
  9. Overland Tandberg RDX QuikStation 4 Guide

Overland Tandberg RDX QuikStation 4 Guide

10400907 ©2019 Overland Storage Page 1 of 3
*10400907*
RDX®QuikStation 4 & 8 Appliances
Replacement Instructions
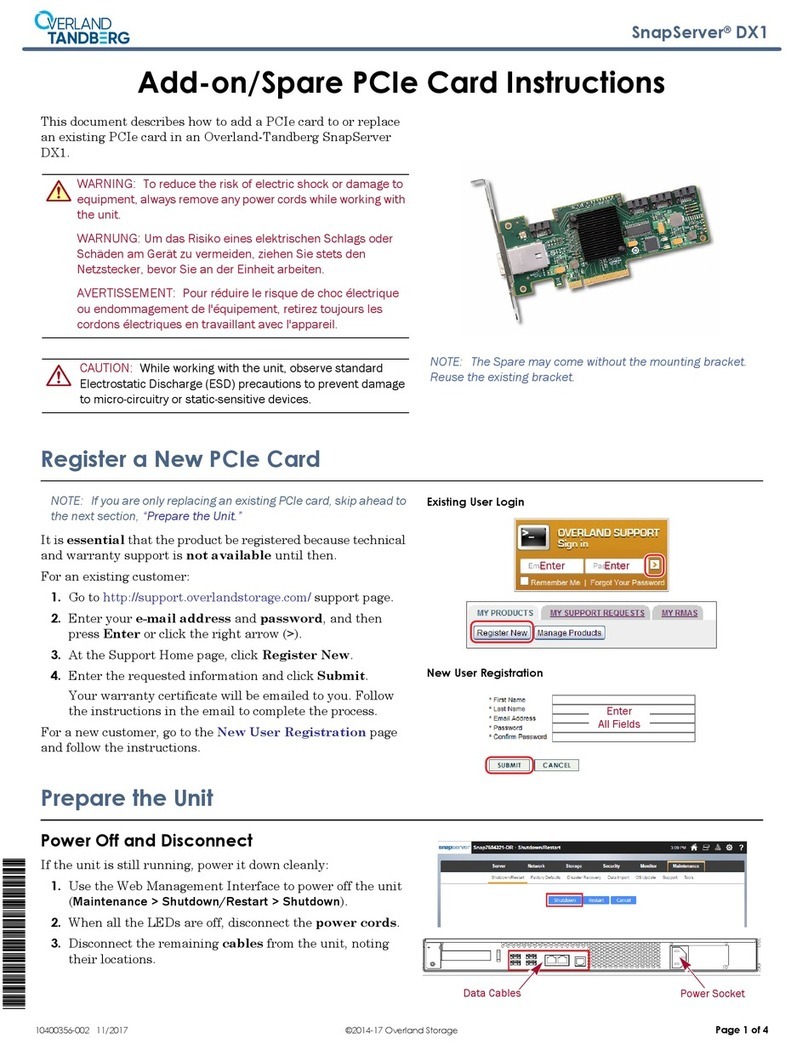
This document describes how to remove and replace an RDX
QuikStation from Overland-Tandberg.
WARNING: To reduce the risk of electric shock or damage to
equipment, always remove any power cords while working with
the unit.
WARNUNG: Um das Risiko eines elektrischen Schlags oder
Schäden am Gerät zu vermeiden, ziehen Sie stets den
Netzstecker, bevor Sie an der Einheit arbeiten.
AVERTISSEMENT: Pour réduire le risque de choc électrique
ou endommagement de l'équipement, retirez toujours les
cordons électriques en travaillant avec l'appareil.
CAUTION: While working with the library, observe standard
Electrostatic Discharge (ESD) precautions to prevent damage
to micro-circuitry or static-sensitive devices.l
Prepare the Unit
Power Off and Remove Cords and Cables
1. Power off the QuikStation.
2. Unplug the power cords (1).
3. Label and remove all the following:
•Any attached USB devices
•Ethernet cables
•VGA cable (if attached)
•Serial cable (if attached)
Remove All Media
Eject and label all the RDX cartridges so they can be inserted
into the same drives on the new unit.
1. Using the supplied RDX Ejection Pin (or straighten
paper clip), insert it in the hole above a drive with media.
2. Press inward until the cartridge ejects.
3. Label the cartridge with the drive number and set it
aside.
4. Repeat Steps 1–3 for all the remaining cartridges.
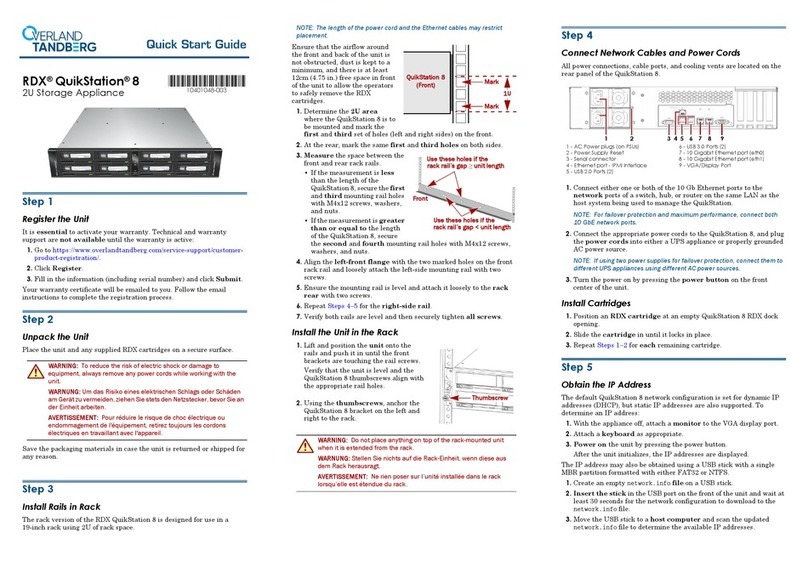
1 - AC Power plugs (on PSUs)
2 - Power Supply Reset
3 - Serial connector
4 - Ethernet port - IPMI Interface
5 - USB 2.0 Ports (2)
6 - USB 3.0 Ports (2)
7 - 10 Gigabit Ethernet port (eth0)
8 - 10 Gigabit Ethernet port (eth1)
9 - VGA connector
154623798
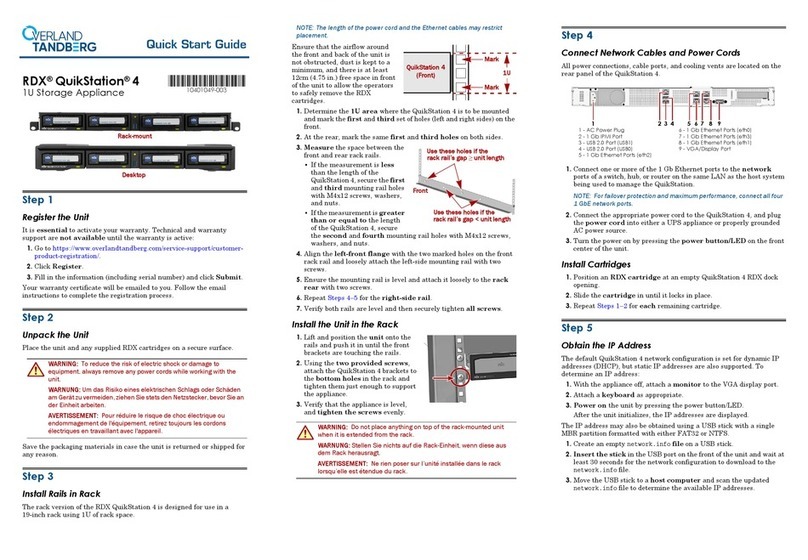
1 - AC Power Plug
2 - 1 Gb IPMI Port
3 - USB 2.0 Port (USB1)
4 - USB 2.0 Port (USB0)
5 - 1 Gb Ethernet Ports (eth2)
6 - 1 Gb Ethernet Ports (eth0)
7 - 1 Gb Ethernet Ports (eth3)
8 - 1 Gb Ethernet Ports (eth1)
9 - VGA/Display Port
129567 843
Emergency Eject Holes
RDX Replacement Instructions
10400907 ©2019 Overland Storage Page 2 of 3
Unpack the New QuikStation
NOTE: If the temperature in the room where the module will be
installed varies by 15º C (30º F) from the room where the boxed
module was stored, allow it to acclimate to the surrounding
environment for at least 12 hours before unpacking it.
1. Remove the unit from its box and set it on a secure
surface.
2. Remove and save the packaging materials and tape
from the unit.
Swap Out QuikStation in Rack
1. Disconnect the QuikStation right and left brackets from
the rack.
•QuikStation 4 – Remove and retain the two Phillips
screws holding the brackets.
•QuikStation 8 – Loosen the two captive thumbscrews
on the brackets.
2. Carefully slide the unit off the rails and set it on a secure
surface.
3. Lift and position the new QuikStation onto the rails and
push it in until the front brackets touch the rack.
4. Verify that the unit is level and aligned with the
appropriate rail holes.
5. Loosely secure the QuikStation brackets to the rack
using the screws/thumbscrews.
6. Verify that the appliance is level, and tighten the screws/
thumbscrews evenly.
Connect the Cables and Cords
Reconnect the cables to the appropriate ports.
1. Connect any the following:
•Ethernet cables
•Any USB devices that were being used
•VGA cable (if used)
•Serial cable (if used)
2. Plug in the power cords.
3. Power on the QuikStation.
Obtain the IP Address
The IP address is obtained using a USB stick with a single
MBR partition formatted with either FAT32 or NTFS.
1. Create an empty network.info file on a USB stick.
2. Insert the stick in the USB port on the front of the unit
and wait at least 30 seconds for the network configuration
to download to the network.info file.
3. Move the USB stick to a host computer and scan the
updated network.info file to determine the IP address.
Thumbscrew
1 - AC Power plugs (on PSUs)
2 - Power Supply Reset
3 - Serial connector
4 - Ethernet port - IPMI Interface
5 - USB 2.0 Ports (2)
6 - USB 3.0 Ports (2)
7 - 10 Gigabit Ethernet port (eth0)
8 - 10 Gigabit Ethernet port (eth1)
9 - VGA connector
154623798
1 - AC Power Plug
2 - 1 Gb IPMI Port
3 - USB 2.0 Port (USB1)
4 - USB 2.0 Port (USB0)
5 - 1 Gb Ethernet Ports (eth2)
6 - 1 Gb Ethernet Ports (eth0)
7 - 1 Gb Ethernet Ports (eth3)
8 - 1 Gb Ethernet Ports (eth1)
9 - VGA/Display Port
129567 843
http://support.overlandstorage.com
You can get additional technical support on the Internet at the Overland Storage Support web page, or by contacting Overland Storage using
the information found on the Contact Us page on our web site.
RDX Replacement Instructions
10400907 ©2019 Overland Storage Page 3 of 3
Complete the Installation
Import the Configuration Files
NOTE: If you do not have a saved copy of the configuration, you will
have to reconfigure your QuikStation manually. Refer to the
QuikStation 4 & 8 Product Manual.
Import the last previously saved QuikStation system
configuration files:
1. From the Remote Management Console main menu, select
System Maintenance > Import Configuration
.
The Import Configuration dialog window opens.
2. Select the network settings you want to import.
By default, all configuration settings are selected.
3. Click the plus (
+
) icon to select the RDX QuikStation
configuration file.
4. Click
Import
.
The system reboots. This process takes three minutes.
When the reboot is complete, the Remote Management
Console interface is active again. You do not have to sign
in again to access the Console.
Reinsert Cartridges
The cartridges need to go back into the same drives that they
were removed from in the old QuikStation.
1. Position an RDX cartridge at the same QuikStation RDX
dock opening.
2. Slide the cartridge in until it locks in place.
3. Repeat Steps 1–2 for each remaining cartridge.
Return Old Parts to Overland
If replacing a in-warranty appliance:
1. Place the old QuikStation in the anti-static bag and put
it in the replacement part’s box.
2. Use the existing packing material to secure it in the box.
3. Use an RMA to return the part to Overland-Tandberg.
For return shipping details and RMA number, go to:
http://docs.overlandstorage.com/return-instructions.

Other manuals for RDX QuikStation 4

6

This manual suits for next models

1

Other Overland Tandberg Disk Array System manuals

Overland Tandberg RDX QuikStation 8 User manual

Overland Tandberg

Overland Tandberg RDX QuikStation 8 User manual

Overland Tandberg RDX QuikStation 4 User manual

Overland Tandberg

Overland Tandberg RDX QuikStation 4 User manual

Overland Tandberg SnapServer DX1 User manual

Overland Tandberg

Overland Tandberg SnapServer DX1 User manual

Popular Disk Array System manuals by other brands

HP A3550A - High Availability Disk Arrays Model 20 Storage... user guide

HP

HP A3550A - High Availability Disk Arrays Model 20 Storage... user guide

Sun Microsystems StorEdge 3000 Series Best practices manual

Sun Microsystems

Sun Microsystems StorEdge 3000 Series Best practices manual

Asus PCI-DA2100 user manual

Asus

Asus PCI-DA2100 user manual

HP XP20000/XP24000 Configuration guide

HP

HP XP20000/XP24000 Configuration guide

NetApp AFF A700 Installation and setup instructions

NetApp

NetApp AFF A700 Installation and setup instructions

Sun Microsystems StorEdge MultiPack-FC Installation, operation and service manual

Sun Microsystems

Sun Microsystems StorEdge MultiPack-FC Installation, operation and service manual

R/Evolution 5730 Setup manual

R/Evolution

R/Evolution 5730 Setup manual

Promise UltraTrak100 TX4 user manual

Promise

Promise UltraTrak100 TX4 user manual

Promise VTrak 15110 quick start guide

Promise

Promise VTrak 15110 quick start guide

easyRAID Q12-U4R2 Hardware user manual

easyRAID

easyRAID Q12-U4R2 Hardware user manual

MaxTronic JanusRAID II SA-6651E Hardware user manual

MaxTronic

MaxTronic JanusRAID II SA-6651E Hardware user manual

manuals.online logo
manuals.online logoBrands
  • About & Mission
  • Contact us
  • Privacy Policy
  • Terms and Conditions

Copyright 2025 Manuals.Online. All Rights Reserved.