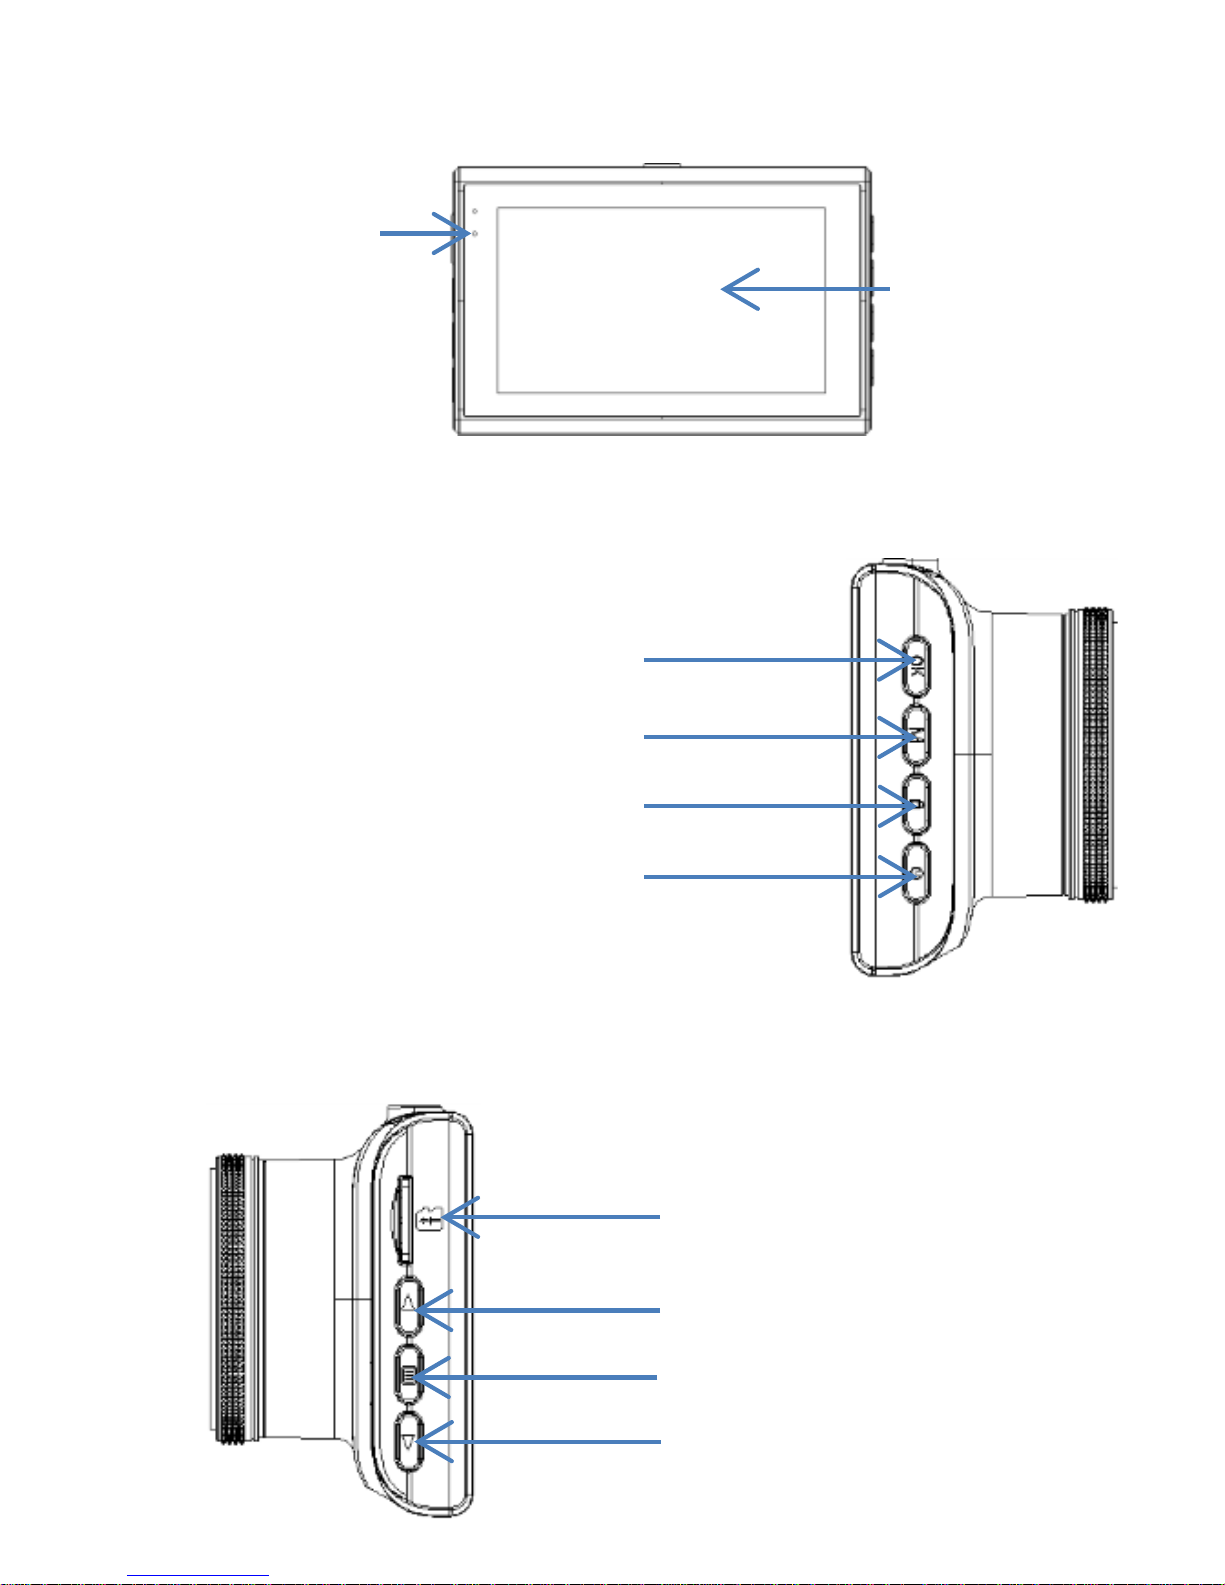
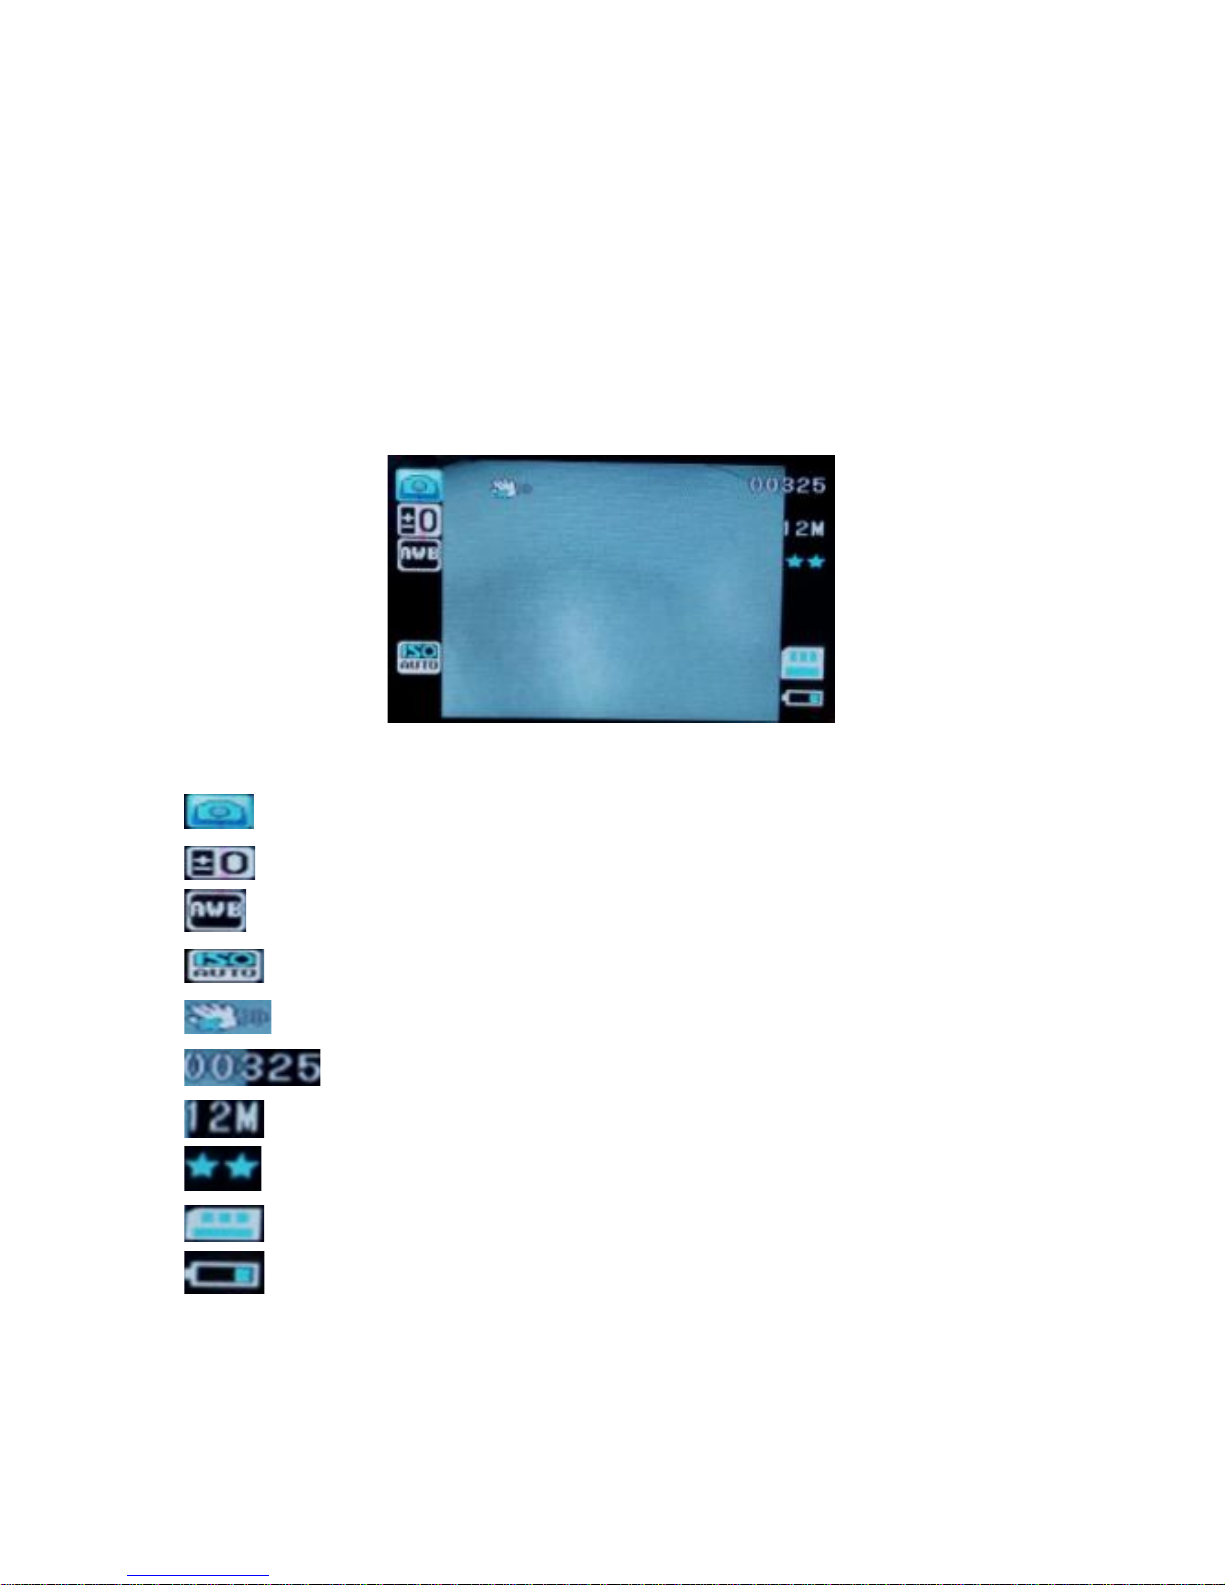
Overmax camroad 4.6 User manual


Thank you for the purchase of our product!
Before using it, please read the included user
manual carefully.
In case of any questions, please visit our website:
www.overmax.eu
FUNCTIONS:
Product illustration and buttons description
Front panel
Lens
Speaker

Rear panel
Left panel
Right panel
LED
Display
OK button
Mode button
Lock button
Power button
Micro SD card slot
“Next” button
“Back” button
Menu button

Upper panel
Bottom panel
Holder
mounting hole
HDMI port
USB port
Microphone
Reset

USAGE
Functions description
Installing a micro SD card
Insert a micro SD card into the micro SD
port until you hear a “click” sound. It
indicates the card has been properly
installed in the slot.
In order to remove the card from the slot,
push it gently to unlock it and then pull it
out.
Note:
1. Before you start using the device, please install a micro SD
memory card (4GB - 32GB) with a Speed Class 6 or higher
and FAT32 file format.
2. While installing a card please make sure you insert it in a
correct position. Otherwise it may damage the card or/and
the device.
3. Make sure the device is switched off before inserting or
removing a micro SD card!

Charging / powering
Please fully charge the device's battery before the
first use. In order to do so, use the included 12V
car charger and mini USB port.
Note: Being used, the device should be
permanently connected to the power source. The
built-in battery allows you to use the camera only
for a short time.
Holder
The included holder allows you to attach the
camera to a windscreen.
Connecting the camera to a vehicle’s power supply
1. Insert the power cord into the cigarette lighter
socket in a car.
2. Connect the USB power cable to the USB port
of the recorder.
Note:
1. Once connected to the car charger, the device turns on
automatically and starts recording.
2. When the battery of the camera is fully discharged the device will
save the file being recorded and turn off automatically.
3. In that case, please charge the camera at least 10 minutes before
you turn it on again.

Turning on / off
Turning on:
Press and hold the power button for about 2
seconds until the start screen appears and the blue
LED indicator starts to glow.
Turning off:
Press and hold the power button for about 2
seconds. The end screen will appear for a brief
moment and the device will turn off.
Switching between modes
The camcorder has 3 operational modes: a video
mode, a photo mode and a preview mode. In order
to switch between them, please use the following
button: .
Video recording
1. Press and hold the power button for 2 seconds to
turn the device on.
Once the startup process is finished, the device
activates the video mode and starts recording
automatically. The video camera icon will be displayed
in the upper left corner of the screen.

2. Press the OK button to start recording. Press it again
to stop:
Video mode
WDR
G-sensor
Recording time
Video time
Motion detection
EV Video resolution
Sound recording
Memory card
Date and time
Battery

Taking pictures
1. Use the Menu button to activate the photo
mode. The camera icon will be displayed in the
upper left corner of the screen.
2. Press the OK button to take a photo.
Photo mode
EV
White balance
ISO
Image stabilization
Available photos
Photo size
Photo quality
SD card
Battery

Preview mode
1.Use the Menu button to activate the preview
mode. The icons of recorded video and photo
files will appear on the camera screen.
2.Use the “Next” and “Back” buttons to select a
file.
3.Press the OK button to display it.
4.In this mode you can also delete files and mark
them as protected ones. Press the MENU
button to start a slideshow.
SETTINGS
There are three setting tabs: video settings, photo
settings and general settings.

Note:
The video and photo settings are available when the device
operates in the corresponding mode.
1.Press the Menu button to open the setting
interface.
2.Use the “Next” and “Back” buttons to navigate
through the settings.
3.Press OK to select a given parameter and press
it again to confirm.
Note:
You must end a given setting first and go back to the menu screen
in order to proceed to another option.
USB mode
After connecting the device to a computer using a
USB cable, the camcorder enters the web camera
mode.
Displaying files on a TV / monitor screen
In order to display the files from the device on a TV
/ monitor screen, connect a compatible Audio /
Video cable into an AV / HDMI port of the
camcorder and a TV / monitor.

Additional information
1. G-sensor - During an event such as sudden hit
or move of the camcorder etc. the G-sensor makes
the camera to automatically start recording and
lock the current file so that it cannot be overwritten.
2. Wide Dynamic Range (WDR) ensures reliable
representation of recorded images despite the high
contrast.
3. Loop recording
4. The camcorder powers on / off automatically
when plugged into the cigarette lighter socket.
5. Manual file protection
You can choose a single file (or all of them) to be
protected from being overwritten.

Common problems and solutions
In case of any problems, please refer to the following instructions. If
the action does not solve the problem, please contact our Technical
Support Department. For more information please visit:
www.overmax.eu.
1. The camera doesn’t record:
- Replace the SD card.
- Change the resolution / frame rate.
- Use a card of a greater capacity.
- Make sure the card has been installed correctly.
- Delete unnecessary files from the memory card.
2. The image is unclear
- Make sure the lens is clean.
3. The device operates properly but the buttons do
not respond
- Press the RESET button to restart the device.
Under normal circumstances, the use of reset
button may cause the loss of data.
All the pictures and information in the manual have been submitted for illustrative
purposes only and are subject to change without prior notice.

Dziękujemy za wybór produktu Overmax.
Przed użyciem prosimy o uważne zapoznanie się z
instrukcją obsługi urządzenia.
W razie pytań prosimy odwiedzić naszą stronę
www.overmax.eu
OPIS FUNKCJI:
Wygląd i przyciski
Panel przedni
Obiektyw
Głośnik

Panel tylny
Lewy panel
Prawy panel
Dioda LED
Wyświetlacz
Przycisk OK
Przycisk trybów
Przycisk blokady
Przycisk zasilania
Slot karty micro SD
Przycisk dalej
Przycisk wstecz
Przycisk menu

Panel górny
Panel dolny
Mocowanie
uchwytu
Port HDMI
Port USB
Mikrofon
Reset

SPOSÓB UŻYCIA
Funkcje i opis
Instalacja karty micro SD
Podczas instalacji karty SD usłyszysz
kliknięcie, oznaczać to będzie poprawnie
zainstalowaną kartę pamięci.
Aby wyjąć kartę SD, wciśnij ją delikatnie,
co spowoduje jej wysunięcie.
Uwaga:
1. Przed pierwszym użyciem włóż kartę micro SD (4 GB do
32 GB), karta powinna być minimum 6 klasy oraz w formacie
plików fat32.
2. Karta Micro SD można włożyć tylko w jeden sposób. Próba
włożenia go w inny sposób może spowodować uszkodzenie
urządzenia i karty pamięci.
3. Wyłączaj rejestratora przed włożeniem lub wyjęciem karty
Micro SD.
Ładowanie i zasilanie
Należy w pełni naładować baterię przed pierwszym
włączeniem. Do naładowania należy użyć
dołączonej ładowarki samochodowej 12V oraz
portu mini USB.

Uwaga: Urządzenie powinno być używane przy
stale podłączonym źródle zasilania. Wbudowany
akumulator pozwala na krótkotrwałe użycie
kamery.
Uchwyt
Dołączony do zestawu uchwyt, pozwala
zamocować kamerę na szybie pojazdu.
Podłączenie zasilania w pojeździe
1. Włóż przewód zasilający do gniazda zapalniczki
w samochodzie.
2.Podłącz końcówkę USB kabla zasilającego do
portu USB rejestratora.
Uwaga:
1. Urządzenie włączy się automatycznie i rozpocznie nagrywanie.
2.W przypadku, kiedy akumulator zostanie w pełni wyczerpany
urządzenie przejdzie w stan ochrony i wyłączy się.
3.Prosimy ładować rejestrator, co najmniej 10 minut po
rozładowaniu, aby upewnić się, że można włączyć urządzenie
ponownie.

Włączanie / wyłączanie
Włączanie: naciśnij i przytrzymaj przycisk zasilania
przez około 2 sekundy, pojawi się ekran powitalny
oraz dioda niebieska LED zapali się.
Wyłączanie: naciśnij i przytrzymaj przycisk
zasilania przez 2 sekundy, pojawi się ekran
pożegnalny i rejestrator wyłączy się.
Przełączanie między trybami
Rejestrator posiada 3 tryby: wideo, zdjęcia,
podgląd. Do przełączania między trybami służy
przycisk .
Nagrywanie wideo
1.Wciśnij i przytrzymaj przycisk zasilania, aby włączyć
urządzenie.
Jeśli rejestrator samochodowy zakończy procedury
startowe, to przejście do trybu wideo i rozpoczęcie
nagrywania zostanie wyzwolone automatycznie, w
lewym górnym rogu pojawi się symbol kamery.

2. Naciśnij przycisk OK, aby rozpocząć nagrywanie,
naciśnij przycisk OK, aby zatrzymać nagrywanie wideo:
Tryb wideo
WDR
G-sensor
Czas nagrania
Czas klipu wideo
Wykrywanie ruchu
EV Rozdzielczość wideo
Nagrywanie dźwięku
Karta pamięci
Data i czas
Bateria
Table of contents
Languages:
Other Overmax Dashcam manuals

Overmax
Overmax OV-CAM-02 User manual

Overmax
Overmax CamRoad-6.1 User manual

Overmax
Overmax CamRoad 2.2 User manual

Overmax
Overmax Motocom 3.0 User manual

Overmax
Overmax CamRoad 4.1 User manual

Overmax
Overmax CamRoad 4.5 User manual

Overmax
Overmax CamRoad2.3 User manual

Overmax
Overmax Camspot 4.9 Pro User manual

Overmax
Overmax OV-CAM-03 User manual

Overmax
Overmax Camroad Mirror User manual