Overmax X-Wave User manual

Instrukcja obsługi / User Manual /
Bedienungsanleitung / Manuale d’uso /
Manuel de l’Utilisateur / Manual de usuario /
Handleiding / Посібник користувача /
Vartotojo vadovas / Korisnički priručnik
IT
LT
FR
HR
PL
ES
EN
NL
DE
UK
Wave

EN: The product complies with requirements of EU directives.
Pursuant to the Directive 2012/19/EU, this product is subject to selective collection.
The product must not be disposed of along with domestic waste as it may pose a
threat to the environment and human health. The worn-out product must be handed
over to the electrics and electronics recycling center.
DE: Das Produkt stimmt mit den Richtlinien der Europäischen Union.
Gemäß der Richtlinie 2012/19/UE unterliegt das Produkt einer getrennten Sammlung.
Das Produkt darf man nicht zusammen mit kommunalen Abfällen entsorgen,
weil das die Gefahr für die Umwelt und die Gesundheit der Menschen bilden kann.
Das verbrauchte Produkt soll man in einem entsprechenden Rücknahmepunkt für
Elektro- und Elektronik-Altgeräte zurückgeben.
PL: Produkt zgodny z wymaganiami dyrektyw Unii Europejskiej.
Zgodnie z Dyrektywą 2012/19/UE, niniejszy produkt podlega zbiórce selektywnej.
Produktu nie należy wyrzucać wraz z odpadami komunalnymi, gdyż może stanowić
on zagrożenie dla środowiska i zdrowia ludzi. Zużyty produkt należy oddać do punktu
recyklingu urządzeń elektrycznych i elektronicznych.
IT: Prodotto conforme ai requisiti delle direttive dell’Unione Europea.
In conformità alla direttiva 2012/19/UE, questo prodotto è soggetto a raccolta
dierenziata. Il prodotto non deve essere smaltito con i rifiuti domestici perché può
costituire una minaccia per l’ambiente e la salute umana. Si prega di restituire il vecchio
prodotto al punto di raccolta applicabile per il riciclaggio di apparecchiature elettriche ed
elettroniche.
FR: Le produit est conforme aux exigences des directives de l’Union européenne.
Conformément à la Directive 2012/19/UE, le présent produit est soumis à la collecte
séparée. Il convient de ne pas jeter le produit avec les déchets ménagers, car il peut
constituer un danger pour l’environnement et la sainte humaine. Le produit usé
devrait être remis au point de recyclage des appareils électriques et électroniques.

ES: El producto cumple los requisitos de las directivas de la Unión Europea.
De acuerdo con la Directiva 2012/19/UE, este producto está sujeto a recogida selectiva.
El producto no debe eliminarse con los residuos municipales, ya que puede suponer una
amenaza para el medio ambiente y la salud humana. Por favor, entrega el producto que
ya no vayas a utilizar a un centro de reciclaje de dispositivos eléctricos y electrónicos.
NL: Product in overeenstemming met de eisen van de richtlijnen van de Europese Unie.
In overeenstemming met Richtlijn 2012/19/EU moet dit product gescheiden worden
ingezameld. Het product mag niet met het huisvuil worden weggegooid omdat het
een bedreiging kan vormen voor het milieu en de volksgezondheid. Lever uw oude
product in bij het daarvoor bestemde inzamelpunt voor recycling van elektrische en
elektronische apparatuur.
UK: Продукт відповідає вимогам директив Європейського Союзу.
Відповідно до Директиви 2012/19/ЄС цей продукт підлягає вибірковому
збору. Продукт не слід утилізувати разом із побутовими відходами, оскільки
це може становити загрозу навколишньому середовищу та здоров’ю людей.
Використаний продукт слід здати до пункту переробки електричних та
електронних пристроїв.
LT: Produktas atitinka Europos Sąjungos direktyvų reikalavimus.
Pagal 2012/19 / ES Direktyvą šis produktas yra rūšiuojamas. Produkto negalima
išmesti su komunalinėmis atliekomis, nes tai gali kelti grėsmę aplinkai ir žmonių
sveikatai. Panaudotą gaminį reikia nugabenti į elektros ir elektroninės įrangos
perdirbimo punktą.
HR: Proizvod je sukladan propisima Direktive Europske Unije.
Sukladno Direktivi 2012/19/UE ovaj proizvod spada u selektivno skupljanje. Proizvod
se ne smije bacati skupa s drugim komunalnim otpadom, jer može predstavljati
prijetnju za okoliš i ljudsko zdravlje. Potrošeni proizvod je potrebno odnijeti u centar
za zbrinjavanje električnih i elektroničkih uređaja.

1
2
1
3
65
1
2
5
4
3
2
4
7

4
3
1 2
3
4
11
5
6 8
9
10
7
OPEN

5
6
1
1
2
2

7
11
22
22
33
44
44
55
66
66
11
11

8
1
2

PL
Wprowadzenie
Drogi Kliencie!
Dziękujemy za obdarzenie nas zaufaniem i wybranie marki Overmax.
Dzięki wykorzystaniu wysokiej jakości materiałów i nowoczesnych rozwiązań
technologicznych oddajemy w Twoje ręce produkt idealny do codziennego
użytkowania. Jesteśmy pewni, że dzięki ogromnej staranności wykonania spełni
on Twoje wymagania. Przed użyciem produktu zapoznaj się dokładnie z poniższą
instrukcją obsługi.
Jeśli masz jakiekolwiek uwagi lub pytania do zakupionego produktu, skontaktuj
się z nami:
Ważne informacje:
Prosimy oprzeczytanie tej instrukcji przed przystąpieniem do obsługi produktu,
aby zapoznać się zjego funkcjami iwykorzystać je zgodnie zprzeznaczeniem.
1.
Nie należy naprawiać oraz dokonywać modyfikacji urządzenia. Czynności
te może dokonać tylko autoryzowany serwis.
2. Nie uruchamiaj urządzenia, jeżeli zauważyłeś jakiekolwiek uszkodzenia.
3.
Nie używaj urządzenia, gdy zaczyna wadliwie działać, zostało upuszczone
lub zanurzone wwodzie, nadmiernie nagrzewa się, pojawią się odbarwienia,
wybrzuszenia oraz gdy wystąpią inne nietypowe zjawiska. Skontaktuj się
zautoryzowanym serwisem producenta.
4. Nigdy nie zostawiaj baterii podłączonej do ładowania bez nadzoru.
5.
Urządzenie jest przeznaczone dla osób powyżej 5 roku życia.
Nie pozwalaj, aby młodsze dzieci nim się bawiły.
6.
Używaj urządzenia zdala od źródeł ciepła, wysokich temperatur, gorących
powierzchni, bezpośredniego światła słonecznego, źródeł iskrzenia,
otwartego ognia, olei oraz ostrych krawędzi.
7.
Nie używaj urządzenia wotoczeniu zawierającego łatwopalne, wybuchowe
lub toksyczne substancje.

PL
8. Nie używaj substancji chemicznych do czyszczenia urządzenia.
9. Po każdym użyciu wyłącz urządzenie iodłącz baterię.
10. Przed czyszczeniem lub przenoszeniem urządzenia, wyłącz je.
11.
Nie używaj urządzenia do innych celów, niż do których zostało ono
zaprojektowane.
12. Trzymaj urządzenie zdala od ostrych przedmiotów.
13. Nie kładź innych przedmiotów na urządzeniu, kiedy zniego korzystasz.
14.
Korzystaj zurządzenia tylko na płaskich itwardych powierzchniach. Unikaj
jazdy po piasku, trawie lub innych powierzchniach, które mogą spowodować
uszkodzenie urządzenia.
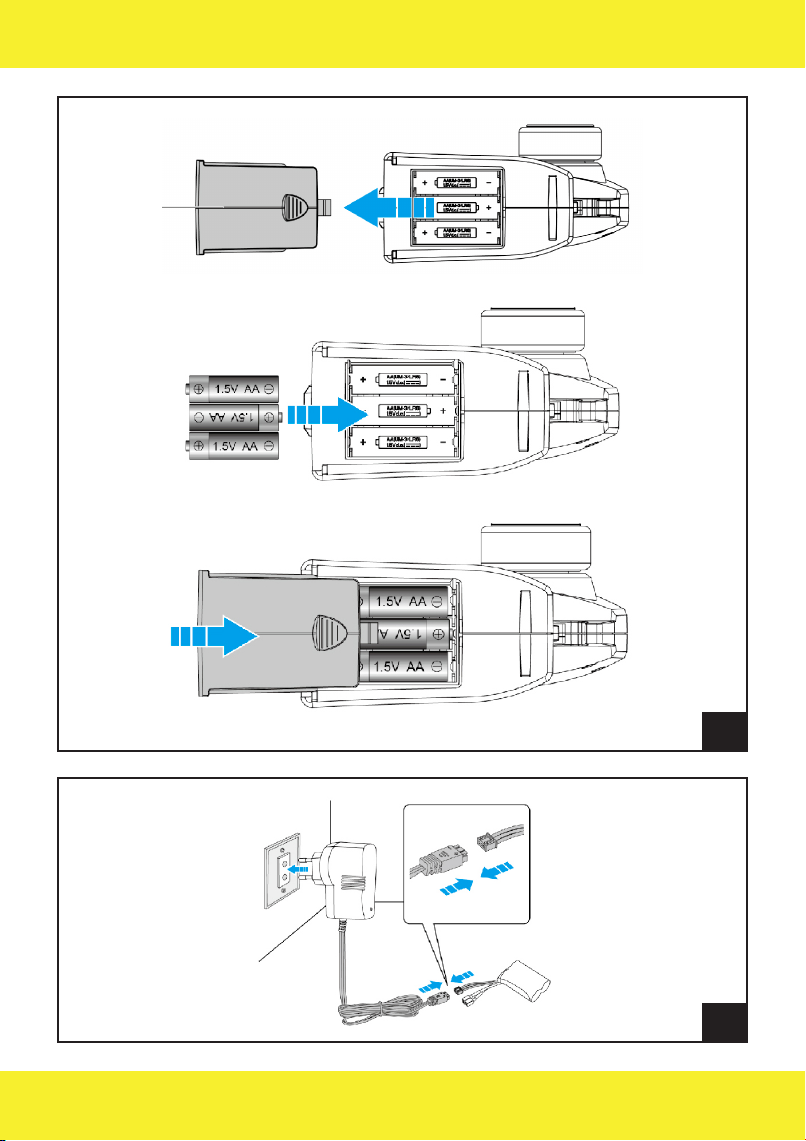
15.
Do ładowania baterii używaj tylko przewodu ładującego załączonego do
zestawu.
16. Po każdym ładowaniu odłącz przewód ładujący od gniazda USB.
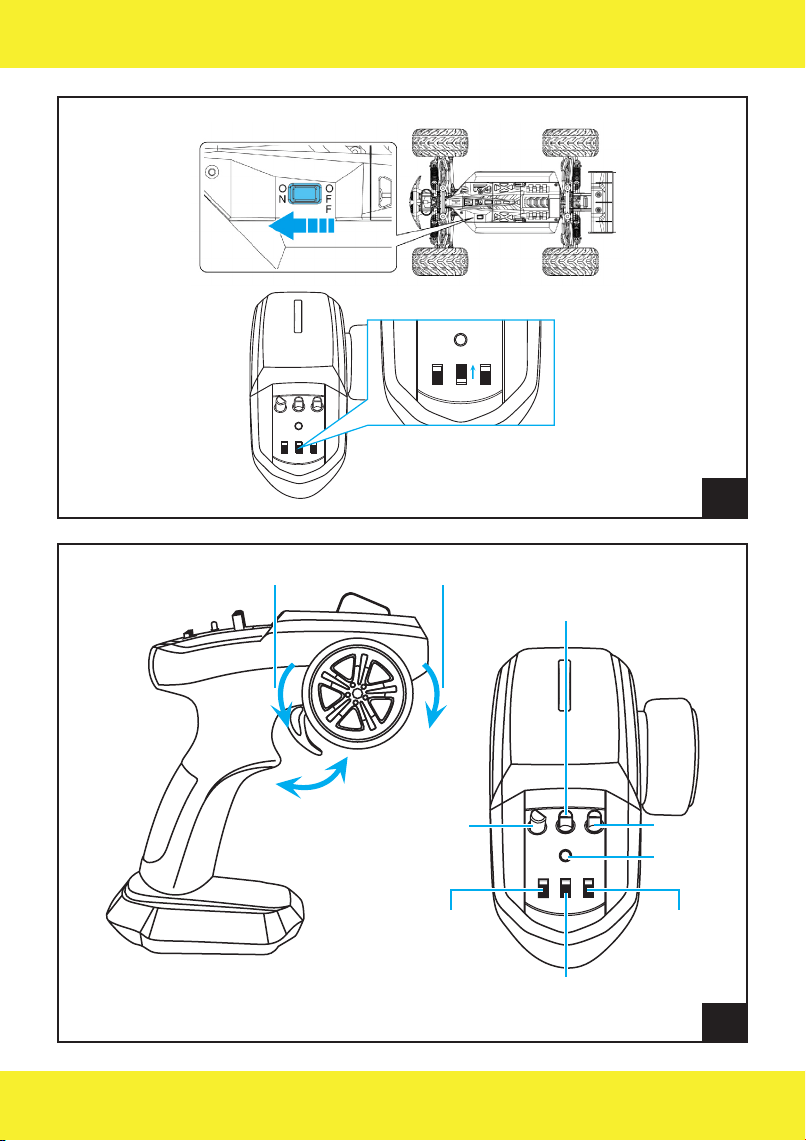
17. Zwracaj uwagę na polaryzację baterii wurządzeniu oraz wkontrolerze.
18.
Wurządzeniu używaj tylko baterii załączonej wzestawie, wkontrolerze
używane są trzy baterie AA 1,5 V (nie znajdują się one wzestawie).
Wkontrolerze nie należy używać akumulatorków.
19.
Po użyciu nie dotykaj silnika samochodu, ponieważ może mieć wysoką
temperaturę.
20.
Źródło zasilania stosowane przy tej zabawce elektrycznej powinno być
regularnie kontrolowane pod kątem uszkodzeń przewodu zasilania,
wtyczki, obudowy lub innych części, awrazie uszkodzeń nie powinno być
wykorzystywane do momentu jego naprawienia.
21.
Zabawki nie można przyłączać do więcej niż zalecana liczby źródeł zasilania.
22. Akumulatory należy ładować tylko pod nadzorem osób dorosłych.
23. Akumulatory należy przed ładowaniem wyciągnąć zzabawki.
24. Nie należy wkładać różnych typów baterii lub nowych iużywanych baterii.
25. Wyczerpane baterie należy wyjąć zzabawki.
26. Zacisków zasilania nie należy zwierać.
27. Baterii jednorazowego użytku nie należy ładować.
28. Baterie należy wkładać z zachowaniem prawidłowej biegunowości.
29. Wodoodporność: IP57.
Ostrzeżenie. Nieodpowiednie dla dzieci w wieku poniżej 3 lat.
Małe części. Ryzyko zadławienia.

PL
1. Opis zawartości opakowania (patrz rys. 1):
1. Nadwozie
2. Kontroler
3. Podwozie
4. Bateria Li-ion 1500 mAh, 7.4V
5. Przewód zasilający
6. Klucz krzyżowy
7. Śrubokręt
Zasilacz nie jest dołączony do zestawu. Używaj zasilacza o podanej specyfikacji:
5V 1A
2. Schemat podłączenia wtyczek (patrz rys. 2):
1. Wtyczka lampki
2. Wtyczka kontrolera
3. Wtyczka silnika
4. Wtyczka baterii
5. Włącznik i wskaźnik mocy
3. Parowanie kontrolera z samochodem (patrz rys. 3):
• Przesuń włącznik na samochodzie do pozycji „ON”, aby włączyć pojazd.
• Przesuń włącznik kontrolera do pozycji „ON”. Dioda zasilania się zapali.
Jeżeli dioda się nie zapali, sprawdź stan baterii kontrolera oraz czy zostały
poprawnie włożone.
• Odczekaj ok. 15 sekund, aż kontroler połączy się z samochodem.
4. Opis kontrolera (patrz rys. 4):
1. Skręt w lewo
2. Skręt w prawo

PL
3. Naprzód
4. Hamulec / cofanie
5. Regulator przyspieszenia
6. Odwrotny kierunek działania przepustnicy
7. Włącznik
8. Odwrotny kierunek działania pokrętła sterowania
9. Dioda zasilania/połączenia
10. Regulator zbieżności kół
11. Regulator zakresu skrętu kół
5. Montaż baterii w kontrolerze (patrz rys. 5):
• Zdejmij pokrywę baterii (1).
•
Włóż 3 baterie alkaliczne AA. Zwróć szczególną uwagę na polaryzację baterii.
• Załóż pokrywę z powrotem (1).
6. Ładowanie baterii (patrz rys. 6):
Przed użyciem naładuj baterię.
1. Odłącz baterię od samochodu przed ładowaniem.
2. Podłącz wtyczkę baterii do kabla USB. Podłącz kabel USB do zasilacza.
3. Ładowanie trwa około 150 minut.
4. Odłącz baterię i włóż ją do samochodu.
7. Instalacja baterii w samochodzie (patrz rys. 7):
1. Zdejmij nadwozie.
2. Obróć haczyki na zewnątrz.
3. Otwórz pokrywę baterii.
4. Zdejmij pokrywę i podłącz wtyczkę baterii do wtyczki w samochodzie.
5.
Włóż podłączoną baterię, załóż i zabezpiecz haczykami pokrywę baterii. Aby
dokonać deinstalacji baterii, postępuj krok po kroku w odwrotnej kolejności

PL
8. Sterowanie pojazdem (patrz rys. 8):
• Kręć pokrętłem w lewo lub w prawo, aby poruszać przednimi kołami.
•
Naciśnij przepustnicę kontrolera, aby jechać do przodu. Im mocniej
przepustnica jest przesunięta, tym samochód szybciej będzie się poruszał.
Przesuń przepustnicę do przodu, aby zahamować, a następnie jechać do tyłu.
9. Opis funkcji kontrolera (patrz rys. 4):
•
Jeśli zauważysz, że samochód zamiast jechać prosto, lekko zbacza na lewo
lub na prawo, możesz wyregulować skręt regulatorem na kontrolerze (5).
•
Trzymaj przód auta w powietrzu, podczas używania regulatora zakresu
skrętu kół.
•
Aby zmienić kąt skrętu kół, przekręć pokrętło regulacji skrętu kół (11)
w prawo, wówczas kąt zostanie zwiększony lub w lewo kąt się zmniejszy.
Jeśli ustawisz pokrętło na „0”, samochód nie skręci.
•
Aby odpowiednio dostosować prędkość, przekręć regulator przepustnicy (10)
w prawo, a maksymalna prędkość się zwiększy. Przekręć regulator w lewo,
a prędkość maksymalna się zmniejszy.
10. Czyszczenie i konserwacja
• Przed czyszczeniem wyłącz urządzenie i odłącz baterię.
• Nałóż olej na wszystkie ruchome części.
• Czyść samochód i kontroler wilgotną szmatką.
• Nie używaj substancji chemicznych do czyszczenia urządzenia.
•
Po każdym użyciu oczyść samochód z piasku i pyłu. Wysusz, jeżeli
urządzenie miało kontakt z wodą.
Ilustracje zamieszczone wyłącznie w celach informacyjnych. Rzeczywisty wygląd
produktów może różnić się od przedstawionych na zdjęciach.

EN
Introduction
Dear customer!
Thank you for placing trust in us and choosing Overxmax.
Thanks to the use of high-quality materials and modern solutions, we provide
you with a product perfect for everyday use. We are convinced that the product
will satisfy your requirements as it has been manufactured with utmost care.
Before you use the product, please read this manual carefully.
Should you have any remarks or questions concerning the product, please do
not hesitate to contact us:
Important:
Please read this manual before you start using the product to see all its
functions and use them in accordance with intended use.
1. Do not repair or modify the device. Only an authorized service technician
is allowed to perform these operations.
2. Do not switch the device on if you have noticed any damage.
3.
Do not use the device when it acts up, has been dropped or immersed in water,
overheats extensively, is discolored or deformed, and when other atypical
circumstances occur. Contact the manufacturer’s authorized service center.
4. Never leave the charging battery unattended.
5. The device is intended for persons aged above 5. Do not let younger children
play with it.
6. Use the device away from sources of heat, high temperatures, hot surfaces,
direct sunlight, source of ignition, naked flame, oils and sharp edges.
7. Do not use the device in inflammable, explosive or toxic atmosphere.
8. Do not use chemicals to clean the device.
9. After every use, switch the device o and disconnect the battery.

EN
10. Before you start cleaning or moving the device, switch it o.
11. Do not use the device for other purposes than designed.
12. Keep the device away from sharp items.
13. Do not place other items on the device when you use it.
14.
Use the device on flat and hard surfaces only. Avoid going on sand, grass or
other surfaces which may lead to damage.
15. To charge abattery, use asupplied charging cable only.
16. After every charging, disconnect the charging cable from USB port.
17. Pay attention to battery polarization in the device and controller.
18.
In the device use the supplied battery only, in the controller three batteries
AA 1,5V are used (they are not supplied). In the controller do not use storage
batteries.
19. After the use, do not touch acar engine because it may be extremely hot.
20.
Transformer, power supply, or battery charger used with the electric toy
shall be regularly examined for damage to the supply cord, plug, enclosure
or other parts, and in the event of such damage, it shall not be used until
the damage has been repaired.
21.
The toy must not be connected to more power sources than recommended.
22. Recharge the batteries only under adult supervision.
23. Batteries must be removed from the toy before charging.
24. Do not use dierent types of batteries or new and used batteries.
25. Remove exhausted batteries from the toy.
26. Power terminals should not be short-circuited.
27. Non-rechargeable batteries should not be recharged.
28. The batteries must be inserted with the correct polarity.
29. Waterproof: IP57.
Warning. Not suitable for children under 3 years. Small parts. Choking
hazard.
1. Description of box content (see fig. 1):
1. Bodywork
2. Controller
3. Chassis
4. Battery Li-ion 1500 mAh, 7.4V

EN
5. Power cord
6. Lug wrench
7. Screwdriver
The power adapter is not supplied. Use the power supply of the following
parameters: 5V 1A
2. Plug connection diagram (see fig. 2):
1. LED’s plug
2. Controller’s plug
3. Motor’s plug
4. Battery’s plug
5. On/o switch and power indicator
3. How to pair controller with car (see fig. 3):
• Slide the switch on the car into „ON” to activate the vehicle.
• Slide the controller’s switch into „ON”. Power LED will go on.
•
If the LED fails to go on, check the controller’s batteries for suitable condition
and proper assembly.
• Wait for about 15 seconds until the controller has connected to the car.
4. Description of controller (see fig. 4):
1. Turn left
2. Turn right
3. Forward
4. Brake/Reverse
5. Acceleration adjustment
6. Reversed direction of throttling valve operation
7. On/O switch
8. Reversed direction of control knob operation
9. Power/connection LED

EN
10. Toe-in adjustment
11. Wheel turn adjustment
5. How to assemble batteries in controller (see fig. 5):
• Remove battery cover (1).
• Insert 3 AA alkaline batteries. Pay special attention to battery polarity.
• Put the cover back on (1).
6. How to charge batteries (see fig. 6):
Charge the battery before use.
1. Disconnect the battery from the car before charging.
2. Connect the battery plug to USB cable. Connect the USB cable to the po-
wer adapter.
3. After about 150 minutes charging will be completed.
4. Disconnect the battery and put it in the car.
7. How to install battery in car (see fig. 7):
1. Remove the bodywork.
2. Turn the hooks outside.
3. Open the battery cover.
4. Remove the cover and connect the battery plug to car plug.
5. Insert the connected battery, put and secure the battery cover with hooks.
To deinstall the battery, take these steps in a reversed order.
8. How to control (see fig. 8):
• Turn the knob left or right to move front wheels.
• Press the controller throttling valve to drive forward. The farther you move
the throttling valve, the faster the car drives. Slide the throttling value
forward to brake, and then to reverse.

EN
9. Description of controller functions (see fig. 4):
• If you can see the car deviates to the left or right instead of going straight,
you can adjust the turn with toe-in adjustment on the controller (5). Keep
the front of the car in the air when using the adjustment.
•
To change the wheel turning angle, turn the wheels turning adjustment knob
(11) to the right to increase the angle, or to the left to reduce the angle. If
you set the knob in „0” position, the car will not turn.
•
To adjust the speed, turn the throttling valve adjustment (10) to the right and
the maximum speed will be increased. Turn it left to reduce the maximum
speed.
10. How to clean and maintain
•
Before you start cleaning, switch the device o and disconnect the battery.
• Apply oil on all moving parts.
• Clean the car and controller with a wet cloth.
• Do not use chemicals to clean the device.
•
After every use, remove dust and sand from the car. Dry if the device had
a contact with water.
The pictures are for reference only. The real design of products may dier from
the pictures presented.

DE
Einführung
Sehr geehrter Kunde!
Wir möchten uns bei Ihnen bedanken, dass Sie uns vertraut und die Marke
Overmax gewählt haben.
Wir übergeben Ihnen ein Produkt, das sich dank hochqualitativer Materialien und
moderner technologischer Lösungen perfekt für den täglichen Gebrauch eignet.
Wir sind sicher, dass die sorgfältige Ausführung Ihre Anforderungen erfüllt.
Vor der Benutzung des Produkts machen Sie sich mit der vorliegenden
Bedienungsanleitung vertraut.
Falls Sie Fragen oder Anmerkungen zu dem eingekauften Produkt haben, setzen
Sie sich mit uns in Verbindung:
Wichtige Informationen:
Bitte, die vorliegende Bedienungsanleitung vor dem Gebrauch des
Gerätes durchzulesen, um seine Funktionen kennen zu lernen und es
bestimmungsgemäß zu verwenden.
1.
Das Gerät darf nicht repariert oder modifiziert werden. Diese Tätigkeiten dürfen
nur durch ein autorisiertes Service durchgeführt werden.
2. Betätigen Sie das Gerät nicht, wenn Sie die Beschädigungen bemerkten.
3.
Das Gerät soll nicht verwendet werden, wenn es mangelhaft funktioniert,
fallen gelassen oder eingeweicht wurde oder, wenn andere ungewöhnlichen
Erscheinungen vorkommen. Nehmen Sie Kontakt mit dem autorisierten Service
des Herstellers auf.
4. Lassen Sie die Batterie während des Ladevorgangs nie unbeaufsichtigt.
5.
Dieses Gerät ist kein Spielzeug. Das Gerät ist für die Kinder über 5 Jahre alt
bestimmt. Lassen Sie nicht zu, dass die Kinder mit ihm spielen.
6.
Das Gerät soll weit von den Wärmequellen, hohen Temperaturen, heißen
Flächen, direkter Sonnenstrahlung, Funkenquellen, oenem Feuer, Ölen und
scharfen Kanten verwendet werden.

DE
7.
Benutzen Sie das Gerät nicht in der Nähe von brennbaren, explosiven oder
toxischen Stoen.
8. Verwenden Sie keine Chemikalien zur Reinigung des Gerätes.
9. Nach jedem Gebrauch schalten Sie das Gerät aus und .schalten Sie die Batterie ab.
10. Vor der Reinigung oder Tragen des Gerätes, schalten Sie es aus.
11.
Das Gerät darf nicht für die anderen Zwecke als die bestimmungsgemäße
Verwendung benutzt werden.
12. Bewahren Sie das Gerät weit von den scharfen Gegenständen auf.
13. Bei der Verwendung stellen Sie keine Gegenstände auf das Gerät.
14.
Benutzen Sie das Gerät nur auf ebenen und harten Oberflächen. Vermeiden Sie
die Sandflächen, Gras oder andere Fläche, die eine Beschädigung des Gerätes
verursachen können.
15. Zum Laden der Batterie verwenden Sie nur ein im Set beinhalteten Ladekabels.
16. Nach jedem Gebrauch klemmen Sie das Ladekabel von der USB-Buchse ab.
17. Beachten Sie die richtige Polarisation der Batterien im Gerät oder Controller.
18.
Im Gerät benutzen Sie nur die im Set beinhaltete Batterie. Im Controller werden
drei Batterien AA 1,5V benutzt (nicht im Set beinhaltet). Im Controller dürfen
keine Akkus verwendet werden.
19. Nach dem Gebrauch fassen Sie den Motor des Autos nicht an, weil er sehr heiß
sein kann.
20.
Der mit dem elektrischen Spielzeug verwendete Transformator, das Netzteil
oder das Batterieladegerät müssen regelmäßig auf Beschädigungen des
Versorgungskabels, des Steckers, des Gehäuses oder anderer Teile überprüft
werden. Im Falle einer solchen Beschädigung darf es erst verwendet werden,
wenn der Schaden behoben wurde .
21.
Das Spielzeug darf nicht an mehr Stromquellen als empfohlen angeschlossen
werden.
22. Laden Sie die Batterien nur unter Aufsicht von Erwachsenen auf.
23. Vor dem Laden müssen die Batterien aus dem Spielzeug entfernt werden.
24. Verwenden Sie keine anderen Batterietypen oder neue und gebrauchte Batterien.
25. Entfernen Sie die verbrauchten Batterien aus dem Spielzeug.
26. Stromanschlüsse dürfen nicht kurzgeschlossen werden.
27. Nicht wiederaufladbare Batterien sollten nicht aufgeladen werden.
28. Die Batterien müssen mit der richtigen Polarität eingelegt werden.
29. Wasserdicht: IP57.
Warnung. Nicht für Kinder unter 3 Jahren geeignet. Kleine Teile.
Erstickungsgefahr.
Table of contents
Languages:
Other Overmax Motorized Toy Car manuals

Overmax
Overmax X-Monster 3.0 User manual

Overmax
Overmax X-rally 2.0 User manual

Overmax
Overmax X-Monster 3.0 User manual

Overmax
Overmax X-Strike User manual

Overmax
Overmax X-Blast User manual

Overmax
Overmax X-Hooligan User manual

Overmax
Overmax X-Quest User manual

Overmax
Overmax OV-X-Monster 3.0 User manual