Overmax X-Hooligan User manual

IT
LT
FR
HR
PL
ES
EN
NL
DE
UK
Instrukcja obsługi / User Manual /
Bedienungsanleitung / Manuale d’uso /
Manuel de l’Utilisateur / Manual de usuario /
Handleiding / Посібник користувача /
Vartotojo vadovas / Korisnički priručnik

1
2
3 4

5
1
2
8
9
10
3
4
5
6
7

10
6
7
A B
8 9
AB

12
11

PL Wprowadzenie
Drogi Kliencie!
Dziękujemy za obdarzenie nas zaufaniem i wybranie marki Overmax.
Dzięki wykorzystaniu wysokiej jakości materiałów i nowoczesnych rozwiązań
technologicznych oddajemy w Twoje ręce produkt idealny do codziennego
użytkowania. Jesteśmy pewni, że dzięki ogromnej staranności wykonania
spełni on Twoje wymagania. Przed użyciem produktu zapoznaj się dokładnie
z poniższą instrukcją obsługi.
Jeśli masz jakiekolwiek uwagi lub pytania do zakupionego produktu, skontaktuj
się z nami:
WAŻNE INFORMACJE
Prosimy o przeczytanie tej instrukcji przed przystąpieniem do obsługi
urządzenia, aby zapoznać się z jego funkcjami i wykorzystać je zgodnie z
przeznaczeniem.
1.
Urządzenie przeznaczone jest dla osób powyżej 14 roku życia. Nie
pozwalaj, aby młodsze dzieci bawiły się urządzeniem. Przechowuj
urządzenie w miejscu niedostępnym dla dzieci.
2.
Dzieci powyżej 14. roku życia mogą korzystać z urządzenia pod nadzorem
dorosłych.
3. Urządzenie nie nadaje się do jazdy w ruchu drogowym, w zatłoczonych
przestrzeniach, oraz w przestrzeniach, w których łatwo spowodować
kolizję z pieszymi bądź z innymi pojazdami.
4.
Ponieważ urządzenie sterowane jest bezprzewodowo, należy uważać
na zakłócenia sygnału wywołane innymi znajdującymi się w pobliżu
urządzeniami.
5.
Po użyciu nie dotykaj silnika samochodu, ponieważ urządzenie nagrzewa
się w trakcie jazdy i może osiągać wysokie temperatury.
6.
Unikaj używania urządzenia w nocy oraz w miejscach z ograniczoną
widocznością.

PL
7.
Nie należy korzystać z urządzenia w złych warunkach pogodowych, takich
jak burza lub silne opady deszczu.
8.
Jeśli korzystasz z urządzenia na plaży, nie dopuść do kontaktu urządzenia
z wodą morską, która może działać niszcząco na obudowę oraz posiada
wysoką przewodność elektryczną.
9.
Nie należy naprawiać oraz dokonywać modyfikacji urządzenia. Czynności
te może wykonać tylko autoryzowany serwis.
10. Nie używaj urządzenia, jeżeli zauważyłeś jakiekolwiek uszkodzenia.
11.
Nie używaj urządzenia, gdy zaczyna wadliwie działać, nadmiernie się
nagrzewa, pojawią się odbarwienia, wybrzuszenia, wydaje nienaturalne
dźwięki, zapachy oraz gdy wystąpią inne nietypowe zjawiska. W takich
przypadkach skontaktuj się z autoryzowanym serwisem.
12.
Używaj urządzenia z dala od źródeł ciepła, wysokich temperatur, gorących
powierzchni, bezpośredniego światła słonecznego, źródeł iskrzenia,
otwartego ognia, olei oraz ostrych krawędzi.
13.
Nie używaj urządzenia w otoczeniu zawierającego łatwopalne, wybuchowe
lub toksyczne substancje.
14. Nie używaj substancji chemicznych do czyszczenia urządzenia.
15. Po każdym użyciu wyłącz urządzenie i odłącz baterię.
16. Jeśli urządzenie nie jest używane przez dłuższy czas, wyjmij wszystkie
baterie.
17.
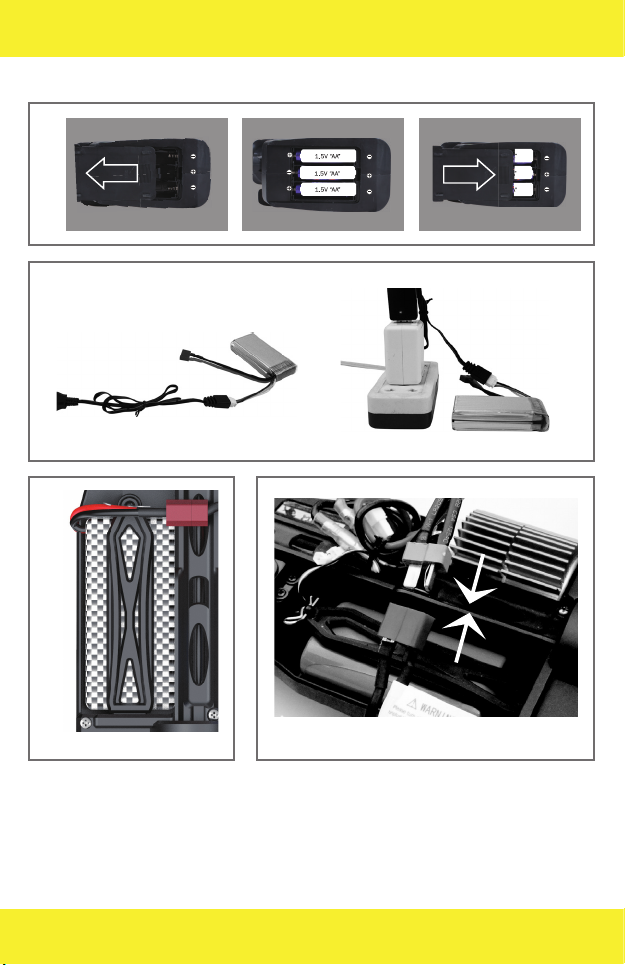
Do ładowania akumulatora używaj tylko przewodu zasilającego
dołączonego do zestawu.
18.
Akumulator oraz przewód zasilający powinny być regularnie kontrolowane
pod kątem uszkodzeń. Nie używaj uszkodzonych elementów.
19.
Urządzenia nie można przyłączać do większej niż zalecana liczba źródeł
zasilania.
20. Baterie nie powinny być ładowane.
21. Akumulatory powinny być ładowane tylko pod nadzorem dorosłych.
22. Akumulator należy przed ładowaniem wyjąć z urządzenia.
23.
Nie należy wkładać różnych typów baterii lub nowych i używanych baterii.
24. Baterie należy wkładać z zachowaniem prawidłowej biegunowości.
25. Wyczerpane baterie należy wyjąć z urządzenia.

PL
26. Zacisków zasilania nie należy zwierać.
27. Nie należy samodzielnie zmieniać obwodów elektrycznych silnika.
28. Przed czyszczeniem wyłącz urządzenie i wyjmij akumulator.
29. Nie używaj urządzenia niezgodnie z przeznaczeniem.
30. Nie kładź innych przedmiotów na urządzeniu w trakcie korzystania.
31. Przechowuj w suchym, chłodnym i zaciemnionym miejscu.
32. UWAGA! Przed pierwszym użyciem, oderwij naklejkę z silnika.
Produkt zgodny z wymaganiami dyrektyw Unii Europejskiej.
Zgodnie z Dyrektywą 2012/19/UE, niniejszy produkt podlega zbiórce selektywnej.
Produktu nie należy wyrzucać wraz z odpadami komunalnymi, gdyż może
stanowić on zagrożenie dla środowiska i zdrowia ludzi. Zużyty produkt należy
oddać do punktu recyklingu urządzeń elektrycznych i elektronicznych.
Opis zawartości opakowania
1. Kontroler
2. Przewód zasilający USB
3. Akumulator x2
4. Instrukcja obsługi
Montaż baterii w kontrolerze (rys. 1)
1. Zdejmij pokrywę baterii.
2. Włóż trzy baterie alkaliczne AAA. Zwróć uwagę na polaryzację baterii.
3. Zamknij pokrywę baterii
Dioda w kontrolerze prawidłowo sparowanym z urządzeniem będzie świecić
się na czerwono.
Jeśli dioda miga na czerwono, oznacza to niski stan baterii kontrolera,
nieprawidłowy montaż baterii, lub próbę sparowania z samochodem. Upewnij
się, że samochód jest włączony.
Jeśli dioda nie świeci się wcale, sprawdź polaryzację baterii w kontrolerze, a
także poziom ich naładowania.

PL
UWAGA! Jeśli dioda wskazuje na niski stan baterii, przerwij korzystanie z
urządzenia ze względu na możliwość utraty sygnału.
Ładowanie akumulatora (rys. 2)
1. Zestaw zawiera przewód do ładowania USB.
2. Przed ładowaniem wyjmij akumulator z urządzenia.
3. Podłącz wtyczkę baterii do kabla USB.
4.
Ładowanie trwa około 120 minut. Dioda na ładowarce świeci się na
czerwono. Migająca dioda oznacza, że akumulator nie został podłączony
lub został podłączony niepoprawnie.
5. Po zakończonym ładowaniu dioda na ładowarce nie świeci się. Odłącz
baterię i włóż ją do urządzenia. Nie pozostawiaj naładowanego
akumulatora podłączonego do źródła zasilania.
6. UWAGA! Akumulator należy ładować pod nadzorem osoby dorosłej.
Montaż akumulatora w samochodzie
1. Zdejmij pokrywę samochodu.
2. Zdejmij sprzączkę i podnieś pokrywę akumulatora (rys. 3).
3. Włóż akumulator do samochodu. Upewnij się, że wkładasz akumulator
w przeznaczone dla niego miejsce.
4.
Zachowując ostrożność, połącz wtyczkę akumulatora z wtyczką w
samochodzie (rys. 4). Ponownie załóż pokrywę akumulatora i sprzączkę.
Opis kontrolera (rys. 5)
1. Włącznik
2. Zmiana kierunku działania przepustnicy
3. Dioda
4. Regulator zbieżności kół
5. Regulator przyspieszenia
6. Regulator zakresu skrętu kół
7. Zmiana kierunku działania pokrętła sterowania
8. Pokrętło sterowania (lewo/prawo)

PL
9. Hamulec / cofanie
10. Naprzód
UWAGA! Wciśnięcie przepustnicy w kierunku przeciwnym do kierunku jazdy
powoduje hamowanie samochodu. Ponowne wciśnięcie przepustnicy powoduje
cofanie samochodu.
Regulator zbieżności kół
Ustaw kierunek kół sterując pokrętłem regulatora zbieżności kół (rys. 6).
Regulator prędkości i przyspieszenia
Ustaw pożądaną prędkość i przyspieszenie samochodu sterując pokrętłem
regulatora prędkości i przyspieszenia. Obróć w prawo aby zwiększyć ustawienia.
Obróć w lewo aby zmniejszyć ustawienia.
Regulator zakresu skrętu kół
Ustaw pożądany zakres skrętu kół sterując pokrętłem regulatora zakresu
skrętu kół (rys. 7). Obróć w prawo (A) aby zwiększyć zakres skrętu kół. Obróć
w lewo (B) aby zmniejszyć zakres skrętu kół.
Odwrotny kierunek działania przepustni-
cy i pokrętła sterowania
Aby zmienić kierunek skręcania samochodu (lewo/prawo), ustaw suwak (A, rys.
8) w pozycji R. Aby powrócić do ustawień domyślnych, ustaw suwak w pozycji N.
Aby zmienić kierunek jazdy samochodu (przód/tył), ustaw suwak (B, rys. 8) w
pozycji R. Aby powrócić do ustawień domyślnych, ustaw suwak w pozycji N.
Sterowanie samochodem
1.
Włącz samochód przesuwając suwak na pozycję ON (rys. 9). Suwak
znajduje się pod pokrywą auta.
2.
Włącz kontroler przesuwając suwak na pozycję ON (rys. 10). Dioda na
kontrolerze zaświeci się na czerwono. Jeśli dioda nie świeci się, sprawdź
czy baterie są prawidłowo zamontowane i naładowane. Jeśli dioda miga

PL
na czerwono, oznacza to próbę połączenia się z urządzeniem lub niski
stan baterii.
3.
Naciśnij przepustnicę kontrolera (rys. 11) do przodu lub do tyłu, aby
sterować kierunkiem jazdy samochodu (przód / tył).
4. Kręć pokrętłem w przód i w tył (rys. 12), aby poruszać przednimi kołami
i sterować kierunkiem jazdy samochodu (prawo / lewo).
5. W przypadku kolizji, zwolnij przepustnicę.
6.
W przypadku niskiego poziomu naładowania akumulatora, samochód
zmniejszy swoją prędkość, aż do całkowitego zatrzymania się.
7.
Po zakończeniu jazdy należy wyłączyć samochód oraz kontroler, a także
wyjąć akumulator z samochodu, aby zapobiec nadmiernemu zużyciu
baterii.
8. Przed ponownym ładowaniem, pozostaw akumulator do ostygnięcia.
Czyszczenie i konserwacja
1. Przed czyszczeniem wyłącz urządzenie i odłącz baterię.
2. Samochód i kontroler czyść wilgotną ściereczką.
3. Nie używaj substancji chemicznych do czyszczenia urządzenia.
4.
Po każdym użyciu oczyść samochód z piasku i pyłu. Wysusz, jeżeli
urządzenie miało kontakt z wodą.
5. Nałóż olej na wszystkie ruchome części.
Zdjęcia mają charakter poglądowy, rzeczywisty wygląd produktów może się różnić od
prezentowanego na zdjęciach.

EN
Introduction
Dear customer!
Thank you for placing trust in us and choosing Overmax.
Thanks to the use of high-quality materials and modern solutions, we provide
you with a product perfect for everyday use. We are convinced that the product
will meet your requirements as it has been manufactured with utmost care.
Before you use the product, please read this operating manual carefully.
Should you have any remarks or questions concerning the product, please do
not hesitate to contact us:
IMPORTANT
Please read this manual before you start using the device to get familiar with
its functions and use them in accordance with intended use.
1.
The device is intended for persons above the age of 14. Do not let younger
persons play with the device. Keep the device out of reach of children.
2. Children above the age of 14 can use the device if supervised by adults.
3. The device is not suitable for road trac, crowded areas and places in
which collision with pedestrians or other vehicles is highly likely.
4.
As the device is remotely controlled, be aware of potential signal
interference caused by other devices nearby.
5. After use, do not touch the car motor because the device heats up while
driving and may reach high temperatures.
6.
Make sure you do not use the device at night and in limited-visibility areas.
7.
Do not use the device if weather conditions are unfavorable, for example
in case of storm or heavy rain.
8. If you use the device on the beach, do not let the product contact sea water
which may destroy the housing and demonstrates high electrical conductivity.
9.
Do not repair or modify the device. Only an authorized service technician
is allowed to perform these operations.
10. Do not use the device if you have noticed any damage.

EN
11.
Do not use the device when it starts acting up, overheats extensively,
is discolored or deformed, emits abnormal sounds or odors, and when
other atypical circumstances occur. This being the case, contact the
authorized service center.
12.
Use the device away from sources of heat, high temperatures, hot
surfaces, direct sunlight, sources of ignition, naked flame, oils and
sharp edges.
13.
Do not use the device in the inflammable, explosive or toxic atmosphere.
14. Do not use chemicals to clean the device.
15. After every use, switch the device o and remove the battery.
16. If you do not use the device for a long time, remove all batteries.
17. To charge the storage battery, use only the power cable supplied.
18. The storage battery and power cable must be regularly checked for any
damage. Do not use damaged elements.
19.
Thedevice mustnot beconnected tomoresources ofpower than recommended.
20. Batteries must not be charged.
21. Storage batteries can be charged if supervised by adults.
22. Before charging, the storage battery must be taken out of the device.
23. Do not insert various batteries or mix new and old batteries.
24. When inserting batteries, pay attention to correct polarity.
25. Worn-out batteries must be removed from the device.
26. Avoid short circuits of power terminals.
27. Do not change electric circuits of the motor on your own.
28. Before cleaning, switch the device o and remove the storage battery.
29. Do not use the device at variance with its intended use.
30. Do not place other items on the device while using.
31. Store in a dry, cold and dark place.
32. WARNING! Tear o the motor sticker before first use.
The product complies with requirements of EU directives.
Pursuant to the Directive 2012/19/EU, this product is subject to selective

EN
collection. The product must not be disposed of together with domestic waste
as it may pose a threat to the environment and human health. The worn-out
product must be handed over to the electrics and electronics recycling center.
Description of the content
1. Controller
2. USB power cable
3. Storage battery x2
4. Operating manual
How to install batteries in the controller
(fig. 1)
1. Remove the battery cover.
2.
Insert three AAA alkaline batteries. Pay attention to polarity of the
battery.
3. Close the battery cover.
The LED light in the controller properly paired with the device will glow in red.
If the LED light flashes in red, it means a low battery of the controller, wrong
installation of the battery, or attempt to pair with the car. Make sure the car
is active.
If the LED light does not glow at all, check battery polarization in the controller
and battery level.
NOTE! If the LED light shows a low battery, stop using the device due to
potential signal loss.
How to charge the storage battery (fig. 2)
1. The set contains a USB charging cable.
2. Before charging, take the storage battery out of the device.
3. Connect the battery plug to the USB cable.
4. Charging takes about 120 minutes. The LED light on the charger glows
in red. A flashing LED light means that the storage battery has not been
connected or has been improperly connected.

EN
5.
When charging is over, the LED light on the charger does not glow.
Disconnect the battery and insert it into the device. Do not leave the
full storage battery plugged in.
6. NOTE! The storage battery charging must be supervised by an adult.
How to install the storage battery in the car
1. Remove the car cover.
2. Remove the buckle and lift the storage battery cover (fig. 3).
3. Insert the storage battery into the car. Make sure you insert the storage
battery in the designated spot.
4. Be careful when connecting the storage battery plug to the car plug (fig.
4). Put the storage battery cover and buckle back on.
Description of the controller (fig. 5)
1. On/o switch
2. Throttling valve direction change
3. LED light
4. Toe-in adjustment
5. Acceleration adjustment
6. Wheel steering adjustment
7. Control knob direction change
8. Control knob (left/right)
9. Brake/reverse
10. Forward
Note! If you press the throttling valve opposite to driving direction, the car
will brake. Press the valve again to make the car reverse.
Toe-in adjustment
Set the wheel direction with the toe-in adjustment knob (fig. 6).
Speed and acceleration adjustment
Set the desired speed and acceleration of the car through the speed and acceleration
adjustment knob. Turn right to increase the value. Turn left to reduce it.

EN
Wheel steering adjustment
Set the desired wheel steering range through the wheel steering adjustment
knob (fig. 7). Turn right (A) to raise the wheel turning range. Turn left (B) to
reduce the value.
Reversed direction of the throttling valve
and control knob
To change the car turning direction (left/right), set the slide (A, fig. 8) in position
R. To restore default settings, set the slide in position N.
To change the car driving direction (forward/backward), set the slide (B, fig. 8)
in position R. To restore default settings, set the slide in position N.
How to control the car
1.
Turn the car on by setting the slide in ON position (fig. 9). The slide is
located under the car cover.
2.
Turn the controller on by setting the slide in ON position (fig. 10). The
LED light on the controller will turn red. If the LED light does not glow,
make sure the batteries have been properly installed and charged. If the
LED light flashes in red, it means an attempt to connect to the device
or low battery.
3.
Press the controller’s throttling valve (fig. 11) forward or backward to
control the car driving direction (forward/backward).
4. Turn the knob forward and backward (fig. 12) to move front wheels and
control the car driving direction (right/left).
5. In case of collision, release the throttling valve.
6.
In case of a low storage battery, the car will reduce its speed and eventually
stop completely.
7.
When driving is finished, turn the car and controller o as well as remove
the storage battery from the car to prevent extensive battery wear.
8. Before another charging, let the storage battery cool down.

EN
How to clean and maintain
1. Before cleaning, switch the device o and remove the battery.
2. Clean the car and controller with a wet cloth.
3. Do not use chemicals to clean the device.
4.
After every use, remove sand and dust from the car. Dry if the device
has contacted water.
5. Apply oil on all moving parts.
The pictures are for reference only. The real design of the products may dier from the
pictures presented.

DE
Einführung
Sehr geehrter Kunde!
Wir möchten uns bei Ihnen bedanken, dass Sie uns vertraut und die Marke
Overmax gewählt haben.
Wir übergeben Ihnen ein Produkt, das sich dank hochqualitativer Materialien
und moderner technologischer Lösungen perfekt für den täglichen Gebrauch
eignet. Wir sind sicher, dass die sorgfältige Ausführung Ihre Anforderungen
erfüllt. Vor der Benutzung des Produkts machen Sie sich mit der vorliegenden
Bedienungsanleitung vertraut.
Falls Sie Fragen oder Anmerkungen zu dem eingekauften Produkt haben,
setzen Sie sich mit uns in Verbindung:
WICHTIGE INFORMATIONEN
Bitte lesen Sie die vorliegende Bedienungsanleitung, bevor Sie das Produkt zu
benutzen beginnen, um sich mit seinen Funktionen vertraut zu machen und
sie bestimmungsgemäß anzuwenden.
1.
Das Gerät ist für Kinder ab 14 Jahren bestimmt. Lassen Sie kleinere Kinder
mit dem Gerät nicht spielen. Bewahren Sie das Gerät fern von Kindern auf.
2.
Kinder ab 14 Jahren dürfen das Gerät nur unter Aufsicht erwachsener
Personen verwenden.
3.
Das Gerät ist für die Fahrt im Straßenverkehr, in überfüllten Räumen
oder in Räumen, wo die Kollision mit Fußgängern oder mit anderen
Fahrzeugen möglich ist, nicht geeignet.
4.
Da das Fahrzeug kabellos gesteuert ist, soll man die Signalstörungen
beachten, die Geräte in der Nähe verursachen können.
5.
Nach der Verwendung berühren Sie nicht den Motor des Autos, weil sich
das Gerät während der Fahrt erwärmt und hohe Temperaturen erreichen
kann.
6.
Vermeiden Sie es, das Gerät in der Nacht oder an Plätzen mit der
beschränkten Sichtbarkeit zu verwenden.

DE
7.
Man soll das Gerät nicht in schlechten Wetterbedingungen, wie Gewitter
oder starke Regenfälle, verwenden.
8.
Wenn Sie das Gerät auf dem Strand verwenden, lassen Sie es nicht
passieren, dass das Gerät in Kontakt mit Seewasser tritt, weil es auf das
Gehäuse des Geräts negativ einwirken kann. Das Wasser hat außerdem
eine hohe elektrische Leitfähigkeit.
9.
Man soll das Gerät weder selbst reparieren noch modifizieren. Diese
Tätigkeiten können nur vom autorisierten Service vorgenommen werden.
10.
Verwenden Sie das Gerät nicht, wenn Sie Beschädigungen beobachtet haben.
11.
Benutzen Sie das Gerät nicht, wenn es fehlerhaft funktioniert, wenn
es sich übermäßig erwärmt, wenn Verfärbungen oder Ausbuchtungen
auftauchen, wenn das Gerät ungewöhnliche Töne, Gerüche abgibt oder
wenn andere ungewöhnliche Erscheinungen auftreten. Setzen Sie sich
in diesem Fall mit dem autorisierten Service in Verbindung.
12. Benutzen sie das Gerät fern von Wärmequellen, hohen Temperaturen,
heißen Flächen, direkter Sonneneinstrahlung, Funkquellen, oenem
Feuer, Ölen und scharfen Kanten.
13.
Benutzen Sie das Gerät nicht in der Nähe von leicht entzündlichen,
explosiven oder toxischen Substanzen.
14.
Verwenden Sie keine chemischen Substanzen zur Reinigung des Geräts.
15.
Nach jeder Verwendung schalten Sie das Gerät aus und schalten Sie
die Batterie ab.
16.
Wenn das Gerät über einen längeren Zeitraum hinweg nicht mehr
verwendet wird, nehmen Sie alle Batterien aus.
17.
Zur Ladung des Akkus verwenden Sie nur das Kabel, das dem Satz
beigefügt wird.
18.
Der Akku und das Kabel sollen regelmäßig auf Beschädigungen überprüft
werden. Verwenden Sie beschädigte Elemente nicht.
19.
Das Gerät soll man nicht zu mehr Versorgungsquellen als empfohlen
anschließen.
20. Die Batterien sollen nicht erneut aufgeladen werden.
21. Die Akkus sollen nur unter Aufsicht erwachsener Personen aufgeladen
werden.

DE
22. Vor der Ladung soll man den Akku aus dem Gerät herausnehmen.
23.
Man soll nicht unterschiedliche Batteriearten oder neue und alte Batterien
zusammenmischen.
24. Die Batterien soll man gemäß Polbezeichnungen einstecken.
25. Leere Batterien soll man aus dem Gerät herausnehmen.
26. Die Versorgungsklemmen soll man nicht verschließen.
27. Man soll die elektrischen Kreise des Motors nicht selbst ändern.
28. Vor der Reinigung schalten Sie das Gerät aus und nehmen Sie den Akku
heraus.
29. Verwenden Sie das Gerät nicht bestimmungswidrig.
30. Legen Sie keine Gegenstände auf dem Gerät, wenn es im Betrieb ist.
31.
Bewahren Sie das Gerät an einem trockenen, kühlen und dunklen Platz auf.
32.
WARNUNG! Reißen Sie den Motoraufkleber vor dem ersten Gebrauch ab.
Das Produkt stimmt mit den Richtlinien der Europäischen Union.
Gemäß der Richtlinie 2012/19/UE unterliegt das Produkt einer getrennten
Sammlung. Das Produkt darf man nicht zusammen mit kommunalen Abfällen
entsorgen, weil das die Gefahr für die Umwelt und die Gesundheit der Menschen
bilden kann. Das verbrauchte Produkt soll man in einem entsprechenden
Rücknahmepunkt für Elektro- und Elektronik-Altgeräte zurückgeben.
Inhalt der Verpackung
1. Kontroller
2. Versorgungskabel USB
3. Akku x2
4. Bedienungsanleitung
Montage der Batterie im Kontroller (Abb. 1)
1. Nehmen Sie den Deckel der Batterie ab.
2.
Stecken Sie drei Alkali-Batterien AAA ein. Beachten Sie die
Polbezeichnungen der Batterie.
Table of contents
Languages:
Other Overmax Motorized Toy Car manuals