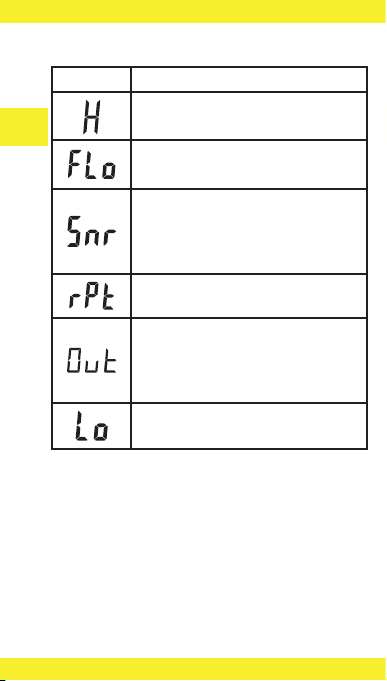
Overmax AD-06 User manual

IT
FR
ES
NL
UK
LT
HR
EN
DE
PL
AD-06
Instrukcja obsługi / User Manual /
Bedienungsanleitung / Manuale d’uso /
Manuel de l’Utilisateur / Manual de usuario /
Handleiding / Посібник користувача /
Vartotojo vadovas / Korisnički priručnik

EN: The product complies with requirements of EU directives.
Pursuant to the Directive 2012/19/EU, this product is subject to selective
collection. The product must not be disposed of along with domestic waste
as it may pose a threat to the environment and human health. The worn-out
product must be handed over to the electrics and electronics recycling center.
DE: Das Produkt stimmt mit den Richtlinien der Europäischen Union.
Gemäß der Richtlinie 2012/19/UE unterliegt das Produkt einer getrennten
Sammlung. Das Produkt darf man nicht zusammen mit kommunalen
Abfällen entsorgen, weil das die Gefahr für die Umwelt und die
Gesundheit der Menschen bilden kann. Das verbrauchte Produkt soll man
in einem entsprechenden Rücknahmepunkt für Elektro- und Elektronik-
Altgeräte zurückgeben.
PL: Produkt zgodny z wymaganiami dyrektyw Unii Europejskiej.
Zgodnie z Dyrektywą 2012/19/UE, niniejszy produkt podlega zbiórce
selektywnej. Produktu nie należy wyrzucać wraz z odpadami komunalnymi,
gdyż może stanowić on zagrożenie dla środowiska i zdrowia ludzi. Zużyty
produkt należy oddać do punktu recyklingu urządzeń elektrycznych
i elektronicznych.
IT: Prodotto conforme ai requisiti delle direttive dell’Unione Europea.
In conformità alla direttiva 2012/19/UE, questo prodotto è soggetto a raccolta
dierenziata. Il prodotto non deve essere smaltito con i rifiuti domestici
perché può costituire una minaccia per l’ambiente e la salute umana. Si prega
di restituire il vecchio prodotto al punto di raccolta applicabile per il riciclaggio
di apparecchiature elettriche ed elettroniche.
FR: Le produit est conforme aux exigences des directives de l’Union
européenne. Conformément à la Directive 2012/19/UE, le présent
produit est soumis à la collecte séparée. Il convient de ne pas jeter le
produit avec les déchets ménagers, car il peut constituer un danger pour
l’environnement et la sainte humaine. Le produit usé devrait être remis
au point de recyclage des appareils électriques et électroniques.

ES: El producto cumple los requisitos de las directivas de la Unión Europea.
De acuerdo con la Directiva 2012/19/UE, este producto está sujeto
a recogida selectiva. El producto no debe eliminarse con los residuos
municipales, ya que puede suponer una amenaza para el medio ambiente
y la salud humana. Por favor, entrega el producto que ya no vayas a utilizar
a un centro de reciclaje de dispositivos eléctricos y electrónicos.
NL: Product in overeenstemming met de eisen van de richtlijnen van
de Europese Unie. In overeenstemming met Richtlijn 2012/19/EU moet
dit product gescheiden worden ingezameld. Het product mag niet met
het huisvuil worden weggegooid omdat het een bedreiging kan vormen
voor het milieu en de volksgezondheid. Lever uw oude product in bij
het daarvoor bestemde inzamelpunt voor recycling van elektrische en
elektronische apparatuur.
UK: Продукт відповідає вимогам директив Європейського Союзу.
Відповідно до Директиви 2012/19/ЄС цей продукт підлягає
вибірковому збору. Продукт не слід утилізувати разом із
побутовими відходами, оскільки це може становити загрозу
навколишньому середовищу та здоров’ю людей. Використаний
продукт слід здати до пункту переробки електричних та
електронних пристроїв.
LT: Produktas atitinka Europos Sąjungos direktyvų reikalavimus.
Pagal 2012/19 / ES Direktyvą šis produktas yra rūšiuojamas. Produkto
negalima išmesti su komunalinėmis atliekomis, nes tai gali kelti grėsmę
aplinkai ir žmonių sveikatai. Panaudotą gaminį reikia nugabenti į elektros ir
elektroninės įrangos perdirbimo punktą.
HR: Proizvod je sukladan propisima Direktive Europske Unije.
Sukladno Direktivi 2012/19/UE ovaj proizvod spada u selektivno skupljanje.
Proizvod se ne smije bacati skupa s drugim komunalnim otpadom, jer može
predstavljati prijetnju za okoliš i ljudsko zdravlje. Potrošeni proizvod je
potrebno odnijeti u centar za zbrinjavanje električnih i elektroničkih uređaja.

A
D
B
C E
1

2
3 4 5

PL
Wprowadzenie
Drogi Kliencie!
Dziękujemy za obdarzenie nas zaufaniem iwybranie marki Overmax.
Dzięki wykorzystaniu wysokiej jakości materiałów inowoczesnych
rozwiązań technologicznych oddajemy wTwoje ręce produkt idealny
do codziennego użytkowania. Jesteśmy pewni, że dzięki ogromnej
staranności wykonania spełni on Twoje wymagania. Przed użyciem
produktu zapoznaj się dokładnie zponiższą instrukcją obsługi.
Jeśli masz jakiekolwiek uwagi lub pytania do zakupionego produktu,
skontaktuj się znami:
pomoctechniczna@overmax
Opis
A. Wejście na ustnik
B. wyświetlacz
C. rozpocznij test / przejrzyj wyniki testów
D. przejrzyj wyniki testów
E.
włącz iwyłącz / pokaż liczbę wykonanych testów / pokaż
ostatni wynik
BATERIA
Alkomat potrzebuje dwóch baterii AA do pracy. Aby wymienić
baterie: przyciśnij nakładkę izsuń ją zkomory baterii (znajduje
się ztyłu urządzenia). Wyciągnij stare baterie iwłóż nowe, zwróć
szczególną uwagę na ich polaryzację. Zamknij komorę baterii.
15 MINUT PRZED POMIAREM
Przed przystąpieniem do badania należy odczekać min. 15 minut
po ostatnim spożyciu alkoholu. Przepłucz usta wodą zanim
wykonasz test.
Podczas tych piętnastu minut nie spożywaj alkoholu inie pal
papierosów. Jeśli spożyjesz alkohol lub nie przepłuczesz jamy
ustnej wynik testu może być sztucznie zawyżony, będzie to
wynikiem pozostałości alkoholu. Jeżeli nie zastosujesz się do

PL
niniejszych zaleceń, wynik testu może być niepoprawny, możesz
także uszkodzić sensor!
OPTYMALNA TEMPERATURA DO POMIARU
Zaleca się wykonywanie testów oraz przechowywanie urządzenia
wtemperaturze pokojowej. Nie przechowuj produktu wmiejscach
oskrajnych temperaturach inader wilgotnych (na przykład waucie
wzimie lub lecie).
WYKONANIE POMIARU
1.
Włóż ustnik w odpowiednie miejsce (górny lewy róg
urządzenia, oznaczony na rys. 2).
Uwaga – testy wykonane bez ustnika mogą dawać niedokładne
wyniki. Zaleca się wymianę ustnika zkażdym pomiarem.
2.
Przytrzymaj przycisk włączenia przez 2 sekundy. Po włączeniu,
urządzenie zacznie rozgrzewać sensory. Cały proces trwa do
20 sekund (licznik pojawi się na wyświetlaczu, patrz: rys. 3).
Następnie, dokonaj wyboru pomiędzy dwoma następującymi
trybami: automatycznym lub manualnym.
Tryb automatyczny – łatwiejszy tryb pomiaru. AD-06 monitoruje
oddech użytkownika, po czym samodzielnie wykrywa najlepszy
moment na zebranie próbki (koniec wydechu powietrza).
Tryb manualny – zazwyczaj używany wsytuacji, kiedy wykonanie
trybu automatycznego nie jest możliwe.
TRYB AUTOMATYCZNY
A.
Kiedy zauważysz napis „rdy” (skrót od „ready” – gotowy, patrz:
rys. 4), aurządzenie wyda zsiebie krótki dźwięk, weź głęboki
wdech idmuchnij wustnik, który wcześniej został założony
na urządzenie. Upewnij się, że wydychasz powietrze długo
imiarowo (nie za szybko, ze stałym tempem).

PL
B.
Urządzenie wyda dźwięk ipokaże komunikat na wyświetlaczu
(patrz: rys. 5). Będzie to oznaczało, że nastąpił prawidłowy
wydech. Kontynuuj dmuchanie aż usłyszysz podwójne
kliknięcie sygnalizujące, że urządzenie pobrało próbkę
wydychanego powietrza.
C. Alkomat zacznie analizować zebrane dane (rys. 5). Zaczekaj
chwilę na pojawienie się wyników.
TRYB MANUALNY
A.
Kiedy zauważysz napis „rdy” (skrót od „ready” – gotowy, patrz:
rys. 4) aurządzenie wyda zsiebie krótki dźwięk, wciśnij lewy
przycisk (C) aby uruchomić tryb manualny.
B. Wyświetlacz pokaże komunikat (rys. 5) iwyda zsiebie ciągły
sygnał dźwiękowy.
C.
Weź głęboki wdech idmuchaj wustnik wsposób ciągły.
Dmuchaj tak długo, aż usłyszysz podwójny dźwięk „kliknięcia”.
Wtym momencie należy przestać wdmuchiwać powietrze.
D.
Urządzenie rozpoczyna analizę wdmuchanego powietrza
ipokazuje”[--- „ (oblicza). Poczekaj chwilę, awyświetli się
wynik ilości alkoholu wwydychanym powietrzu.
E.
Wynik ilości alkoholu wwydychanym powietrzu będzie
wyświetlany wdowolnym formacie (‰, %, mg / l) zgodnie
zformatem wyświetlania BAC specyficznym dla danego kraju.
Wprzypadku, gdy chcesz zmienić format wyświetlania, naciśnij
lewy przycisk (C), aby zmienić format wyświetlania.
WAŻNE!
• Wniektórych przypadkach urządzenie może automatycznie
wydłużyć sygnał dźwiękowy przed dmuchnięciem
wurządzenie iwyświetlić wynik jako 0.00. Dzieje się tak,
ponieważ możliwe jest zmierzenie bardzo niskiej obecności
innej substancji wczujniku po długim przechowywaniu bez
użycia. Wtakim przypadku, ponownie rozpocznij test.
•
Wniektórych przypadkach, urządzenie może wyświetlać
wynik jako . Dzieję się tak, ponieważ test został

PL
przeprowadzony wzbyt zimnym lub zbyt gorącym otoczeniu.
Przed ponownym testem może być konieczne odczekanie
kilku minut, aż czujnik wewnątrz urządzenia ustabilizuje się
do temperatury pokojowej.
•
Wynik ilości alkoholu wwydychanym powietrzu, będzie
wyświetlany na wyświetlaczu przez 30 sekund. Urządzenie
wyłączy się automatycznie później. Możesz także wyłączyć
urządzenie wdowolnym momencie, naciskając iprzytrzymując
przycisk wł./wył. (E) przez 3 sekundy.
SUGEROWANY CZAS JAKI NALEŻY ODCZEKAĆ MIĘDZY
TESTAMI
Po zakończeniu pierwszego testu ichęci wykonania kolejnego itd.
zaleca się odczekanie co najmniej kilku minut (najlepiej 5-10 minut)
między testami, aby zapobiec nagromadzeniu się pozostałości
alkoholu na czujniku iutrzymać prawidłowy stan czujnika.
TRYB PAMIĘCI ZAPISU TESTÓW:
Aby sprawdzić łączną liczbę przeprowadzonych testów na stężenie
alkoholu wwydychanym powietrzu, postępuj zgodnie zopisem:
•
Podczas odliczania naciśnij przycisk wł./wył. (E), aby wyświetlić
łączną liczbę przeprowadzonych testów. Liczba ta pomaga
również zdecydować, kiedy potrzebna jest wykonanie kalibracji.
Aby uzyskać więcej informacji, zobacz sekcję „Kalibracja”.
•
Jeśli chcesz zresetować ten licznik, długo naciskaj lewy przycisk
(C), aż zobaczysz, że licznik został zresetowany do zera.
•
Zaleca się ponowną kalibrację urządzenia raz wroku lub po 300
testach, wzależności od tego, co nastąpi wcześniej.
WYŚWIETLANIE OSTATNICH 50 TESTÓW:
•
Naciśnij przycisk wł./wył. (E), aby wyświetlić historię
wykonanych testów (pojawią się na ekranie, oznaczone
numerem seryjnym „1”, anastępnie odpowiednim wynikiem)
•
Naciśnij prawy przycisk (D), aby wyświetlić poprzednie wyniki.
•
Aby wyjść ztrybu pamięci zapisu testu, ponownie naciśnij
przycisk przejrzyj wł. / wył. (E).

PL
KOMUNIKATY SYSTEMOWE
Komunikat Znaczenie komunikatu
Urządzenie wykryło wysokie stężenie alkoholu
(powyżej 4.00‰ BAC / 0.400%BAC /2.00 mg/L).
Wykryto niewystarczające lub nierównomierne
stężenie wdmuchanego powietrza. Należy
wykonać kolejny test.
Czujnik urządzenia nie jest gotowy. Dzieje się
tak, gdy na czujniku zostatniego testu wykryto
wysokie stężenie pozostałości alkoholu lub
zanieczyszczeń. Wtakim wypadku, wyłącz
urządzenie i odczekaj kilka minut przed
przeprowadzeniem następnego testu.
Urządzenie nie mogło ukończyć testu. Powtórz
test.
Test został przeprowadzony wzbyt niskiej lub
zbyt wysokiej temperaturze. Przywróć urządzenie
do normalnej temperatury pokojowej. Przed
ponownym testem odczekaj kilka minut, aż
czujnik wewnątrz urządzenia ustabilizuje się do
temperatury pokojowej.
Niski poziom naładowania baterii. Wymień nowe
baterie alkaliczne AA.
ŚRODKI OSTROŻNOŚCI
•
Odczekaj co najmniej 15-20 minut po wypiciu alkoholu oraz
po paleniu tytoniu przed badaniem. Pamiętaj owypłukaniu
jamy ustnej wodą.
•
Wcelu uzyskania dokładniejszych wyników zaleca się
kalibrację urządzenia co 12 miesięcy lub co 300 testów.
•
Urządzenie pracuje w zakresie temperatur 10 – 40°C,
zoptymalną dokładnością do testów przeprowadzanych
wtemperaturze pokojowej (tj. ok 20 – 26°C).

PL
•
Jeśli wynik testu jest niższy niż 0,10 ‰ lub 0,10 % BAC lub
0,050 mg / L, jest to naturalne, gdy wcześniej nie piłeś
alkoholu. Jest tak, ponieważ wniektórych przypadkach
możliwe jest zmierzenie wwydychanym powietrzu innej
substancji niż alkohol.
•
Nie używaj urządzenia, jako narzędzia do określania
ipodejmowania decyzji omożliwości prowadzenia pojazdów.
Wyświetlany wynik ilości alkoholu wwydychanym powietrzu
ma charakter wyłącznie informacyjny. Producent isprzedawca
zrzekają się wszelkiej odpowiedzialności prawnej za zmierzoną
/ szacunkową wartość testu.
KONSERWACJA
Aby utrzymać urządzenie wdobrym stanie, zaleca się korzystanie
zurządzenia przynajmniej raz wmiesiącu.
KALIBROWANIE
•
Dokładność testerów zawartości alkoholu wwydychanym
powietrzu, może zmieniać się po 6 - 12 miesiącach normalnego
użytkowania, wzależności od liczby przeprowadzonych testów
iwarunków pracy.
•
Jeśli urządzenie wykonuje niespójne wyniki testu, nie dostarcza
żadnych wyników badań lub zapewnia wyjątkowo wysokie lub
niskie wyniki badań, produkt powinien zostać skalibrowany.
• Wcelu kalibracji skontaktuj się zserwisem.
Zdjęcia mają charakter poglądowy, rzeczywisty wygląd produktów
może różnić się od prezentowanego na zdjęciach.

EN
Introduction
Dear customer!
Thank you for placing trust in us and choosing Overmax.
Thanks to high-quality materials and modern solutions, we provide
you with a product perfect for everyday use. We are convinced
that the product will satisfy your requirements as it has been
manufactured with utmost care. Before you use the product, please
read this manual carefully.
Should you have any remarks or questions concerning the product,
please do not hesitate to contact us:
Description
A. mouthpiece inlet
B. display
C. start test / see test results
D. see test results
E. switch on and o / show number of tests done / show last
result
BATTERY
The breathalyzer needs two AA batteries to operate. To replace the
batteries, press the cover and slip if o the battery compartment (at
the back of the device). Take old batteries out and put new batteries
in; pay special attention to polarity. Close the battery compartment.
15 MINUTES BEFORE MEASUREMENT
Before you start the test, please wait for at least 15 minutes after
drinking alcohol. Rinse your mouth with water before you initiate
the test.
Do not drink alcohol or smoke cigarettes for these fifteen minutes.
If you do so or if you forget to rinse your mouth, the test result
may be false. This results from existence of alcohol remains. If you
ignore the aforesaid guidelines, the test result may be incorrect
and you can also damage the sensor!

EN
OPTIMAL TEST TEMPERATURE
It is advisable to conduct tests and store the device at the room
temperature. Do not store the product if temperatures are extreme
and if conditions are highly humid (for example in the car in winter
or summer).
HOW TO TAKE A TEST
1.
Put the mouthpiece in a relevant inlet (upper left corner of
the device, marked in fig. 2).
Note – if a test is done without the mouthpiece, the results
may be inaccurate. It is advisable to replace the mouthpiece
before every measurement.
2. Press and hold the on key for 2 seconds. After switching on,
the device will start heating sensors up. The entire procedure
takes up to 20 seconds (the counter will be showed on the
display, see: fig. 3).
Next choose one of two modes: automatic or manual.
Automatic mode – easier test mode. AD-06 monitors the user’s
breath and then decides when to take the sample on its own (end
of air exhalation).
Manual mode – usually used when the automatic mode is
unfeasible.
AUTOMATIC MODE
A. When you can see „rdy” (abbreviated from „ready”, see: fig.
4) and the device emits a short sound, take a deep breath
and blow into the mouthpiece which was previously inserted
into the device. Make sure you exhale long and evenly (not
too fast, at regular pace).

EN
B.
The device will emit a sound and show a message on the
display (see: fig. 5). This will mean that you have exhaled
properly. Keep on blowing until you can hear a double „click”.
At this moment stop blowing in, the device has collected the
sample of breath.
C.
The breathalyzer will start analyzing the data (fig. 5). Wait
for results.
MANUAL MODE
A. When you can see „rdy” (abbreviated from „ready”, see: fig.
4) and the device emits a short sound, press the left key (C)
to activate the manual mode.
B.
The display will show a message (fig. 5) and emit a continuous
sound.
C.
Take a deep breath and blow into the mouthpiece continually.
Keep on blowing until you can hear a double „click”. At this
moment stop blowing in.
D.
The device starts analyzing the breath and shows”[--- „
(calculating). Wait for a while to see alcohol level result.
E.
The alcohol level result will be displayed in any format (‰,
%, mg / l) according to the BAC display format specific to
the given country. If you wish to change this format, press
the left key (C).
IMPORTANT!
•
In some cases the device may automatically prolong the sound
before blowing in and show the result 0.00. This happens
because a very low content of other substance in the sensor
may be measured if you do not use the product for a long
time. This being the case, retake the test.
•
In some cases the device may show the result . This
happens when the temperature of the test is too low or too
high. Before you retake the test, you may be required to wait
for a couple of minutes until the sensor inside the device
reaches the room temperature.

EN
•
The alcohol level result will be presented on the display for 30
seconds. The device will switch o later automatically. You
can also shut it down at any time by pressing the on/o key
(E) and holding for 3 seconds.
RECOMMENDED TIME BETWEEN TESTS
After you finish the first test and before you start another, you are
advised to wait for at least a couple of minutes (5-10 minutes at
best) to prevent accumulation of alcohol remains on the sensor
and keep the proper condition of the sensor.
TEST MEMORY MODE:
To check the total number of breathalyzer tests, please follow
the steps below:
•
When counting, press on/o key (E) to display the total
number of tests done. This number helps you decide when
to perform calibration. For more details, see „Calibration”.
• If you want to reset this counter, long-press the left key (C)
until you can see the zero on the counter.
• It is advisable to re-calibrate the device once a year or after
300 tests, depending on what happens earlier.
DISPLAYING LAST 50 TESTS:
• Press the on/o key (E) to display history of tests done (they
will be showed on the screen, marked with serial number „1”
and then with relevant result)
• Press the right key (D) to display previous results.
•
To leave the test memory mode, press the on/o key (E) again.
SYSTEM MESSAGES
Message Meaning of the message
The device has detected high alcohol level (above
4.00‰ BAC / 0.400%BAC /2.00 mg/L).
Insucient or uneven breath detected. Retake
the test.

EN
The sensor of the device is not ready. It happens
when there is high alcohol or dirt remains from the
last test on the sensor. This being the case, switch
the device o and wait for a couple of minutes
before you take another test.
The device was unable to finish the test. Retake it.
The temperature of the test is too low or too high.
Restore room temperature for the device. Before
you take another test, wait for a couple of minutes
until the sensor inside the device reaches the room
temperature.
Low battery. Use new AA alkaline batteries.
SAFETY PRECAUTIONS
•
Wait for at least 15-20 minutes after drinking alcohol or
smoking cigarette and before you start the test. Remember
to rinse your mouth with water.
•
For more precise results, it is advisable to calibrate the device
every 12 months or 300 tests.
•
The device operates at the temperature of 10 – 40°C, with optimal
precision for tests at room temperature (i.e. ca. 20 – 26°C).
• If the test result is lower than 0,10 ‰ or 0,10 % BAC or 0,050
mg / L, it is natural if you did not drink alcohol before. It
happens because in some cases it is possible to measure
other substance than alcohol.
•
Do not use the device to specify and decide about driving
vehicles. The alcohol level result is for information purposes
only. The manufacturer and retailer waive any legal liability
for the estimated/measured test value.
MAINTENANCE
To keep the device in a good condition, it is advisable to use the
device at least once a month.

EN
CALIBRATION
•
The precision of alcohol level testers may change after 6-12
months of use, depending on the number of tests and working
conditions.
•
If the device shows inconsistent test results, fails to show
any results or displays very high or very low results, it must
be calibrated.
• To perform calibration, please contact the service center.
The pictures are for reference only. The real design of the products
may dier from the pictures presented.

DE
Einführung
Sehr geehrter Kunde!
Wir möchten uns bei Ihnen bedanken, dass Sie uns vertraut und
die Marke Overmax gewählt haben.
Die Stoe höchster Qualität und moderne technologische Lösungen
sorgen dafür, dass wir Ihnen das ideale Produkt für den täglichen
Bedarf übergeben. Wir sind sicher, dass die sorgfältige Ausführung
Ihre Anforderungen erfüllt. Bevor Sie das Produkt benutzen, lesen
Sie bitte genau die vorliegende Bedienungsanleitung.
Falls Sie Fragen oder Anmerkungen zu dem gekauften Produkt
haben, setzen Sie sich mit uns in Verbindung:
Beschreibung
A. Eingabe für das Mundstück
B. Display
C. Beginnen/Testergebnisse anschauen
D. Testergebnisse anschauen
E.
Ein-/Aus-Taste/Anzahl der durchgeführten Tests anzeigen/
das letzte Testergebnis anzeigen
BATTERIE
Das Alkoholmessgerät braucht zwei AA-Batterien. Um die Batterien
zu ersetzen: drücken Sie die Kappe und schieben Sie sie von der
Batterieschachtel herunter (hinterer Teils des Geräts). Nehmen
Sie die alten Batterien heraus und installieren Sie die neuen,
achten Sie auf die Polarisationsbezeichnungen. Schließen Sie
die Batterieschachtel.
15 MINUTEN VOR DER MESSUNG
Vor dem Testbeginn soll man mindestens 15 Minuten vor dem
letzten Alkoholgenuss abwarten. Vor dem Test spülen Sie den
Mund mit Wasser.
Während dieser 15 Minuten sollen Sie keinen Alkohol trinken und
keine Zigaretten rauchen. Wenn Sie Alkohol trinken oder den Mund

DE
nicht mit Wasser spülen, kann das Testergebnis ungewöhnlich
hoch sein. Das ist auf die Alkoholreste zurückzuführen. Wenn Sie
nicht gemäß diesen Empfehlungen handeln, kann das Testergebnis
falsch sein, Sie können dadurch auch den Sensor beschädigen!
OPTIMALE TEMPERATUR ZUR MESSUNG
Es ist empfohlen, Tests bei einer Raumtemperatur durchzuführen,
das Gerät soll auch in dieser Temperatur aufbewahrt werden.
Bewahren Sie das Produkt nicht bei extremen Temperaturen oder
an feuchten Plätzen (z.B. im Auto im Winter oder im Sommer).
MESSUNG DURCHFÜHREN
1. Stecken Sie das Mundstück in die richtige Stelle (linke obere
Ecke des Geräts, auf Abb. 2 markiert). Achtung – Tests, die
ohne das Mundstück durchgeführt sind, können ungenaue
Ergebnisse geben. Es ist empfohlen, das Mundstück nach
jeder Messung zu ersetzen.
2.
Halten Sie die Ein-/Aus-Taste 2 Sekunden lang. Nach dem
Einschalten, beginnt das Gerät Sensoren zu erwärmen. Der
Prozess dauert bis 20 Sekunden (der Messer erscheint auf
dem Display, Abb. 3).
Dann wählen Sie einen der beiden Modi: automatischen oder
manuellen.
Automatischer Modus – der einfachere Modus der Messung. AD-
06 kontrolliert den Atem des Benutzers, danach ermittelt er den
besten Zeitpunkt für die Einnahme der Probe (Ausatmen beenden).
Manueller Modus – meistens dann benutzt, wenn der automatische
Modus nicht möglich ist.
AUTOMATISCHER MODUS
A.
Wenn Sie die Aufschrift „rdy“ (Abkürzung von „ready“ - fertig,

DE
Abb. 4) sehen, und das Gerät ein kurzes Signal abgibt, machen
Sie einen tiefen Atemzug und pusten Sie in das Mundstück,
das vorher installiert wurde. Stellen Sie sicher, dass Sie die
Luft lang und gleichmäßig ausatmen (nicht zu schnell, im
gleichen Tempo).
B. Das Gerät gibt ein Signal ab und zeigt die Meldung auf dem
Display an (Abb. 5). Das bedeutet, dass das Ausatmen richtig
war und das Gerät die Probe der Atemluft eingenommen hat.
Blasen Sie weiter, bis Sie einen Doppelklick hören.
C.
Das Alkoholmessgerät beginnt die Daten zu analysieren (Abb.
5). Warten Sie kurz auf die Testergebnisse.
MANUELLER MODUS
A.
Wenn Sie die Aufschrift „rdy“ (Abkürzung von „ready“ - fertig,
Abb. 4) sehen, und das Gerät ein kurzes Signal abgibt, drücken
Sie die linke Taste (C), um den manuellen Modus zu starten.
B. Das Display zeigt die Meldung (Abb. 5) an und gibt ein kurzes
Tonsignal ab.
C.
Nehmen Sie einen tiefen Atemzug und pusten Sie in das
Mundstück gleichmäßig. Pusten Sie solange, bis Sie ein
doppeltes Signal des „Klickens“ hören. Dann soll man
aufhören, die Luft auszuatmen.
D. Das Gerät beginnt die Analyse der Atemluft und zeigt ”[--- „
an (zählt). Warten Sie, bis der Wert der Alkoholkonzentration
in der Atemluft angezeigt wird.
E.
Der Wert der Alkoholkonzentration in der Atemluft wird im
beliebigen Format angezeigt (‰, %, mg / l), gemäß dem BAC-
Format, das für jedes Land spezifisch ist. Falls Sie das Format
ändern wollen, drücken Sie die linke Taste (C), um es zu ändern.
WICHTIG!
•
In einigen Fällen kann das Gerät das Signal vor dem Einatmen
automatisch verlängern und das Testergebnis als 0.00
anzeigen. Das kommt vor, weil auch eine andere Substanz
in einer geringen Menge im Sensor gemessen werden kann,
Table of contents
Languages:
Other Overmax Test Equipment manuals
Popular Test Equipment manuals by other brands

LeCroy
LeCroy HDO6000 Getting started guide

GE
GE FAT Installation instruction

AVYCON
AVYCON AIVO-70A4K user manual

Wavetek Wandel Goltermann
Wavetek Wandel Goltermann ANT-20 manual

AlcoSense
AlcoSense Ultra instruction manual

Kyoritsu Electrical Instruments Works, Ltd.
Kyoritsu Electrical Instruments Works, Ltd. 4200 instruction manual