Tinker & Rasor CS-10 Instruction sheet

CORROSION MITIGATION INSTRUMENTATION
P. O. BOX 281 SAN GABRIEL,CA91778 TEL: (626) 287-5259 FAX: (626) 287-0132
PRODUCT INSTRUCTIONS
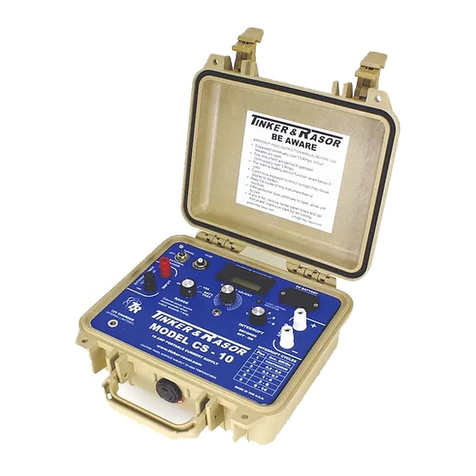
CS-10
PORTABLE - 10 AMP CURRENT SOURCE
for Cathodic Protection Testing
Dimensions: 5-3/4” High, 12-1/4” Wide, 10” Long Weight: 8.0 pounds
FEATURES TESTS
2 Ranges Current Requirement
Internal Batteries Short Identification
External Power Input Capability Insulator Location
Continuous/Interrupted Operation Short Location
Insulator Test Casing Tests
Fully adjustable current output 0 mA to 10 amps
BATTERIES ARE INCLUDED - (1) 12 volt lead/acid and (1) 9 volt
Warranty: 90 Days
NOT FOR USE IN AN EXPLOSIVE ATMOSPHERE
Web: www.tinker-rasor.com E-mail: Info@tinker-rasor.com
– 1 –

CORROSION MITIGATION INSTRUMENTATION
P. O. BOX 281 SAN GABRIEL,CA91778 TEL: (626) 287-5259 FAX: (626) 287-0132
PRODUCT INSTRUCTIONS
CS-10 PORTABLE CURRENT SUPPLY
GENERAL
The CS-10 Portable Current Supply is designed to be a convenient source of current from zero to
ten amperes. The range is selected by adjusting the range switch. It is intended primarily for
temporary drains in connection with the cathodic protection of underground piping. It can also be
a convenient source of current for testing insulating joints with a compass, determining the extent
of a CP area, locating shorts and testing casings.
PRECAUTIONS
The CS-10 can only be used in non-hazardous (unclassified) locations because it can
supply current and voltages above those allowed in hazardous (classified) locations.
LOAD LIMITING CIRCUITRY
The CS-10 is capable of supplying currents in excess of 10 Amps for very short periods of time,
draining the batteries rapidly, (less than 10 minutes). To keep the output at an acceptable level
the CS-10 circuit incorporates a current limiter for the protection of the regulating circuit and the
batteries. A feature of the current limiter is the ability to detect whether or not the CS-10 is limiting
the current through the circuit or the load is limiting the current through the circuit. In order to let
the operator know when the CS-10 is limiting the current, the Limiting Indicator L.E.D. was
incorporated on the front panel. When the CS-10 is limiting the current through the load the
Limiting Indicator L.E.D. is off. When the load is limiting the current through the circuit, the
Limiting Indicator L.E.D. is on continuously.
LOW VOLTAGE LOCK-OUT
The Limiting Indicator L.E.D. has a second duty. It is to warn when the internal battery of the CS-
10 has fallen below 9-volts. Since the batteries in the CS-10 have an increasing chance of
shorting when they are discharged beyond a safe point, the Low Voltage Lock-out is activated to
keep this from happening. When the Low Voltage Lock-out is reached there are two things that
occur. First, the power to the Output Terminals is cut. Second, the Limiting Indicator L.E.D. is
activated. In order to distinguish between a Current Limiting condition and the Low Voltage Lock-
Out condition, the Limiting Indicator L.E.D. will start flashing. The Low Voltage Lock-Out can only
be reset when the CS-10 is turned off for 15 seconds and turned back on. At this point in time, it
is recommended that the batteries be recharged immediately or use an external power source.
HEAT
This type of equipment, under high loads, will build up high temperatures rapidly. Caution should
be used to prevent damage to the CS-10. Operator should avoid direct contact with the panel
after high output operation or after prolonged use.
The CS-10 will heat up in hot weather when currents approaching 5 or more amperes are
delivered to a load. The transistor that controls the current is mounted on an aluminum heat sink.
The panel of the CS-10 should face away from the sun to reduce heat input. For more than short
Web: www.tinker-rasor.com E-mail: Info@tinker-rasor.com
– 2 –

CORROSION MITIGATION INSTRUMENTATION
P. O. BOX 281 SAN GABRIEL,CA91778 TEL: (626) 287-5259 FAX: (626) 287-0132
PRODUCT INSTRUCTIONS
use, the interrupter can be used to further reduce the heat effect if the current drain is high and
extends the battery life.
The panel on the CS-10, gets hot and stays hot in the higher output ranges. USE
CAUTION!
INTERRUPTER
The interrupter will increase battery life and decrease heating of the case at higher currents. The
timer is engaged in or out of use by a 4 post rotary switch on the panel. Positions; 1. Continuous,
2. 1 off - 4 on, 3. 2 off - 8 on, 4. 6 off - 14 on, (in seconds).
BATTERIES
The CS-10 comes with a 12 volt lead/acid battery and can be operated with a 12 volt external
power source (i.e., truck battery). The battery that controls the LCD is a standard 9 volt transistor
battery. This should be checked with a voltmeter while working. Voltage under load should be
above 7 volts. The 12 volt internal battery can be checked at the Battery test point on the Range
Switch.
CHARGING
The CS-10 has been designed so that the 12 volt internal battery can be charged via the auxiliary
power supply (cigar lighter) present in most motor vehicles today. An optional overnight battery
charger is available from Tinker & Rasor.
CONNECTION
To connect the CS-10 to increase the polarization of a structure, a temporary ground bed (metal
structure with good earth contact) is first connected to the “+” terminal; then connect the “-”
terminal to the structure. Select either “Continuous” or an interrupt cycle as desired. Once the
CS-10 is connected, turn the “CURRENT ADJUST” slowly clockwise until the desired current is
indicated on the meter. If more current is needed, than the internal battery can provide or a long
operation is anticipated, an external battery must be used. Connect the CS-10 to the external
battery by the red and black binding posts marked “EXTERNAL POWER” and flip the power
switch to the external position. Attach the appropriate battery terminals to the proper binding
posts. Whenever the CS-10 is not in use, turn the “CURRENT ADJUST” fully counter clockwise.
The CS-10 can only be used in non-hazardous (unclassified) locations because it can
supply currents and voltages above those allowed in hazardous (classified) locations.
CURRENT REQUIREMENT TEST
During corrosion control work, it may be desirable to make tests to determine the amount of
current required to cathodically protect a new structure, or bring a buried structure back up to
protection. This test consists of forcing a direct current to flow from a temporary ground
connection, to the target structure. Adjust the current output until the protective level is reached,
at the lowest P/S (pipe to soil) voltage location. Polarization of a structure will take a period of
time (up to weeks for bare structures). If instantaneous current vs. voltage readings are plotted, a
Web: www.tinker-rasor.com E-mail: Info@tinker-rasor.com
– 3 –

CORROSION MITIGATION INSTRUMENTATION
P. O. BOX 281 SAN GABRIEL,CA91778 TEL: (626) 287-5259 FAX: (626) 287-0132
PRODUCT INSTRUCTIONS
prediction of the final polarized current requirement may be made. The CS-10 should be
operated in the continuous mode for this test with the “positive” terminal connected to the
temporary ground and the “negative” output connected to the structure.
During this test, the location with the lowest Pipe to Soil reading can be determined if the
protective current is to be installed at the same point as the test is being conducted. The low
Pipe to Soil point will be the best location for a test point to ensure that there is adequate cathodic
protection current available to the system to meet protection criteria.
SHORT IDENTIFICATION TEST
To determine if there is a short on the system, some knowledge of the CP area is required. Is the
structure bare or coated? How large is it? Has the protection level changed dramatically in a
short time? When the CS-10 is connected to the structure, as in the current requirement test, and
current is applied in the continuous mode, does it take more current than would be anticipated to
increase the protective level? If so, there is a high probability that there is a short (additional load
connected) to the protected system.
SHORT LOCATION TEST
To locate the short(s) on a protected system, the CS-10 can be connected to the structure to
increase polarization, as in the current requirement test above, but operated in the interrupted
mode. At various points on the protected structure take both “off” and “on” Pipe to Soil readings.
Subtract the “off” reading from the “on” reading and record that difference (delta V) with the
location. As you approach the short location, the delta V will decrease toward 0 and as you pass
and leave the short location, the delta V will increase again. The lowest resistance short will
usually be identified first so another test for shorts should be performed to ensure that all shorts
have been located and cleared.
INSULATOR LOCATION TEST
To determine the location of buried insulator, hook the CS-10 to the structure and a temporary
ground to increase the structure polarization and switch to the interrupted mode as in the short
location test above. Then take half cell readings until there is dramatically reduced on/off
switching. This will indicate that the location is beyond an insulator. Pinpoint location can be
completed with an Audio Frequency Locator such as Tinker & Rasor’s Models PD or Mark V
Ranger .
CASING TEST
Connect the CS-10 so that it will depolarize the casing to a temporary ground. Take initial half
cell readings of the pipe and the casing, apply a small amount of current (approx. 30 mA) and
take another set of half cell readings. If the pipe and casing are both less negative, there is
probably a somewhat low resistance path between them. However, if the pipe is slightly more
negative and the casing less negative, there maybe no short. Apply a larger amount of current
(approx. 100 mA) and take another set of half cell readings. If the pipe and casing are still less
negative, a low resistant path is still indicated. If the pipe and casing keep the same reading as
each other, the path has low resistance. If the pipe is still a little more negative and the casing
less negative, any short is of very high resistance. Additional current steps will help determine if
Web: www.tinker-rasor.com E-mail: Info@tinker-rasor.com
– 4 –

CORROSION MITIGATION INSTRUMENTATION
P. O. BOX 281 SAN GABRIEL,CA91778 TEL: (626) 287-5259 FAX: (626) 287-0132
PRODUCT INSTRUCTIONS
there is a high resistance (electrolyte) connection between the pipe and the casing rather than a
short.
TESTING INSULATION JOINTS WITH A COMPASS
A magnetic compass used as a “lay-on” ammeter is a valuable means of checking insulating
joints such as insulating unions and flanges. It will work on parallel flanges as in a manifold. The
CS-10 makes this test simple.
The compass must not be liquid filled and its needle must not drag on the dial when the compass
is laid on a steel pipe. A machete or wrench is a handy steel surface to check it on. Because the
compass reacts to a magnetic field created when DC current flows, it will indicate whether or not
a current is flowing through the insulator to be tested.
The most common set-up is to place the compass on the top of a straight run of pipe as close to
the insulating joint as practical. The needle must be free to swing, and should, more or less align
itself with the pipe. When an attempt is made to pass current through the insulating joint from a
point on the other side of the compass from the pipe, the needle should not move if the joint is
insulated.
REPAIR
Tinker & Rasor strongly suggest all repairs be performed by Tinker & Rasor. All warranty work
must be performed by Tinker & Rasor. Many of the CS-10 components may not be readily
available to outside repair agencies. All repairs are turned around in 24 hours.
WARRANTY
Ninety-day warranty on Parts and Labor.
TECHNICAL SUPPORT
Should you require assistance with the CS-10 or any Tinker & Rasor product, please call (323)
283-3134 Monday through Friday 6:00 am to 4:00 PM Pacific time.
002-081
Web: www.tinker-rasor.com E-mail: Info@tinker-rasor.com
– 5 –
Table of contents
Other Tinker & Rasor Test Equipment manuals
