OWC Multi-Mount User manual

Assembly Manual
Multi-Mount
3.5” to 5.25” Drive Bay Converter Bracket
2.5” to 3.5” Drive Bay Converter Bracket

OWC Multi-Mount Table of Contents
1 INTRODUCTION
1.1 SYSTEM REQUIREMENTS
1.1.1 Computer Requirements
1.1.2 Hard Drive Requirements
1.1.3 Tool Requirements
1.2 PACKAGE CONTENTS
2 BRACKET ASSEMBLY
5 APPENDIX
6 CUSTOMER SERVICE
6.1 BEFORE CONTACTING CUSTOMER SERVICE
6.2 CONTACT INFORMATION
2.1 INSTALLING EITHER 1 OR 2 3.5” HARD DISK DRIVES INTO THE OWC
MULTI-MOUNT 3.5” BRACKET
2.2 INSTALLING A 2.5” HARD DRIVE INTO THE OWC 2.5” MULTI-MOUNT
2.3 INSTALLING 1 OR 2 2.5” HARD DISK DRIVES INTO THE OWC 3.5”
MULTI-MOUNT
2.4 INSTALLING 1 2.5” HARD DISK DRIVE AND 1 3.5” HARD DISK DRIVE
INTO THE OWC 3.5” MULTI-MOUNT
3 INSTALLATION
3.1 INSTALLING THE OWC MULTI-MOUNT INTO THE MAC PRO
3.2 INSTALLING THE OWC MULTI-MOUNT INTO A GENERIC PC CASE
4 TROUBLESHOOTING & TIPS
4.1 TROUBLESHOOTING
4.2 USAGE TIPS
5.1 FAQ
5.2 ABOUT DATA PROTECTION
IMPORTANT NOTE:
The OWC Multi-Mount drive mounting system brackets are sold both
individually, and also as sets. This manual encompasses both types of
brackets. Please be aware that the item you purchased may not include
all of the items listed here. Please see your invoice for specic items
ordered.

Got tools? If you don’t have the tools necessary to complete
this installation, Newer Technology has a fantastic toolkit which
includes everything you need to perform this and most other com-
mon computer hardware installations.
Your computer is a static-sensitive device.
It is susceptible to invisible damage if not
protected during installation.
We recommend proper grounding through
the use of a grounding strap. Be sure to work
in a clean and static-free area, and avoid
wearing clothing that retains static charges.
For more information, please visit
http://www.macsales.com/static
It’s available at:
http://www.macsales.com/tools
Thank you for purchasing the OWC Multi-Mount system. We’re con-
dent that it will provide years of high-performance service to you.
This guide will get you up and running quickly, demonstrating how to
install your own hard drives into the OWC Multi-Mount bracket system
and into 2 common types of computers.
Should you require additional support after reading this manual along
with helpful tips and FAQs, please see the inside back page for OWC
customer support options.
OWC Multi-Mount Introduction

OWC Multi-Mount Chapter 1 - Introduction
1 INTRODUCTION
1.1 System Requirements
1.1.1 Computer Requirements
Any computer system with a free 5.25” or 3.5” optical or hard drive bay.
1.1.2 Hard Drive Requirements
The OWC Multi-Mount is designed to work with any 3.5” or 2.5”hard disk
drive, either mechanical or SSD drive mechanisms.
1.1.3 Tool Requirements
• Phillips #1 or #2 Screwdriver
Note: Depending on the computer you are installing this into, there may be dif-
ferent tools required - see your specic system instructions for more details.
1.2 Package Contents
Item
➀ OWC Multi-Mount 3.5” Drive Bracket (2 required)*
➁ OWC Multi-Mount 2.5” Drive Bracket (2 required)*
➂ Screws for 2.5” Bracket - Fine Thread (6 pieces)*
➃ Screws for 3.5” Bracket - Coarse Thread (16 pieces)*
➄ Installation Manual
*NOTE: Depending on model purchased, contents may dier. Sold as individual
units, and as complete sets. Please check your invoice for proper contents.
➀
➁
➂➃
Assembly Manual
Multi-Mount
3.5” to 5.25” Drive Bay Converter Bracket
2.5” to 3.5” Drive Bay Converter Bracket
➄
OWC Multi-Mount Chapter 2 - Bracket Assembly
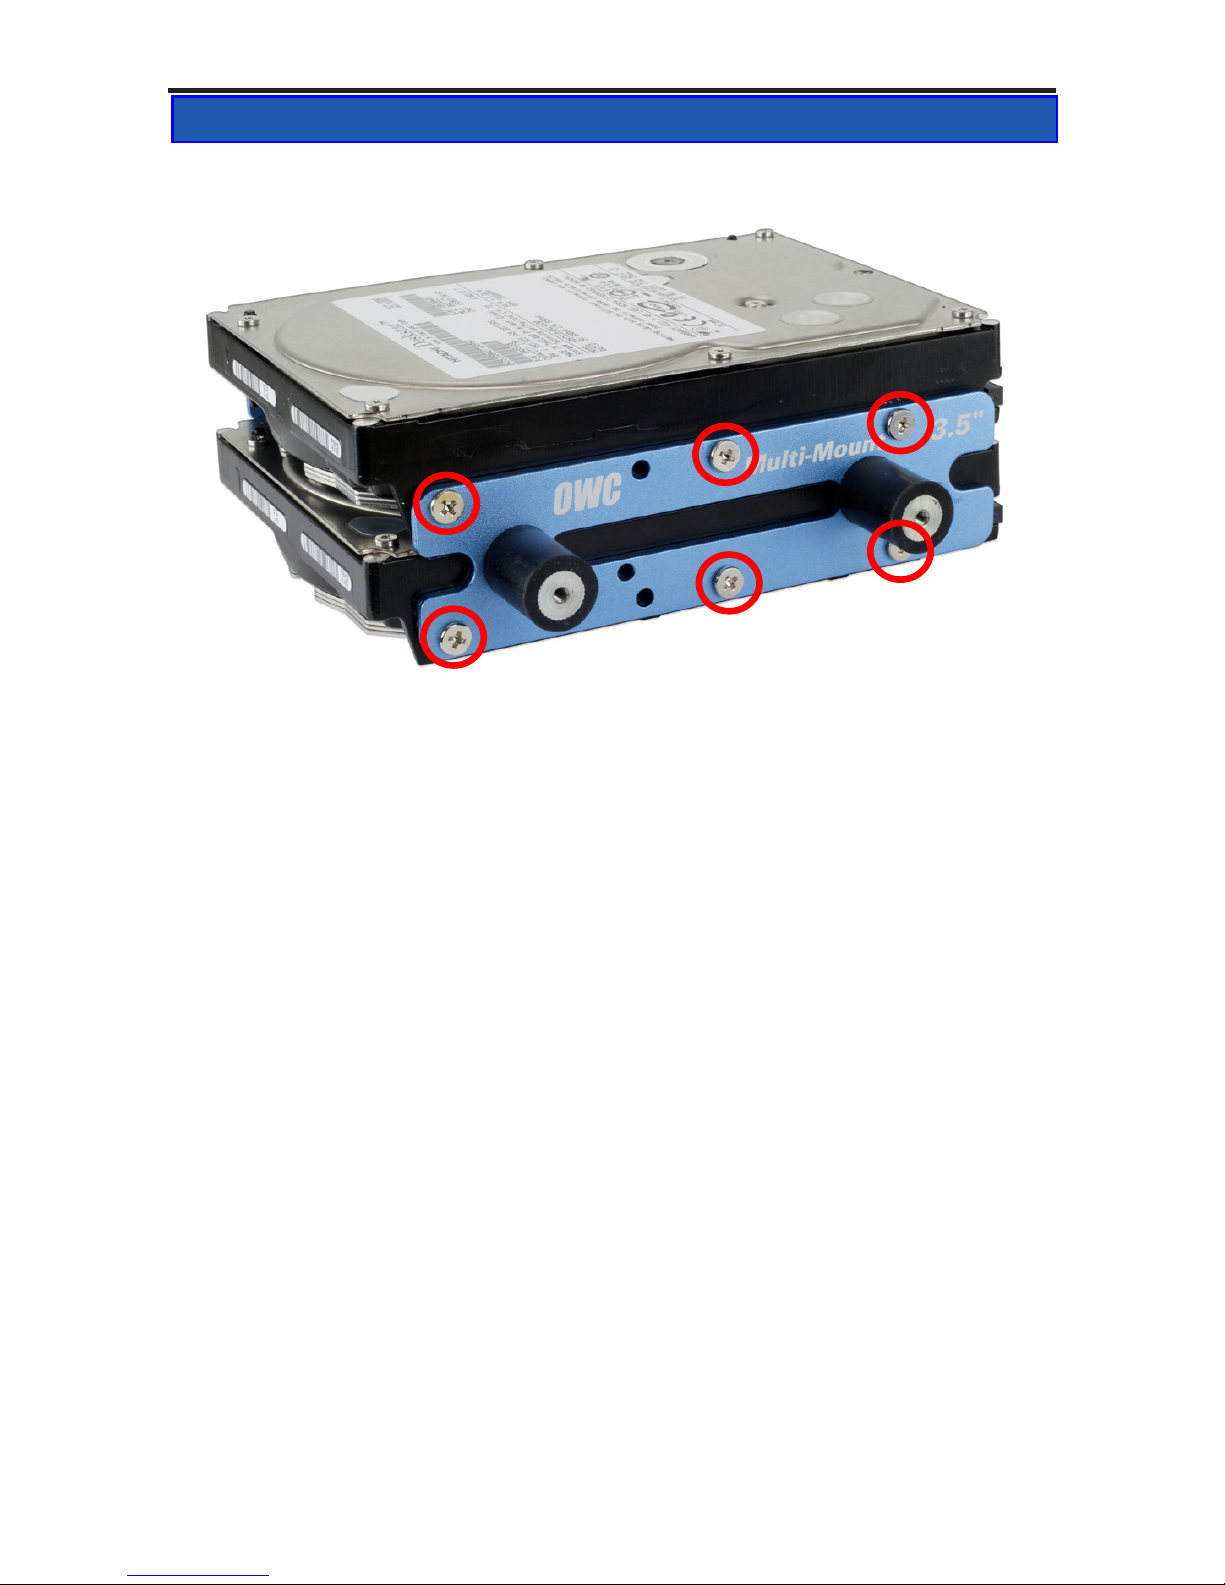
2.1 Installing either 1 or 2 3.5” Hard Disk Drives
2 3.5” BRACKET ASSEMBLY
Begin by positioning the bottom 3.5” hard disk drive with
the connection ports facing away from you, and then pick
up the OWC Multi-Mount 3.5” drive bracket that has the
white OWC Multi-Mount 3.5” silkscreening on it.
Place the OWC Multi-Mount onto the bottom 3.5” hard disk
drive using the center Phillips screw - coarse thread - and
don’t tighten it all the way yet. Leave it loose.
Attach a second screw to one of the outside holes, that will
make sure that you have the bracket centered on the hard
disk drive. Then, you can insert the third screw and tighten
all 3 of them rmly.
If you are going to install a 2nd 3.5” drive in the OWC Multi-
Mount, continue with installation of that drive now follow-
ing the same instructions. You do not have to install 2 drives
into the bracket and can add a 2nd drive at any time.
➀

OWC Multi-Mount Chapter 2 - Bracket Assembly
2.1 Installing either 1 or 2 3.5” Hard Disk Drives
2 3.5” BRACKET ASSEMBLY
Once you have the right bracket installed, rotate the hard
drive and attach the left side bracket using the same
method as step 1.
You also can add a 2.5” hard disk drive using the OWC 2.5”
Multi-Mount. See the next chapter if you are wanting to
install a mixed environment of drive mechanisms.
The OWC 3.5” Multi-Mount assembly is ready to install into
your system. Continue to chapter 3 for common installation
photographs.
➁

OWC Multi-Mount Chapter 2 - Bracket Assembly
2.2 Installing a 2.5” Hard Disk Drive
2 2.5” BRACKET ASSEMBLY
Installing a 2.5” Hard Disk Drive into the OWC Multi-Mount is
simple - place the 2.5” drive mechanism on the table in front
of you, with the interface connection to the right side.
Take the OWC Multi-Mount 2.5”drive bracket that has the
white OWC silkscreen on it, and attach it to the drive mecha-
nism as shown above, with the portion of the bracket that
has the OWC logo extended o of the drive to the left.
Firmly tighten the large Phillips screws that are held to the
OWC Multi-Mount bracket through rubber grommets to the
side of the hard drive facing you.
Once attached, turn the drive around and repeat using the
other drive bracket. Make certain that all screws are fully
inserted into the drive.
The OWC 2.5” Multi-Mount is now ready to install into a 3.5”
drive bay, or into the OWC 3.5”Multi-Mount. Continue to
chapter 3 for common installation photographs.
➀

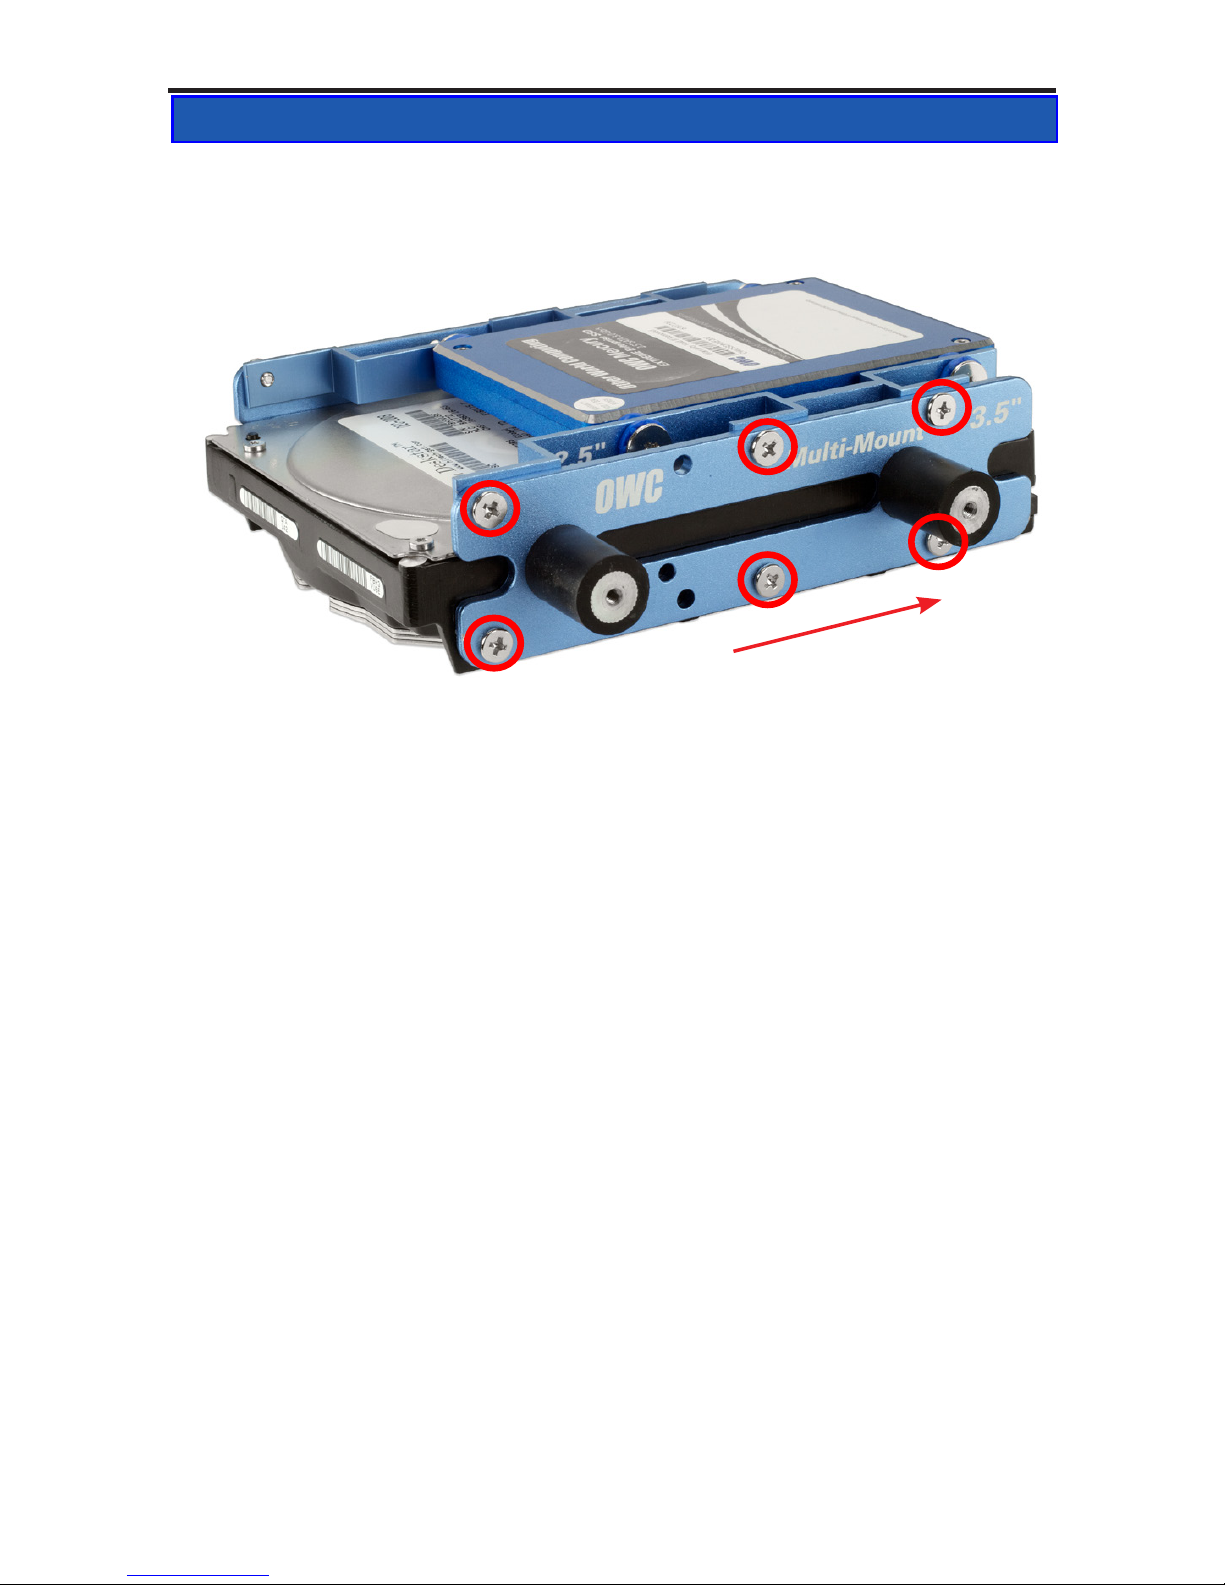
OWC Multi-Mount Chapter 3 - Bracket Installation
2.3 Installing 1 or 2 2.5” Hard Disk Drives into the
OWC Multi-Mount
3 BRACKET ASSEMBLY
Once you have the 2.5”OWC Multi-mount attached to the
2.5” hard disk drive, you can install up to (2) 2.5” drives onto
the 3.5” OWC Multi-Mount bracket.
In the above picture you see an arrow pointing towards the
extended portion of the 2.5” OWC Multi-Mount bracket.
That would be the front of the drive, the 2.5” OWC Multi-
Mount bracket says “OWC” silkscreened in white right on
that portion of the bracket. You need to place the bracket in
this orientation to properly install.
The 3.5” OWC Multi-Mount bracket that you are attaching
the 2.5” OWC Multi-Mount bracket to has the white OWC
text silkscreening on it as well. Use that as your orientation.
The picture on the next page may also assist in orientation.
➀

OWC Multi-Mount Chapter 3 - Bracket Installation
3 BRACKET ASSEMBLY
Here you see a completed assembly comprised of one set
of 3.5” OWC Multi-Mount drive brackets, and two sets of 2.5”
OWC Multi-Mounts, all assembled into one unit.
The 2.5” OWC Multi-Mount is attached to the 3.5” OWC Multi-
Mount using 6 of the ne thread Phillips screws included
with the mount - 3 per side, 6 total per drive bracket assem-
bly. It’s easiest to start the center screw, but not fully tighten
it, and then insert the outer two screws. This assures that you
have the bracket lined up perfectly before continuing.
Depending on the installation you choose for your system,
the 3.5” to 5.25” OWC Multi-Mount adapter bracket may not
be needed - but in many applications such as installation
into the Mac Pro, this is the best way to add 2 more 2.5” Hard
Drives into your system.
Continue reading chapter 3 for more options and installed
photographs.
➁
2.3 Installing 1 or 2 2.5” Hard Disk Drives into the
OWC Multi-Mount
OWC Multi-Mount Chapter 3 - Bracket Installation
2.4 Installing 1 2.5” Hard Disk Drive and 1 3.5” Hard Disk Drive
into the OWC Multi-Mount
3 BRACKET ASSEMBLY
This is a completed assembly comprised of one set of 3.5”
OWC Multi-Mount drive brackets, and one set of 2.5” OWC
Multi-Mount, all assembled into one unit. Be sure to orient
the bracket so that the SATA ports both point towards the
rear of the Multi-Mount.
Continue reading chapter 3 for more options and installed
photographs.
Other manuals for Multi-Mount
1
Table of contents
Other OWC TV Mount manuals


