Oxford Nanopore PromethION48 User manual

ONT-08-00549-00-2
BR_1050(EN)_V2_29Jul2020
Quick start guide

3
2
Welcome
Here’s everything you need to install your PromethION 48
and to check the system is ready for use.
Just follow the steps on the following pages in order to:
• Set up the PromethION 48
• Power on the device
• Run the hardware check

54
Your PromethION 48
What’s in the box:
1. PromethION 48 Sequencing Unit
2. PromethION 48 Data Acquisition Unit
3. Country-specific C13 cables
4. 48x Configuration Test Cells (CTCs)
5. 3x PCIe cables
6. 3x USB A - Mini USB cable
7. 1x USB A - USB B cable
1.
2. x1
x1
4. x48 5. x3
7. x1
6. x3
x3
3.
Store CTCs at room
temperature and not
in your Sequencing Unit.
Your PromethION 48: How it’s packaged
PCIe cables
PromethION 48
Data Acquisition Unit
C13 cables
PromethION 48
Sequencing Unit (below)
Configuration Test Cells
USB cables and
C13 cables

76
Device connections
Numbers correspond to the step in
which that connection is used.
1.
3.
3.4.7.6.
5.
2.
4.
6.
1. Fibre module cages
2. Ethernet ports
3. PCIe cable ports
4. USB ports
5. VGA port
6. Power sockets
7. Power on/off
Installation advice
Recommended laboratory location:
Place device on a well-supported, strong, clean bench
Ensure data and power connectors are in close proximity
Ensure power sockets are easily accessible should a disconnection be
required in case of emergency
Sequencing should be carried out at a room temperature of +18oC to +22oC
Allow 30 cm clearance to rear and sides of device
Do not cover any ventilation grills
Warning – rear of device heats up during operation
28 kg Recommend 2 person lift to
better handle with care
Pre-installation
Before installing the device, the following should be available:
SFP+ modules and cabling for 2x 10 Gbps fibre OR cabling for 2x 10 Gbps Copper
A single Copper cable for hardware check
Fibre OR Copper ports providing:
IP address through DHCP
Outbound-only access to the internet over ports 80 and 443
1x Monitor (VGA compatible)
1x VGA cable
1x USB connected keyboard
1x USB connected mouse
3x Power supplies/wall sockets
Optional: UPS solution with C14 cables

98
Setting up your PromethION 48
4 Connect PCIe cables
Connect the PCIe cables to the rear
of the Sequencing Unit and the rear
of the Data Acquisition Unit. Note the
port-to-cable colour requirement
on both units
5 Connect USB cables
Connect:
- 2x USB A – Mini USB
- 1x USB A – USB B
From the Data Acquisition Unit
to the Sequencing Unit
6 Connect peripherals
Plug in:
- Monitor VGA cable
- USB Keyboard
- USB Mouse
1 Unpack the device
Place the Sequencing Unit on the
bench where it will be run and the
Data Acquisition Unit within 2 metres
of the Sequencing Unit
2 Optional: Insert SFP+ modules
If the fibre optic cables are to be used,
then you must insert your chosen
SFP+ modules into the ports on the
rear of the Data Acquisition Unit
3 Connect data cabling
For the hardware test, a single copper
cable should be used and connected
to a port with a DHCP service running.
A full network configuration will be
completed later
Powering on your PromethION 48
Logging on
9 Booting
A loud fan will sound from the Data
Acquisition Unit but will quieten after
~5 s. After ~2-5 minutes a login screen
will appear, preceded by a blank screen
and multiple loading screens
10 Login
Enter the password prom and log in.
This password must be changed later
later and instructions for doing this are
included below. The desktop will load
and display the MinKNOWTM icon
11 Load software
Double click the MinKNOW icon
to load the MinKNOW software.
You will see an initialisation screen
followed by the Graphical User
Interface (GUI)
7 Power supply
Insert two of the supplied C13
cables into the top of the Data
Acquisition Unit, and the third into
the Sequencing Unit. Connect all of
the cables to the mains power supply
8 Power on
Turn on:
a) Mains power
b) Sequencing Unit
c) Data Acquisition Unit
c)
b)

1110
Log in screen Starting the hardware check
17
Starting the hardware check
The CTC icon will be shown in the GUI
as the CTCs will be inserted into the
Sequencing Unit. Select all of the flow
cell positions. Click Start in the bottom
right corner of the screen to initiate a
hardware check
18
Progressing the hardware check
The hardware check will begin. The
Sequencing overview screen will then
be shown by MinKNOW where the
hardware check can be monitored.
The hardware check will take
approximately 1-2 minutes
19
Completing the hardware check
The flow cell icon will display Run
complete once the device has passed
the hardware check
Note: Consult Help and shortcuts in this
guide if your hardware check fails. Do not
store the CTCs in the Sequencing Unit after
a hardware check. See ‘Your PromethION’.
12 Log in screen
At the MinKNOW login screen, enter
your Nanopore account and Log in
15 Inserting the CTCs into the
PromethION 48
Open the doors on top of the
Sequencing Unit and load the CTCs
into all 48 flow cell positions covering
all three strips. Shut the doors once all
48 CTCs are loaded. The LED adjacent
to the flow cell will first show blue
(initialising), followed by green (ready)
13 Tutorials
A pop-up will appear on the screen.
Please click Continue Tutorial to
understand how to use the GUI, then
continue to step 14
16 Start
Go to Start in the side panel, then click
Hardware Check to enter the Hardware
check screen
14 Connection Manager
The software will load the Connection
Manager screen. Click My Device to
load the features of the software

1312
Powering off your PromethION 48
Help and support
23 Device settings options
Navigate to the Device settings via
the Host settings option in the side
panel of landing page
System messages
The System Messages panel informs
the user of the actions that are
being carried out by MinKNOW. The
panel also provides simple process
history messages that maybe useful
during use of the device (e.g. after
a hardware check)
Help
The tutorials mentioned earlier in this
PromethION 48 Quick start guide lead
the user through the GUI
The tutorials can be repeated if
you Recap or by Resetting tutorial
state for new users of the GUI
24 Shutdown the PromethION 48
Select Shutdown under System on
the Device settings screen to power
off your device
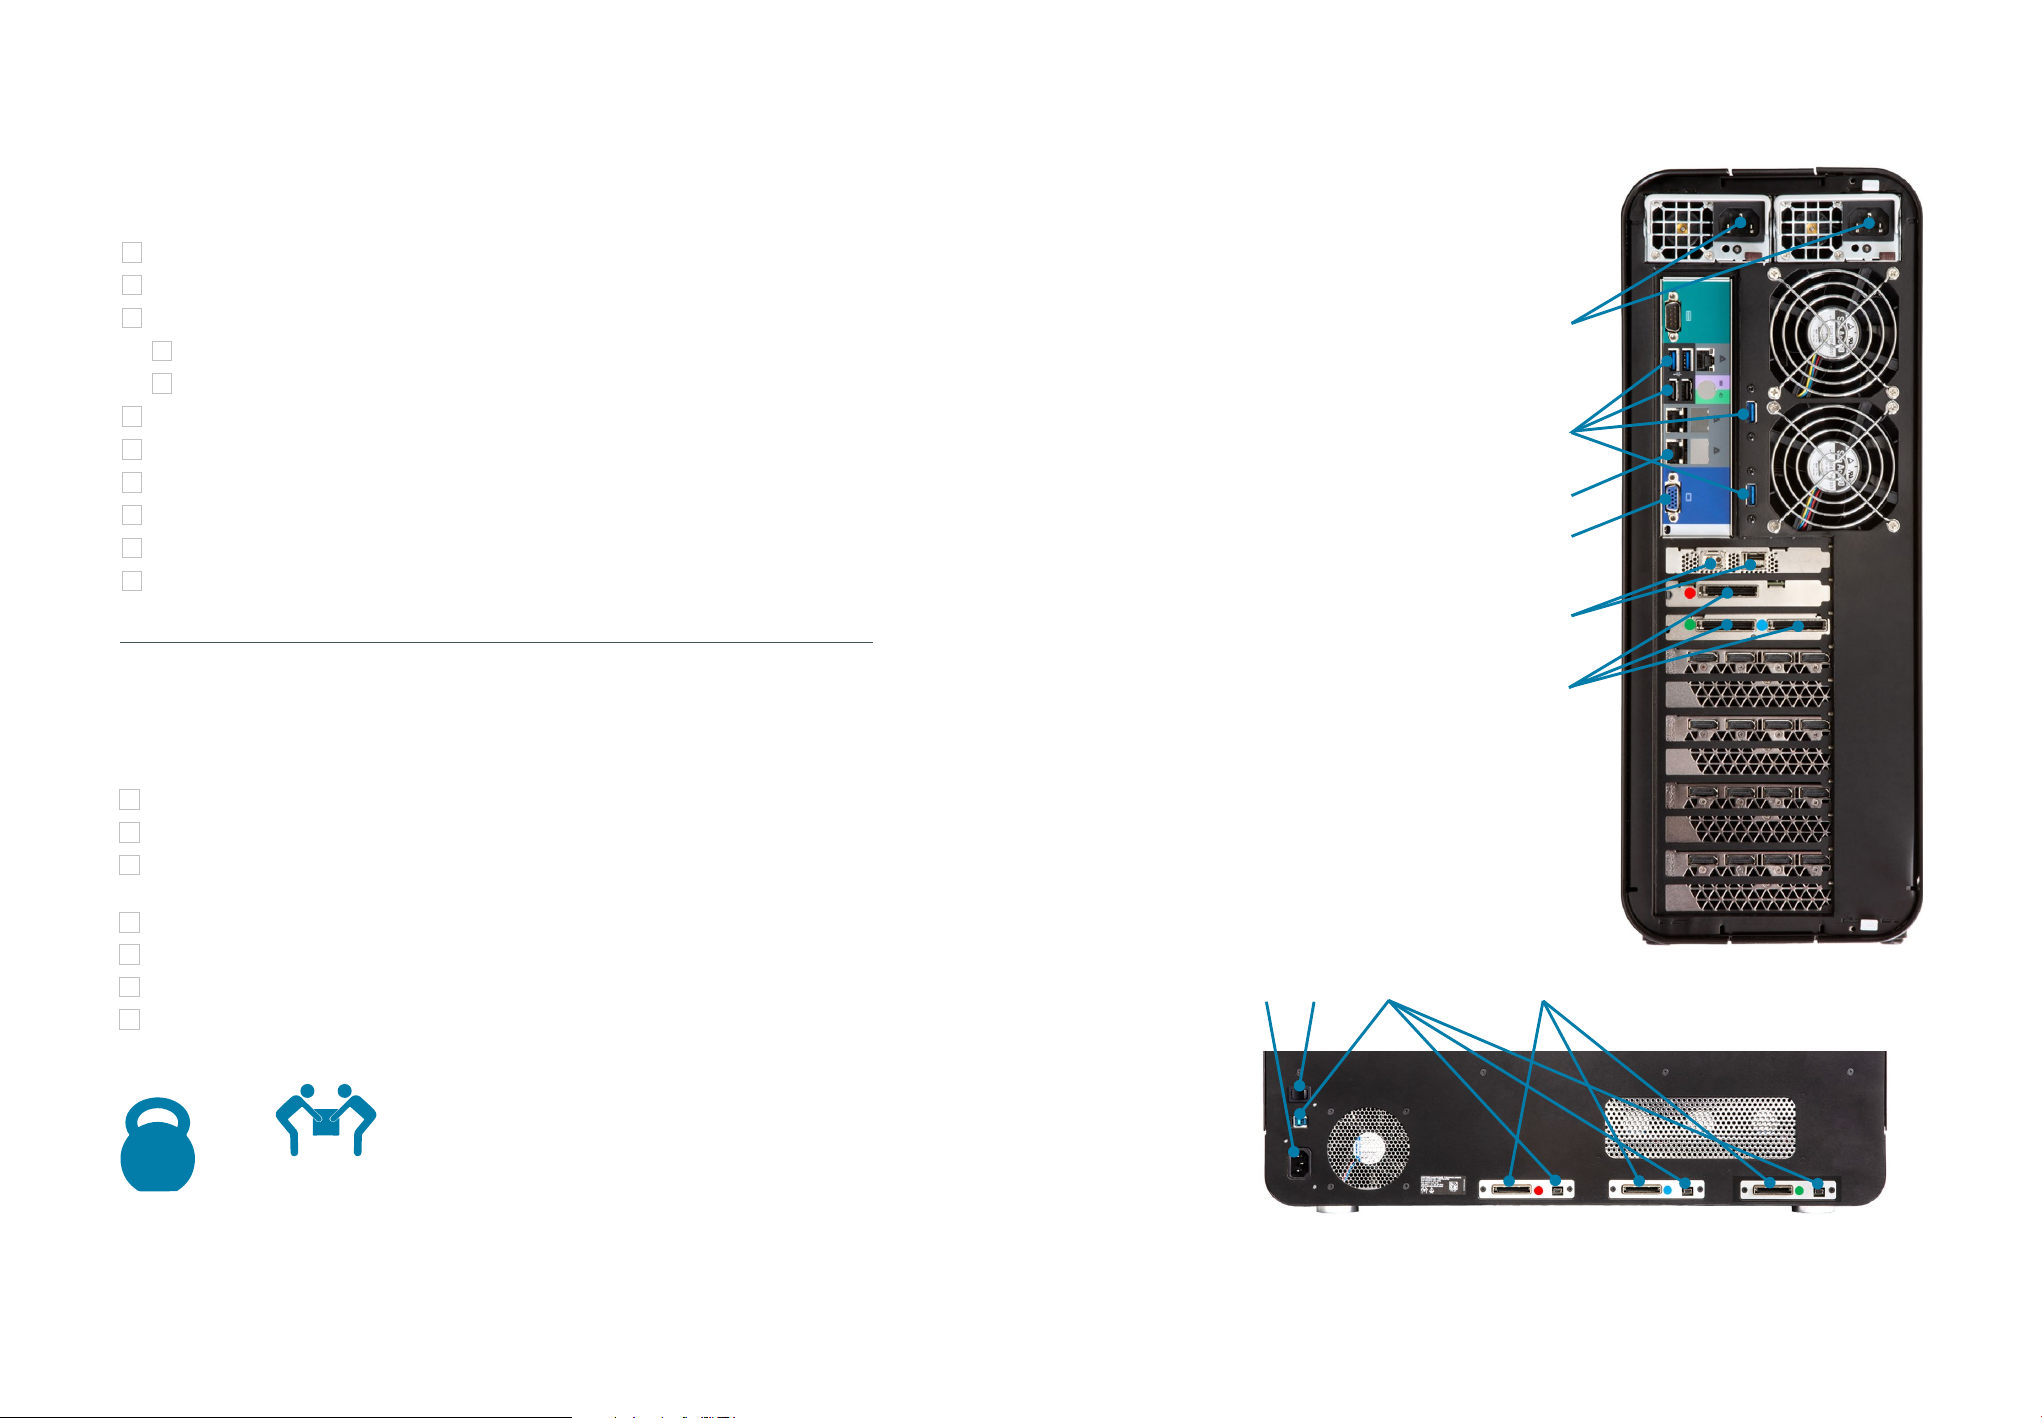
25 Power off your Sequencing Unit
Power down the Sequencing Unit
using the switch on the back of
the device
Updating the network settings,
MinKNOW, and password
20 Network configuration
See the product documentation
in the Nanopore Community for
the PromethION installation and
configuration protocol to configure
the PromethION network settings
21 Updating the system
Check for an update to the latest
software release after configuring
your PromethION network settings.
This can be completed by entering:
into the terminal. The default sudo
password is prom, however this
should be changed at the earliest
opportunity
22 Changing the default password
Your PromethION password should be
changed as soon as possible and in
line with your local IT guidance. This
can be achieved by typing:
into the terminal. Press Enter before
following the on-screen prompts.
Please take note of your new
password as this will be required to
log in to your device and for running
with sudo privileges required for
e.g. Oxford Nanopore Technologies’
software updates
sudo apt update
sudo apt install ont-promethionbeta-release
passwd

14
Additional information
Cleaning the PromethION 48
Absorb any excess liquid and clean the device
with an IPA wipe.
Dispose of any cleaning materials in
a biohazard (yellow) bin.
Device updates and support
Ongoing updates and support for your PromethION 48 device are available in the
Nano ore Communit .
Research Use Only
15
Connections for installation
1. Power sockets
2. USB ports
3. Ethernet ports
4. VGA port
5. Fibre module cages
6. PCIe cable ports
5.
6.
4.
USB B port
Power socket Mini USB Port PCIe cable ports
2.
3.
1.

1716
Supply voltage 100-240 VAC (50/60 Hz)
Maximum power 1200 W
Maximum current 15-7.5 A
Supply voltage 100-240 VAC (50/60 Hz)
Maximum power 2000 W
Maximum current 12-11 A (220-240 V - 2200 W)
Maximum current 14-11 A (100-127 V - 1200 W)
Electrical information
Sequencing Unit
Data Acquisition Unit
Component Specification
Size H 190 x W 590 x D 430 mm
Weight 28 kg
Power
1x for Sequencing Unit
C13 cable included with device
Max power draw of 1200 W
Sequencing specification 48 sequencing positions designed to accept flow cells
Thermal management Designed to sequence at a controlled room temperature
of +18˚C to +22˚C*
Users should allow 30 cm clearance to the rear and sides
of the device
WARNING: Rear of instrument heats up during operation
Component Specification
Size H 440 x W 178 x D 470 mm
Weight 25 kg
Power
2x for Data Acquisition Unit
C13 cables included with device
Max power draw of 2000 W
Compute specification
60 TB SSD Storage, 384 GB RAM
Intel CPU
4x Nvidia GV100
Pre-loaded software Ubuntu OS, PromethION OS, MinKNOW
Thermal management Designed to sequence at a controlled room temperature
of +18˚C to +22˚C*
Users should allow 30 cm clearance to the rear and sides
of the device
WARNING: Rear of instrument heats up during operation
Technical specification
Sequencing Unit
Data Acquisition Unit
*Functional range of electronics is -5°C to +40°C for ambient temperatures

1918
Labels on the instrument
Labels on the PromethION 48 Sequencing Unit:
Labels on the PromethION 48 Data Acquisition Unit:
Label on the flow cell:
15200
PROPERTY OF
www.nanoporetech.com
XXXXX
15200
PROPERTY OF
www.nanoporetech.com
XXXXX

Oxford Nanopore Technologies, the Wheel icon, MinKNOW, and PromethION,are registered trademarks
of Oxford Nanopore Technologies Limited in various countries. All other brands and names contained
are the property of their respective owners. © 2019 Oxford Nanopore Technologies. All rights reserved.
Oxford Nanopore Technologies products are currently for research use only.
ONT-08-00549-00-2 | BR_1050(EN)_V2_29Jul2020
Table of contents
Other Oxford Nanopore Laboratory Equipment manuals
Popular Laboratory Equipment manuals by other brands

Varian
Varian ProStar 430 Driver manual

Drucker Diagnostics
Drucker Diagnostics Horizon 12 Flex Operator's manual

LBX instruments
LBX instruments H04X10 user manual

Industrial Scientific
Industrial Scientific MX6 iBrid Operation guide

Controls
Controls iMech Series product manual

Raven
Raven Sidekick Pro Installation and operation manual

Shodex
Shodex Asahipak NH2P-40 3E Operation manual

Oroboros Instruments
Oroboros Instruments O2k manual

NanoEnTek
NanoEnTek ADAMII-CD34 user manual

Thermo Scientific
Thermo Scientific Thermo Scientific Sorvall Legend Micro 17 instruction manual

Metrohm
Metrohm 942 Extension Module Vario ONE/Deg manual

ARA
ARA mini 6 user manual