Oxhark Flame WM36D Owner's manual

WARNING
Read and understand this entire owner’s manual, including all safety
information, before plugging in or using this product. Failure to do so could
result in fire, electric shock, or serious personal injury.
CAUTION Keep this owner’s manual for future reference. If you sell or give this product
away, make sure this manual accompanies this product.
NO VENTING REQUIRED
120V AC; 60 Hz; 1500 Watts
WM36D / WM42D / WM50D
WM60D / WM72D / WM84D / WM100D
IMPORTANT
INSTRUCTIONS
&
OPERATING
MANUAL

IMPORTANT:
IMPORTANT:
IMPORTANT:
IMPORTANT: It
It
It
It is
is
is
is important
important
important
important to
to
to
to read
read
read
read these
these
these
these instructions
instructions
instructions
instructions carefully
carefully
carefully
carefully before
before
before
before using
using
using
using the
the
the
the appliance
appliance
appliance
appliance for
for
for
for
the
the
the
the first
first
first
first time.
time.
time.
time. Keep
Keep
Keep
Keep the
the
the
the instructions
instructions
instructions
instructions safe
safe
safe
safe so
so
so
so that
that
that
that you
you
you
you can
can
can
can refer
refer
refer
refer t
t
t
to
o
o
o them
them
them
them later
later
later
later if
if
if
if necessary.
necessary.
necessary.
necessary.
【IMPORTANT
IMPORTANT
IMPORTANT
IMPORTANT INSTRUCTIONS
INSTRUCTIONS
INSTRUCTIONS
INSTRUCTIONS】
1. Read all instructions before installing or using this heater
2. This heater is hot when in use. To avoid burns, do not let bare skin touch hot surfaces. Keep combustible
materials, such as furniture, pillows, bedding, papers, clothes, etc. and curtains at least 0.9 m from the front
of the heater and keep them away from the sides and rear.
3. Extreme caution is necessary when any heater is used by or near children or invalids and whenever the
heater is left operating and unattended.
4. Do not operate any heater after it malfunctions. Disconnect power at service panel and have heater
inspected by a reputable electrician before reusing.
5. Do not use outdoors.
6. To disconnect heater, turn controls to off, and turn off power to heater circuit at main disconnect panel (or
operate internal disconnect switch if provided).
7. Do not insert or allow foreign objects to enter any ventilation or exhaust opening as this may cause an
electric shock or fire, or damage the heater.
8. To prevent a possible fire, do not block air intakes or exhaust in any manner.
9. A heater has hot and arcing or sparking parts inside. Do not use it in areas where gasoline, paint, or
flammable vapors or liquids are used or stored.
10. Use this heater only as described in this manual. Any other use not recommended by the manufacturer
may cause fire, electric shock, or injury to persons.
11. This heater may include an audible or visual alarm to warn that parts of the heater are getting excessively
hot. If the alarm sounds (or illuminates), immediately turn the heater off and inspect for any objects on or
adjacent to the heater that may have blocked the airflow or otherwise caused high temperatures to have
occurred. DO NOT OPERATE THE HEATER WITH THE ALARM SOUNDING (OR ILLUMINATING).
12. “SAVE THESE INSTRUCTIONS”
This heater is for use on 120 volts. The cord has a plug as shown below Figure. An adapter as shown at C is
available for connecting three-blade grounding-type plugs to two-slot receptacles. The green grounding lug
extending from the adapter must be connected to a permanent ground such as a properly grounded outlet box.
The adapter should not be used if a three-slot grounded receptacle is available.

Instructions importantes
1. Lisez toutes les instructions avant d'installer ou d'utiliser ce radiateur.
2. Ce radiateur est chaud lorsqu'il est utilisé. Pour éviter les brûlures, ne laissez pas la peau nue toucher
les surfaces chaudes. Gardez les matériaux combustibles, tels que les meubles, les oreillers, la literie,
les papiers, les vêtements, etc. et les rideaux à au moins 0,9 m de l'avant du radiateur et éloignez-les des
côtés et de l'arrière.
3. Une extrême prudence est nécessaire lorsqu'un radiateur est utilisé par ou près des enfants ou des
invalides et chaque fois que le radiateur est laissé en fonctionnement et sans surveillance.
4. Ne faites pas fonctionner de radiateur après les dysfonctionnements. Débranchez l'alimentation au
panneau de service et faites inspecter le radiateur par un électricien réputé avant de réutiliser.
5. N'utilisez pas à l'extérieur.
6. Pour déconnecter le radiateur, tourner les commandes vers OFF et désactiver l'alimentation sur le circuit
du chauffage au panneau de déconnexion principale (ou faire fonctionner l'interrupteur de déconnexion
interne s'il est fourni).
7. Ne pas insérer ou permettre aux objets étrangers de pénétrer dans une ventilation ou une ouverture
d'échappement car cela peut provoquer un choc électrique ou un incendie, ou endommager le radiateur.
8. Pour éviter un éventuel incendie, ne bloquez pas les apports d'air ou ne vous échappez en aucune façon.
9. Un radiateur a des pièces chaudes et arc ou étincelles à l'intérieur. Ne l'utilisez pas dans les zones où
l'essence, la peinture ou les vapeurs ou liquides inflammables sont utilisés ou stockés.
10. Utilisez ce radiateur uniquement comme décrit dans ce manuel. Toute autre utilisation non recommandée
par le fabricant peut provoquer un incendie, un choc électrique ou une blessure aux personnes.
11. Ce radiateur peut inclure une alarme audible ou visuelle pour avertir que les parties du radiateur
deviennent excessivement chaudes. Si l'alarme sonne (ou illumine), éteignez immédiatement le radiateur et
inspectez tous les objets ou adjacents au radiateur qui pourrait avoir bloqué le flux d'air ou autrement
provoqué des températures. Ne faites pas fonctionner le radiateur avec le sondage d'alarme (ou illuminant).
12. «Enregistrez ces instructions»
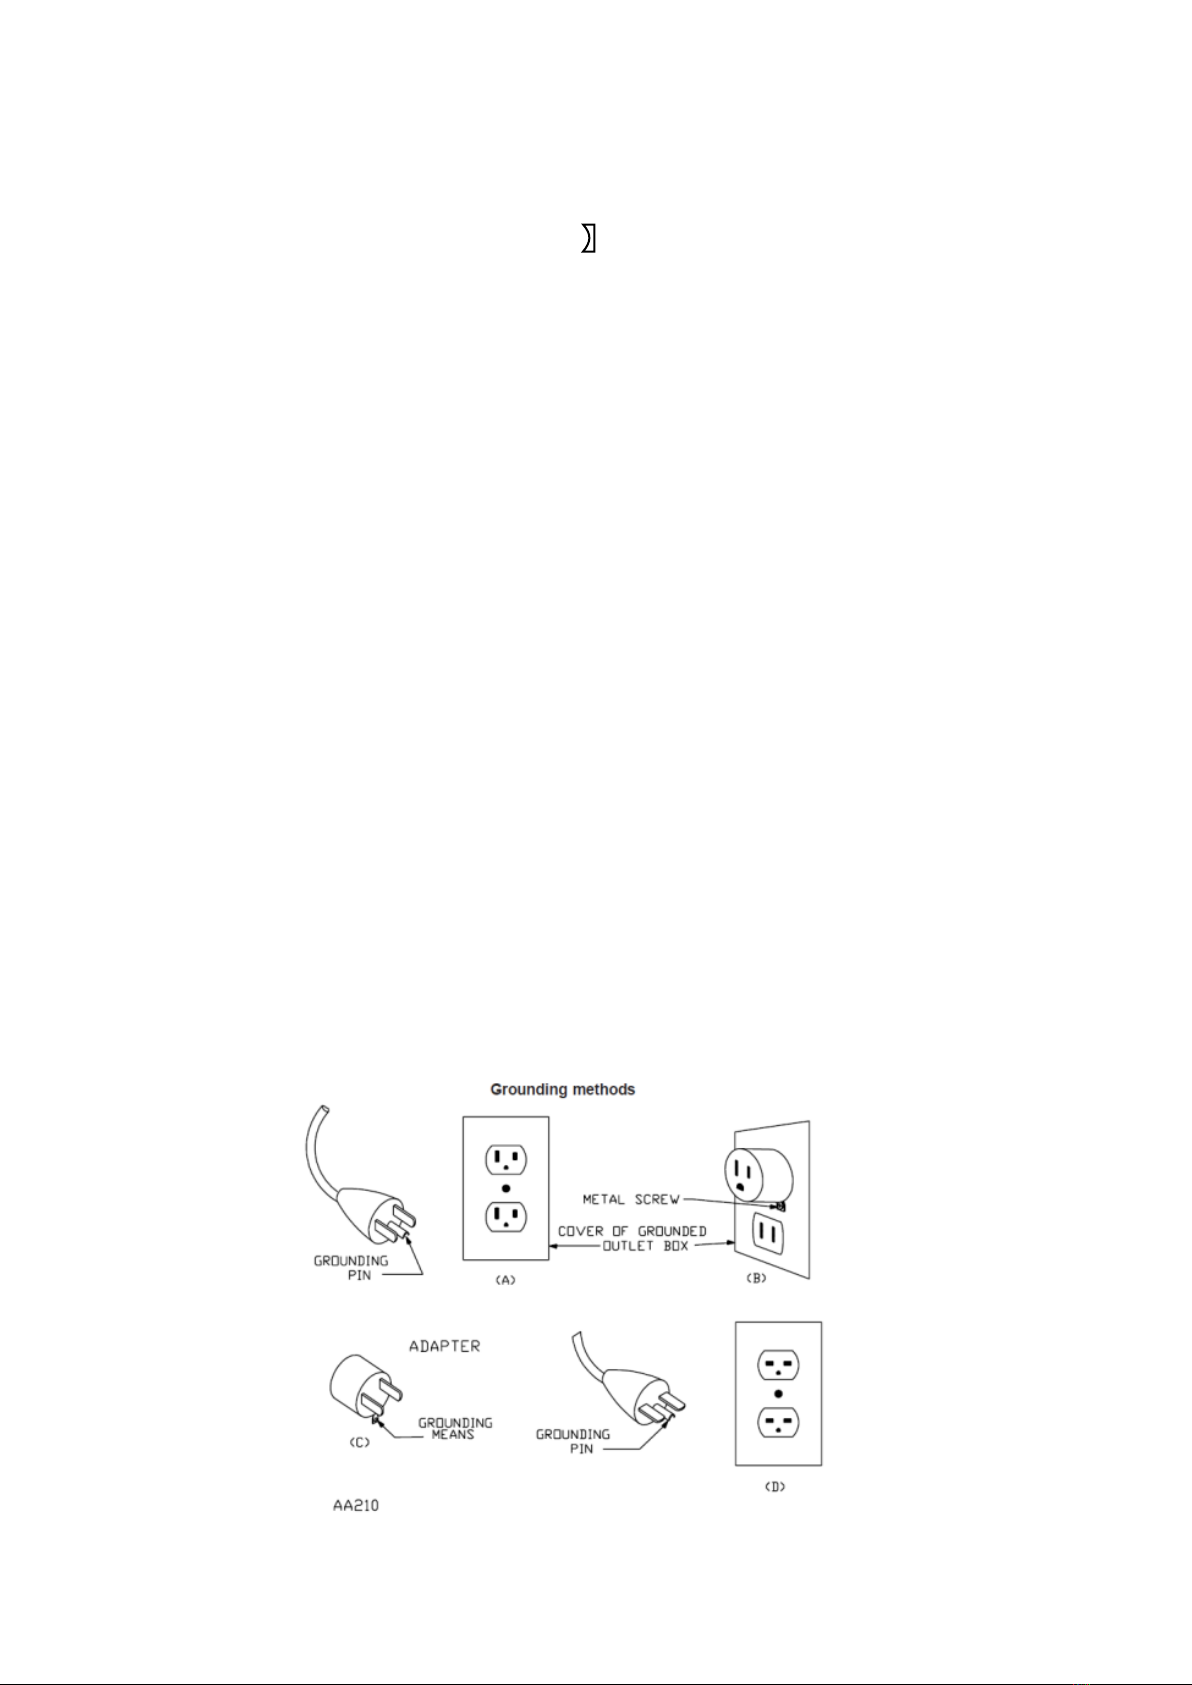
Ce radiateur est utilisé sur 120 volts. Le cordon a une fiche comme indiqué ci-dessous. Un adaptateur comme
indiqué sur C est disponible pour connecter les bouchons de type de mise à la terre à trois lames aux
réceptacles à deux plans. La patte de mise à la terre verte s'étendant de l'adaptateur doit être liée à un sol
permanent comme une boîte de sortie correctement mise à la terre. L'adaptateur ne doit pas être utilisé si un
réceptacle mis à trois places est disponible.

UNPACKING AND TESTING APPLIANCE
Carefully remove the appliance from the box. Prior to installing the appliance, test to make sure the
appliance operates properly by plugging the power supply cord into a conveniently located 110-120 Volt
grounded outlet.
Grounding
Grounding
Grounding
Grounding Appliance
Appliance
Appliance
Appliance
This appliance is for use on 120 Volts.For connecting three-blade grounding type plugs to three -slot
receptacles. The green grounding lug extending from the adapter must be connected to a permanent
ground such as a properly grounded outlet box. The adapter should not be used if a three-slot grounded
receptacle is available .To disconnect appliance, turn controls to off, then remove plug from outlet.
WARNING:
WARNING:
WARNING:
WARNING:
Keep the front of the appliance through which the heat is radiated at least 1 meter away from furniture,
curtains and other flammable objects at all time.Never use an extension lead. The mains cable must
remain at the back of the appliance and must not be in contact with any hot elements.
【
【
【
【INSTALLATION
INSTALLATION
INSTALLATION
INSTALLATION】
】
】
】
WARNING:Before installing the in-wall fireplace,please read the following steps carefully.
1.Wall mounted functional fireplace.
1
STEP 1:Remove the two silver colors screws and remove
the glass according to the direction of the arrow.
STEP 2:Make the drywall anchors onto the wall.Fix four ST4 * 8
screws on the drywall anchors.(Keep the screws with 5mm expose)
2
WAENING:Please reference the following illustration distance to install drywall anchors.
3
STEP 3:Hang the fireplace on the wall and take out four ST4 * 8 screws to fix it.

2.Recessed functional fireplace Installation.
4
STEP 4:Place the white plastic tray inside the product, place the Crystal and logs on it, hang the glass and fix it
with two silver white screws.
Warning:This product is installed in a semi-embedded way.
STEP 1:Remove the six silvery white screws as shown in the picture,and then remove the wall hook and glass.
STEP 2:Move the wall hook forward and install it as shown in the picture.
WARNING:The following picture shows the schematic diagram of the installation hole and the relevant dimensions.

ALWAYS
ALWAYS
ALWAYS
ALWAYS unplug
unplug
unplug
unplug this fireplace heater before
before
before
before assembly
assembly
assembly
assembly or cleaning,
cleaning,
cleaning,
cleaning, or
or
or
or before
before
before
before relocating.
relocating.
relocating.
relocating.
Failure to do so could result in electric
electric
electric
electric shock
shock
shock
shock,fire
fire
fire
fire, or personal
personal
personal
personal injury
injury
injury
injury.
Warning
Warning
Warning
Warning
This carton includes GLASS!ALWAYS use extrme caution when handing glass.
Failure to do so could result in personal injury or property damage.
Warning
Warning
Warning
Warning
STEP 3:Put the fireplace into the hole and fix it with screws.Again, this is a semi-embedded product.
STEP 4:Place the white plastic tray inside the product, place the Crystal and logs on it, hang the glass and fix it with two silver white screws.
After the installation is completed, please note that the product is semi-embedded into the wall so that the upper air outlet can be breathable.

【
【
【
【Special
Special
Special
Special characteristics
characteristics
characteristics
characteristics of
of
of
of this
this
this
this Electric
Electric
Electric
Electric Fireplace
Fireplace
Fireplace
Fireplace】
】
】
】
1、The smouldering glow of the flames can hardly be distinguished from that of a real fireplace.
3、Produces the effect of a hot current of air.
4、Automatic and constant temperature control.
5、Fireplace can be both used as Build-in the wall.
6、Fireplace exchanged freely from LOG and Glass Media.
7、Perfect for small to mid-sized rooms.
8、Timer.( 1hrs to 9hrs)
9、Operated with remote control and Manual Panel Switch.
Plug the power cord into a 110-120 Volt 15 Amp outlet.Make sure the outlet is in good condition and that
the plug is not loose.NEVER exceed the maximum amperage for the circuit.DO NOT plug other appliances
into the same circuit.
2、Rich and colorful colors for you to choose from.
10、5-Gear flame brightness adjustment.

O
nly use the appliance in accordance with the instructions in this manual! It cannot be used for any
other purpose.
Never operate the appliance when the appliance itself or the main cable show any signs of damage.
In order to avoid overheating, do not cover the heater.
Be responsible when handling the packing material. Warning: plastic wrapping may be lethal to children.
Do not place the appliance next to a socket.
Never operate the heater on a program switch, timer switch or any other appliance for automatic
operation.
The heater is only suitable for indoor use.
Never use the heater in the bathroom, shower or near a swimming pool.
The heater must not be located immediately below a socket-outlet
If the supply cord is damaged, it must be replaced by the manufacturer or its service agent or a similarly
qualified person in order to avoid a hazard.
Never leave small children unattended near the appliance.
In case of malfunction, disconnect the plug immediately.
When not in use for a considerable amount of time, unplug the appliance.
Components should only be serviced by an approved electro technician.
【
【
【
【
To
switch on】
】
】
】
Plug in the appliance into the socket. Turn on the Power
Power
Power
Power Switch
Switch
Switch
Switch
The control Switch
Switch
Switch
Switch Panel
Panel
Panel
Panel is on the bottom of tempered glass panel(See
(See
(See
(See pic)
pic)
pic)
pic)
Control Switch Panel
【
【
【
【Safety
Safety
Safety
Safety instructions
instructions
instructions
instructions】
】
】
】
1、
2、
3、
4、
5、
6、
7、
8、
9、
10、
11、
12、
13、
14、

【
【
【
【Instruction
Instruction
Instruction
Instruction for
for
for
for Remote
Remote
Remote
Remote Controller
Controller
Controller
Controller and
and
and
and Switch
Switch
Switch
Switch Panel
Panel
Panel
Panel】
】
】
】
Control Panel / Remote Control Operation
(Control panel POWER switch must be ON to use remote control.)
POWER
Turns the appliance ON/OFF.
TIMER
TEMPERATURE
Controls the Timer.
9 Settings:
(1h, 2h, 3h, 4h, 5h, 6h, 7h, 8h,9h) Press button
until reach desired setting.
Brightness
Flame color
Controls Flame change.
13 colors
:
Cycle by cycle.
Display Value
Temperature
01234 ... 12 13 14 15 N
17 18 19 20 21 ... 27 28 29 37 ON
62 64 66 68 69 ... 80 82 84 99 ON
°
C
°
F
HEATER
Controls the Heater.
Press button to initiate the heate
r.
(OFF) no heater or blower.
(LO), heater blows warm air (750W)
(HI), heater blows hot air (1500W)
NOTE
:Heater functions cycle from OFF-LO-HI
1. Press once: Touch panel indicator becomes active.
2
.
Press again until desired setting is reached. Digital display
shows setting circles as belo
w.
NOTE: Press the button for 10 seconds, the temperature
setting will switch from °C to °F. Same way from °F to °C.
The touch display panel is shown by LED's on the front bottom right of the appliance. The LED's will
appear on the bottom of the fireplace control panel.
WARNING : Do not move or remove the mesh trim panel, when the appliance is plugged in and
operating. This will cause the remote control and touch panel to no longer function.
Color
setting
Brightness
setting
Brightness setting
Color setting
( F01-F02...F12-F13) Flame dims from F01 to F13.
Controls flame Brightness
The power on default is L5 (100% brightness);
Brightness cycle according to L5(100%)-L4(80%)-L3(60%)
-L2(40%)-L1(20%)-L5(100%)

NOTICE When the heater is first turned on, a slightodor may be present. This is normal and
should not occur again unless the heater is not used for a longperiod of time.
NOTICE To improve operation, aim the remote control at the front of the fireplace. DO NOT
press the buttons too quickly. Give the unit time to respond to each command.
Remote Control Battery Information
This remote control uses two AAA batteries (Not included).
Instructions for battery installation are on the Remote Control battery compartment.
NEVER dispose of batteries in fire. Failure to observe this precaution may result in an
explosion.Dispose of batteries at your local hazardous material processing center.
Temperature Limiting Control
This heater is equipped with a Temperature Limiting Control. Should the heater reach an unsafe
temperature, the heater willautomatically turn OFF. To reset:
1. Unplug the power cord from the outlet.
2. Turn the ON/OFF switch on the CONTROL PANEL to OFF. Wait 5 minutes.
3. Inspect the fireplace to make sure no vents are blocked, or cloggedwith dust or lint. If they are,
use a vacuum to clean the vent areas.
4. With the POWER switch in the OFF position, plug the power cord back into the outlet.
5. If the problem continues, have your outlet and wiring inspected by a professional.
Care and Maintenance
Cleaning
ALWAYS turn the heater OFF andunplug the power cord from the outlet before
cleaning,performing maintenance, or moving this fireplace. Failure to do so could result in
electric shock, fire, or personal injury.
NEVER immerse in water or spray with water. Doing so could result in electric shock,
fire, or personal injury.
Metal:
Buff using a soft cloth, slightly dampened with a citrus oil-based product.
DO NOT use brass polish or household cleaners as these products willdamage the metal trim.
Glass:
Use a good quality glass cleaner sprayed onto the cloth or towel. Dry thoroughly with a paper
towel or lint-free cloth.
NEVERuse abrasive cleansers, liquid sprays, or any cleaner that could scratch the surface.
Vents:
Use a vacuum or duster to remove dust and dirt from the heater and vent areas.
Plastic:
Wipe gently with a slightly damp cloth and a mild solution of dish soapand warm water.
NEVERuse abrasive cleansers, liquid sprays, or any cleaner that could scratch the surface.

CAUTION:
CAUTION:
CAUTION:
CAUTION: sharp
sharp
sharp
sharp edges!
edges!
edges!
edges!
1. After installation, the power plug should be accessible.
2. If the power cord is damaged. It must be replaced by the manufacturer or its service agent or a
similarly qualified person in order to avoid a hazard.
3. The heater must not be located immediately below a socket.
4. The appliance is not intended for use by young children or infirm persons. Young children should be
supervised to ensure that they do not play with the appliance.
5. Do not use this heater in the immediate surroundings of a bath, a shower or a swimming pool.
6. In order to avoid overheating, do not cover the heater.
Model:WM36D,WM42D,WM50D,WM60D,WM72D,WM84D,WM100D
Power supply:120V-60Hz
Power consumption: 1500W
Protection class: I
Light bulb: LED
Thank you for purchasing this product! If you have questions about assembly or operation of this
product,please e-mail us or call at:
oxharkflame@oxharkflame.com
Tel:1-302-281-1886
This manual suits for next models
6
Table of contents
Popular Heater manuals by other brands

Sonnenkonig
Sonnenkonig TURM INFRAROT user manual

Stilevs
Stilevs CH03 instruction manual

Protemp
Protemp PT-45-KF User's manual & operating instructions

Empire Heating Systems
Empire Heating Systems SR-10T-3 Installation instructions and owner's manual

HOFFEN
HOFFEN ACNY-H008 instruction manual

Faithfull
Faithfull FPPHEAT2KWC User instructions